Save to My DOJO
Table of contents
Like most major versions, vSphere 7 brought new virtual hardware levels with many new features and improvements. Everyone will agree that keeping your environment up to date is paramount to ensuring support and stability. However, in some instances, VM compatibility is sometimes the cause of issues according to the upgrade process.
While upgrading is straightforward, downgrading can only be done in a few different ways and may be needed to ensure retro-compatibility. We will describe, in this article, how you can do it in vSphere 7.
What is VM compatibility?
First off, a quick reminder on what VM compatibility (a.k.a. virtual hardware) represents. Be it in vSphere 7 or any other version. From a purely functional standpoint, VM compatibility will dictate which vSphere version a VM can run on.
Each new VM hardware version brings additional features and improvements to the VM’s capabilities. That’s why it is recommended, mind you not mandatory, to upgrade it to the latest version. Only after vSphere has been upgraded on all the nodes in a cluster! Such features may include increased resource limits, added support for new hardware… You can find the exhaustive list in the VMware documentation.
“Virtual Machines Compatibility features set.”
At the end of the day, VM compatibility and virtual Hardware refer to the same thing. Except compatibility is expressed in vSphere versions and virtual Hardware has a specific version number. Note that these also apply to VMware Workstation, Fusion…
Compatibility and virtual hardware versions are usually revised with each major version of vSphere. Although it’s been more often since the release of vSphere 7 and the move to a shorter 6-months release cycle. As you can see in vSphere 7 Update 2, we are currently on virtual hardware version 19.

“Virtual Machine Compatibility Options table.”
You get to choose the compatibility level when you create a VM. In case you run a heterogeneous cluster (in terms of vSphere version), you should always pick the compatibility for the lowest vSphere version.
Also, note that you can configure a default compatibility version for your newly created virtual machines. That way you can still select the latest virtual hardware but the one selected by default in the list will be the one you chose. This helps prevent mistakes in heterogeneous environments.

“Default compatibility settings change the preselected virtual Hardware version.”
Virtual Hardware retro-compatibility
Now the issue at hand, which is the topic of this blog, occurs when a VM has been upgraded to a newer version and needs to be powered on or moved to a host running an older version of vSphere.
Such VM cannot run on a host running a version inferior to its compatibility level. For instance, a VM that was upgraded to the latest hardware version 19 on a vSphere 7.0 Update 2 host will not be able to power on or be migrated to a host running vSphere 7.0 Update 1 or older, even powered off.

“Hosts running an older version of vSphere appear as not compatible in the VM migration wizard.”
If you somehow managed to get the VM on an incompatible host, by downgrading the underlying ESXi version, for instance, it would show up as invalid as you can see in the screenshot below. In which case you can’t perform any action on the VM besides “remove from inventory”.
In order to get this screenshot, I removed a VM from a vSphere 7u2 host and added it manually on a vSphere 7u1.

“A VM in version 19 (vSphere 7 U2) cannot run on a host running vSphere 7 U1.”
In the next section, we will briefly cover how to upgrade the virtual hardware after which we will demonstrate 4 ways to downgrade it.
VM Hardware Upgrade
In order to avoid running into the very issue we are covering here, do not upgrade your VMs unless all the hosts in the cluster are running the same vSphere version. Also, note that you should always update the VMware Tools before the compatibility as they may include drivers for potential new virtual hardware.
vSphere Client
Interactive
Upgrade the compatibility of a VM is as easy as it gets. When the VM is powered off, right-click on it and hit “Upgrade VM Compatibility”. You can then select a compatibility level; you don’t have to go for the latest one thankfully.

“VM compatibility can be upgraded in powered off state but cannot be downgraded.”
Scheduled
As you can tell in the screenshot above, you can also schedule the task which makes it more convenient if you have a large number of VMs. Although scheduling is a bit misleading a term in this context in that the VM will be upgraded the next time it is powered on.
You can of course cancel the upgrade scheduling should you want to keep it at the current level or select a different compatibility level.

“Schedule compatibility upgrade to have it run at the next power cycle.”
PowerCLI
Upgrading the compatibility can also be done quickly through the API using the embedded PowerCLI cmdlets.
Interactive
-
- If you want to check the current hardware version of a VM, you can use the “HardwareVersion” property.
Note that the “Version” property is now deprecated and doesn’t support versions above v14.
| Get-VM | select name,hardwareversion |

“Get the versions of all VMs with the ‘HardwareVersion’ property.”
-
- You can then upgrade the compatibility with the Set-VM cmdlet. Again, either using the pipe or the named -VM parameter. In the following example, we upgrade to version 19 which is vSphere 7 Update 2.
| $vmToUpgrade = Get-VM -name myVM
Set-VM -VM $vmToUpgrade -HardwareVersion vmx-19 -Confirm:$false |
Again, use the “-HardwareVersion” parameter which takes “vmx-xx” arguments, instead of “-Version” which uses “vxx”. It sounds confusing but it’s a PowerCLI things that happens quite often.

“Use the new ‘HardwareVersion’ property and parameter as ‘Version’ is deprecated.”
If the version supplied is not supported by the ESXi host, the cmdlet will throw an “operation is not supported on the object” error as shown next. It’s a bit of a catch-all exception but it’s usually due to an unsupported version in this instance.

“Invalid Compatibility versions will throw an exception.”
Scheduled
Scheduling the upgrade in PowerCLI isn’t as straightforward as in the vSphere Client as you need to create and work with a specific class of object. To simplify it I created a function out of it but you’ll still get the gist of how it works.
Note that it can take multiple VM objects as arguments (because of “[]” in the type section) so watch how you feed it.
| Function Upgrade-VMCompatibility {
param( [VMware.VimAutomation.ViCore.Types.V1.Inventory.VirtualMachine[]]$VM, [ValidateScript({$_ -match “vmx-??”})] [string]$Version ) Foreach ($V in $VM) { $vmSpec = New-Object -TypeName VMware.Vim.VirtualMachineConfigSpec $vmSpec.ScheduledHardwareUpgradeInfo = New-Object -TypeName VMware.Vim.ScheduledHardwareUpgradeInfo $vmSpec.ScheduledHardwareUpgradeInfo.UpgradePolicy = “always” $vmSpec.ScheduledHardwareUpgradeInfo.VersionKey = $Version $vmToUpgrade = $V $vmToUpgrade.ExtensionData.ReconfigVM_Task($vmSpec) } } |
-
- Once it is loaded into your session, you can use it like so:
| Upgrade-VMCompatibility -VM (get-vm core-vra, core-vrops) -Version “vmx-18” |
The command can take multiple VM objects as argument but a single target version, meaning you will need to make sure all the VMs specified can actually be upgraded to said version if they run on separate hosts.

“This custom function wraps all the necessary actions in an easy-to-use cmdlet.”
The scheduled task is executed once the VM is rebooted, which will upgrade the VM to the specified hardware version.
Downgrading VM Hardware
Now getting to the matter at hand. You may need to downgrade for various reasons but the most common one is when someone upgraded a VM to the latest version when older hosts are still in the cluster. The VM then cannot be moved to it which reduces the overall failover capacity of your workloads.
As mentioned earlier, this cannot be done natively like an upgrade so we need to resort to alternative methods. VMware actually has a KB describing 3 different ways to do it which we will go through here.
Option 1: Connect the virtual disks to a new VM
The first and most straightforward fix is to create a new VM with the same exact hardware specs and the required hardware version. After which you attach the existing disks from the source virtual machine to it. Note that the new VM will have a different UUID that might break the backup chain.
If this is a critical VM, it may be relevant to make sure you have a backup handy. If not, you can always make a copy of the disks or clone the VM to have a version to revert to should things go sideways somehow. Better be safe than sorry.
-
- On the source VM, take note of the location of the disk files and the SCSI controller ID, especially if the VM has multiple disks.

“Take note of the virtual disks attribute before removing them.”
-
- Remove the virtual disks from the source machine – Leave the delete checkbox unchecked!!

“The ‘Delete files from datastore’ must be left unchecked!”
-
- Create an empty virtual machine in the right hardware version and configure it like the source one (pay attention to storage controllers). Remove the default “hard disk 1” disk.
- Attach the virtual disks to the new VM on the same SCSI IDs.
- It may be worth running a storage vMotion of the VM afterwards to tidy up the file names and locations.
This method may be slightly inconvenient if the VM in question is equipped with many disks like the VCSA appliance which sports no less than a dozen. Adding each and every one manually is error-prone so pay attention to steps 1 and 4 if you go that route.
Option 2: vCenter Converter
A second and perhaps less strenuous option is using VMware vCenter Converter which allows you to effectively migrate it to another host and select a hardware version in the process. Note that, like with Option 1, this will create a new VM with a new UUID which in turn may break the backup chain.
Keep in mind that vCenter Converter will not delete the source VM so you have something to roll back to if needed. VMware vCenter Converter is a product distributed for free by VMware that you can download at my.vmware.com.
-
- Click Convert machine in the top left corner and configure your source and destination. Most likely your vCenter Server for both.
- Change the name of the destination VM to avoid duplicates.
- Select the destination. Note that you can select the same host as the source VM if necessary. For some reason, I could only select hardware version up to 8 even though the doc mentions 11.
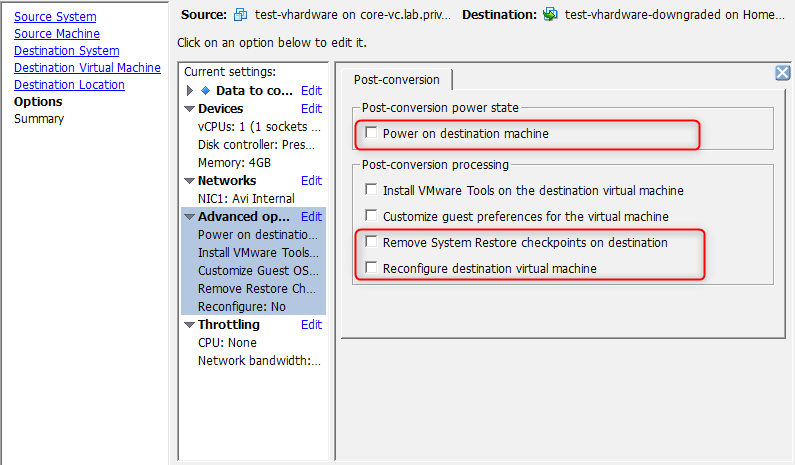
- Leave the VM powered off and uncheck the last 2 boxes which refer to powered on guests. Double-check the options in the final steps (disk thick/thin…).

“These last 2 boxes must be unchecked or the copy will fail.”
-
- Once the clone is completed, you can go ahead and upgrade the compatibility of the new VM to whatever compatibility you are after.

“Select the correct compatibility level on the new level.”
-
- Check that the VM is now at the right virtual hardware level.

“Once upgraded, the VM can be powered on.”
Make sure that the source VM is powered off or have its network cards disconnected before powering on the new one to avoid IP duplicates on the network.
Option 3: Revert to snapshot
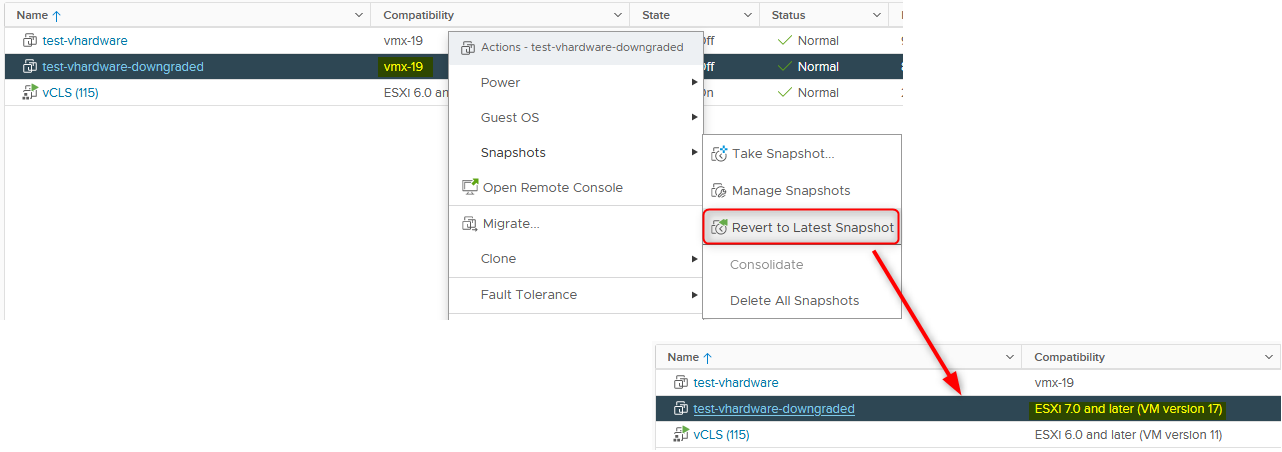
Chances are this third option is not available to you if you are here reading this. However, if you took a snapshot before upgrading the virtual hardware of the virtual machine, you can revert to it to go back to the previous compatibility level.

“Snapshots include the virtual Hardware version of the VM at the time it was taken. Making it a safe way to downgrade.”
Keep this option in mind if you are unsure the next time you have an important VM to upgrade.
Option 4: Edit VMX file (unsupported!)
This fourth and final option is not stated in VMware’s KB because it is not supported by them. That option warrants a modification to the VM’s config file (*.vmx). Because of that, we recommend you stay away from this option for production workloads.
This can be done by downloading the vmx file, editing it and uploading it back to the datastore and de-re-register the VM. The disadvantage is that the VM’s UUID will be reset. You can actually do this operation quicker in command line and maintain the identifier.
-
- Make sure the VM to downgrade is powered off.
- Enable SSH on the host and connect to it with a client such as putty. You can also use the local ESXi shell if that works better for you.
- Once connected to the host, change directory to the VM’s folder.
| cd /vmfs/volumes/my_datastore/my_vm |
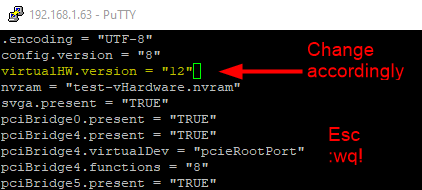
4. Edit the vmx file using vi and change the line “virtualHW.version” to whatever version you need. Refer to the table displayed earlier. In the screenshot I picked 12 as a random number.
Once in vi, hit “ i ” to enter edit mode, hit “ escape ” to leave edit mode and type “ :wq! ” to save and exit vi.

“The virtualHW.version key controls the VM’s compatibility level.”
-
- The VM is still at the same version in vCenter. We need to reload the vmx file to see the change. First, find the VM’s inventory ID (Replace “test-vHardware” with your VM’s name).
| vim-cmd vmsvc/getallvms | grep test-vHardware |
6. Finally, reload the VM’s config file by using its inventory ID, in my case it is 11.
| vim-cmd vmsvc/reload 11 |

“Changing the version with this method maintains the VM’s UUID.”
-
- You won’t get any output from this command so head back over to the vSphere client and check the VM’s compatibility version. In my case, it turns out version 12 is a VMware Workstation version.

“The VM shows the downgraded version after reloading the vmx file.”
You should now be able to migrate the VM. Once again, this method should not be used on production systems unless you have no other choice.
Case of unsupported hardware
Remember at the beginning we mentioned the fact that new virtual hardware version sometimes brings support for new hardware. One example is the Virtual Watchdog Timer device for instance, a virtual device meant to better handle the detection of OS and App crashes.

“The Watchdog Timer device was introduced in vSphere 7, meaning it is incompatible with older versions.”
We will be using the device here, which I never used, to find out what happens if we downgrade the VM to a version that existed before the release of this feature.
-
- First, we add a Watchdog Timer device to the VM in version 19 (vSphere 7 Update 2).

“The Watchdog Timer can only be added on a vSphere 7 host.”
-
- Then we downgrade the VM to an older version using the method we described.
I picked version 15 which corresponds to vSphere 6.7 Update 2 (incompatible) and reloaded the vmx file.
-
- Now let’s see what it looks like in the vSphere Client.
As you can see the VM is “(Invalid)” and in an “Unknown” state. The version isn’t even updated and stays at “vmx-19”. As you can tell most options are greyed out meaning the VM is unusable in the current state.

“VMs in ‘Invalid’ state are unusable with most options greyed out.”
In order to fix this, you can either upgrade the VM’s version back to vSphere 7 on a newer host and remove the device from the UI, otherwise you will have to find the incriminating device in the vmx file and remove the lines referring to it.
In my case it was easy as I had a pretty good idea of what I was looking for. Turns out the Watchdog Timer device is configured as follows:
| vwdt.present = “TRUE”
vwdt.runOnBoot = “TRUE” |
I deleted these 2 lines > Reloaded the vmx file and the VM was back on its feet.

“The VM is back in a valid state after removing the unsupported device.”
Conclusion
We’ve seen how the VM hardware or compatibility version changes with every new version of ESXi released. Upgrading to the latest hardware version allows VMs to leverage newly released features and in some case boost performance across the board. vSphere 7 brought a large array of improvements through the VM compatibility.
You may find yourself needing to downgrade the hardware version of a VM for one of the reasons mentioned in this blog. Out of the four ways described in this article, keep in mind that only options 1 to 3 are supported by VMware. Option 4 should not be performed in production?


Not a DOJO Member yet?
Join thousands of other IT pros and receive a weekly roundup email with the latest content & updates!


