Save to My DOJO
Table of contents
One might infer that I am a VMware fanboy which is only partly true, at least when it comes to hypervisors and virtualization in general. The fact remains, however, that both vSphere and Hyper-V have their strong points. I think people tend to waste too much time bashing one product over the other. With Windows Server 2016 released last September 2016, things now look pretty interesting on the Hyper-V front. With this in mind, it is perhaps time to revisit some old preconceptions and give the MS product a thorough look.
But I digress. Today, I’ll show you how to convert a virtual machine running on Hyper-V to one hosted on a VMware platform such as ESXi or VMware Workstation. To do this, we will be using a free tool called VMware vCenter Converter Standalone.
[thrive_leads id=’18673′]
Installation time
The tools can be download from here provided you have a valid VMware account. If not, go ahead and sign up for one. Once downloaded, you can install the software on either a physical machine or a virtual one running Windows. I installed mine on a Windows 10 laptop despite having the OS complain about it. Other than that, the installation process is dead simple.
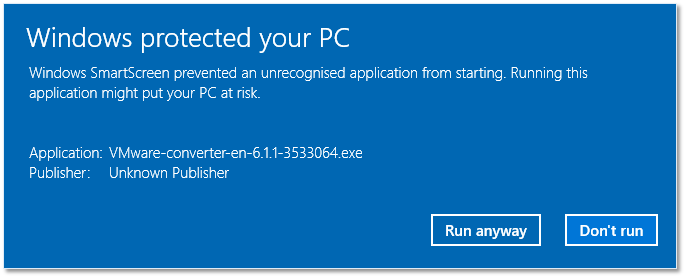
You’ll need to choose between a local or client-server install. The software consists of 4 components namely the server, an agent, the client and a remote access component. The local installation option installs all the components on the same machine. The Client-server installation option, on the other hand, lets you choose and install any of the individual components. For example, you can install the server component on one machine and connect it to remotely using the client and remote access components installed on a second machine. Regardless, here’s a video that takes you through the process of setting up a local instance.
Use cases
Admittedly, the post’s title can be a little bit misleading since the converter has other uses apart from converting Hyper-V VMs to run on VMware products such as vSphere. It can also be used to convert VMs and physical machines (P2V) running either Windows and Linux to VMware Workstation, Fusion and Player. Note that P2V (Physical-to-Virtual) is subject to a number of restrictions and requirements as outlined in this user guide.
Next, is a list of supported source and destination types.
| Source | Type |
| Powered On physical machines | . Remote Windows machines . Remote Linux machines . Local Windows machines |
| Powered On virtual machines | . VMware virtual machines . Hyper-V Server virtual machines . Red Hat KVM or RHEL XEN virtual machines |
| Powered Off VMware virtual machines | . vCenter Server 4.0, 4.1, 5.0, 5.1, 5.5 and 6.0 . ESX 4.0 and 4.1 . ESXi 4.0, 4.1, 5.0, 5.1, 5.5 and 6.0 . VMware Workstation 10.x, 11.x and 12.x . VMware Fusion 6.x, 7.x and 8.x . VMware Player 6.x, 7.x and 12.x |
| Powered Off Hyper-V virtual machines (Windows Server 2008 R2, 2012 and 2012 R2) |
. Windows Server 2003 (x86 and x64) SP1 and SP2 . Windows Server 2003 (x86 and x64) R2 SP1 and SP2 . Windows Server 2008 (x86 and x64) SP2 . Windows Server 2008 (x64) R2 and R2 SP1 . Windows Server 2012 (64-bit) . Windows Server 2012 (64-bit) R2 . Windows 7 (except Home editions) . Windows Vista SP1 and SP2 (except Home editions) |
| Destination | Type |
| VMware virtual machines | . ESX 4.0 and 4.1 . ESXi 4.0, 4.1, 5.0, 5.1, 5.5 and 6.0 . vCenter Server 4.0, 4.1, 5.0, 5.1, 5.5 and 6.0 . VMware Workstation 10.x, 11.x and 12.x . VMware Fusion 6.x, 7.x and 8.x . VMware Player 6.x, 7.x and 12.x |
A practical example
Leafing through the user guide is a long winding affair, as with most VMware documentation, so I find that experimenting with the software is generally quicker if you need to determine asap if a specific type of VM can be converted or not. You can always return to the user guide if you end up stuck.
Let’s get down to the business of converting a Windows 7 VM running on Hyper-V to one hosted on a vCenter Server managed ESXi host. Notice the use of the word convert, as opposed to migrate. This outlines the fact that the source VM, or physical machine, are left untouched during the conversion process.
One other point of interest, is that the Hyper-V VM has to be powered off first before it can be converted. If you need to keep it running, treat it as if it were a physical machine. To do this, you’d install and run the converter directly off the VM. The process of converting a powered on machine is referred to as hot cloning. One inherent issue when using this method, is that any change made to the VM during the conversion process is not carried over, something you should keep in mind. Refer to the user guide for a more detailed explanation.
Let’s move on with our example.
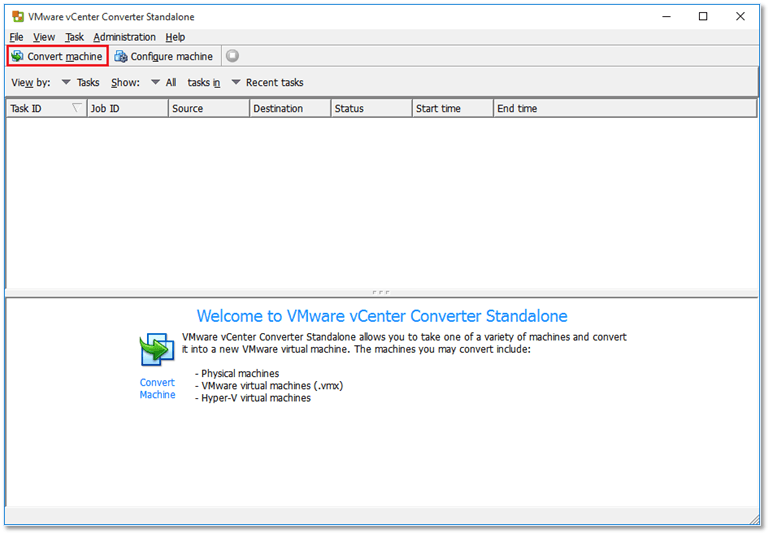
Step 1 – Launch VMware vCenter Converter and click on Convert machine.
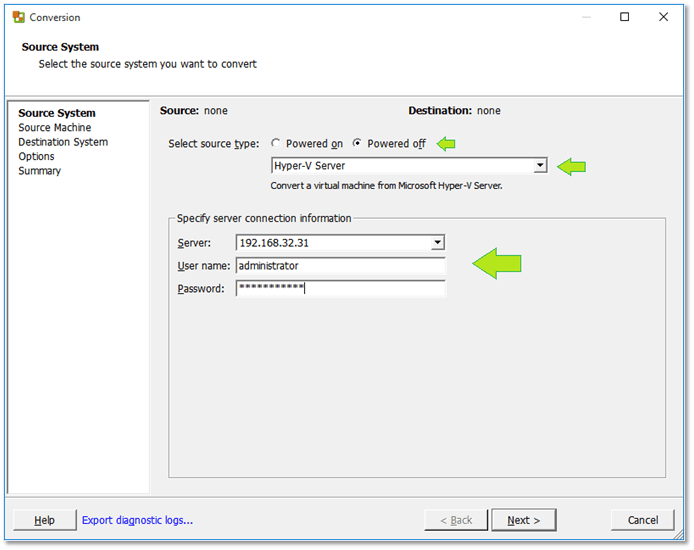
Step 2 – Tick Powered off as the source type and select Hyper-V Server from the drop-down list. Type in the Hyper-V server’s IP address (or hostname) and a set of valid credentials.
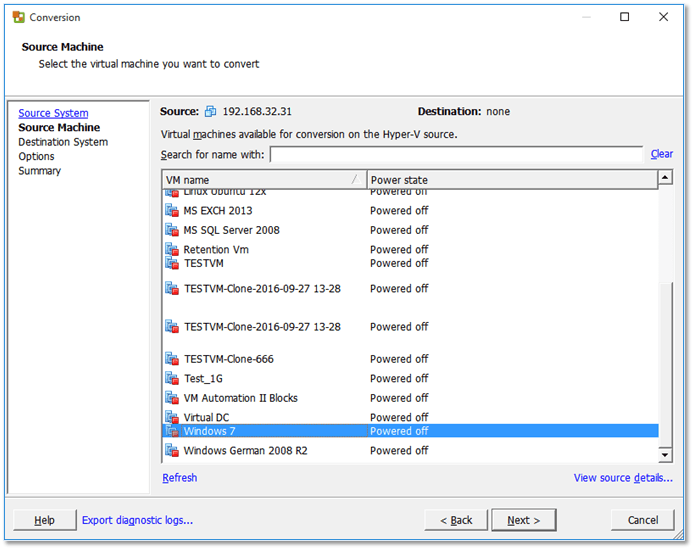
Step 3 – Select the virtual machine to convert.
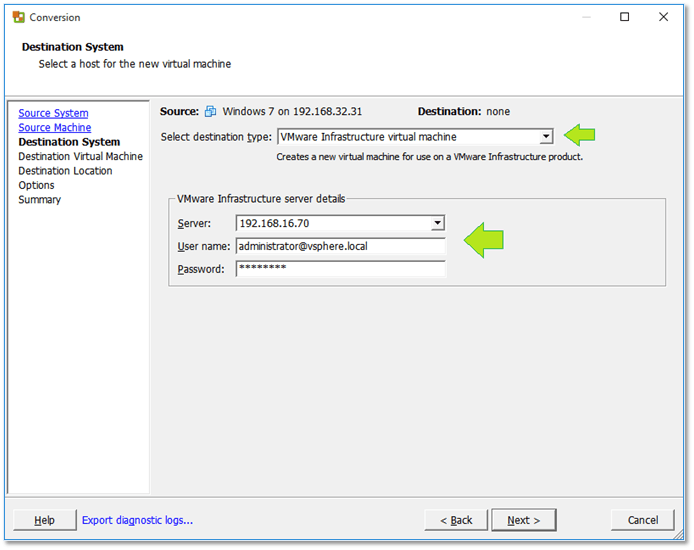
Step 4a – Specify where the converted VM will be created. Select VMware Infrastructure virtual machine from the destination type drop-down list and supply the vCenter Server or ESXi IP address (or hostname) and a set of valid credentials.
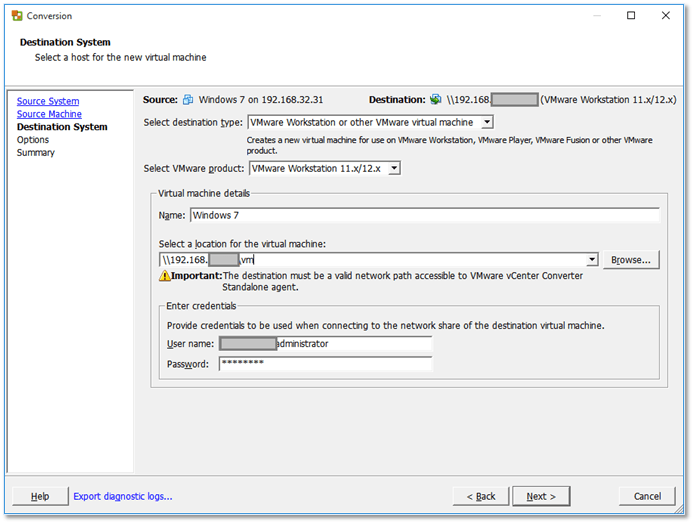
Step 4b – To convert a VMware Workstation hosted VM or similar, select VMware Workstation or other VMware virtual machine instead. When selecting this option, you need to specify the path to a local folder or a network share. If a network share is used, supply a set of credentials that have read / write access to the share. Once a VM is converted (the files comprising it are copied over), it’s then just a matter of importing the VM manually to VMware Workstation, Fusion or Player.
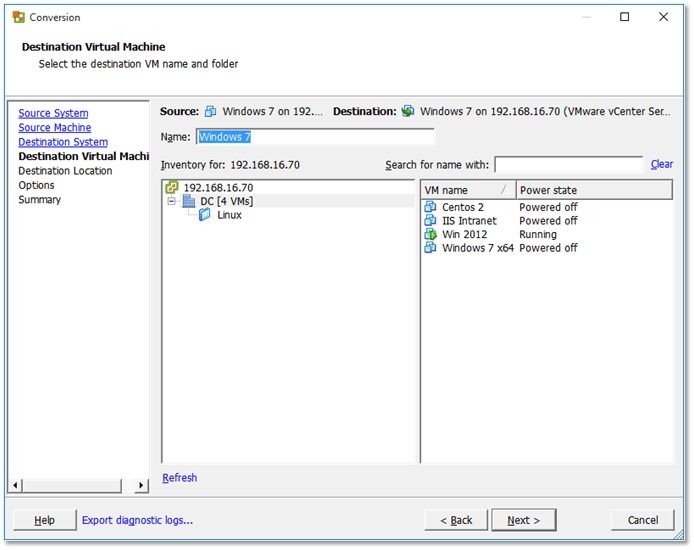
Step 5 – Assign a name to the VM being converted.
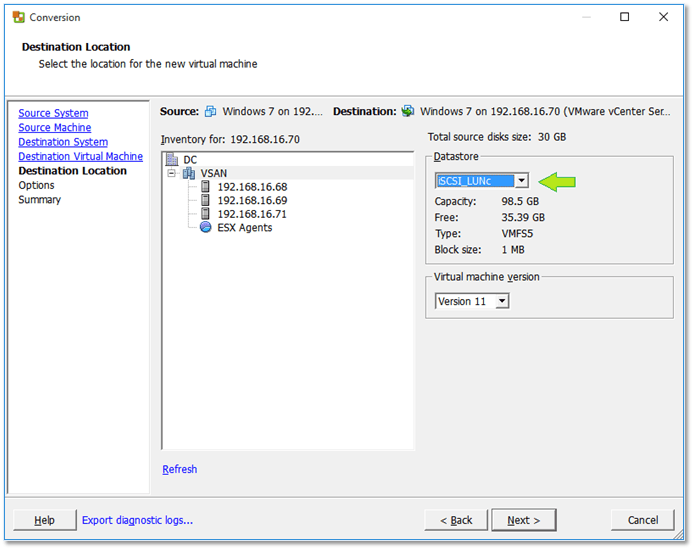
Step 6 – Select the datastore where you want the VM created. If targeting a vCenter Server, you must also select an ESXi host.
Step 7 – Specify the VM’s VMDK type (virtual disk) when recreated at destination In this example, I changed the VMDK disk type to Thin.
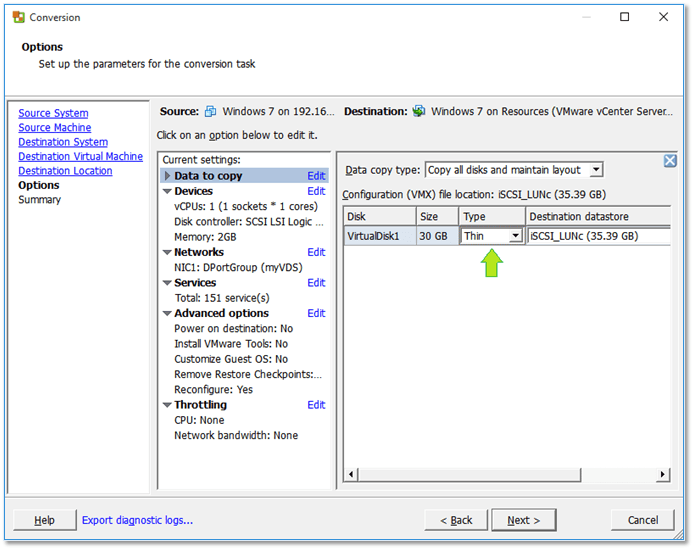
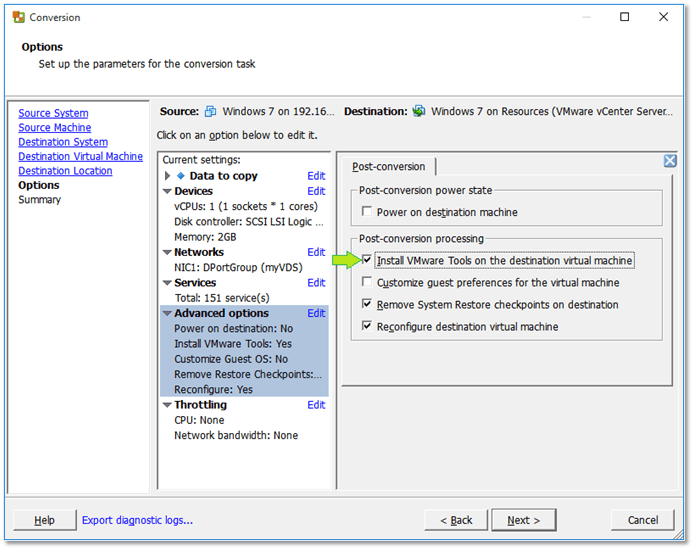
Step 8 – You can further customize the conversion process, for instance, by having VMware Tools automatically install after the VM powers up. You can also select which Windows services to run, the network adapter type as well as the portgroup the VM is hooked up to.
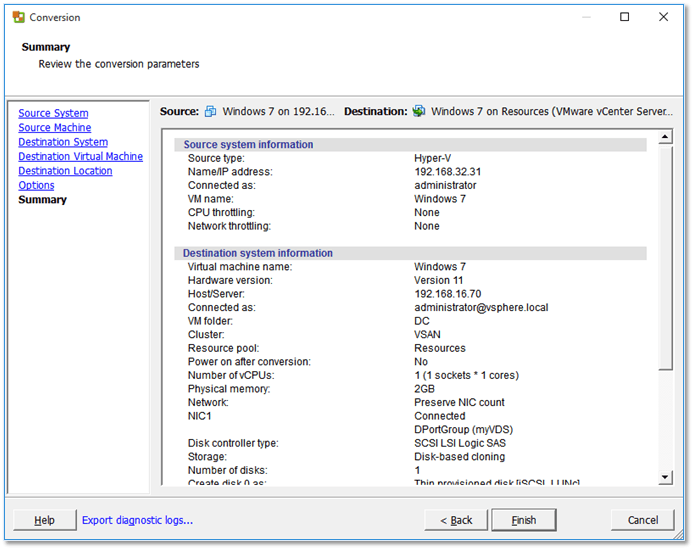
Step 9 – Pressing Finish initiates the conversion process.
The next screen, shows the conversion task progress at the top of the UI. The bottom part of the screen shows the vSphere thick client and the corresponding Create Virtual Machine event in the status window.
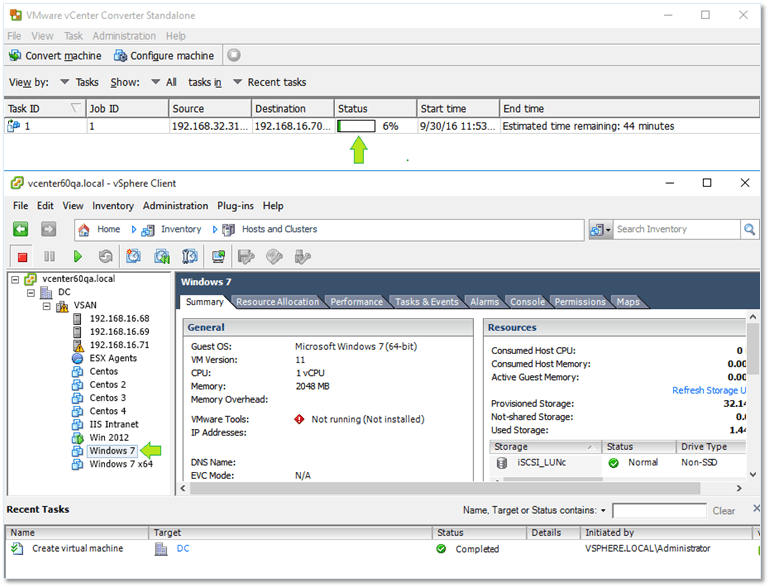
A conversion task in progress
The whole process took roughly 15 minutes for a VM with an 8GB disk. After the VM is powered up and the guest OS is running, VMware Tools are installed followed by a reboot after which, the VM is ready to use.

A completed conversion task
I also mentioned that you can convert VMs to run on other VMware products such as Workstation or Player (see Step 4b above). After conversion completes, locate the vmx file under the VM’s folder in Explorer and click on it to import the VM to the associated VMware product. Alternatively, you can import it directly from the VMware software itself as shown next.
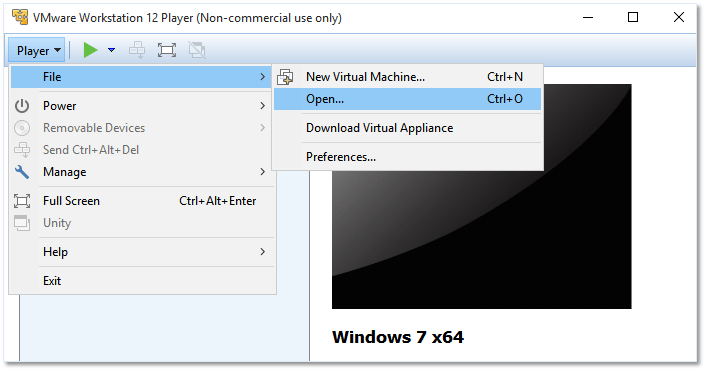
Importing a converted VM to VMware Workstation Player
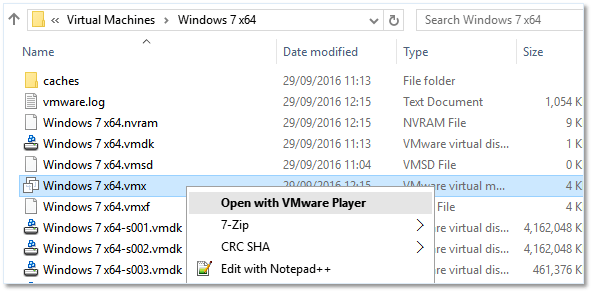
Importing a converted VM to VMware Player using the VM’s VMX file
The next and last video shows how to convert a Hyper-V VM to run on a vCenter Server manged ESXi server.
Conclusion
Whatever your reasons for converting machines across virtualization platforms may be, it’s good to know that the VMware Converter does a pretty good job and, better still, will not cost you a dime. I must also add that I haven’t tested P2V but only because I tend to shy away from converting anything physical to virtual. I prefer instead to start afresh with a newly set up VM and transfer any applications and data afterwards assuming it is possible to do so. Of course, it all depends on the task at hand, so going full P2V might be your only option.
Last but not least, it’s only fair to mention that Microsoft offers a similar tool called Microsoft Virtual Machine Converter which is used to convert VMware hosted VMs to Hyper-V. Similarly, this tool is free to use as well!
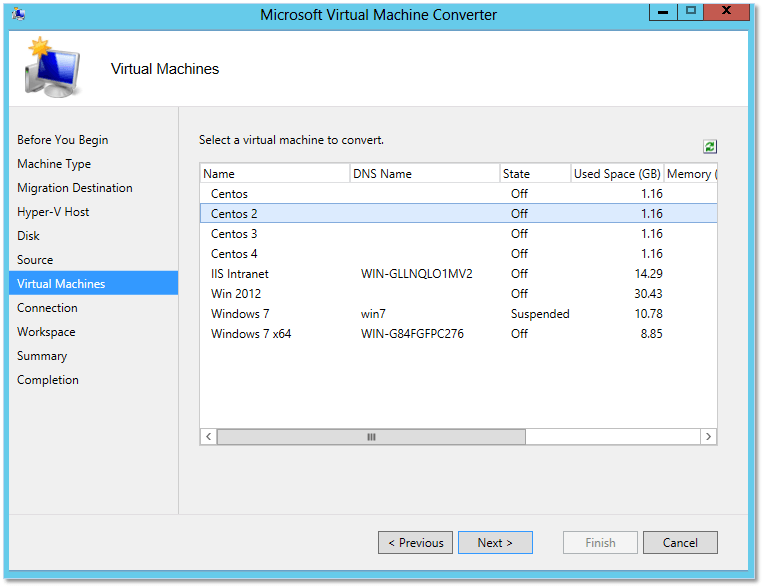
Microsoft Converter – Converting from ESXi to Hyper-V
If you want to share your experiences converting virtual machines, drop me a comment in the box below.
[the_ad id=”4738″]


Not a DOJO Member yet?
Join thousands of other IT pros and receive a weekly roundup email with the latest content & updates!


48 thoughts on "How to convert a Hyper-V VM to run on vSphere"
when i get here:
Step 2 – Select Powered off and choose Hyper-V Server from the drop down list. Type in the server’s IP address or hostname together with valid credentials.
i get this error message:
unable to contact the specified host the host might not be available on the network there might be a network configuration problem or the management services on this host are not responding
what should i do?
Hi,
Is the firewall enabled on the hyper-v Windows server? If it is, disable it temporarily and see if you can connect.
regards
Jason
Install the Server and Remote Access components of VMware vCenter Converter Standalone on the actual Hyper-V host that you are connecting to. Alternatively install the Agent component on the VM that you want to migrate and do an online migration. both ways are working nicely for me 🙂
I’m having VSS issues backing up to Veeam after converting a 2012 Server with Share point installed on it , After I converted it from Hyper V to ESXi…
The server still is running the Hyper V Volume Shadow copy requester and other Hyper V services, can those be removed to fix the VAA errors in Veeam?
Hi,
I don’t believe that the vss copy requester for Hyper-V is required since you migrated to vSphere. Hyper-V services are generally needed if you’re running Hyper-V on the server itself. Have you tried the Veeam support forum or KB by any chance?
regards
Jason
It is not possible to import or convert a downloaded .vhd into Vmware workstation?Have some through my Microsoft account(need them for testing purposes) and i cant use them in Vmware workstation.
regards,
Dre
Hi,
As far as I know, you must first convert the vhd disk to a vmdk using something like Winimage or Startwind. Once you do, create a VM in workstation and attach the converted disk to it.
Hope this helps.
Jason
Jason–I’m curious if you have tried converting a gen 1 Hyper-V guest running Windows Server 2012 R2 to VMware and whether you’ve had success? I’ve tried a couple of different times playing with the Converter options related to the disk controllers–have tried automatic (which resulted in the converted disks showing as IDE disks), LSI Logic SAS, and even Bus Logic. The Issue is that the converted VM gets stuck in a continuous reboot where it displays a “getting devices ready” message for a bit and then restarts. It does this endlessly. I’ve seen some general guidance (not specific to this issue) about possibly installing the VMware virtual SCSI drivers (vmscsi) on the source system prior to conversion and that may be what I try next. Just wondered if you had performed a conversion of a 2012 R2 Hyper-V guest successfully and might be willing to share any specific details as to how you did it… Thanks!
Hi, I haven’t come across the issue to be honest but I’ll update if I do comes across it. In general, I’d rather install from scratch and migrate data to the new VM. Of course, this is not always possible, hence the post. This might help perhaps -> https://kb.vmware.com/s/article/1016330