Save to My DOJO

VMware PowerCLI is a collection of PowerShell modules providing many cmdlets to manage a wide range of VMware products. It allows IT Pros to not only perform most vSphere administrative tasks but also automate them.
Take a chunky vSphere cluster made up of 50 nodes for instance, in which you need to make a change to detach one or more LUNs on all of them. You could either spend a few hours making the change on each host manually in the vSphere Client, or you can use PowerCLI to execute the change on all the nodes in a matter of minutes. Granted such change must be performed carefully if you know what you are doing.
Pushing changes to hosts or VMs isn’t the only benefit VMware PowerCLI brings to the table. You can also use it to collect data that is relevant to a specific use case in a single place. There are ready to use scripts available such as Alan Renouf’s vCheck that acts as a framework to email HTML reports based on what you want to keep an eye on. This script is backed by VMware themselves.
Automation always was a crucial part in IT operations and was introduced into its own category since the exponential gain in traction by solutions like Terraform. VMware PowerCLI and PowerShell becoming more advanced with each release, we are able to automate more and more. PowerCLI also provides integration with applications like vRealize Operations, NSX, VSAN, Horizon, VMware Cloud platforms…
PowerCLI Licensing Limitations
It is important to understand that there are some limitations to VMware PowerCLI based on which type of licenses are installed in your vSphere environment.
Hosts that are licensed with the free hypervisor version can only be queried by PowerCLI in “read only” mode. This means that you can only use commands that collect information. Commands that are used to make changes like Set-*, Add-*, New-*, or Remove-* will not work. Any paid license of vSphere will be enough to provide full access to all of PowerCLI’s functions and features.
Prerequisites for VMware PowerCLI
Powershell
VMware PowerCLI 12.2.0 is compatible with the following PowerShell versions:
- Windows PowerShell 5.1
- PowerShell 7
To verify which version of PowerShell is installed on your system, simply open up a PowerShell prompt and display the content of $PSVersionTable.PSVersion. In the following example, you can see that PowerShell 5.1 is installed.
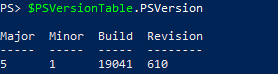
The $PSVersionTable variable contains information about PowerShell.
If the version installed on your system is outdated you will need to install the Windows Management Framework 5.1. Refer to the appropriate documentation for the installation of Powershell 7 on Linux distributions.
.Net Framework
As well as running a recent version of PowerShell, you also need to ensure that .Net Framework is installed in a supported version:

You can quickly check which version of .Net Framework is installed:
Registry Editor
- Left click on the Start Menu and select Run.
- Enter regedit.exe to open up the Registry Editor.
- In the Editor, navigate to the following key:
HKEY_LOCAL_MACHINE\SOFTWARE\Microsoft\NET Framework Setup\NDP\v4.
- Display the content of the “Client” subkey to find the exact version.
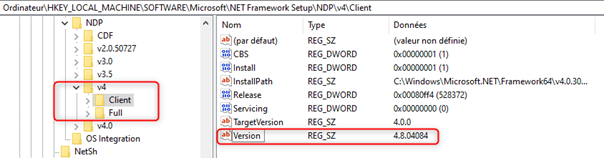
Get the installed .Net version with the registry key
PowerShell
You can also get the installed version with a PowerShell one-liner that will check the same registry key:
Get-ItemProperty "HKLM:\SOFTWARE\Microsoft\NET Framework Setup\NDP\v4\Full"
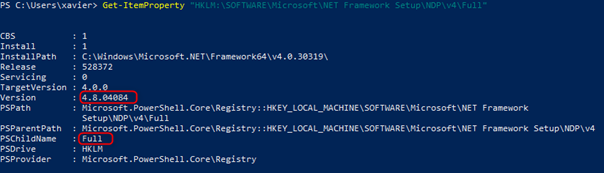
Display the .Net registry key in PowerShell
Updating .Net
Note that a newer version may already be installed on your system according to the Windows build you are running. Details on the .Net version per OS build in the Microsoft documentation.
If the version you are currently running is outdated, download and install the latest version on Microsoft’s repository.
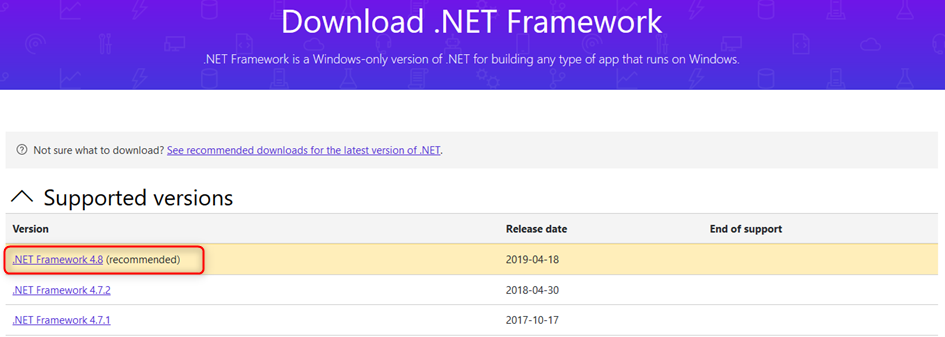
Download and install the latest .Net version online.
To learn more about the interoperability between PowerCLI and VMware products, refer to the official interoperability matrix.
How to Install VMware PowerCLI
VMware PowerCLI used to be a standalone software to install up until version 6.5 R1. You need to uninstall any such version from your system prior to installing the latest version. You can uninstall it like any installed software in “Programs and Features“.
The installation procedure will be slightly different with regards to whether the machine you are installing it on has internet access or not. We will cover both scenarios.
Machine with Internet Access
Installing
The installation procedure has been simplified since the modules have been added to the PowerShell Gallery on version 6.5.1 in April 2017 and is now straightforward.
- Open a PowerShell prompt and install the modules using:
| Install-Module VMware.PowerCLI -Scope CurrentUser |
The modules will be automatically downloaded and stored in the correct folder. Note that you can use the -Scope parameter to make the PowerCLI modules available to AllUsers.
Updating
Although it will work, it is recommended to avoid using the Update-Module cmdlet to update PowerCLI as it will not remove any files rendered obsolete by the new version. Therefore,
- Uninstall the existing version using:
| Get-module VMware.* -listAvailable | Uninstall-Module -Force |
- Next, install the new version by following the install procedure outlined previously
Machine with no Internet access
Installing
If your system does not have Internet access you need to download PowerCLI as a zip file from the VMware website or with the “Save-Module” cmdlet and copy the content into the modules folder of the offline system. Unlike many of the VMware products, you don’t need to be logged in to download PowerCLI.
- Head over to VMware code and select the latest version of PowerCLI
- Download the zip file

Download PowerCLI online to install it on offline systems
- Transfer the file to your offline machine and copy all the folders present in the zip to your PowerShell Modules folder. Again, choose the location accordingly to make it available to everyone or to yourself only:
| Current User | %USERPROFILE%\Documents\WindowsPowerShell\Modules |
| All Users | C:\Program Files\WindowsPowerShell\Modules |
Updating
To update PowerCLI, delete the existing PowerCLI module folders and follow the procedure outlined above.
Execution policy
Execution policies are a security mechanism that determines if files can be loaded in PowerShell such as config files, modules, scripts… You can find your current execution policy by running:
| Get-ExecutionPolicy |
You may need to change the default execution policy to be able run scripts you wrote. Unless a GPO changed the default setting, you won’t need to if you are on a Windows Server OS. However, it is required for Windows client OS (i.e. Windows 10) as the default is set to Restricted, you will need to change it to RemoteSigned with the following command:
| Set-ExecutionPolicy -ExecutionPolicy RemoteSigned |
Some highly secured environments may require that all the scripts (even those written in-house) are digitally signed by the enterprise PKI. This means the execution policy must be set to AllSigned if not already done via GPO. In which case you will have to digitally sign your scripts prior to running them.
Connecting to a VMware instance
Once the PowerCLI modules are installed you can start using it from within your PowerShell prompt, as opposed to older versions of VMware PowerCLI where you had to either launch the software or import the snap-ins.
You also don’t need to manually import the module prior to using PowerCLI, they will be automatically loaded and autocompleted in your prompt.
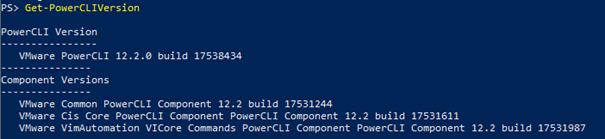
Get-PowerCLIVersion
Note that if a warning regarding CEIP is displayed whenever loading the PowerCLI modules, you can disable it by enabling or disabling CEIP with:
Set-PowerCLIConfiguration -Scope User -ParticipateInCEIP $true or $false
Although it may have seemed useless to enable CEIP before, it has become more interesting in the last few vSphere versions as it enables online checks and facilitates support tickets which can prove useful in the lifecycle management of your environment.
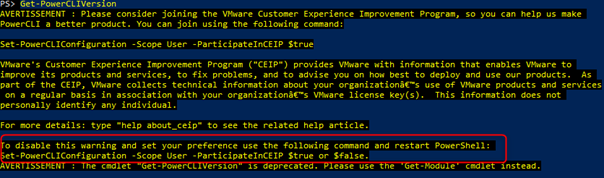
CEIP related warning that can be disabled
Finally, we can now connect to our VMware environment. We can connect to a single ESXi host or a vCenter server.
- To establish a connection, we simply use the Connect-VIServer cmdlet with the –Server parameter.
Connect-VIServer -Server 192.168.10.11
Note that you don’t have to specify the -Server parameter as it has the default position 1 applied to it so you can just type the IP or FQDN right after the cmdlet.
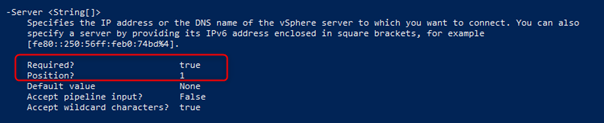
Server parameter of the Connect-VIServer cmdlet
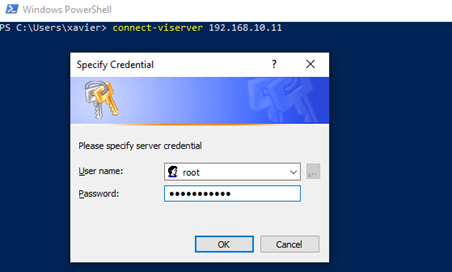
- A prompt for login credentials may appear, input correct credentials and click OK. Note that if the user you are currently logged as in Windows has permissions on vCenter (AD account), you will be connected automatically.
Input credentials to connect
- The connection info will be displayed and you will now have an established PowerCLI session to the vCenter Server.
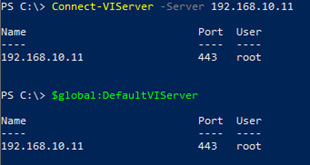
$DefaultVIServer contains information about the connected instance
The output you see is the content of the “$DefaultVIServer” variable which is the vCenter or ESXi object you are connected to.
The procedure is the same whether you are connecting to a host or a vCenter server. Below you see the difference in the “ProductLine” property if you are connected to a host or a vCenter.
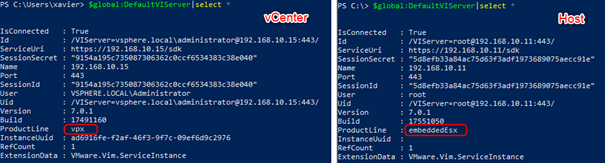
Content of $DefaultVIServer when connected to a vCenter and a standalone host
How to use VMware PowerCLI
If you have no experience with PowerShell or other command line tools you might feel a little disoriented as to where to start and what to type in? Worry not, PowerCLI is known to have a shallow learning curve and includes a plethora of help pages similar to Linux’s “man” pages. To quote Jeffery Snover, PowerShell Chief Architect, “It’s like programming with hand grenades”. We recommend getting comfortable with Get-* commands before using Set-*, Remove-*…
Here are a few tips and tricks to help you get started on your PowerCLI journey. Note that, while those will serve you with VMware PowerCLI, they apply to PowerShell in general.
Using Get-Help on PowerCLI
VMware PowerCLI has its own built in help system which will save you some googling time. It works by typing Get-Help followed by the name of a cmdlet.
Note that it is always good measure to update the help in PowerShell by running the Update-Help cmdlet. You should do it at least once when you launch PowerShell for the first time it is not a bad idea to run the command now and again to get the most up to date help content. Check out the Save-Help cmdlet if your system doesn’t have a direct internet connection.

Updating the help with Update-Help
In the example below we look up the help information about the Get-Command cmdlet. Note that Help is an alias of Get-Help.
Get-Help Get-Command
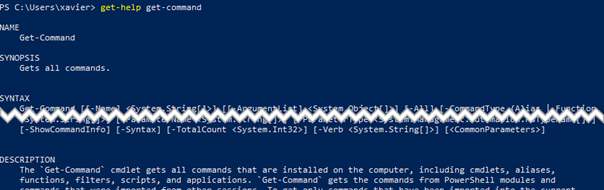
Obtain help on any cmdlet
This gives us information such as the different parameters, the value types that they take as well as the description of what the cmdlet does. You can also get examples on how to use the cmdlet by appending the –example switch. Note that some of the help won’t be available if you never ran Update-Help.
Get-Help Get-Command -Example
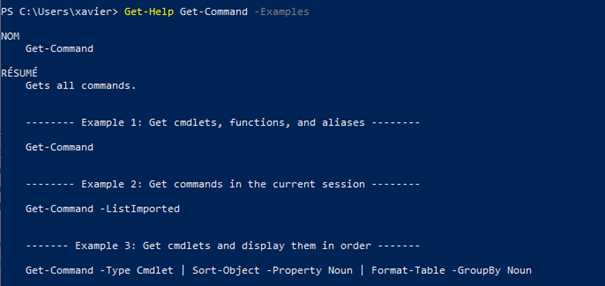
Display examples on how to use a command
More often than not you will need to display the complete help information including the examples, description, parameters, etc. You can do that simply with the –full switch:
Get-Help Get-Command -Full
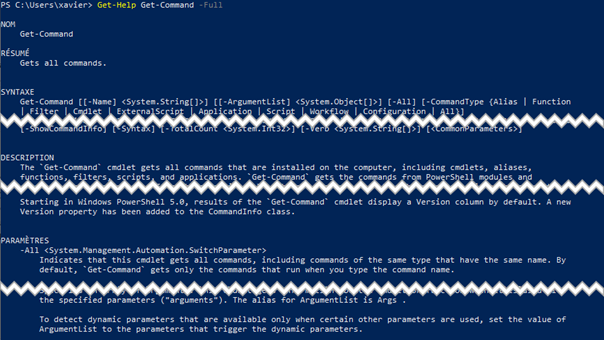
Obtain the full help content of a cmdlet
All of the information appears right in the shell display without having to open up a web browser and manually search for the information. If you really want to improve your skills with PowerCLI and PowerShell in general, it is a good idea to use the help system first before “Googling” it. The more familiar you are with using the help system, the better you will become at using VMware PowerCLI.
How to use Get-Command
Get-Command is a great way to sift through the different cmdlets when trying to decide how you want to accomplish a task. For instance, let’s say you want to delete a snapshot on a VM but you don’t know which command to use.
A way to figure out which cmdlet will perform this action for us is to use Get-Command with the –Name parameter and search for any commands that match the keyword Snapshot with the wildcard symbol (*). The syntax is as follows:
Get-Command -Name *snapshot*

Display the list of cmdlets that match a string
The output is a list of cmdlets that perform actions on snapshots. However, you will look at the “ModuleName” column to find which cmdlets belong to the VMware modules. According to the screenshot above, we will choose the Remove-Snapshot cmdlet.
In order to display all the cmdlets available within the VMware modules we can use the –Module parameter and specify any module that starts with “VMware” by using the following syntax:
Get-Command -Module VMware*
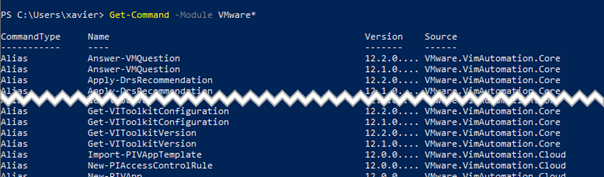
Display the list of cmdlets within a module
If you count the number of cmdlets with Measure-Object on the output you will realize that there are quite a few.
Get-Command -Module VMware* | Measure-Object
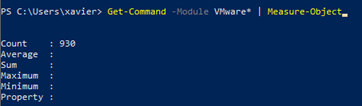
Count the number of objects in a collection
Using Out-GridView
Out-GridView is a nifty little cmdlet that will display the output in an interactive GUI window that you can sort through, filter… In order to use it, simply pipe (|) your commands into Out-GridView (Alias ogv). In the example below, we use it to get all the cmdlets that contain the word “Snapshot”. Note that we use gcm which is an alias for Get-Command.
Gcm *snapshot* | Out-GridView
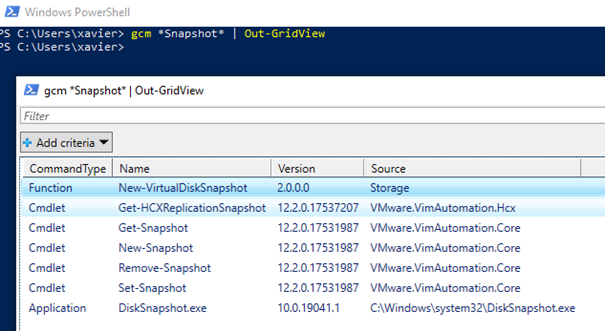
Open the output of a command in a useful GUI
You can then use the window to filter and sort the information displayed. Let’s say we want to narrow down the search for cmdlets that contain “Remove” in their name. We can do this by simply clicking the Add Criteria button, check the Name check box, and click Add and type your filter :
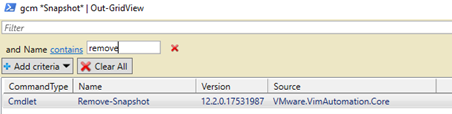
Narrow down the search with criteria
This example is pretty simple, however, if you were filtering through large amounts of data it can prove beneficial. The screenshot below shows an example where I narrowed down to the running VMs that have 2 or more CPUs:
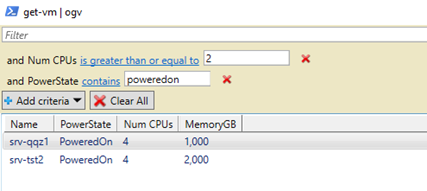
You can stack several filters
If you ever get stuck and don’t know how to get around a specific problem, you can always ask the PowerCLI VMTN community. One of its many members will try and help you out. It is a great resource for documents and discussions that can provide assistance with any question you might have.
Scheduled scripts
Those have been around since the dawn of modern IT and they are still as relevant today as they used to be. Our updated ebook will show you how to work with scheduled tasks. The main pointers being the following:
- Test your script extensively before putting it on a schedule.
- The account running the script must have the right permissions on the destination (vCenter…).
- You can run the script from a simple batch file which can log all the output in a log file or run PowerShell straight from the scheduled task.
Customizing your profile
PowerShell offers the possibility to create a customized profile in which you can execute commands that will be run when you start PowerShell.
Creation of the profile
It comes in the form of a .ps1 file that doesn’t exist by default so you need to create it:
- Check if the profile file already exists.
Test-Path $PROFILE
- If the output is “False”, you need to create it.
New-Item -Type File -Force $PROFILE
- You can now edit the newly created profile file. You can get the path to the profile by displaying the content of $PROFILE.
Prompt customization
One of the most popular uses of the PowerShell profile is to customize the prompt. In order to do that, you need to create a function named “Prompt” that you place inside the Microsoft.PowerShell_profile.ps1 file. Meaning whatever you put into this function will be executed every time the prompt is solicited.
In the example below we show you how to enrich the prompt by displaying the username you’re running as and the system on which you are connected like in a Linux shell. Another nice addition that I particularly like is to display the vCenter servers you are currently connected to. I almost consider it to be a security measure to avoid running commands against an environment you forgot you were still connected to.
Here is the difference between a vanilla and customized PowerShell prompt.
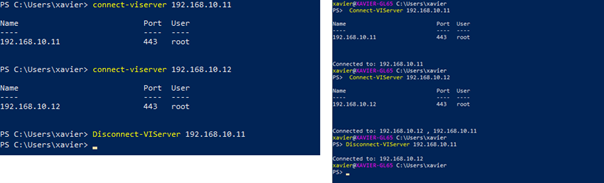
Example of a customized prompt that displayed the connected vCenter(s)
Here is the code that will achieve this result. It needs to be placed in Microsoft.PowerShell_profile.ps1.
Function Prompt {

write-host ""

# Display list of connected vCenter servers.

If ($global:DefaultVIServers) {

Write-Host "Connected to: $([string]($global:DefaultVIServers | where isconnected -eq true).name -replace " "," , ")"

}

# Display username@computername in color.

Write-Host $env:USERNAME -ForegroundColor Yellow -NoNewline

Write-Host "@" -NoNewline

Write-Host "$env:COMPUTERNAME " -ForegroundColor Magenta -NoNewline

"PS> "

}
|
Other applications
While customizing the prompt is fun and can be a good prank at the office, PowerShell profiles can serve many purposes.
Here are a few ideas of what you can do with it:
- Set a different default location.
- Add aliases for often used commands.
- Display the welcome message of your organization.
- Display whether the prompt is elevated or not.
As you can see your imagination is the limit but try not to get carried away with too many actions or your shell will become less responsive.
Custom modules
One of the strengths of PowerShell is the flexibility offered by the use of modules. Those are files that contain collections of cmdlets to extend the reach of your shell. Major software and hardware vendors distribute PowerShell modules to simplify interactions with their products’ APIs, PowerCLI is one of them by the way.
You can write your own modules in which you will put your homemade functions. You will find more details on functions in our updated ebook on PowerCLI with examples covering datastores, vCenter HA, RDM disks…

You can create your own modules containing your cmdlets
Writing your own functions is a great exercise that allows you to condense a set of actions that would require many commands or GUI interactions into a single cmdlet.
Get in the scripting mindset
Here I wanted to touch base on a less technical approach to PowerCLI. Whether it is VMware PowerCLI or some other framework, scripting is not something you learn overnight. Like most learning processes, it takes time, it is a trial-and-error path and you need to make mistakes, fix them and start over to get better.
Don’t feel bad about taking time to script
An unspoken truth that is regularly verified among our peers is that some IT managers only value work that can be quantified like closing tickets or deploying VMs and RUN is a great example of that. Spending time working on scripts may be seen differently by the less hands-on people who could think you are not doing “real work”. As one wise man used to say: “You are never thanked for the problems you don’t have”.
It may be the admin’s role to explain that spending time learning, testing and writing scripts is an investment both in yourself and in the company. Sure, it may take a few days or even weeks of brainstorming to understand how to interact with such and such in VMware PowerCLI.
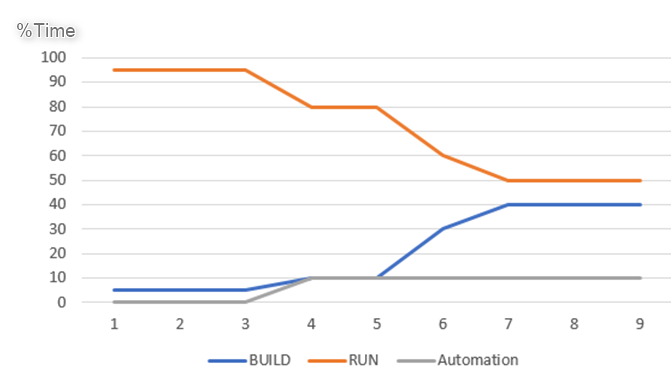
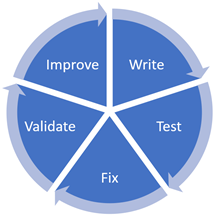
Automation will free up time from RUN tasks to work on BUILD projects
But this won’t be a problem if you can demonstrate that the time you spent doing it will free up valuable hours over the course of (a) year(s) during which you can work on projects, other automation topics or even those pesky RUN tasks that will always require a human being behind the keyboard. The diagram above is an attempt at depicting the effects of implementing automation in your processes.
Identify the actions you perform often
Automation is all about improving efficiency and saving time. At the end of the day, you could probably automate just about anything as long as you can throw in enough man-hours. However, the point is: Automating a task should save you time in the long run, not the opposite.
For instance, it makes very little sense to spend 2 weeks automating a task that takes a day or two a year. Although you will have learned some things in the process, the return on invested time will be very poor. Instead, try and identify tasks on which you spend a significant amount of time.
All of this to say that, even though an automation project may sound cool and appealing, you should always review it before starting.
Challenge your own ideas
Starting an automation project isn’t always easy. We often start with a specific goal in mind and start writing code in order to get there as quickly as possible. Some very experienced professionals will get it right the first time, however, it isn’t the case for most of us. I found myself that it is unusual that I get it spot-on on the first go.
When I finish a PowerCLI automation project or even a function, I try and challenge myself to find what I could do better and cleaner. For instance:
- Can I reduce it in size to optimize the code tidiness? with a cleaner loop maybe?
- Can I turn repetitive occurrences into a function?
- Can/Should I parameterize some of the variables?
- Can I simplify it to make it more flexible and render it functional in various environments?
- Where should I add comments so I understand it 6 months down the line?
Keep challenging your own scripts to improve them
Now, the quality of a script is a subjective concept. While we recommend going through a few passes of improvement, it will also depend on how much time you can spend on it. At the end of the day, if it works, fulfils its purpose and you’re happy with it, it’s as good a script as any.
Wrap up
You will probably find at some point, or maybe you can already relate to the fact that the first PowerCLI scripts are usually quite long and monolithic. Writing scripts is like playing a musical instrument, everyone is a lifelong student as there is so much to it and there will always be something new to learn and do better.
Most of the concepts we reviewed so far are not only applicable to VMware PowerCLI but to any scripting language for that matter. Fortunately, PowerCLI is quite an easy scripting language compared to others and you don’t need to be an expert to work with it.
So, get started now with our updated free ebook on PowerCLI and start writing your very own scripts.


Not a DOJO Member yet?
Join thousands of other IT pros and receive a weekly roundup email with the latest content & updates!
More in this category


About the Author
Xavier Avrillier


18 thoughts on "Getting Started with VMware PowerCLI – A Beginner’s Guide"
This is quite good article! Especially about continuous improvements.