Save to My DOJO

With the release of VMware vSphere 7 Update 1, VMware customers are undoubtedly looking at upgrading production infrastructure to the new release. VMware vSphere 7 Update 1 is the most powerful version of VMware vSphere to date and provides the capabilities that organizations need for traditional and modern applications and workloads. The core of VMware vSphere is the ESXi hypervisor. VMware vSphere ESXi 7 Update 1 is the most potent version of ESXi to date and allows organizations to take advantage of the new features and capabilities found in vSphere 7 Update 1. Before you can fully take advantage of ESXi 7 Update 1, you have to install it. This post will look at how to install ESXi 7 Update 1 and consider the various ways to install and upgrade your existing ESXi installation to ESXi 7 Update 1.
How to install ESXi 7 Update 1
There are various ways to install ESXi 7 Update1. For many organizations, they will choose between an install of ESXi 7 Update 1 and an upgrade. Let’s detail the following methods of installing and upgrading to ESXi 7 Update 1.
- Clean installation of ESXi 7 Update 1
- Command-line upgrade
- vSphere Update Manager
- vSphere Lifecycle Manager
1. Clean installation of ESXi 7 Update 1
There isn’t a right or wrong answer for either method when thinking about performing a clean installation vs. an upgrade for a new ESXi version. Performing a clean installation can have the advantages of working with a fresh, clean slate, with no issues carried forward. However, in many production environments, performing an upgrade is the preferred approach as it can help shortcut time and effort in configuration and other post-installation tasks.
Let’s take a look at performing a clean installation of ESXi 7.0 Update 1 and the steps to use this approach for installing ESXi 7 Update 1 in your environment. Like previous installations, ESXi 7 Update 1 is available from VMware through a downloadable ISO file for installing your bare-metal hypervisor hosts. Note, the only supported “nested” installation of ESXi is the vSAN witness node virtual appliance. The witness node virtual appliance is essentially a nested copy of ESXi running in a vSphere environment. You can download VMware vSphere ESXi 7 Update 1 from the link below.
Once you have the ISO downloaded, you are ready to install your VMware ESXi 7 Update 1 hypervisor host. In the walkthrough below, a nested ESXi 7 Update 1 installation is shown.
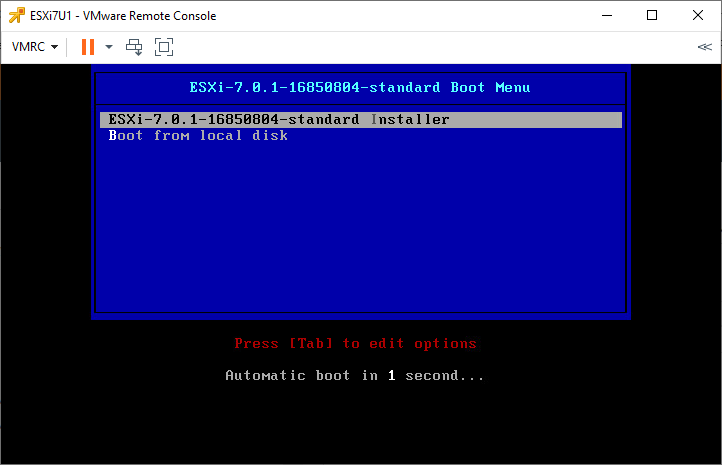
Booting from the ESXi 7 Update 1 ISO
Press Enter to continue with the clean installation.
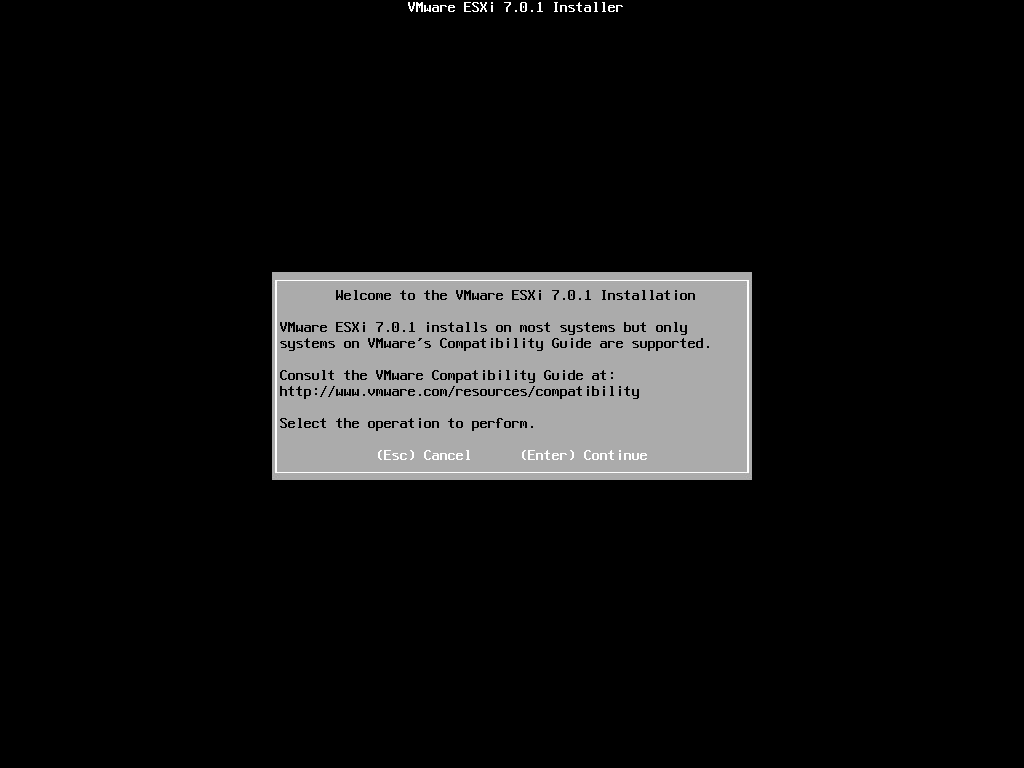
Beginning the ESXi 7 Update 1 installation
Select the partition to install VMware ESXi 7 Update 1. Note – You will be prompted to upgrade ESXi if a previous installation is found on the partition.
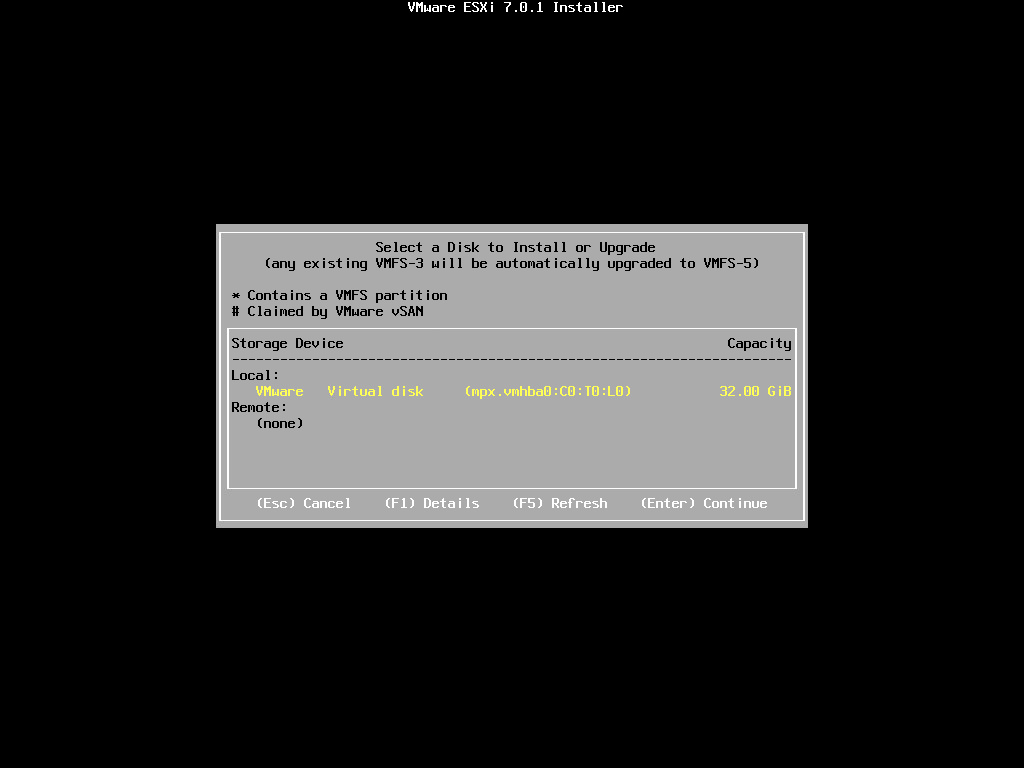
Select the partition to install ESXi 7 Update 1
Next, select the language of your ESXi 7 Update 1 installation.
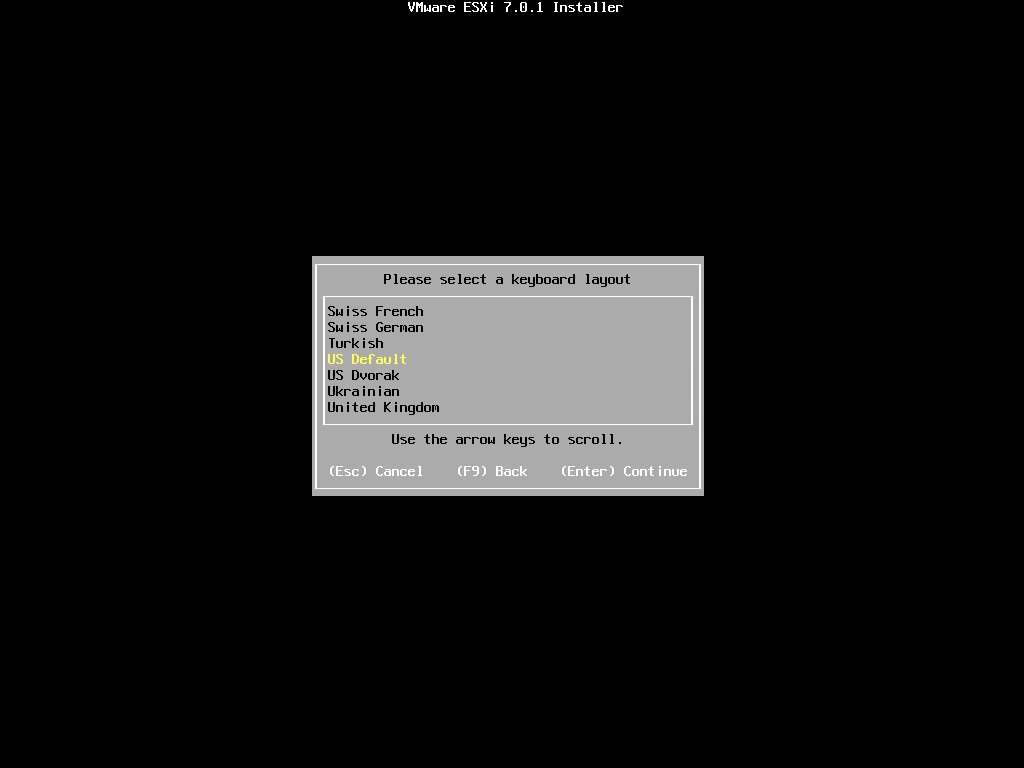
Language selection
Next, the installation will ask you to configure a root password.

Configuring the root password
Begin the installation of ESXi 7 Update 1 by pressing F11.
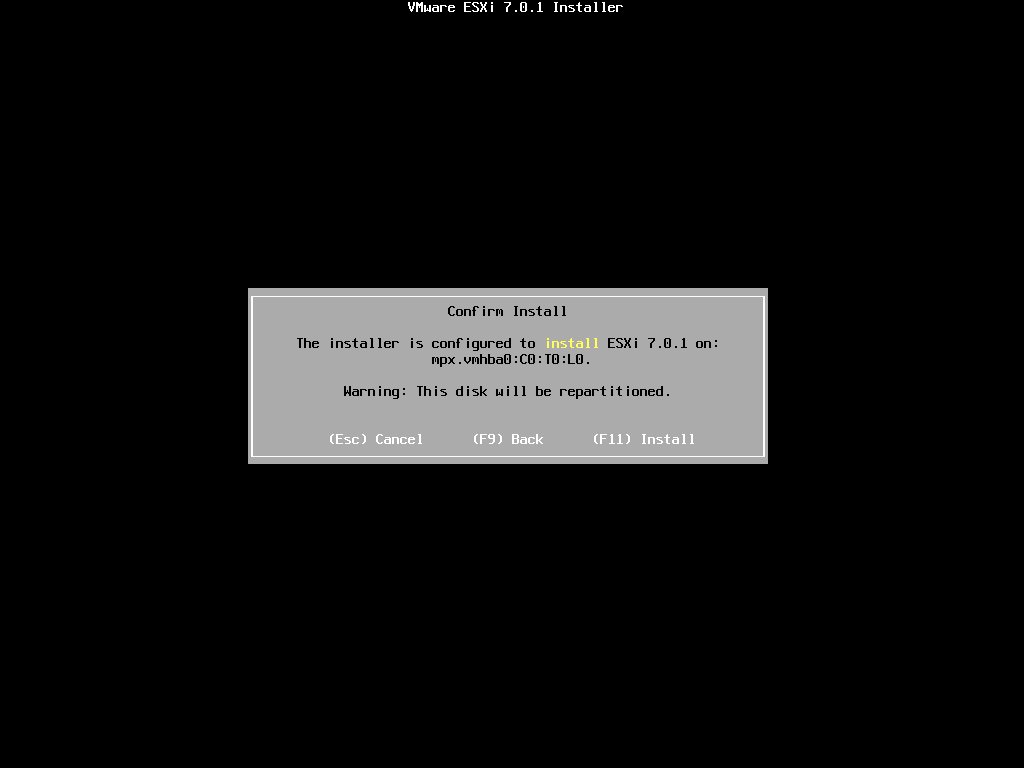
Begin the installation by pressing F11
The installation will progress and should only take a couple of minutes. You will be asked to remove the installation media and reboot the Server once the installation is complete. Press Enter to reboot.
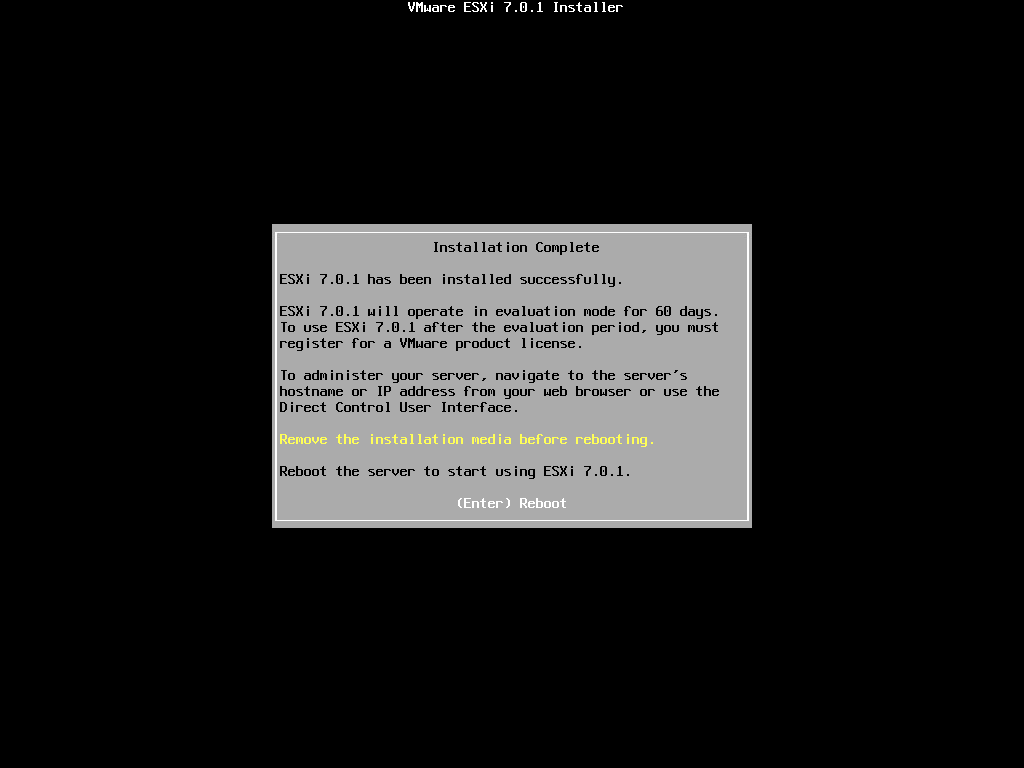
Installation of ESXi 7 Update 1 is successful
After rebooting, the ESXi 7 Update 1 host is booted and ready to configure.
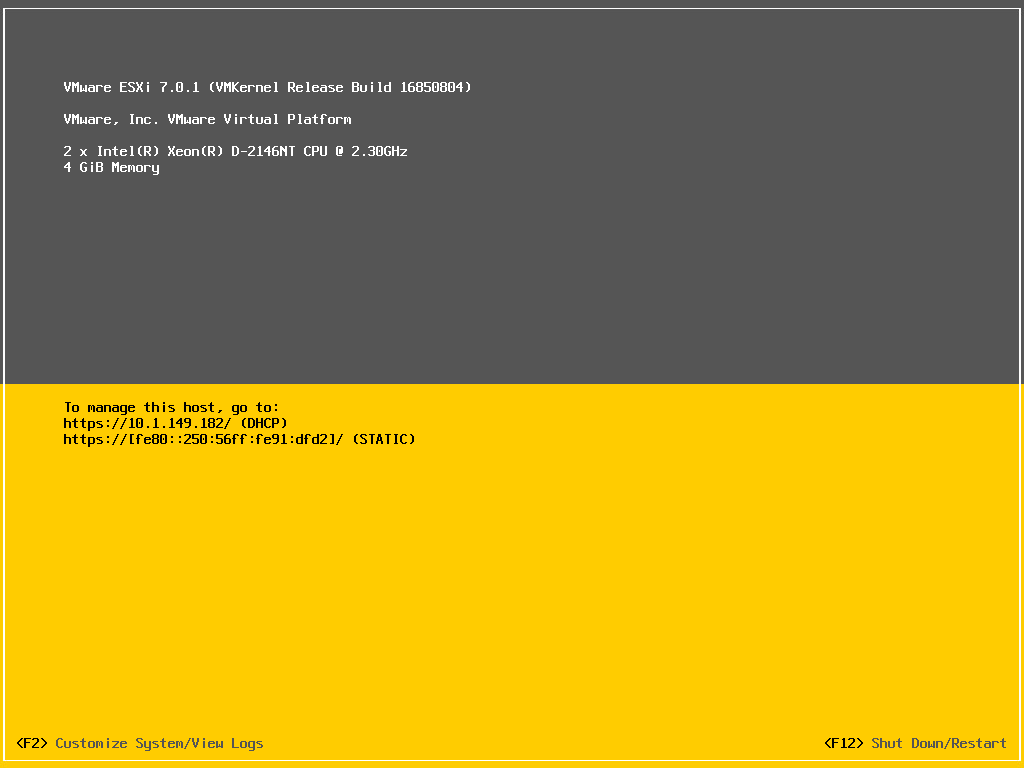
A new ESXi 7 Update 1 host ready to configure
With a clean ESXi 7 Update 1 installation, you will want to customize the configuration to align with your environment. Let’s step through the initial setup of a fresh ESXi 7 Update 1 installation. Your ESXi 7 Update 1 server’s initial configuration is primarily the configuration of your network parameters, uplinks, and other details like DNS values.
Completing the Initial Configuration of the ESXi 7 Update 1 Host
The initial configuration of your physical hypervisor host is performed using the Direct Console User Interface (DCUI). This is the console session that you log into when you press F2 at the DCUI screen when ESXi boots. In addition to configuring the network settings for your ESXi 7 Update 1 host, you configure and perform other tasks such as Troubleshooting options. These allow enabling the ESXi shell as well as SSH.
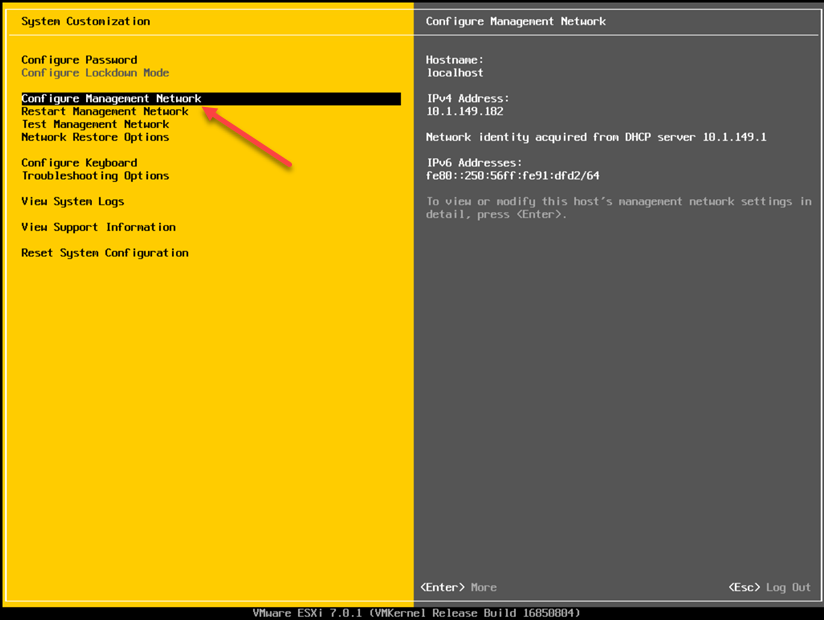
Configuring the management network with the DCUI interface
Once you select Configure Management Network, you have many options to configure including:
- Network adapters
- VLAN
- IPv4 Configuration
- IPv6 Configuration
- DNS Configuration
- Custom DNS Suffixes
By default, when you install ESXi, a default vSwitch is created (vSwitch0). This is a vSphere Standard Switch (VSS) that houses the VMkernel port for the management interface. The network adapters selected on the DCUI configure management network option are the network adapters that back the default vSwitch0.
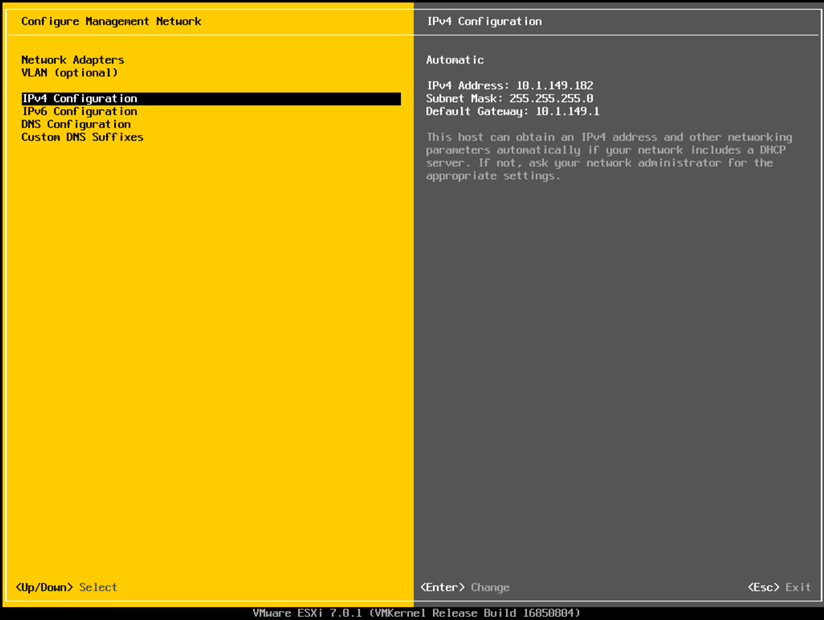
Configuring the management network details, including network adapters and IP address
After you have configured the management network on your clean installation of ESXi 7 Update 1, you are ready to either begin using the host as either a standalone host or as part of a vSphere cluster. If standalone, you can manage using the VMware Host Client, the built-in HTML5 management interface you access when browsing to the management IP address. You can also add the host to your VMware vCenter Server by adding the host using the vCenter Server Add hosts functionality.
Below is a screenshot showing the Add hosts screen that allows you to add your newly installed ESXi 7 Update 1 host to vCenter Server. Here, you will add the host using the IP or FQDN along with the username and password. Once you add the host to your vCenter Server, you can fully manage it from vCenter. VMware vCenter Server’s vSphere Client allows further configuration changes and virtual networking configuration.
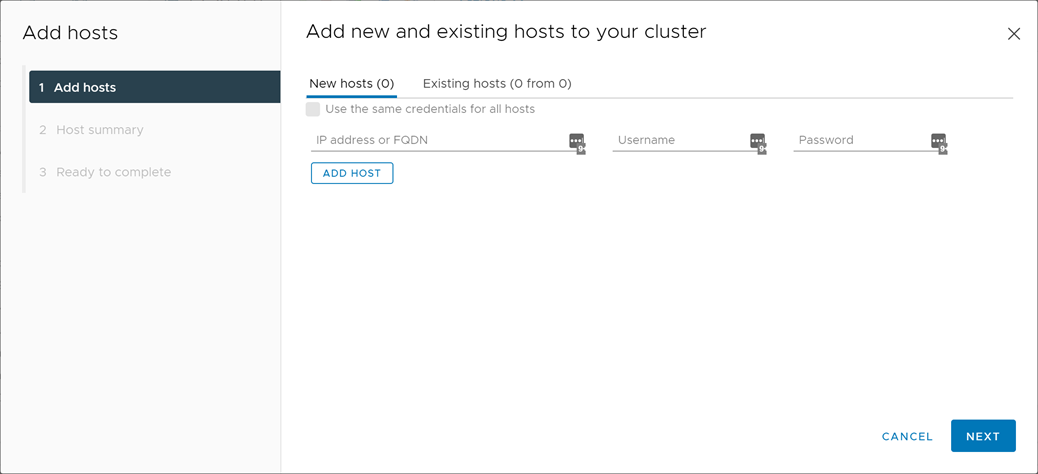
Adding a new ESXi host to vCenter Server using the Add hosts wizard
Upgrading to ESXi 7 Update 1 and Considerations
There are many considerations to make before you upgrade your ESXi hosts in the environment to avoid potential issues. Notably, you want to make sure you upgrade your vSphere environment in the proper order. In a standard vSphere implementation with ESXi hosts part of vSphere clusters, you want to upgrade your vCenter Server before you upgrade your ESXi hosts. In other words, you want to upgrade vCenter Server to version 7 Update 1 before you upgrade your ESXi hosts. It ensures that vCenter has no issues communicating with the new ESXi host version.
VMware vCenter Server has no issues communicating with downlevel ESXi hosts, but newer hosts than vCenter can undoubtedly lead to problems. Also, make sure any other solutions you have integrated with your current vSphere environment through vCenter Server or direct ESXi host communication are supported with a new vSphere version. Even VMware solutions outside of native vSphere are not immediately supported for ESXi and vCenter Server’s newest versions when first released.
An excellent resource for validating interoperability with other VMware solutions is the VMware Interoperability Matrix. It is a VMware provided tool that allows validating interoperability between various VMware products and solutions. Before upgrading your vSphere environment, including vCenter Server and your ESXi hosts, be sure to validate that all VMware solutions are compatible with the vSphere version you are applying, i.e. vSphere 7 Update 1.
Another pre-upgrade check that is essential is to ensure your backup solution is compatible with the latest version of vSphere. Even if you have validated your other VMware solutions are compatible with vSphere 7 Update 1, your backup solution may not be. It is crucial to check this compatibility before performing the upgrade. Backups of your business-critical workloads are vital and must not be broken by an upgrade of your vSphere platform.
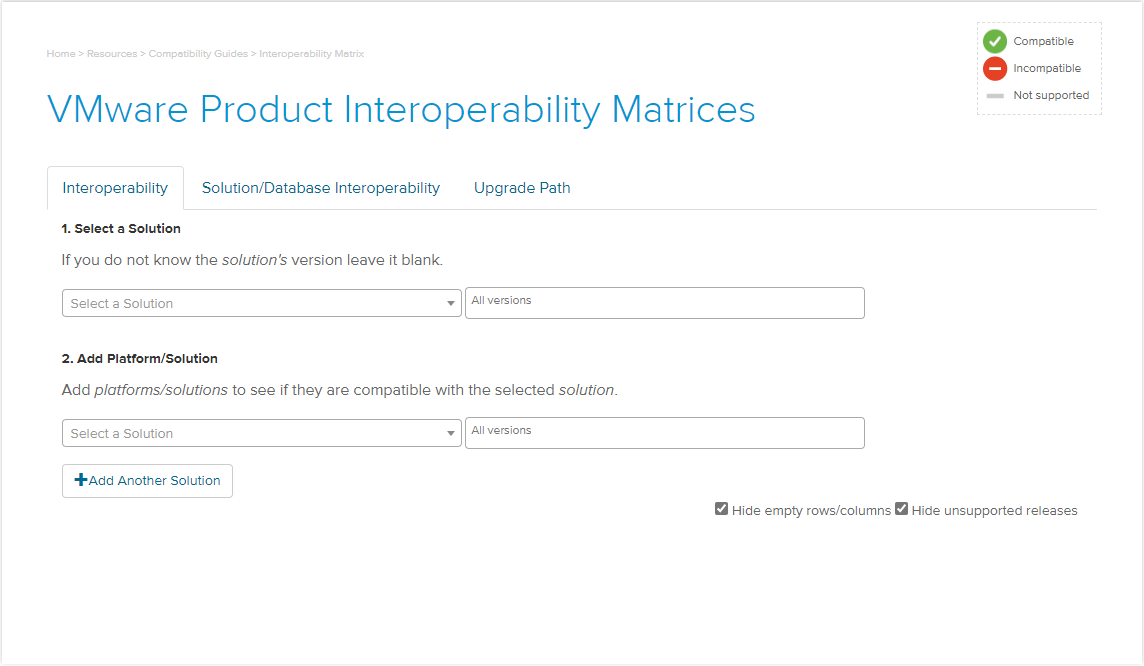
VMware Product Interoperability Matrices
2. Command-line upgrade
If you do not perform a clean installation of VMware ESXi 7 Update 1, you will complete an upgrade of ESXi. When you upgrade your VMware ESXi installation from a legacy version to VMware ESXi 7 Update 1, you are essentially upgrading the existing configuration running on the current ESXi version to the latest VMware ESXi 7 Update 1 version. For many who are running ESXi in production, this is the desirable approach since it leaves the existing configuration intact without reconfiguring them.
If you are running a standalone ESXi host and making use of the VMware Host Client without vCenter Server integration, you have two options to perform an upgrade to ESXi 7 Update 1. It includes:
- Booting from the VMware ESXi 7 Update 1 ISO and choosing an Upgrade instead of a clean install
- Performing a Command-line upgrade
The command-line upgrade is a straightforward way to upgrade to ESXi 7 Update 1. Upgrading from the command-line pulls the installation from online without having to download the media first. In this way, you avoid having to mount the installation media to the Server, reboot the Server and boot from the new media, and then choose to upgrade. We can use just a few commands to effectively upgrade the existing ESXi version to ESXi 7 Update 1.
To upgrade your ESXi host to ESXi 7 Update 1 from the command-line, you need to run the following commands:
- esxcli network firewall ruleset set -e true -r httpClient
- esxcli software profile update -d https://hostupdate.vmware.com/software/VUM/PRODUCTION/main/vmw-depot-index.xml -p ESXi-7.0U1b-17168206-standard
The first command allows the host to have egress connectivity to pull down the VMware ESXi 7 Update 1 upgrade from the VMware patch depot. The second command actually applies the upgrade to your ESXi host. At the time of this writing, the ESXi-7.0U1b-17168206-standard is the latest software update from VMware, applying both ESXi 7 Update 1 as well as the latest patches.
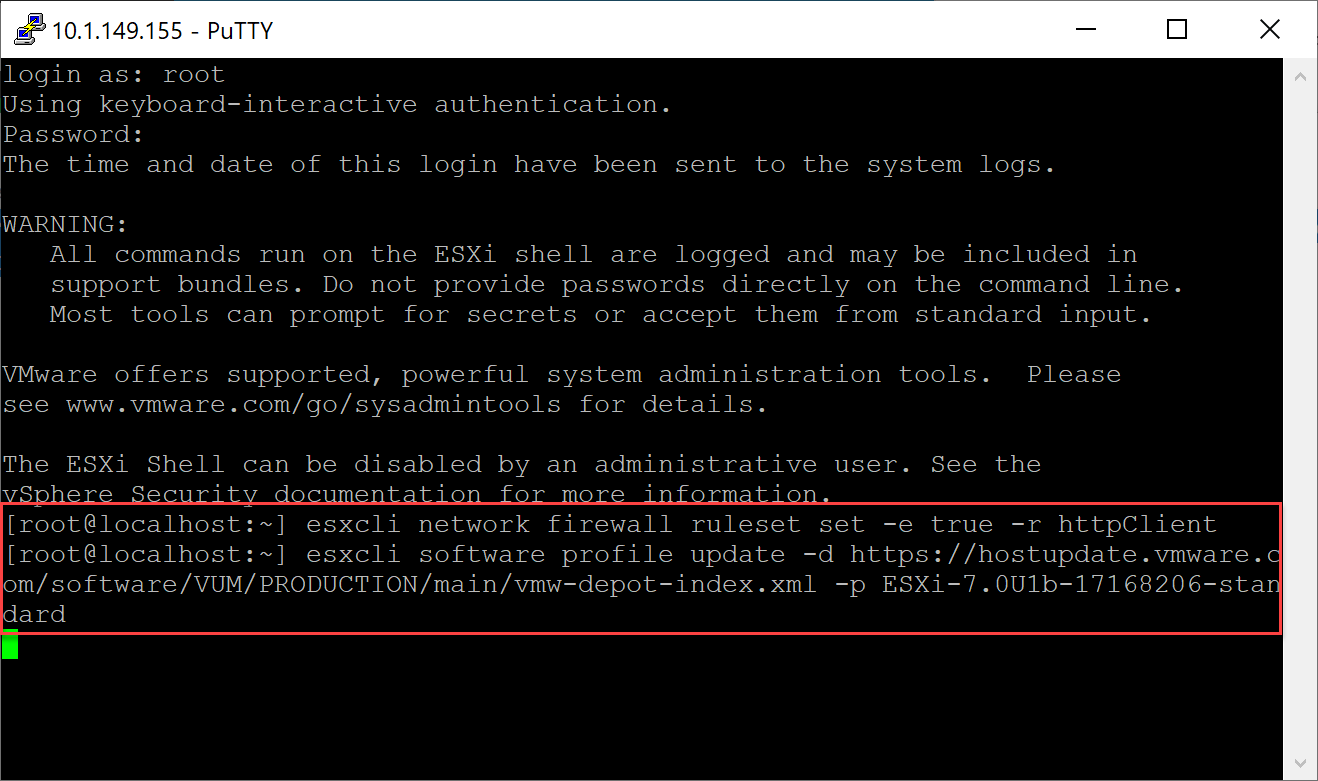
Upgrading to ESXi 7 Update 1 via the command-line interface
3. vSphere Update Manager
Now that we have taken a look at the command-line upgrade process using the ESXi software update command, let’s look at an upgrade using the GUI vSphere Client from a host managed by vCenter Server. The traditional approach to upgrading your vSphere ESXi hosts in a vSphere Cluster using vCenter Server’s vSphere Client is the vSphere Update Manager (VUM). VUM is the tool that has been used for many versions of vSphere to date and has provided a fairly rock-solid approach to managing the software on your ESXi hosts. Using VUM you can apply patches and updates as well as version upgrades to your ESXi host.
With VUM to upgrade your ESXi host version to ESXi 7 Update 1, you uploaded the ESXi 7 Update 1 ISO to the new vSphere Lifecycle Manager interface (more on this later) and create a baseline that makes use of the uploaded ISO. Even though the Lifecycle Manager is displayed here, it essentially takes on the functionality of both VUM and vLCM in vSphere 7.0 and higher.
Navigate to Lifecycle Manager > Imported ISOs > Import ISO.
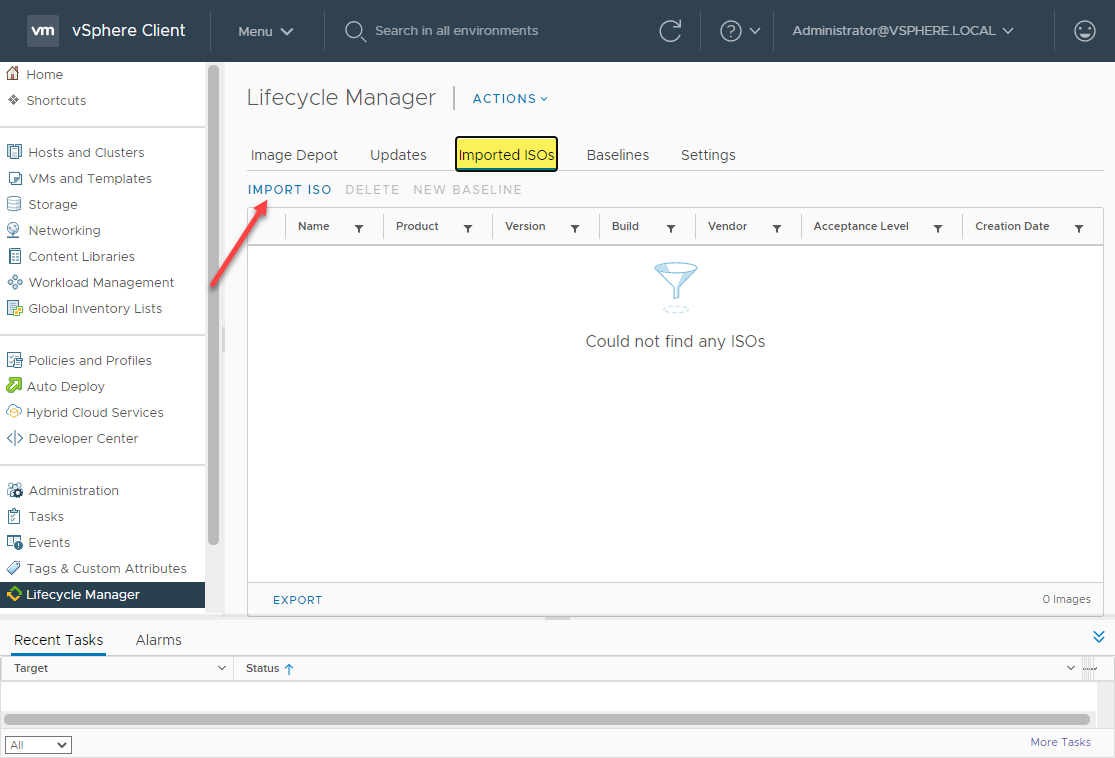
Importing an ISO for use with VUM
The process will have you browse your local computer for an ISO to import and upload.
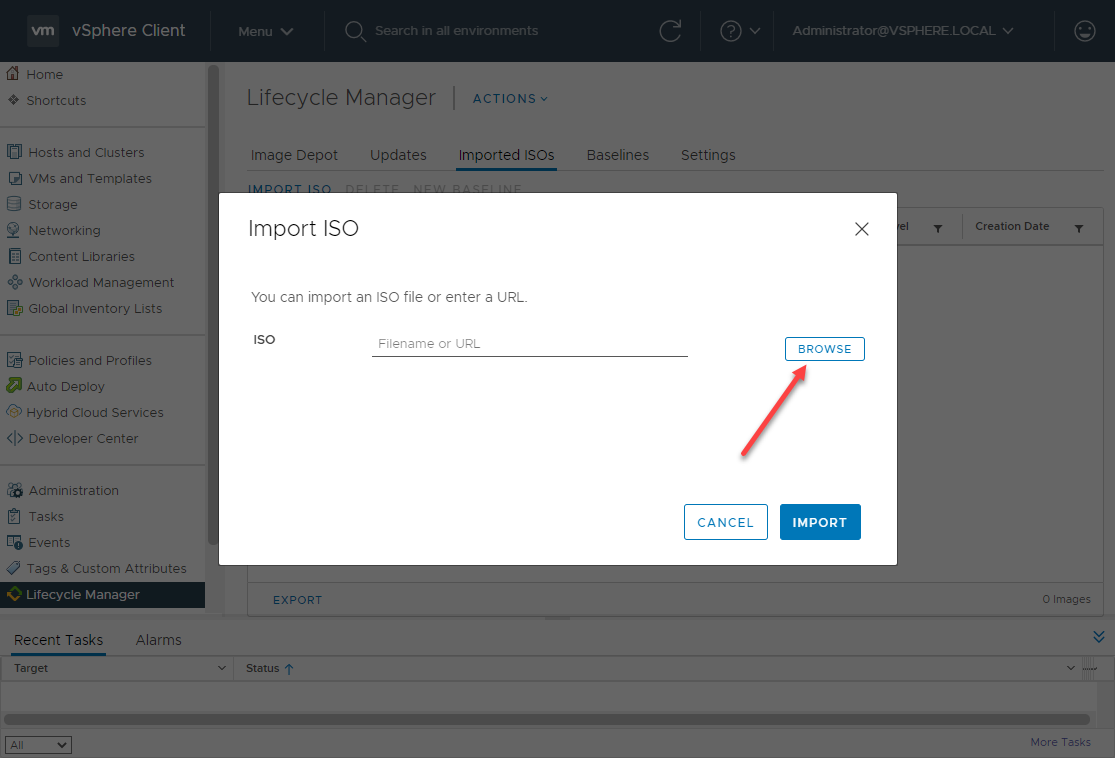
Browse for an ISO to upload
The ISO upload will begin automatically.
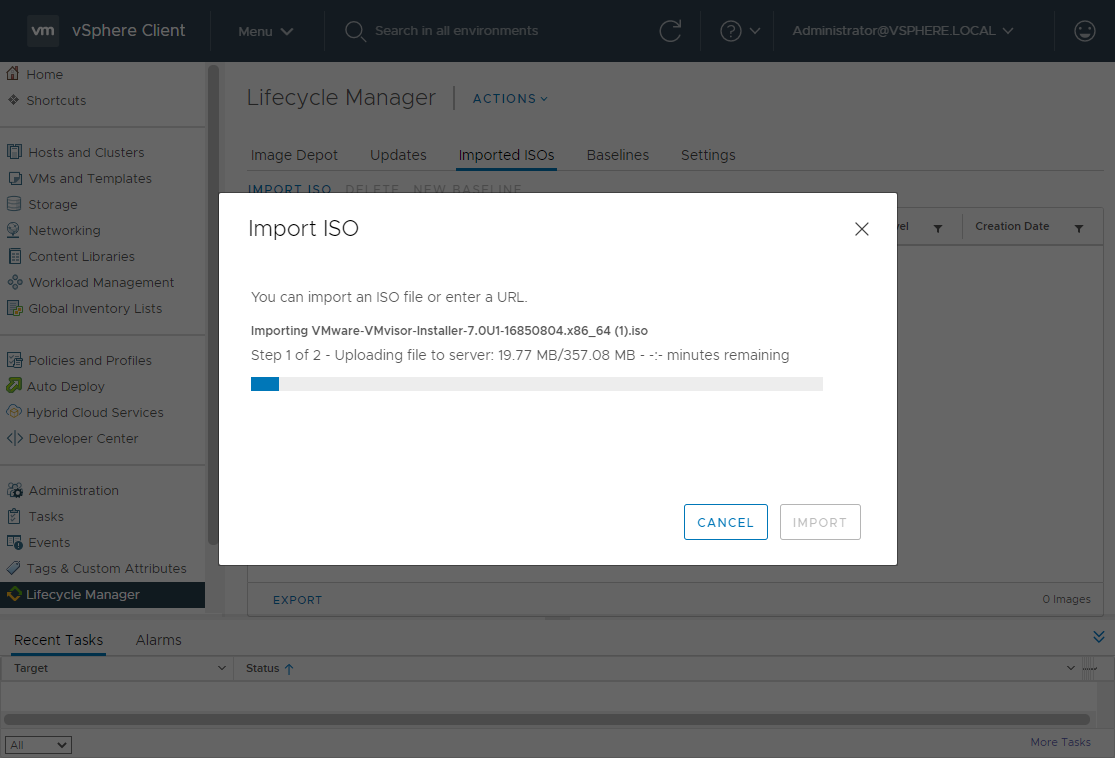
ISO upload begins for vSphere 7 Update 1
Next, with VUM, we need to create a new Baseline. The Baseline tells VUM which updates or upgrades to apply to a particular host.
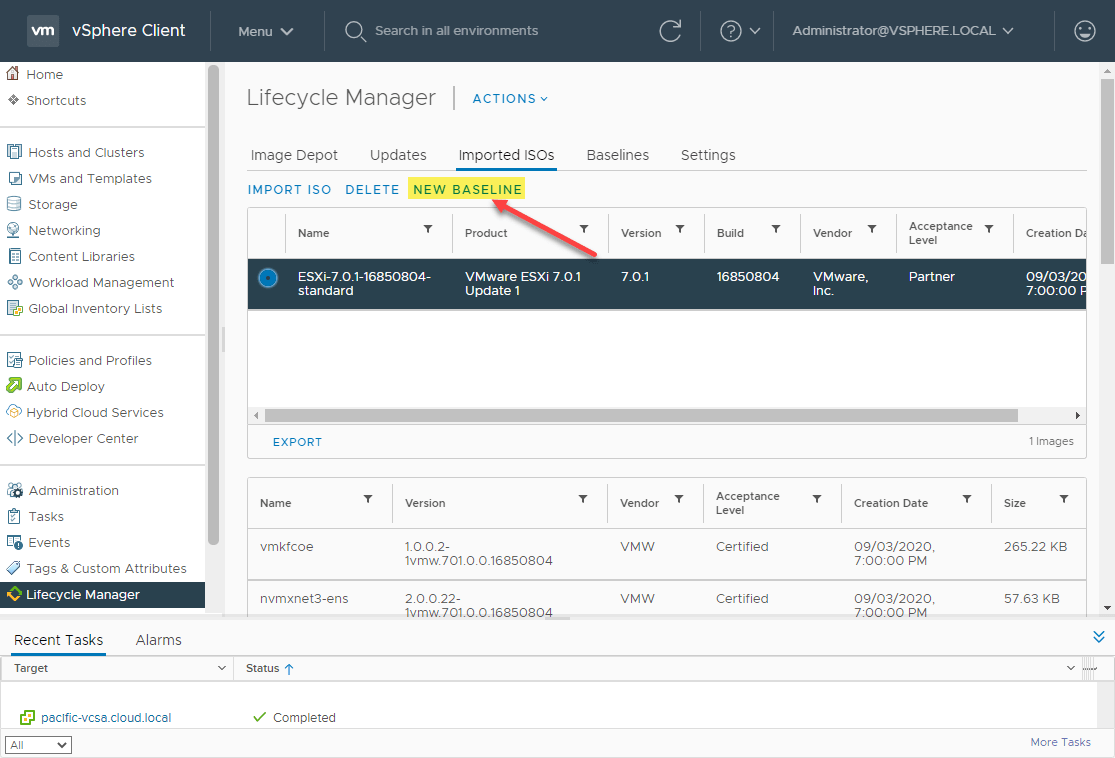
Creating a new Baseline for upgrading to vSphere 7 Update 1
The Create Baseline wizard begins. Name your Baseline that VUM will use to upgrade to ESXi 7 Update 1.
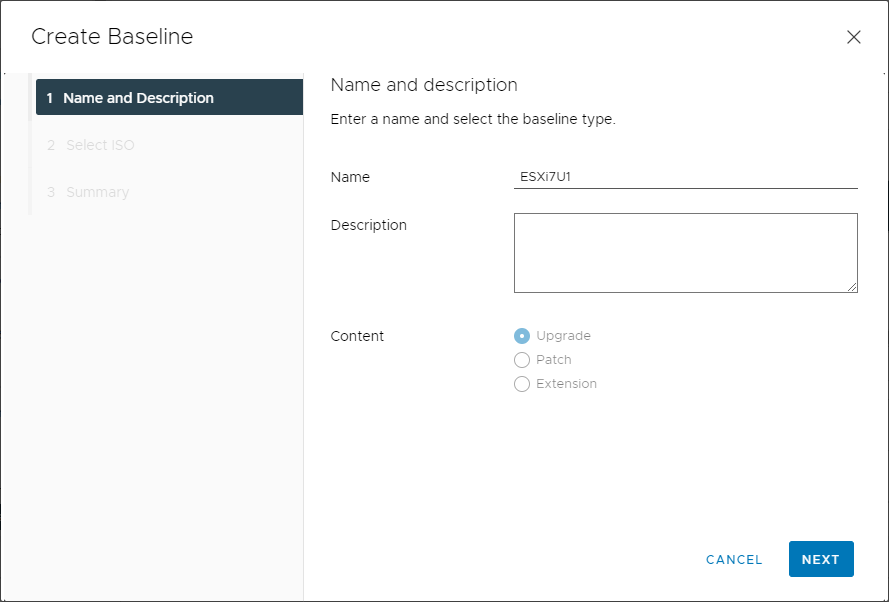
Name the upgrade baseline for ESXi 7 Update 1
Select the ISO that was imported that will be used for the upgrade.
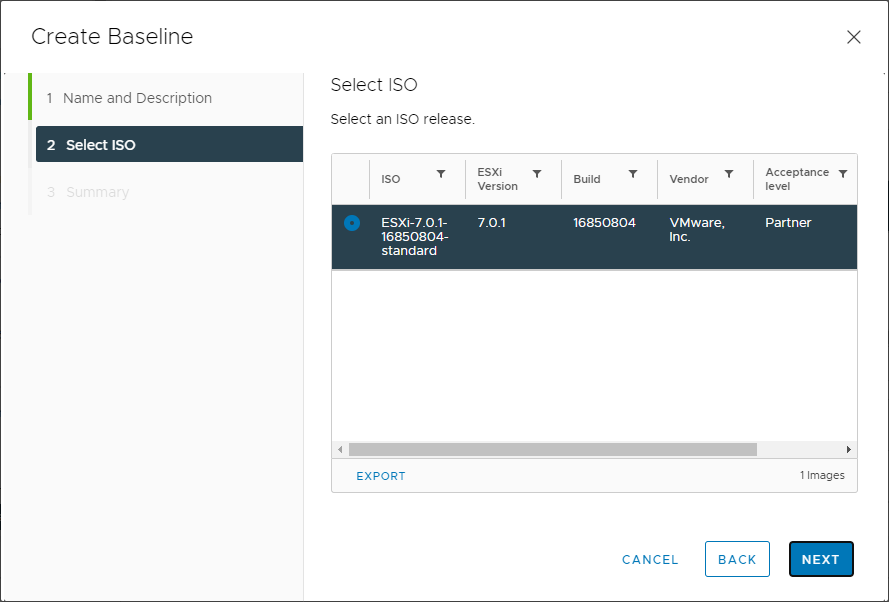
Select the ISO for ESXi 7 Update 1
Click Finish to finish creating the new Baseline.
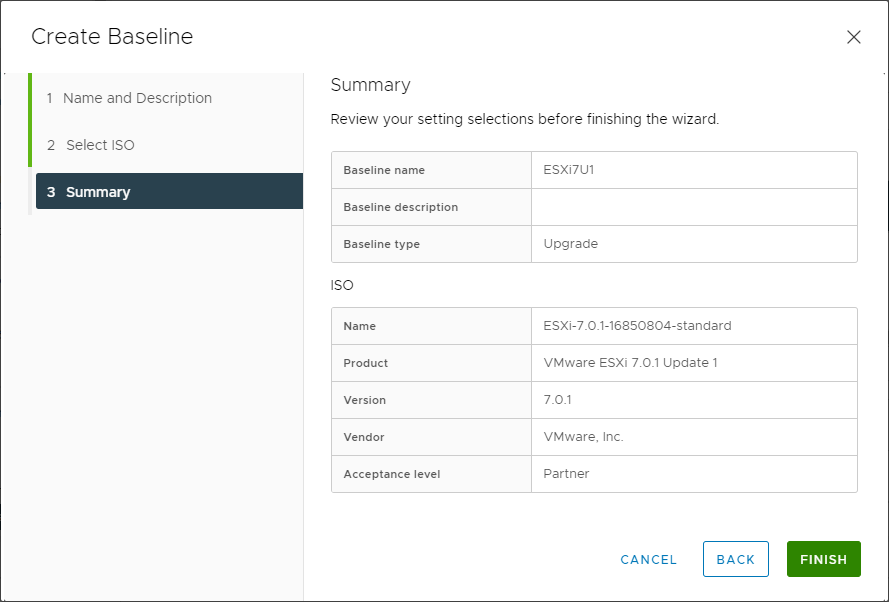
Finishing the creation of a new ESXi 7 Update 1 upgrade Baseline
Once the Baseline is created, this needs to be applied to the ESXi host that you want to upgrade to ESXi 7 Update 1.
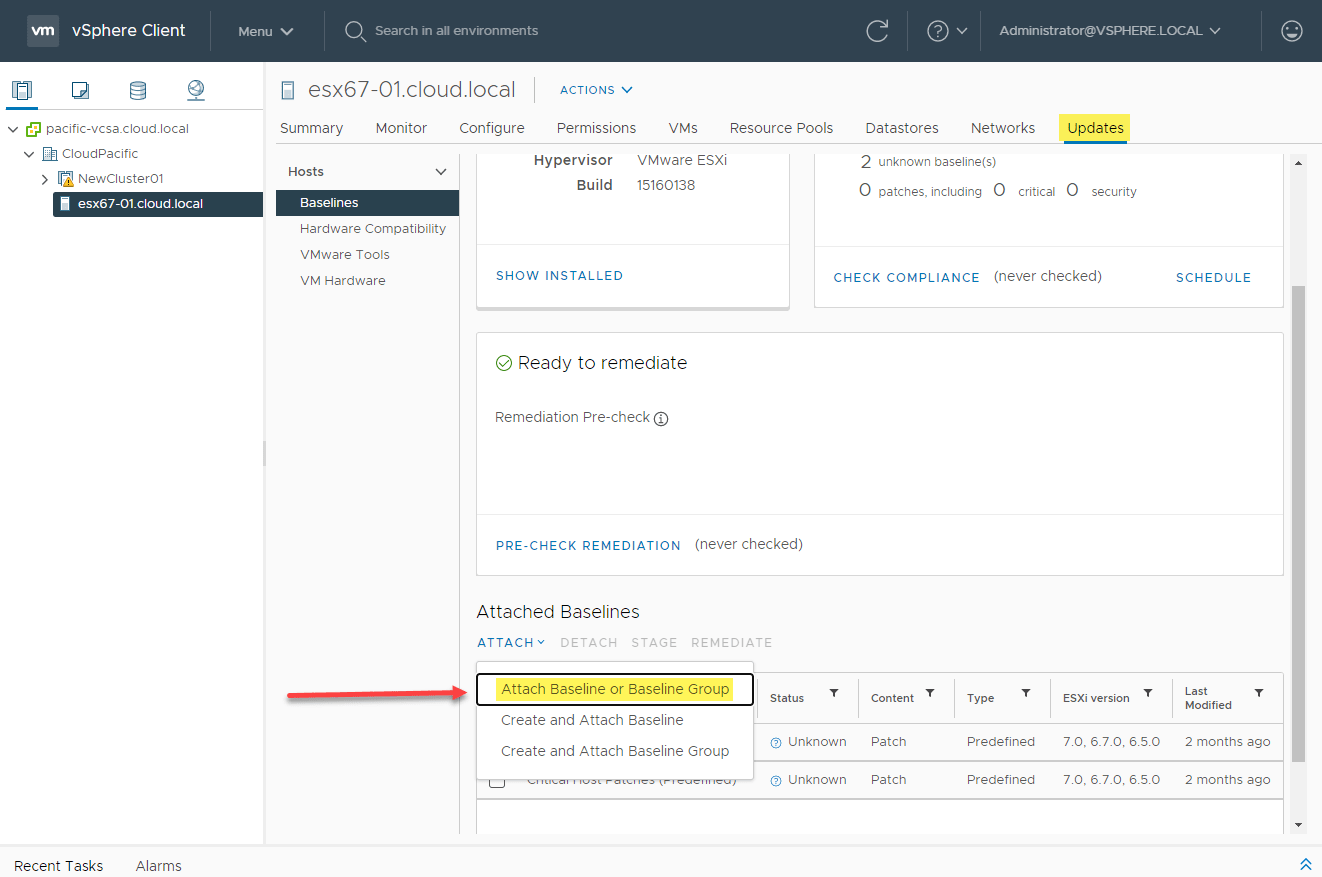
Attach the upgrade Baseline for ESXi 7 Update 1
Select the newly created upgrade Baseline.
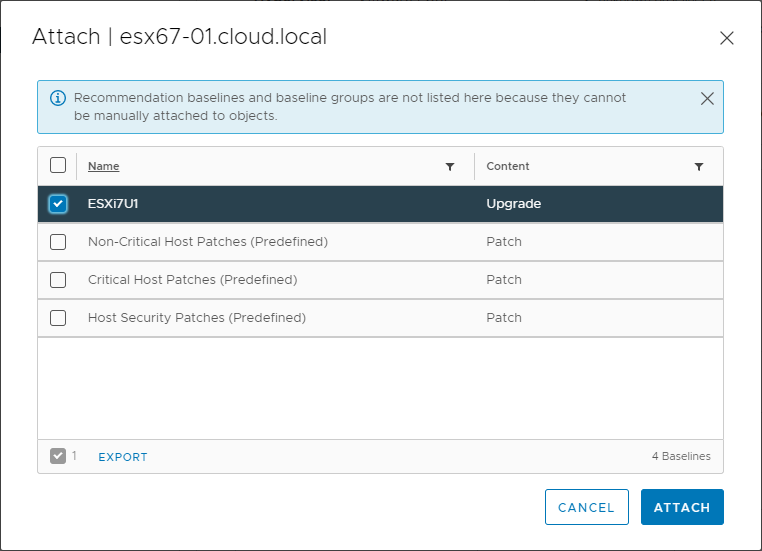
Select the new upgrade baseline
Once the upgrade Baseline is applied to the host, you are ready to remediate the host using the new Baseline.
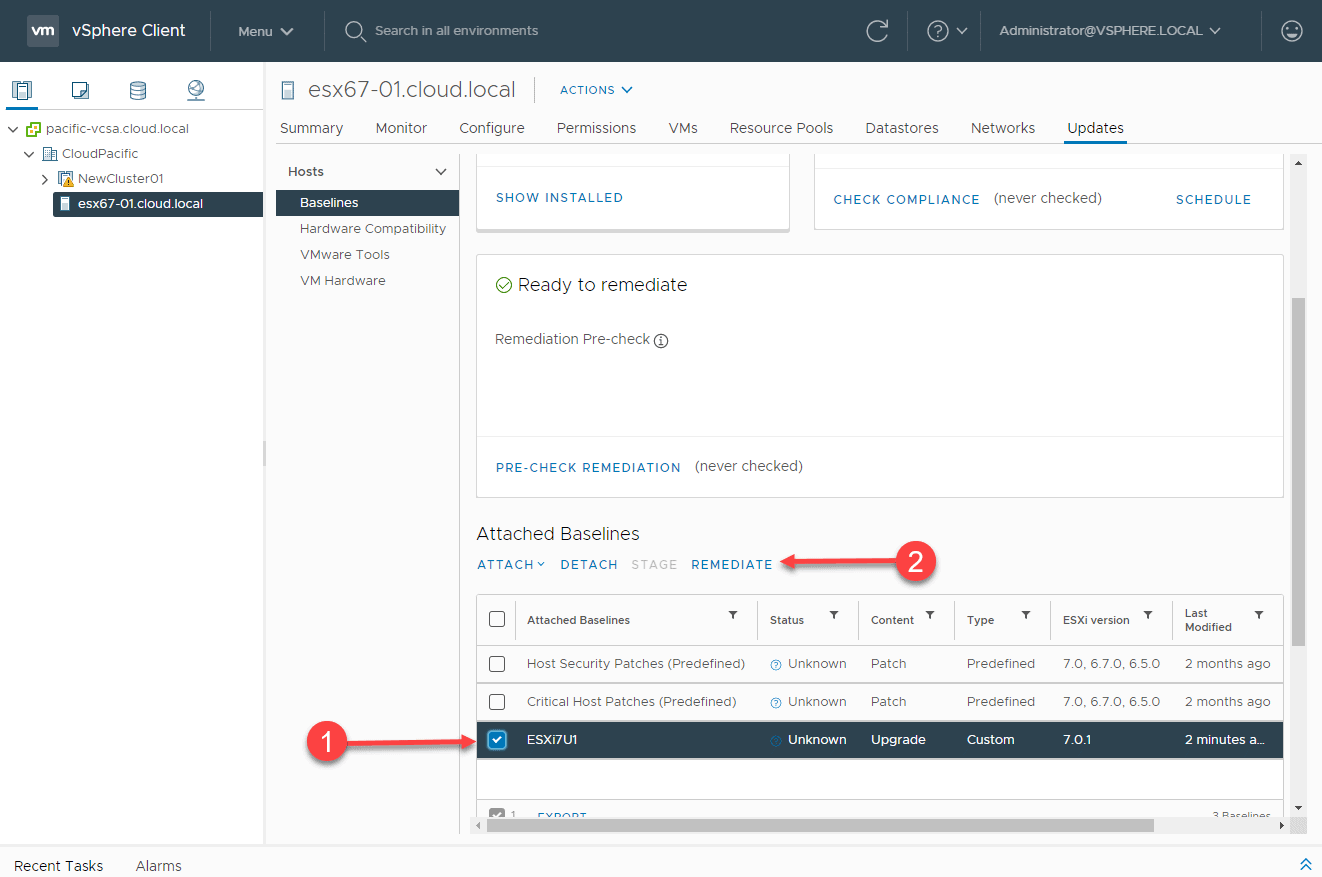
Remediating an ESXi host with the ESXi 7 Update 1 upgrade Baseline
Accept the EULA for the upgrade.
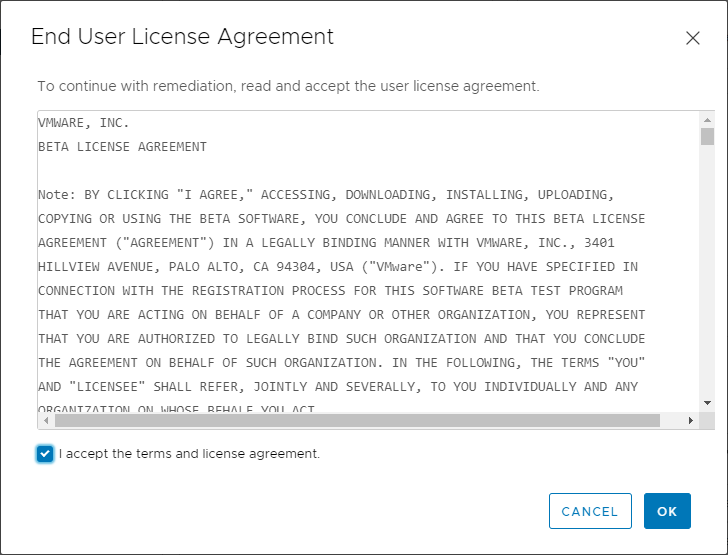
Accept the EULA for the ESXi 7 Update 1 upgrade
Now, you are ready to remediate the host. Click Remediate.
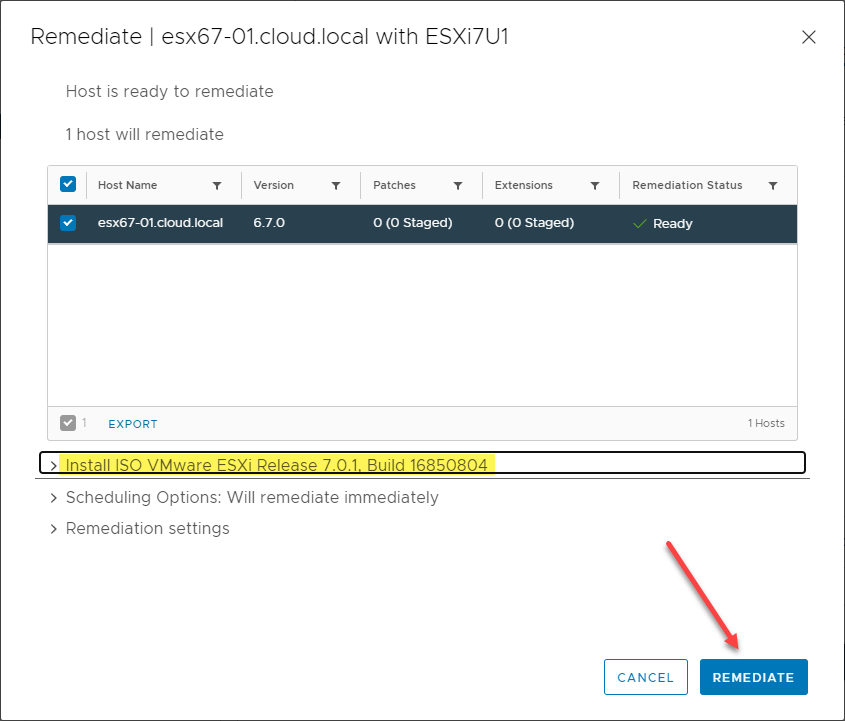
Remediate the host with the ESXi 7 Update 1 baseline
The remediation process begins and proceeds. This is shown in the vSphere Client vCenter Server tasks.
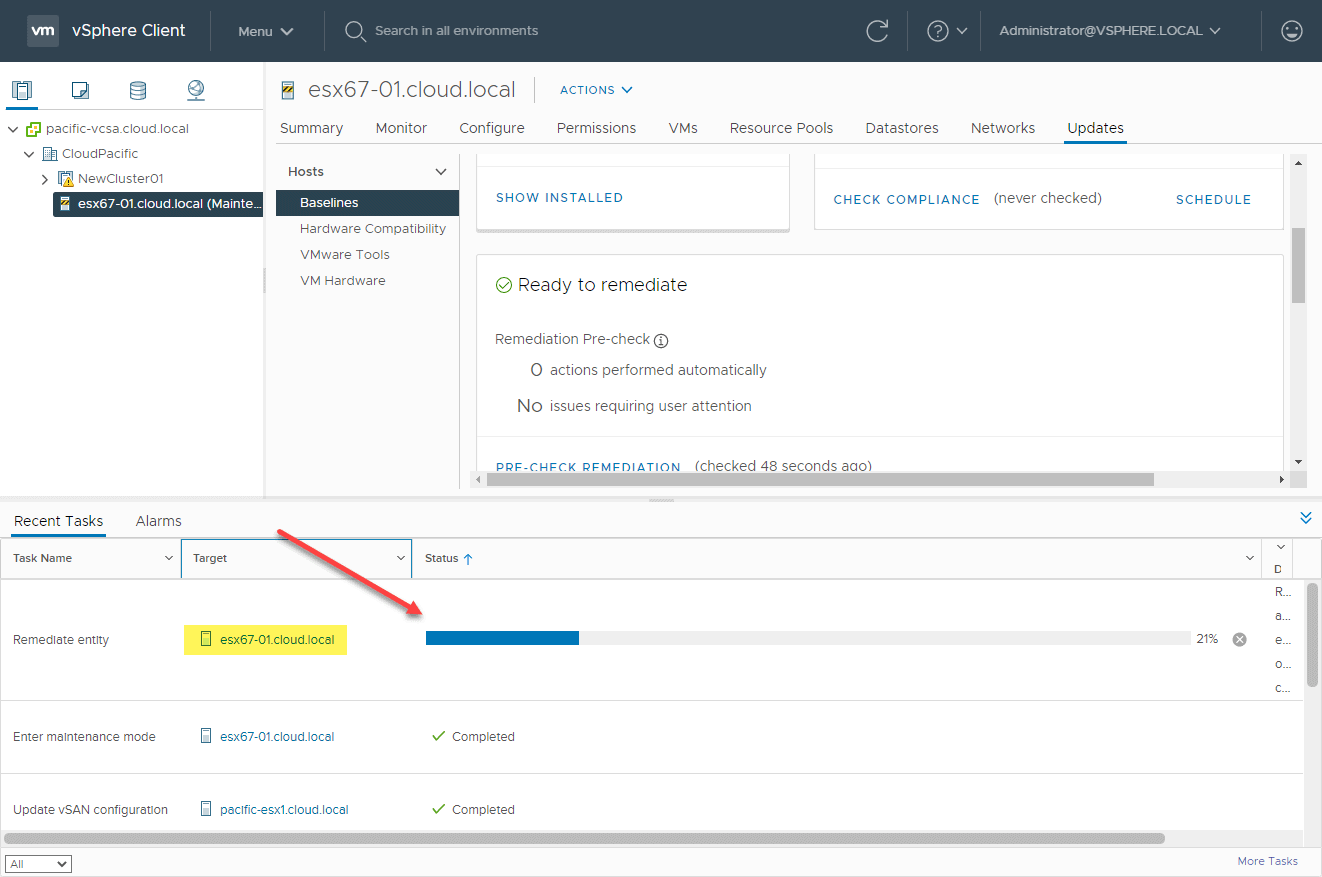
Remediation task running for ESXi 7 Update 1
As you can see below, VUM has successfully updated the ESXi host from ESXi 6.7 to ESXi 7 Update 1.

ESXi host successfully updated to ESXi 7 Update 1 using vSphere Update Manager
4. vSphere Lifecycle Manager
With the release of vSphere 7.0, VMware introduced a powerful new tool that is the preferred method of lifecycle management moving forward with vSphere. The new tool is called the vSphere Lifecycle Manager (vLCM). The vLCM tool is the new way to perform lifecycle management of your ESXi hosts in a cluster. The vLCM tool is image-based and can manage the vSphere-specific lifecycle and also firmware and other vendor-specific software from supported hardware solutions.
It takes offsets an enormous amount of effort from the vSphere administrator and makes this a simple part of the standard installation of vSphere updates on your hardware platform. It also helps to shorten the maintenance windows of lifecycle tasks. Hardware updates can be taken care of as part of the overall vSphere updates applied. The vSphere administrator no longer has to use vSphere to manage VMware patches and then use another lifecycle tool to manage firmware and other software. VMware vSAN administrators greatly benefit from this new functionality since it takes care of the storage controller and drives firmware as part of the updates.
There are a few differences about the vSphere Lifecycle Manager (vLCM) tool to note. It is a declarative approach to managing the “image” of your ESXi host. You can think of it as a desired state for your ESXi hosts. You build the image that you want to apply to a host, and the vLCM tool ensures the host matches the applied image. The vLCM tool also works at a cluster-level and not at the host level. You can’t use it for a standalone host, and the host must be a member of a vSphere cluster to take advantage of the new lifecycle management platform.
One of the other requirements for using vLCM to upgrade your ESXi host to ESXi 7 Update 1 is that the host must be running at least ESXi 7.0 GA. The vLCM tool can only manage that version level and higher.
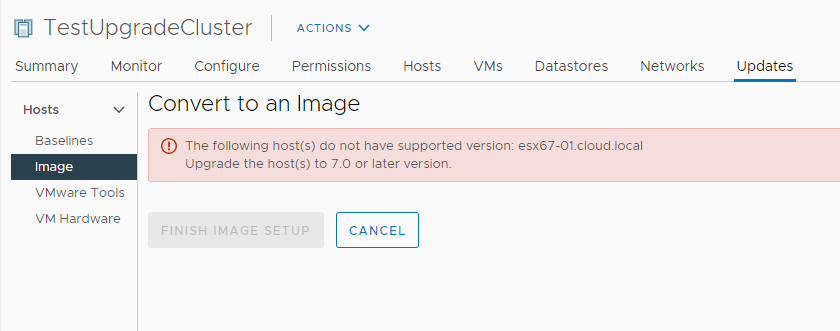
Error when attempting to use vLCM with ESXi 6.7
Another interesting requirement of the vSphere Lifecycle Manager is once you flag the cluster to use the Image-based update remediation as part of vSphere Lifecycle Manager, you cannot go back to using VUM for that specific cluster. It is a one-way operation.
To begin using vSphere Lifecycle Manager, you will notice a new option, Image under the Updates tab. Additionally, you will see Manage with a single image on the Baselines menu. These are only visible when you click the vSphere cluster. If you click the ESXi host in the cluster, these options are not available. Again, vLCM is a cluster-level feature. To begin using vSphere Lifeycle Manager, click the Manage with a single image button.
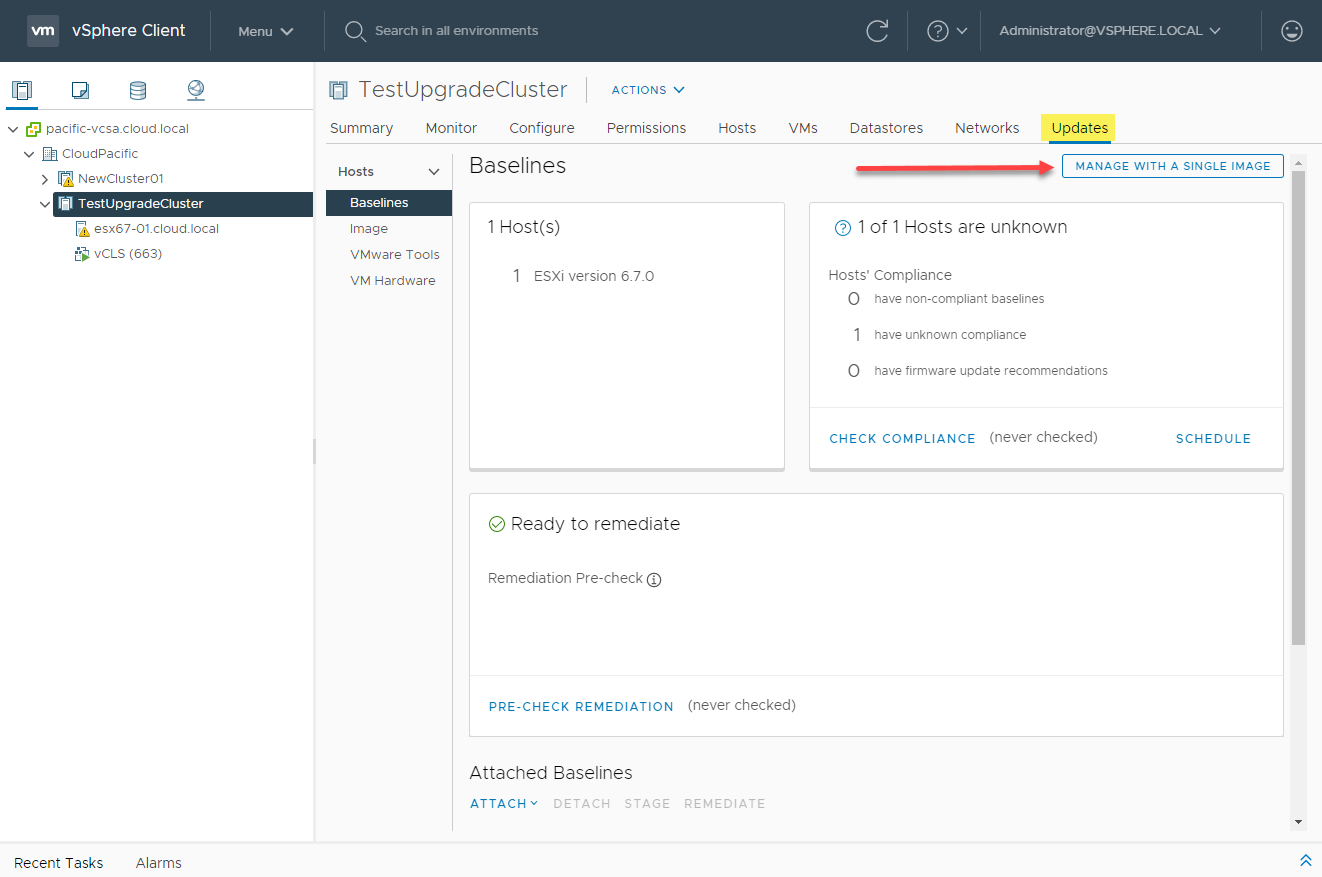
Begin using the vLCM mechanism to update your vSphere cluster
This will take you to the Manage with a single image wizard. Click the Setup Image button to begin.
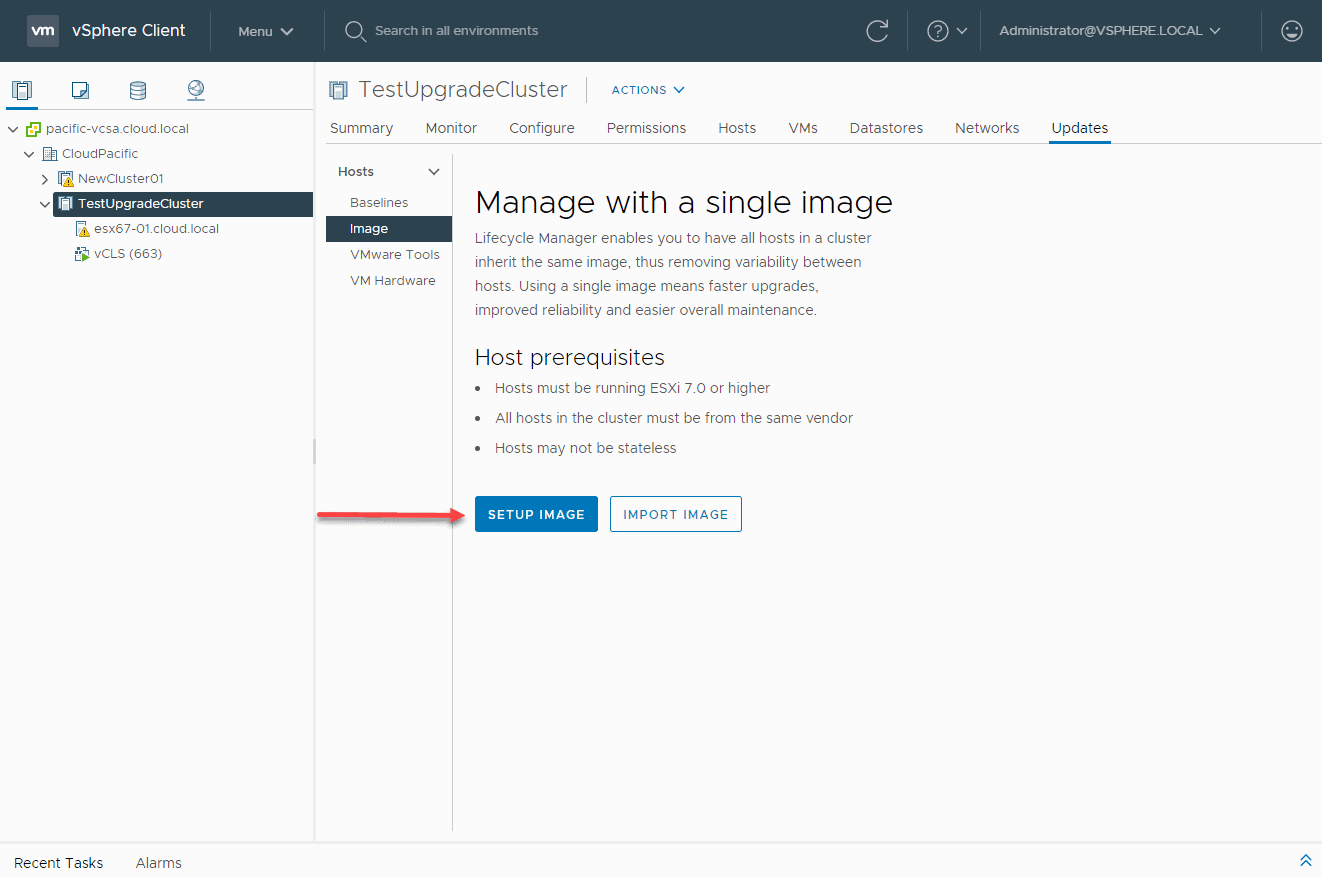
Setup the image to use with vLCM
The images are automatically pulled from the vSphere online repository using vLCM. These are listed as options in the dropdown when you begin the “Setup Image” process. Note the additional options:
- Vendor Addon
- Firmware and Drivers Addon
- Components
As mentioned earlier, the vSphere Lifecycle Manager allows adding additional vendor-provided solution updates to your ESXi host image. It allows applying all updates in a single operation as part of the image applied to your vSphere cluster. Chose your options and select Save.
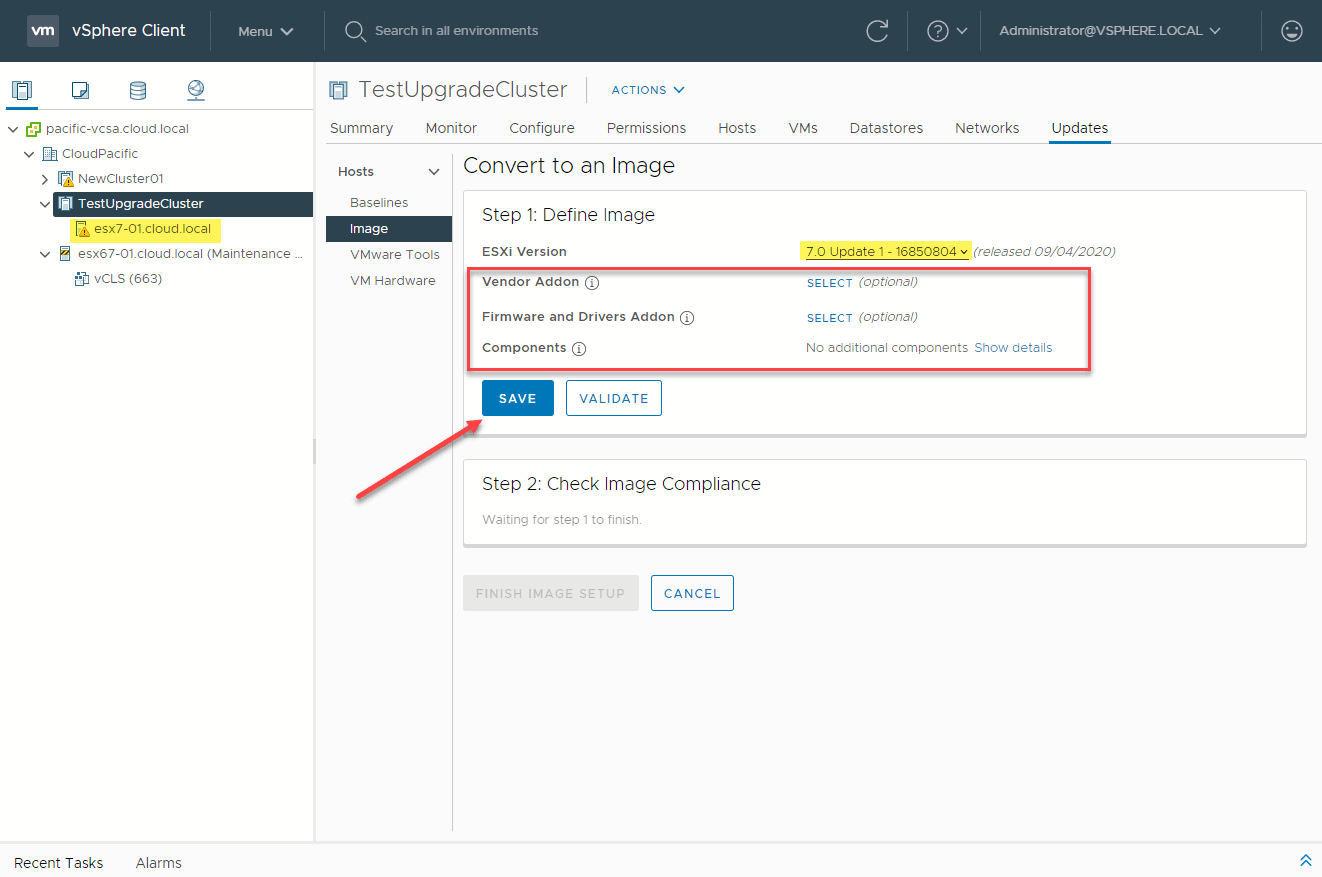
Save your vLCM image options
Choose Yes, finish image setup.
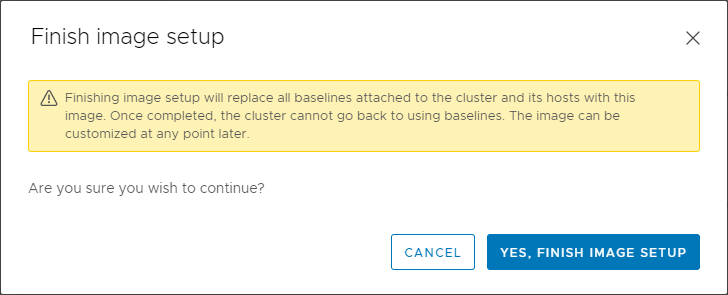
Finish the setup of the vLCM image
You can now choose to remediate the cluster using the newly created image. You can also check the compliance on your cluster to see drift from the image.
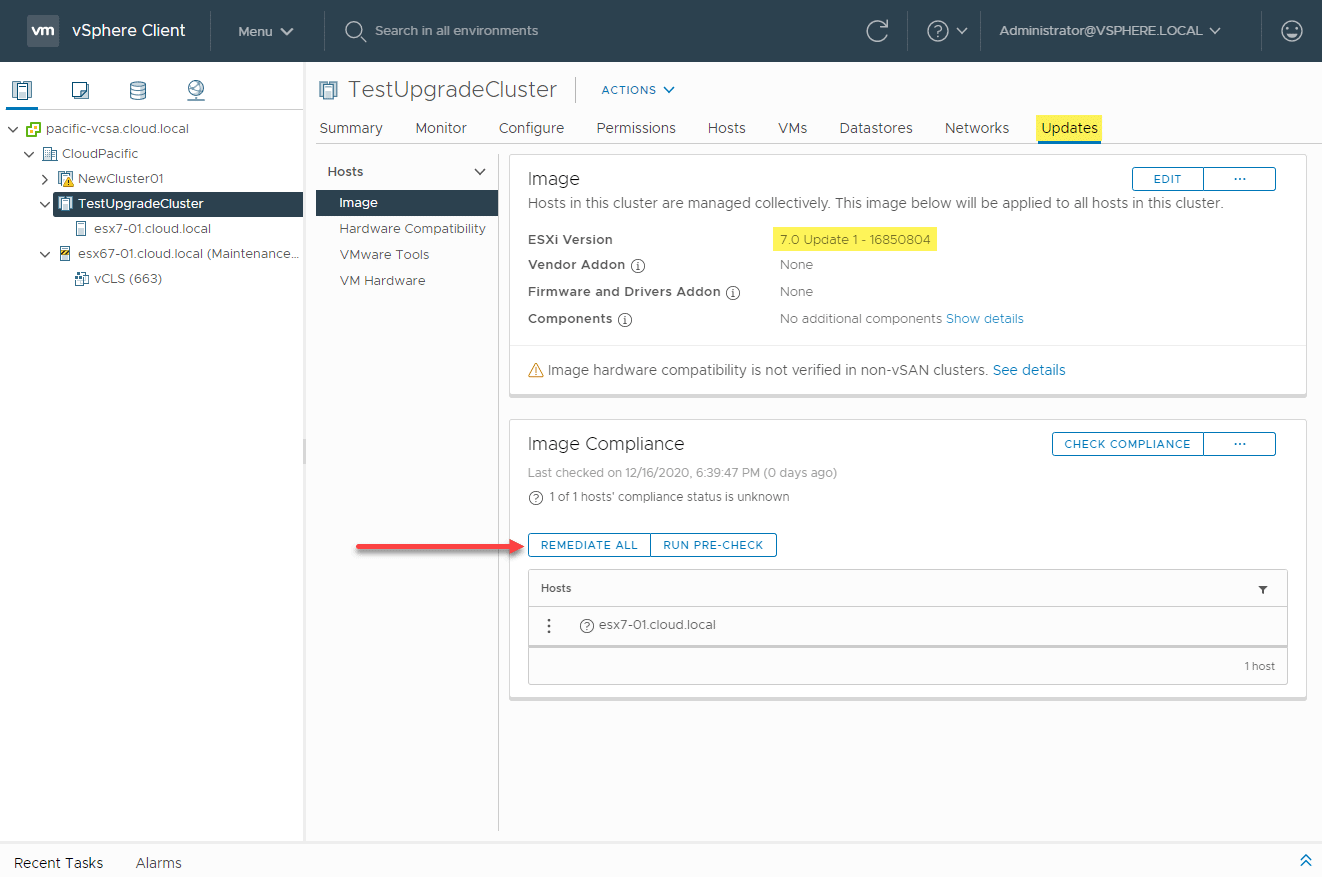
Remediating the vSphere cluster using vLCM
Choose to start the remediation.
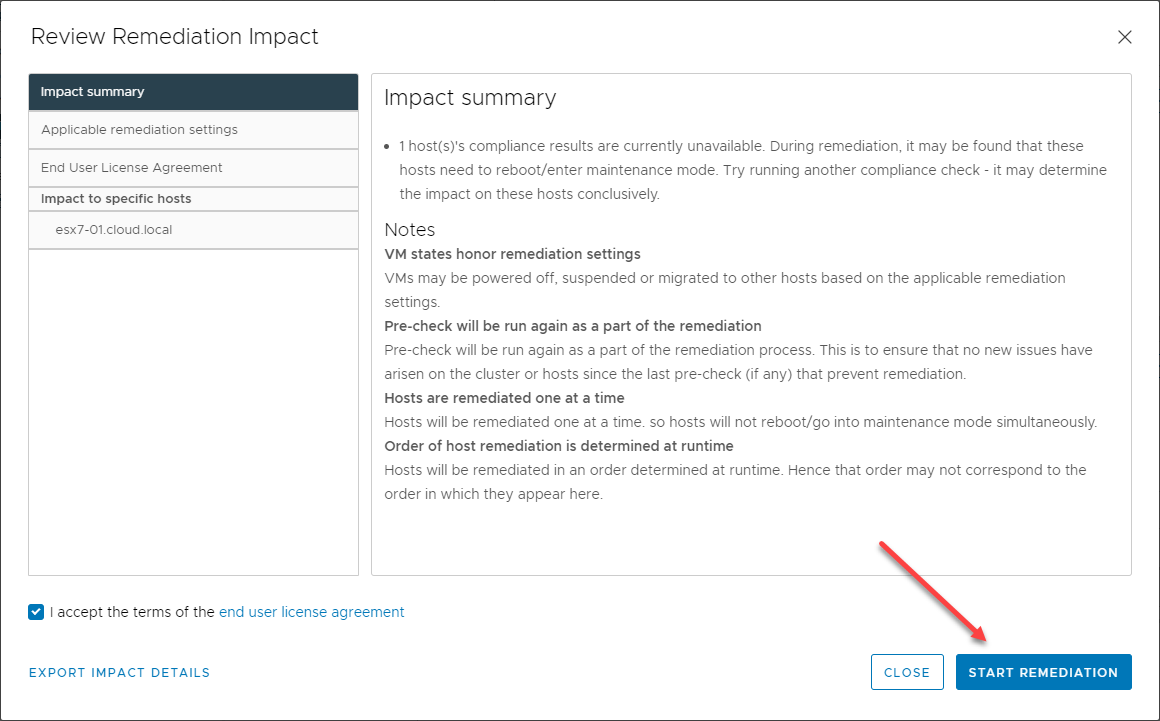
Starting a cluster remediation using vLCM
Each host in the cluster will be remediated in line with the image applied at the cluster level. After the reboot, the ESXi hosts will be updated to ESXi 7 Update 1.
Many options for Install and Upgrade
There are many options for both installing and upgrading to VMware vSphere ESXi 7 Update 1. VMware vSphere administrators can either perform a clean installation of ESXi 7 Update 1 or use one of the many ways to upgrade the ESXi hosts, whether standalone or in vSphere clusters. The tried and true upgrade methods using the command-line and vSphere Update Manager still work very well in vSphere 7 Update 1.
However, the new vSphere Lifecycle Manager that takes the place of VUM is a great new tool that provides powerful new lifecycle management capabilities to your vSphere environment. It provides the ability to roll in hardware solution updates provided by supported hardware vendors such as Dell and HP into the vSphere cluster image. This will help to shortcut the update process for vSphere administrators who can now combine maintenance windows for both vSphere updates and hardware solution updates.
This is a great new feature with VMware vSAN in mind as vSAN administrators can now perform updates on storage controllers and disk firmware along with vSphere and vSAN updates at a cluster-level. There are a few things to keep in mind about vLCM as it requires the ESXi hosts are at least running ESXi 7.0 and it is a one-way process to turn this on at a vSphere cluster level.


Not a DOJO Member yet?
Join thousands of other IT pros and receive a weekly roundup email with the latest content & updates!
More in this category


About the Author

Brandon Lee

