Save to My DOJO

The state of a virtual machine at any specific point in time can be preserved by taking what is known as a VMware snapshot.
The VMware snapshot feature is particularly useful in those scenarios where you want to quickly recover from a failure or simply revert back to the desired state. Restoring a VM to a functional state following a botched update or patch is one common use case. Similarly, you can use snapshots to reset a VM back to a baseline state once a user is done using it, perhaps as part of a training lab maintenance regimen.
The VMware snapshot feature is available on both standalone ESXi hosts and vCenter Server as well as VMware Workstation snapshot
Working with VMware snapshots and Snapshot Manager
You can work with VMware snapshots from any vSphere client or by making API calls from PowerCLI or similar. Different tasks such as reverting from snapshot, deleting VMware snapshot file, etc. follow the same click and select pattern. The common denominator here is Snapshot Manager using which, you’ll be able to:
-
- Take snapshots.
-
- Revert to the latest snapshot or any other snapshot.
-
- Delete a snapshot.
-
- Delete all snapshots.
-
- Edit a snapshot (Name and Description).
-
- Manage snapshots.
-
- Consolidate disks.
From vSphere client, it’s always a case of right-clicking on the VM name, selecting Snapshot(s) from the VM’s context or actions menu followed by the operation wanted. This is shown in Figure 1 as Option A. Alternatively, highlight the VM name, click on the Snapshots tab and select a task from the All Actions drop-down menu or by clicking on the respective task icon i.e. Option B.

Figure 1 – Two ways to carry out a snapshot related action on a VM
Note that each VM can have a maximum of 32 VMware snapshots. For best performance, it is VMware snapshot best practices that you stick to 2-3 snapshots per VM. When this limit is exceeded, the error shown in Fig.2 is returned.

Figure 2 – Error indicating that the maximum number of snapshots per VM limit has been exceeded
Another limit to be aware of is that of retention. The VMware snapshot best practices include to avoid using a snapshot for more than 72 hours since the files constituting the VMware snapshot keep growing and may impact system performance aside from the fact that you can run out of space on datastores that are relatively small in size.
How to take snapshots
____________________________________________________________________________
When you take a VMware snapshot of a VM, the following information is preserved.
-
- Virtual machine settings. The virtual machine directory, which includes the disks added or changed after you take the snapshot.
-
- Power state. The virtual machine can be powered on, powered off, or suspended.
-
- Disk state. State of all the virtual machine’s virtual disks.
-
- (Optional) Memory state. The contents of the virtual machine’s memory with.
Two optional settings determine the state a VM is restored in when reverting back from the VMware snapshot. Note that none of these options are available, or required for that matter when a snapshot is taken while the VM is powered off. The two options are:
-
- Snapshot the virtual machine’s memory: Enabled by default, this option flushes the memory content of a VM to disk as part of the snapshot. This allows a VM to revert back to the exact state it was running in when the snapshot was taken. If this option is deselected, and quiescing is not selected either, the VMware snapshot file is crash-consistent, meaning you’ll need to power up the VM manually after restoring it from a VMware snapshot. A memory snapshot will significantly take longer to complete. Additionally, a VM is “frozen” to ensure state integrity.
-
- Quiesce guest file system: This option requires that VMware Tools are installed and working properly. Doing a VMware snapshot quiesce is the preferred method to ensure a state suitable for backups. This includes operations such as flushing dirty buffers from the OS’s in-memory cache to disk or other higher-level application-specific tasks. Quiescing indicates pausing or altering the state of running processes on a computer, particularly those that might modify information stored on disk during a backup, to guarantee a consistent and usable backup. VMware snapshot quiesce is not necessary for memory snapshots; it is used primarily for backups.
Figure 3 captures a series of screenshots showing how VMware snapshots, of VMs residing on different environments, are taken using a particular vSphere or Host client.
-
- Example 1 – Taking a snapshot of a VM managed by vCenter Server 7.0 via the vSphere Web Client.
-
- Example 2 – Taking a snapshot of a VM hosted on an ESXi 7.0 standalone host via the ESXi host client.
-
- Example 3 – Taking a VMware workstation snapshot in VMware Workstation 16 (Note that you cannot create VMware player snapshot).

Figure 3 – You just created a snapshot of a virtual machine
The fourth and last example illustrates how PowerCLI is used to create VMware snapshots of a VM managed by vCSA 7.0. I’ve included two possible ways you can use to snapshot a VM. In the first example, I simply retrieve a VM using the Get-VM which I then go on to pipe into the New-Snapshot cmdlet. In the second example, I’ve used the New-Snapshot cmdlet on its own where you specify the VM you wish to snapshot via the -VM parameter. In both examples, the -Name parameters assigns a name to the snapshot taken.
Get-VM core-opnsense | New-Snapshot -Name “Test snap 1”
New-Snapshot -Name “Test snap 1” -VM core-opnsense

Figure 4 – Two ways to create snapshots with PowerCLI
How to exclude disks from a snapshot
There might be instances where you do not want particular VM disks to be affected by VMware snapshots. To achieve this, change a VM’s hard disk Disk Mode to Independent – Persistent or Independent – Nonpersistent from the VM’s settings. The two options differ slightly as per VMware’s explanation:
-
- Independent – Persistent: Disks in persistent mode behave like conventional disks on your physical computer. All data written to a disk in persistent mode are written permanently to the disk.
-
- Independent – Nonpersistent: Changes to disks in non-persistent mode are discarded when you power off or reset the virtual machine. With nonpersistent mode, you can restart the virtual machine with a virtual disk in the same state every time. Changes to the disk are written to and read from a redo log file that is deleted when you power off or reset.
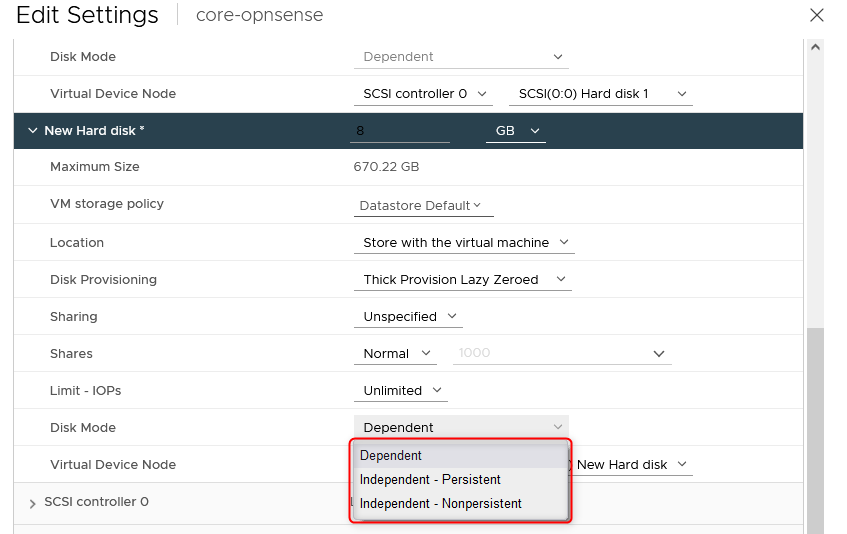
Figure 5 – Changing the disk mode of a VMDK to exclude it from being affected by a VMware snapshot
How to revert to a snapshot![]()
When you perform a VMware revert to snapshot, you either select the Revert to Latest Snapshot option. If a VM has multiple snapshots, just highlight the snapshot you want to revert to from the snapshot hierarchy displayed in Snapshot Manager and hit the Revert To icon as shown in Fig. 6.

Figure 6 – Selecting the snapshot to revert to in Snapshot Manager for a VMware revert to snapshot
The state a VM reverts to depends on the selected options at the time the snapshot was taken. If the memory option was selected, the VM remains powered on while it reverts back to a previous state. If the memory option was not included at the time the snapshot was taken, you will need to power up the VM manually after reverting back from snapshot regardless of the power state the VM was in when the snapshot was taken.
Whenever you do a VMware revert to snapshot VMware will warn you that the current state of the VM will be lost unless you take a snapshot as shown in Fig. 7.

Figure 7 – Loss of current state warning when reverting to a snapshot
If the memory option was selected when the snapshot was taken, you are then presented with the option to suspend the VM while it is being reverted. If you do select the option, you must then “unpause” the VM manually by powering it back up.

Figure 8 – Suspending the VM while reverting back from snapshot
The first snapshot VMware takes is referred to as the base parent snapshot. This is the most recently saved version of the current state of the virtual machine. The parent VMware snapshot is always the snapshot that appears immediately above the You are here icon in Snapshot Manager. If you restore from snapshot VMware, it then becomes the parent of the You are here current state. A VMware snapshot of a VM taken after the parent snapshot is called a child snapshot.

Figure 9 – VMware Snapshot hierarchy illustrating the relation between parent and child snapshots and the current state represented by You are here
How to delete snapshots
You can delete a single VMware snapshot or any existing snapshots all at one go. Deleting snapshots is an I/O expensive process and may affect performance. When a snapshot is deleted, the current state of a VM remains unchanged. However, all the changes accumulated to date are then copied from the delta disks and written to the base disk in a process called Consolidation. Following this, the consolidation process takes care to remove all the redundant files associated with the snapshot just deleted.
If the consolidation process fails, you can initiate the process manually from the Snapshots menu by selecting the Consolidate option. It’s important that consolidation is carried out successfully since the redundant delta disks (see next section) can adversely affect performance.

Figure 10 – Carrying out disk consolidation manually
For further details, refer to the How to consolidate snapshots in vSphere 5.x/6.x KB article.
Snapshots from a file perspective
VMware snapshot consists of a number of files you can view in the Datastore Browser after navigating to a VM’s folder for which snapshots have been taken.
A snapshot consists of the following files:
-
- Delta disk files: A .vmdk file to which the guest operating system can write. The delta disk represents the difference between the current state of the virtual disk and the state that existed at the time that the previous VMware snapshot was taken. When you take a snapshot, the state of the virtual disk is preserved, which prevents the guest operating system from writing to it, and a delta or child disk is created. A delta disk has two files, including a descriptor file that is small and contains information about the virtual disk and a corresponding file that contains the raw data. The files that make up the delta disk are referred to as child disks or redo logs.
-
- Flat file: A -flat.vmdk file that is one of two files that comprises the base disk. The flat disk contains the raw data for the base disk. This file does not appear as a separate file in the Datastore Browser but is listed separately when listing the directory contents while consoled to ESXi.

Figure 11 – Some files are only visible when consoled to ESXi
-
- Database file: A .vmsd file that contains the VM’s snapshot information and is the primary source of information for the Snapshot Manager. This file, which can be viewed in any text editor, contains line entries that define the relationships between VMware snapshots and the child disks for each snapshot.
-
- Memory file: A .vmsn file, includes the active state of a VM and captures the memory state of the VM to allow you to revert to a turned-on virtual machine state. If the snapshot memory option is deselected, you can only revert to a turned-off VM state.
You can refer to the post titled The Anatomy of a VMware Virtual Machine for further details.

Figure 12 – Mapping the VMware snapshot files displayed in Datastore Browser to the entries found in the database file
As mentioned, a VMware snapshot preserves the disk and/or VM state at a specific point in time by creating a series of delta disks for each attached virtual disk or virtual RDM. Optionally, the memory and power state are preserved by creating a memory file.
Each VMware snapshot creates an additional delta file. When you take a snapshot, the snapshot mechanism prevents the guest operating system from writing to the base .vmdk file and instead directs all writes to the delta disk file. The delta disk represents the difference between the current state of the virtual disk and the state that existed at the time that you took the previous snapshot. If more than one snapshot exists, delta disks can represent the difference between each snapshot. Delta disk files can expand quickly and become as large as the entire virtual disk if the guest operating system writes to every block of the virtual disk.
Further details can be found in the following links:
Snapshots limitations
There are a number of limitations you need to be aware of. A few, such as those related to how snapshots interact with vMotion, need to be properly addressed if you’re still using older versions of vSphere.
-
- Snapshots of VMs with raw disks, RDM physical mode disks, or guest operating systems using an iSCSI initiator in the guest are not supported.
-
- VMs with independent disks must be powered off before you take a snapshot.
-
- Snapshots of powered-on or suspended VMs with independent disks are not supported.
-
- Snapshots are not supported with PCI vSphere Direct Path I/O devices.
-
- Snapshots of VMs configured for bus sharing is not a VMware-supported option.
-
- Although snapshots provide a point-in-time image of the disk that backup solutions can use, these are not meant to be a robust method of backup and recovery. If the files containing a virtual machine are lost, their snapshot files are also lost. Also, large numbers of snapshots are difficult to manage, consume large amounts of disk space, and are not protected in the case of hardware failure.
-
- Snapshots can negatively affect the performance of a virtual machine. Performance degradation is based on how long the snapshot or snapshot tree is in place, the depth of the tree, and how much the virtual machine and its guest operating system have changed from the time you took the snapshot. Also, you might see a delay in the amount of time it takes the virtual machine to power on. Do not run production virtual machines from snapshots on a permanent basis.
-
- If a virtual machine has virtual hard disks larger than 2TBs, snapshot operations can take significantly longer to finish.
Legacy pre-vSphere 6.0 environments had caveats with regards to Migrating virtual machines with snapshots. A common issue was one where you’d put a host in maintenance mode and wait for the VMs to migrate off of it automatically, only to find the process stuck because one or more VMs had VMware snapshots. However, you should absolutely no longer be running vSphere 5.x which has been obsolete for a long time now.
Troubleshooting
Here are a few KB articles that cover some most common issues you’ll likely to cross paths with when working with VMware snapshots.
To properly protect your VMware environment, use Altaro VM Backup to securely backup and replicate your virtual machines. We work hard perpetually to give our customers confidence in their VMware backup strategy.
To keep up to date with the latest VMware best practices, become a member of the VMware DOJO now (it’s free).
Conclusion![]()
VMware snapshots can save the day if used properly but are definitely no substitute for proper backups, which is a common misconception among folks who are new in the infrastructure space. You should also make it a point to follow VMware snapshot best practices together with VMware’s recommendations when using snapshots in your environment.


Not a DOJO Member yet?
Join thousands of other IT pros and receive a weekly roundup email with the latest content & updates!
Frequently Asked Questions
Does VMware clone include snapshots?
How do I move a snapshot in VMware?
Are VMware snapshots safe?
Do VMware snapshot causing performance issues?
What are the snapshot files in VMware?
More in this category


About the Author
Jason Fenech


32 thoughts on "Learn how and when to use vSphere Snapshots"
Great article.
I found that creating a snapshot with memory (online) does let you use the VM in the same time. My question is, can the snapshot be affected by what I’m doing? I didn’t thought so, but then I found some inconsistent snapshots and their state is hard to explain.
In other words, Is the snapshot going to be exactly as the vm state was when I pushed the button, or when it finished the snapshoting task?
Thanks for the comment first of all. If you choose to snapshot memory, the VM becomes unresponsive until the RAM contents are written to disk. This is normal behavior as per this KB. So, if you restore from a snapshot that included memory, the VM remains powered up and reverts back to the exact state it was in when the snapshot was taken.
As for consistency issues, make sure you’re running vmtools on the VM and that you select the quiescing option if supported.
“Quiescing indicates pausing or altering the state of running processes on a computer, particularly those that might modify information stored on disk during a backup, to guarantee a consistent and usable backup. Quiescing is not necessary for memory snapshots; it is used primarily for backups.”
Hope this helps.
Jason
Hi, I have a question please, if i created one snapshot (VM was powered on- current memory status was option was selected), No other snapshots. Now I did my changes on the VM but I am not happy with it and I want to revert back to my original status of VM without any snapshot. What I have to do here? In snapshot manager, i have two options only delete and delete all, per to my understanding that both options will commit the changes to the base disk which i don’t want it. Environment is vSphere 5.5. Thanks for your guidance here.
Hi,
Using the vSphere Web Client, right-click on the VM and select Manage Snapshots. Have a look a this link. Select the first snapshot taken and click on Revert To from the All Actions menu. This will revert back the VM to the exact state it was in when the snapshot was taken. You can then delete any snapshots if you no longer need them.
Hope this helps.
regards
Jason
Very good article.
A question for you; why is that some of my VM snapshots are very small in size (as indicated by looking at Snapshots/Manage Snapshots/Disk Usage) and others are equal to the size of the VM? We do not snapshot the VM’s memory.
Thanks for your time.
Hi Dave,
Thanks for your comment. It depends on when the snapshot was taken. If it’s been there for a while, it can potentially reach the same size of the VMDK itself. Here’s a good KB on the subject matter -> https://kb.vmware.com/s/article/1015180
regards
Jason
This blog is very useful. thanks for sharing such information.
Thank you for your feedback!
Hi Jason,
Thank you very much for all the information!
To add, you can change the location of the default snapshots:
Great Article Jason !! Thank You 🙂
Awesome and very informative article Jason. Thanks.
I have a question, can I restart a VM during the consolidation process?
Hi Jonathan,
While the consolidation process is running the VM cannot be powered on or off. It needs to stay in the same state.