Save to My DOJO

Task automation has always been an important discussion topic in IT departments as it offers faster-than-humans’ delivery, ensures consistency, saves us time and reduces the risk of error. vRealize Orchestrator is one of the many workflow engine platforms out there. Contrary to what many people think, vRealize Orchestrator is not limited to VMware integration as it can automate almost anything.
Check out our blog for more infrastructure automation topics.
What is vRealize Orchestrator
vRealize Orchestrator is an automation platform that comes in the form of a virtual appliance. You can automate various infrastructure tasks using workflows that can be combined in a number of ways. While it is perfectly integrated with VMware vSphere and offers extensive content for it, you can automate almost any IT process through partner provided workflows for tasks outside of the VMware world such as Active Directory, SQL Server, REST…
Now you may wonder what is the difference between vRealize Orchestrator and vRealize Automation?
-
- vRealize Orchestrator: vRO is a workflow engine that offers runbook automation with the ability to automate almost any IT task and not only VMware centric ones as some might think.
-
- vRealize Automation: On the other hand, vRA is an IT service delivery platform with governance and control features. vRealize Automation actually contains an embedded version of vRealize Orchestrator for workflow execution.

“vRealize Orchestrator can be used as a standalone but it is embedded within vRealize Automation”
vRealize Orchestrator 8
What’s new
You may have come across our older blog on vRealize Orchestrator 7.3 which is the previous major version of the product. As of the time of this writing, we are currently on vRealize 8.4.2 which brought many changes and improvements.

“vRealize Orchestrator”
Among other new features and fixes you will find the following:
-
- New Kubernetes based virtual appliance architecture. The components actually run in containers.
-
- Devops friendly approach with Git integration (vRealize Automation license required).
-
- Web Orchestrator client only, the java-based client is no longer available.
-
- Support for PowerShell, Node.js, Python (vRealize Automation license required).
-
- New viewer role with read-only permissions in the Orchestrator Client (vRealize Automation license required).
-
- Enhanced search and filtering capabilities.
Plug-ins
The following plugins are embedded in the vRealize Orchestrator appliance.
-
- vCenter Server Plug-In 6.5.0
-
- Mail Plug-In 7.0.1
-
- SQL Plug-In 1.1.4
-
- SSH Plug-In 7.1.1
-
- SOAP Plug-In 2.0.0
-
- HTTP-REST Plug-In 2.3.4
-
- Plug-In for Microsoft Active Directory 3.0.9
-
- AMQP Plug-In 1.0.4
-
- SNMP Plug-In 1.0.3
-
- PowerShell Plug-In 1.0.13
-
- Multi-Node Plug-In 8.0.0
-
- Dynamic Types 1.3.3
-
- vCloud Suite API (vAPI) Plug-In 7.5.0
As you can tell you can already automate a fair bunch of things with these. However, if it is not enough for you and you need additional product integration, you can refer to the VMware Marketplace in which you will find a whole lot of VMware and third-party provided plugins to extend vRealize Orchestrator’s capabilities.
“Plug-in extend the automation capabilities of vRealize Orchestrator”
Migration from vRealize Orchestrator 7
Note that upgrading from vRealize Orchestrator 7.x to vRealize Orchestrator 8.x is not supported, instead it has to be a migration. You can perform such migration if a number of conditions are met:
-
- Running standalone vRealize Orchestrator 7.3 or above.
-
- Standalone version (not vRA embedded).
-
- Source deployment running in non-clustered mode.
-
- Using vSphere authentication.
Step 0 – Check compatibility and requirements
Before starting any project, it is always a good idea to ensure that all the components that will be interacting with each other are cross-compatible to avoid unpleasant surprises and fruitless troubleshooting sessions.
You can start by checking the VMware interoperability matrix to ensure that the latest version of vRealize Orchestrator is compatible with your version of vSphere, vCenter, vRA or whatever product you are running. In my case, I am running the latest versions which will, unsurprisingly, happily work together.

“Check the VMware interoperability matrix to ensure product compatibility”
Step 1 – Deployment of the appliance
The deployment of the vRealize Orchestrator appliance is straightforward. If the deployment fails against the vCenter server, you can deploy it using the VMware OVF Tool or by connecting directly to the vSphere client of an ESXi host. We will demonstrate the latter as it is the easiest.
Note that even though you are connected to a vSphere host, the VM will be automatically registered in the vCenter inventory.
-
- First things first, we need to download the appliance itself from my.vmware.com. Select the latest version, 8.4.2 in my case, and download the OVA. Make sure you grab the virtual appliance, not the update repository.

-
- Then, open the vSphere client on one of your ESXi hosts and click on Create/Register VM.

-
- Click Deploy a VM […] and Next.

-
- Choose a name for the VM and browse to the OVA file you downloaded.

-
- Select a datastore with enough space. The requirements state 200GB but you can get away with 40GB to start with if you use thin disk.

-
- Accept the EULA that you’ll have read, obviously.

-
- Select a portgroup on your management network that has access to vCenter server at the very least. Choose Thin or Thick according to your storage policies and leave Power on automatically checked.

-
- In the last pane you need to configure the appliance according to your organization’s network.
Make sure you put the FQDN in the hostname sections as this is what you will use to connect to the server.
Leave the Kubernetes sections as is.
I suggest you double-check everything for typos if you don’t want to re-deploy the appliance.

-
- Finally, review the settings and hit Finish to start the deployment.

-
- Note that by default the root password will expire in 365 days. If you want to set it to never expire, connect to the appliance via SSH using root with the password you configured and run the following command.
| Passwd -x 99999 root |
![]()
“Set the root password to never expire in SSH”
Step 2 – Initial configuration in the Control Center
Now that the appliance is deployed, we need to perform the initial configuration of it in the control center. Note that it will take a few minutes before the web interface is available so go make yourself a coffee and press F5.
The Control Center is comparable to the VAMI on vCenter Appliances. It is where you configure the appliance itself such as authentication, clustering, certificates…
-
- Browse to this URL and make sure you use the same name (FQDN recommended) you used in the hostname section during the vApp deployment. The URL still shows vco as the product used to be called “vCenter Orchestrator” in early versions. Then click on START THE CONTROL CENTER.

-
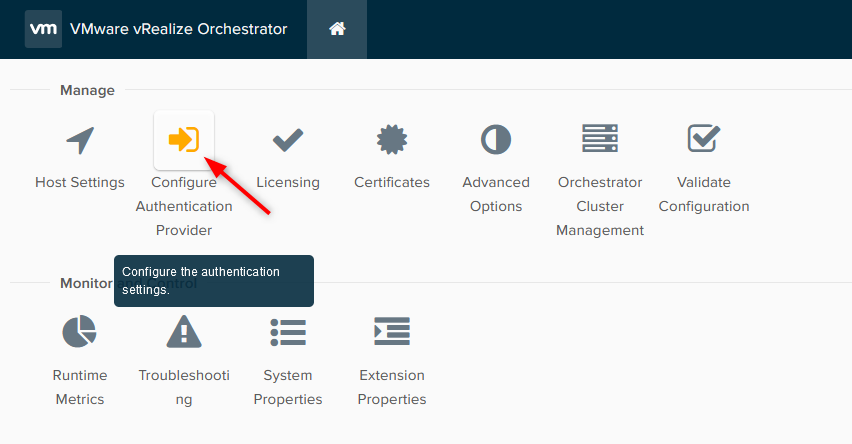
- Click on Configure Authentication Provider. This is where we will connect our vCenter to use vCenter Single Sign-On authentication.
-
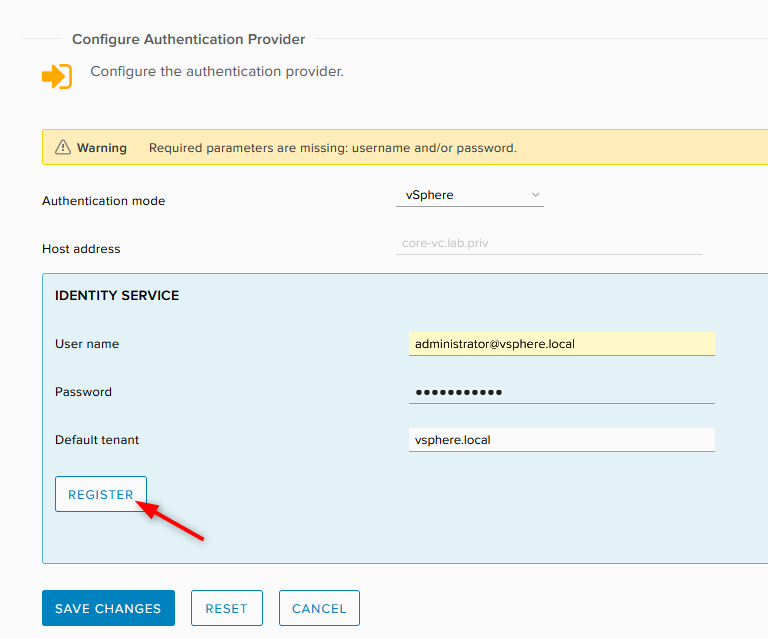
- Select vSphere as the Authentication Mode, type your vCenter server’s FQDN in the Host Address section and click Connect.

-
- Accept the certificate thumbprint if the vCenter server’s certificate’s root CA is not trusted by the vRO appliance and save the change.

-
- You are then asked to type your credentials to connect to vCenter.
-
- Finally, you have to set a user group that will have administrator permissions on vRealize Orchestrator. In this case I set it to an AD group named “vRO Administrators” but you can use the SSO domain if you prefer.

-
- Once you finish the Authentication provider wizard, the server will restart automatically after 2 minutes. Go have yourself another coffee and log back in the UI. Go back to the Control Center and click on Validate Configuration.

-
- Make sure that everything is green. If some are still red, wait a couple of minutes and hit refresh.
Every time you make a change to the configuration, you need to come back here to check that it has been applied correctly. It usually takes a few minutes or so.

At this point we are done with the control center. We don’t need to touch any of the other settings to get started with it.
Step 3 – Add a vCenter instance in the Orchestrator Client
Now that the initial configuration of the appliance is done, we can start looking at the vRealize Orchestrator client. This is where everything interesting happens. If the control center is comparable to the VAMI in vCenter, the Orchestrator Client is the equivalent of the vSphere Client.
-
- To get access to the Orchestrator client, head back to the same URL as before and click START THE ORCHESTRATOR CLIENT.
https://<fqdn-vro>/vco

-
- Type the credentials of a user that is a member of the vRO Admin group. You need to use the “user@domain” syntax and not “domain\user” which does not seem to work.

“Use the ‘user@domain’ syntax in order for the logon to work”
-
-
- If the vRealize Orchestrator Client is empty like in the screenshot below, it means you connected using a user that isn’t a member of the Admin Group.
-

“Interface displayed to a user that is not a member of the admin group”
-
-
- Below is what the vRealize Orchestrator Client should look like. The left-hand navigation pane gives you access to the workflow library, the tasks in the activity pane, all your plugins as well as several administration opportunities.
-

“Typical interface displayed to a vRO admin user”
-
- Under Library > Workflows, type add a vcenter and it should narrow down the result to the Add a vCenter Server instance workflow. Click Run.

-
- In the Set the vCenter Server instance properties tab, type in the FQDN of the vCenter server to connect in the first field. You can then check to ignore the certificate warning and click the Set the connection properties tab. Don’t hit RUN yet.

-
- Type in the credentials of the user that will connect to vCenter to run the workflows with the domain it uses (AD, vSphere SSO…) and click RUN. I used the administrator account in this screenshot.

-
- The workflow engine will display a diagram of the workflow’s execution. There is a bit of red in there due to response times but it shows Completed in green in the top left corner.

-
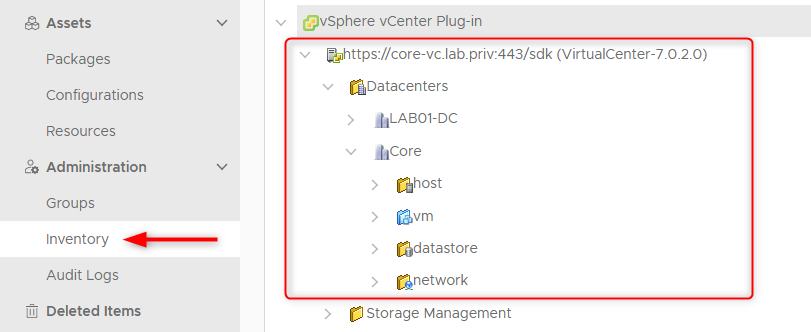
- You can verify that the connection completed successfully by browsing to Administration > Inventory and expand the vCenter Plug-in view. It should show your vCenter instance along with the inventory objects managed by it.
Step 4 – Execute Workflows
Now that vRealize Orchestrator is connected to vCenter server, you can start executing embedded workflows.
In the following example, I will use the simple use case of taking a VM snapshot.
-
- Type a string that is relevant to your action in the search field. In my case it is “snapshot”.
As you can tell there is a bunch of workflows available for snapshot tasks. The first “Create a snapshot” workflow is the one I am after.

-
- The next step will depend on the workflow you choose. This one is as simple as it gets but your custom workflows can be as complicated as you want them to be. The field is configured to accept VM objects, click on it to open the wizard.

-
- Expand the tree view and check the virtual machine(s) you want to snapshot and click Select.

-
- Fill in the mandatory field(s) at least and hit Run.

-
- Wait for the task to complete. It should show up green at the top.
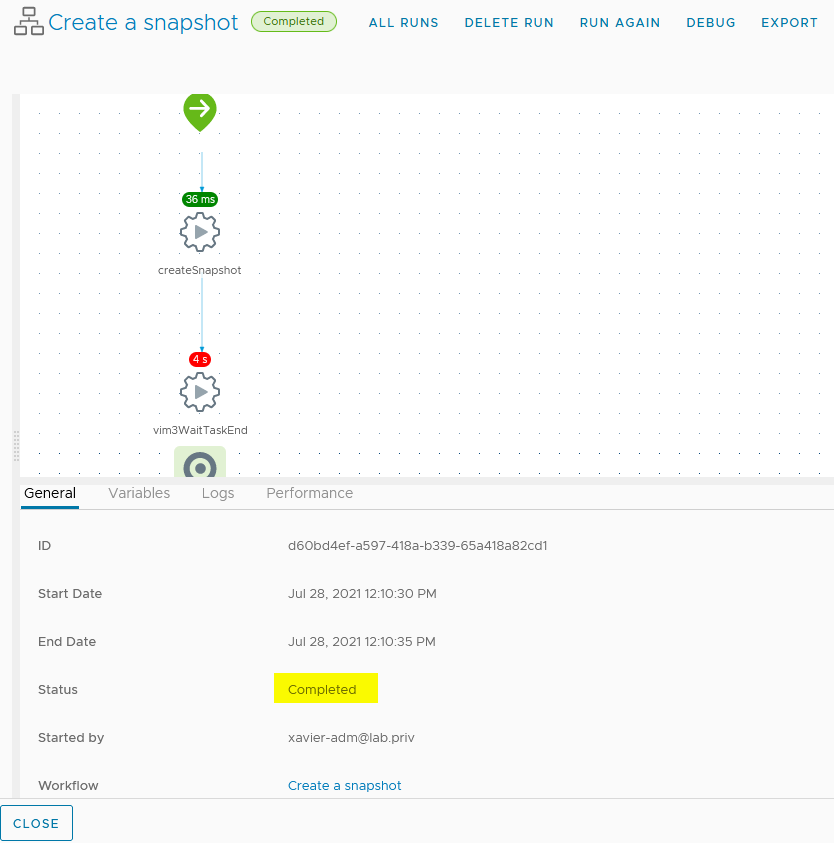
-
- You will find the same task in the vSphere client that ran under the user you were logged in as.

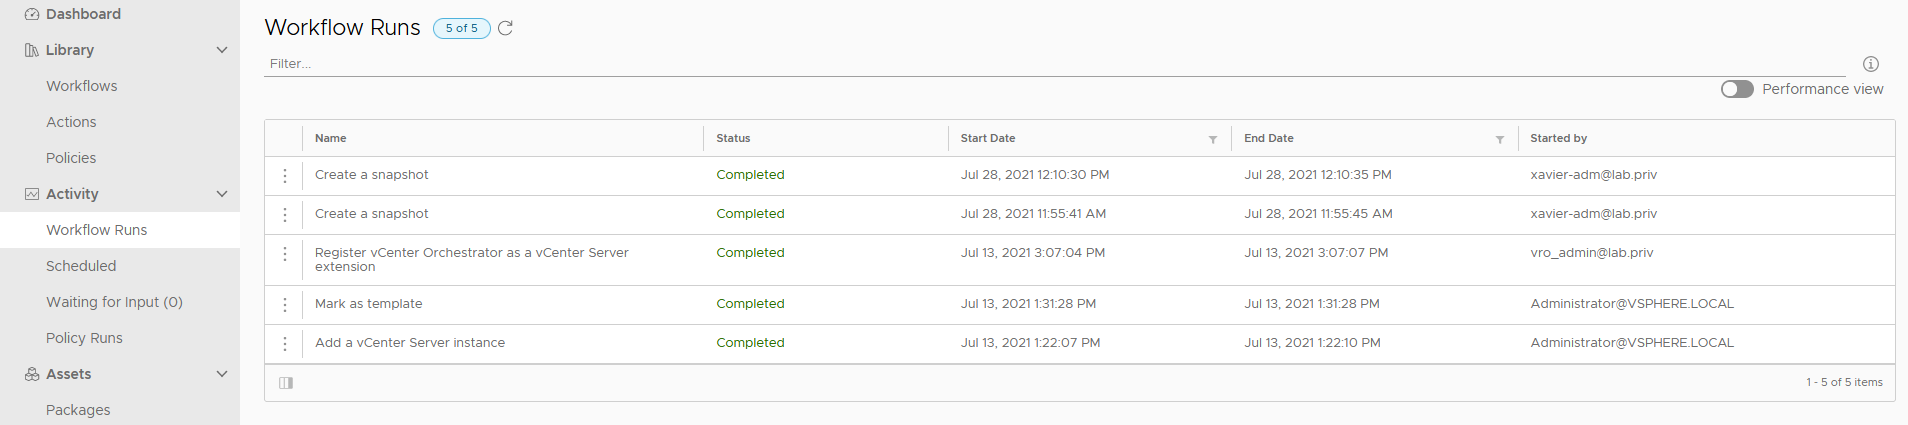
Note that you can find the history of the workflows that were run in the vRealize Orchestrator Client under Activity > Workflow Runs.
Note on vCenter plug-in integration
In older versions of Orchestrator, you could integrate it in the vSphere Client as a plug-in but this feature is not supported yet with the HTML5-based GUI. Although the “Register vCenter Orchestrator as a vCenter Server extension” workflow is here and you can run it, it won’t bring vRealize Orchestrator to your vSphere web client.
If you feel you really need it, work has been done on a Beta version which is obviously not supported yet so we won’t describe it here.
Wrap up
In these days of modern apps, cloud and automation, it is becoming increasingly relevant to invest in a workflow engine platform to start automating more infrastructure task and get closer to an Infrastructure as a Service (IaaS) approach in SDDC management.
While vRealize Automation has an incredible amount of features and possibilities, vRealize Orchestrator offers a nice compromise with an easy-to-use Orchestrator Client and compatibility for a wide array of solutions at no cost.


Not a DOJO Member yet?
Join thousands of other IT pros and receive a weekly roundup email with the latest content & updates!
Frequently Asked Questions
What is vRealize orchestrator?
What is VMware orchestrator used for?
What is vRA and vRO?
What is the difference between vRealize automation and vRealize orchestrator?
More in this category


About the Author
Xavier Avrillier

