Save to My DOJO
Let’s cut to the chase and look at what vRealize Orchestrator, vRO for short, can do for you. Here’s the product definition straight from the horse’s mouth;
VMware vRealize Orchestrator is a development- and process-automation platform that provides a library of extensible workflows to allow you to create and run automated, configurable processes to manage VMware products as well as other third-party technologies. vRealize Orchestrator automates management and operational tasks of both VMware and third-party.
Today’s post will show you how to install and configure vRealize Orchestrator 7.3 so you can manage or, to use the proper term, orchestrate vCenter Server.
All the information you need on vRO 7.3, the latest version at the time of writing, can be found on the VMware OR portal.
Before installing vRO
Before you go ahead and install vRealize Orchestrator, make sure that the version being installed is compatible with the version of vCenter Server you’ll eventually want to orchestrate. Again, by orchestrate, I mean the process of managing a vCenter Server instance using vRO. To ensure compatibility, use the VMware Product Interoperability. This will give you an overview of what works with what.
While doing the research for this post, I installed vRO 6.0.4 with the idea of orchestrating a vCenter Server 6.5 instance. I did not bother checking compatibility and such so even though the install kind of worked, I kept running into a number of SSO authentication issues. In the end, I gave up and decided to start afresh with a vCSA 6.5 instance orchestrated via vRO 7.3. So, with that in mind, do yourself a favor and always run a compatibility check prior to an install or upgrade.
The next screenshot, for one, shows that vRO 7.2 and 7.3 can happily co-exist with vCenter Server 6.5. Earlier versions, however, are not supported!
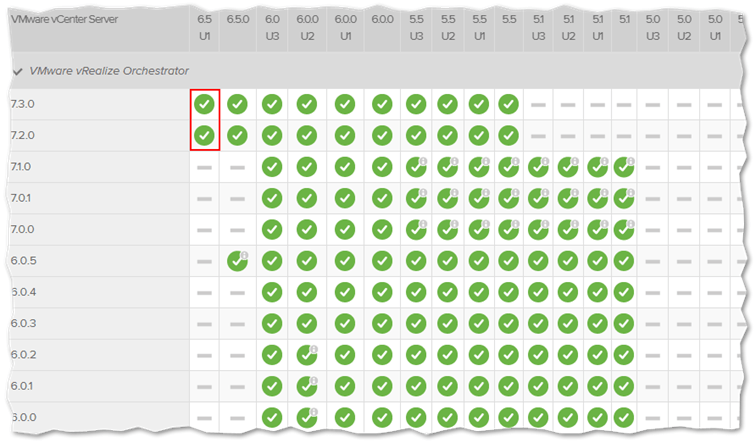
Using the VMware interoperability tool to determine product compatibility
Orchestrator is distributed as an appliance. This means there’s little you need to do other than ensuring that the following hardware resources are available; 2vCPUs, 6GB of RAM and at least 17GB of disk space. On the network side of things, make sure that the ports listed here are not being blocked by a firewall or otherwise.
Regarding licensing, you’re free to use vRO as long as you have a valid vCenter Server license.
How to install vRealize Orchestrator 7.3
Installing vRO is easy. Configuring it, not so much. To begin with, I could not find a free or evaluation version of vRO 7.3, so you must have a valid entitlement account to be able to download it. If you do have a valid account, navigate to the vSphere Suite branch under product downloads and expand it. You’ll find vRealize Orchestrator listed under any non-Essentials edition of the vSphere suite as shown next.
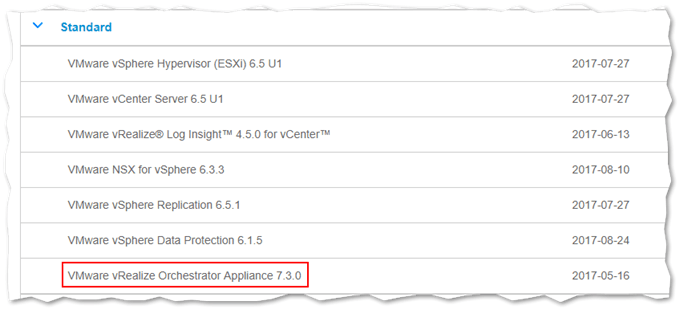
Downloading the vRO appliance from the my.vmware site
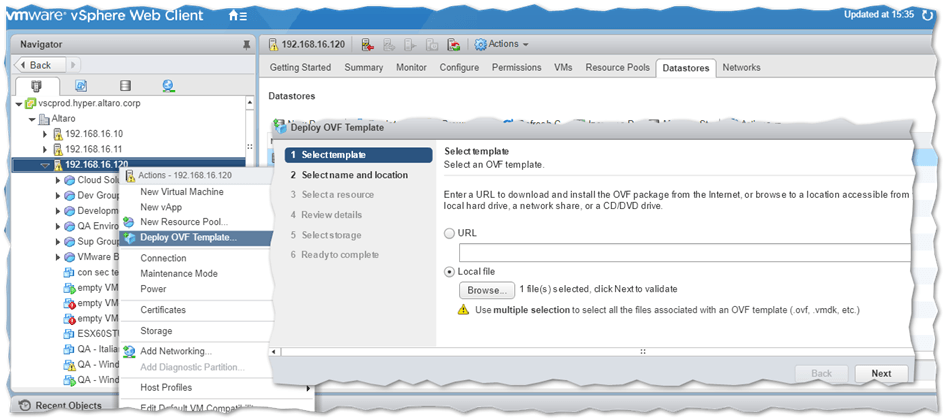
Once you download the appliance, use the vSphere Web or HTML5 client to deploy it. The OVA used for this post is the following; VMware-vRO-Appliance-7.3.0.21553-5521409_OVF10.ova. The deployment steps are as follows:
Note: You do not necessarily have to install vRO on the vCenter Server you want to orchestrate.
Step 1 – Using the Deploy OVF Template option, locate the downloaded OVA file using the Browse button and click Next.
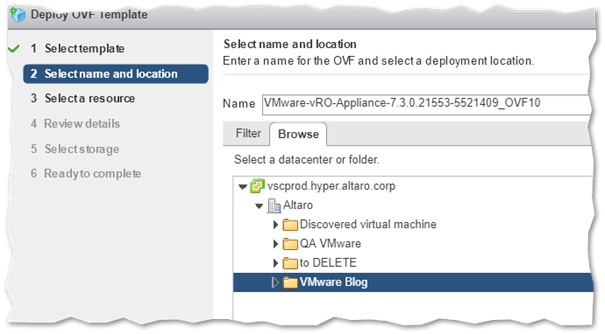
Step 2 – Specify a location where you want the appliance installed. In my case, I selected the VM folder under which all my testing stuff exists. Press Next.
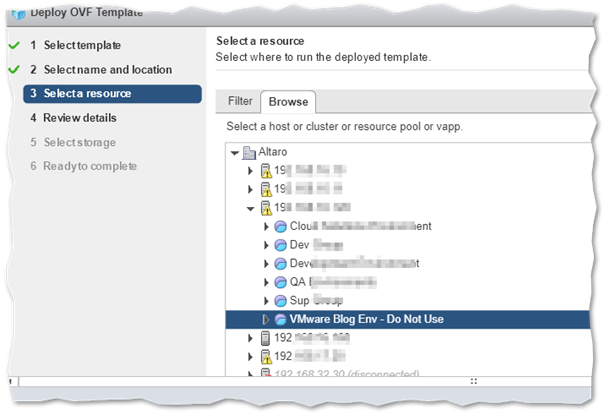
Step 3 – Specify the host and resource pool to which the appliance will be deployed. Press Next.
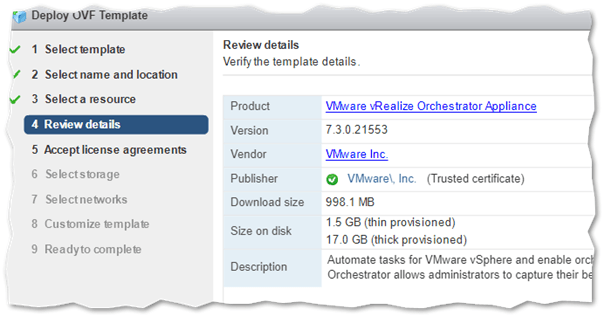
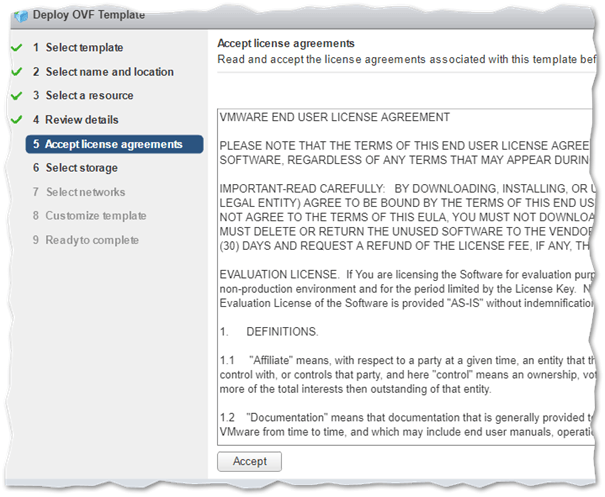
Steps 4 & 5 – Review the provisioning settings and accept the license agreement. Press Next in both cases.
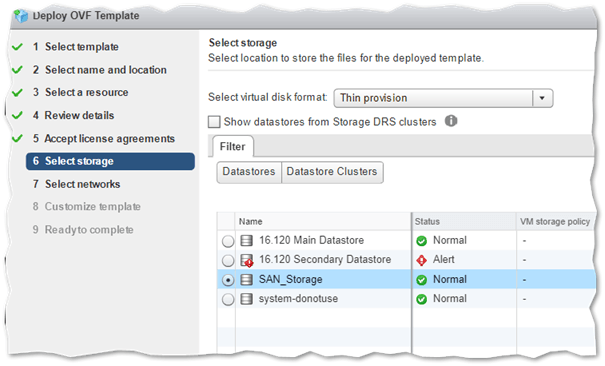
Step 6 – Select the virtual disk format (thin or thick) and the datastore where the appliance is created. Press Next.
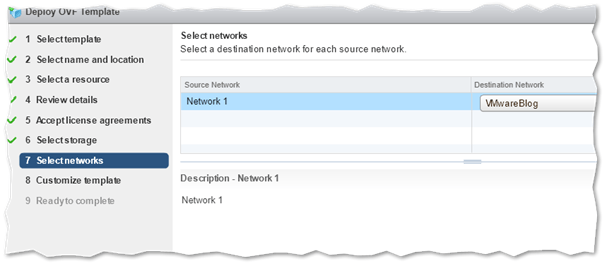
Step 7 – Select the network you want the appliance connected to. Press Next.
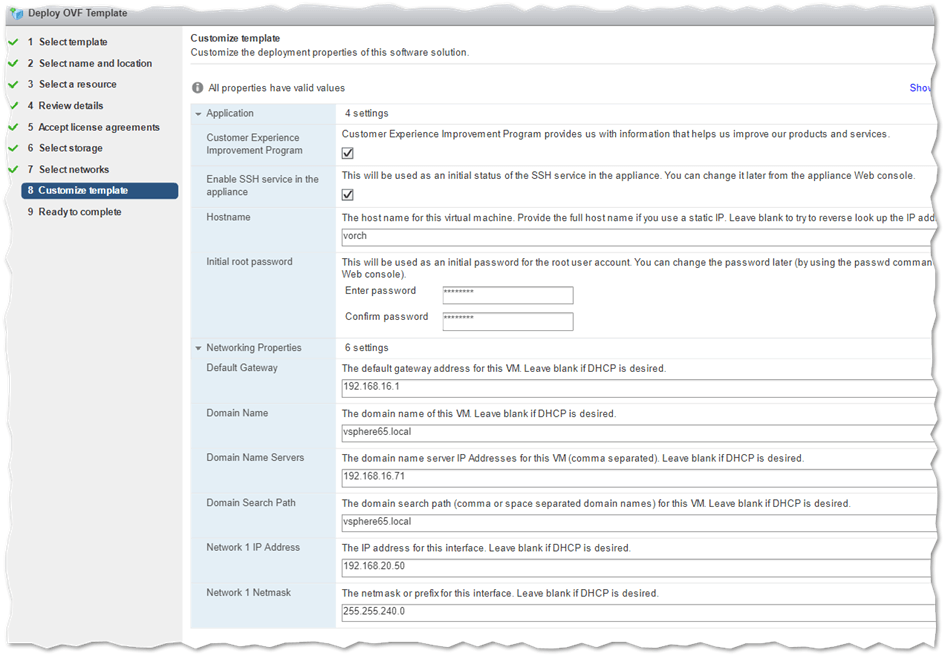
Step 8 – This is where the bulk of the settings are specified. Type in the hostname you want to be assigned to the appliance making sure you have a corresponding DNS A record created for it. It’s best to use static IP addressing meaning you’ll need to set the appliance’s IP address, gateway address, DNS server, and subnet mask. Finally, type in a password for the root account and the domain name; this must match the name of the DNS zone under which you created the A record. Press Next.
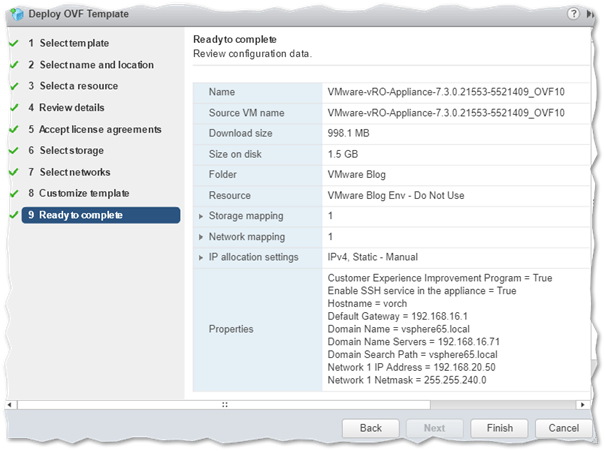
Step 9 – Review the settings one last time and press Finish to kick the OVA deployment process.
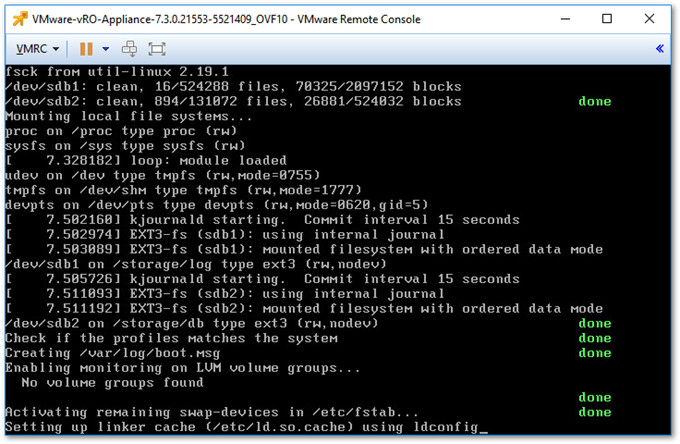
Step 10 – Once the appliance has finished deploying, proceed to power it up as you would with any other
Configuring vRealize Orchestrator 7.3
Configuring vRO is a multi-faceted affair. As you can see from the appliance’s console screenshot, there are a number of links to various components of vRO these being Orchestrator Control Center, Orchestrator Server, and Appliance Configuration.
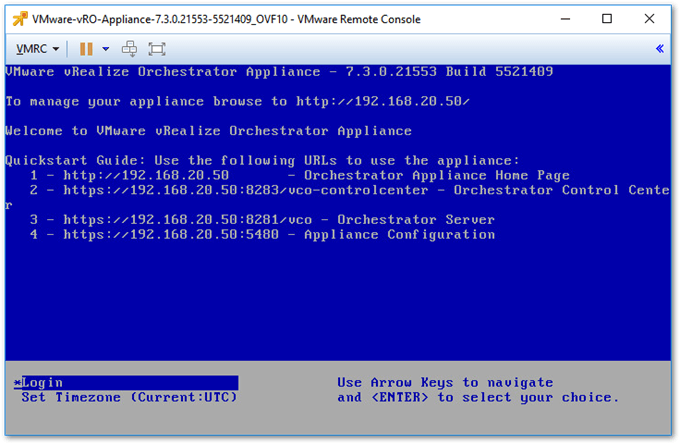
Orchestrator Control Center
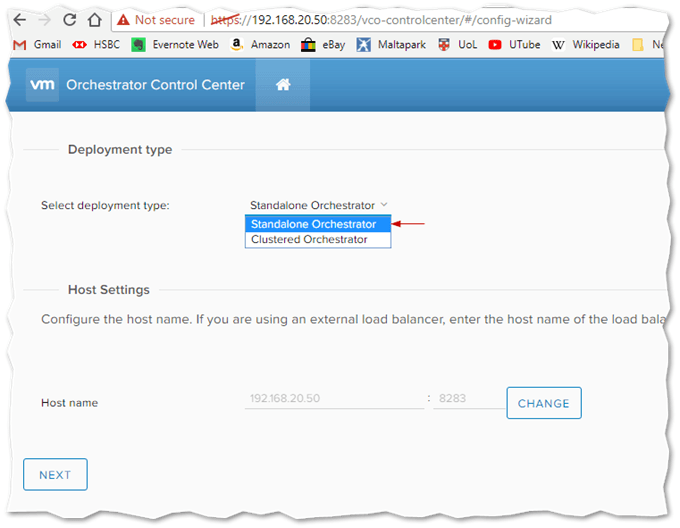
To begin with, decide if you want to deploy a standalone or clustered setup of Orchestrator. For simplicity’s sake, let’s go for a standalone setup. In addition, decide on whether you want to use vRO authentication or vSphere SSO. I’ve chosen the latter since SSO is better suited to managing user accounts and permissions. We’ll use Control Center to do this is as follows:
Step 1 – Navigate to https://your_orchestrator_server_IP_or_DNS_name:8283/vco-controlcenter. Log in as root.
Step 2 – Using the deployment type drop-down box, select Standalone Orchestrator. Make sure that the hostname and port number are correct. Press Next.
Step 3 – Select vSphere from the Configure the authentication provider drop-down box. Type in the FQDN of the vCenter Server you want to orchestrate and press Connect.

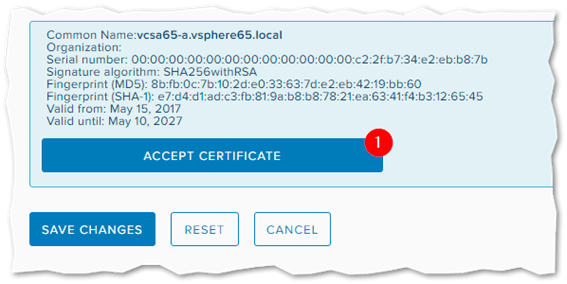
Step 4 – Press Accept Certificate to accept the SSL certificate retrieved from vCenter. Make sure that the common name matches the FQDN specified for vCenter.
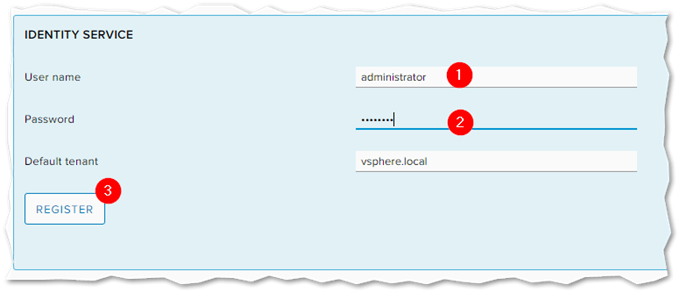
Step 5 – Type in the credentials for a vCenter administrative account such as [email protected] and press Register.
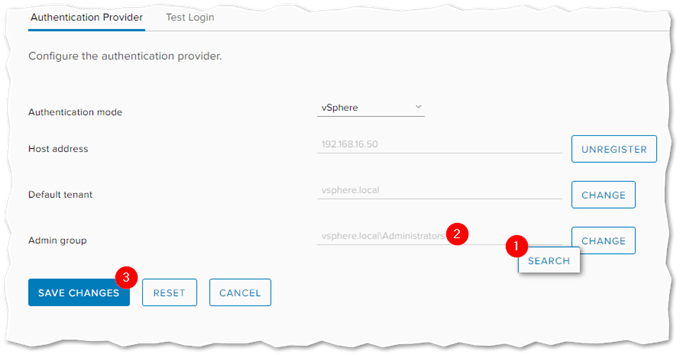
Step 6 – In the Admin Group field, type in vsphere.local\Administrators and click on the Search button to ensure the group exists. Press Save Changes when done.
Step 7 – If the changes are successfully committed, you are redirected back to Control Center’s homepage. Before proceeding, you must first sign out and log back in using an SSO account. Go to the far upper right corner of the screen, click on the cog wheel and sign out. Log back in as [email protected].

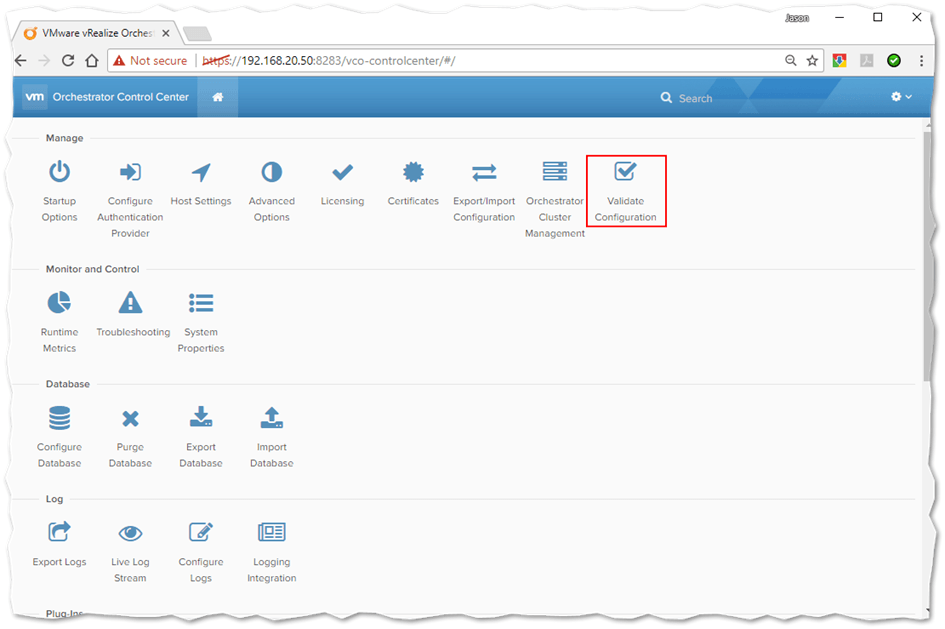
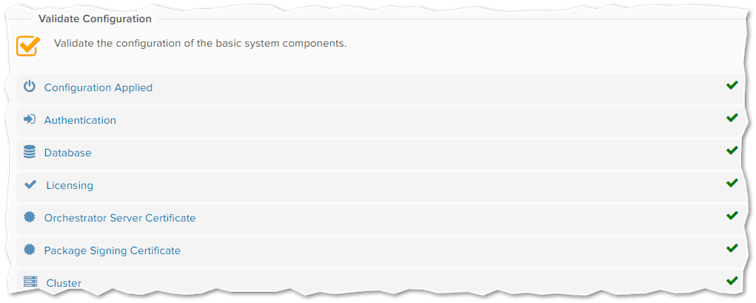
Step 8a – From the home screen, hit the Validate Configuration option to make sure vRO is properly configured.
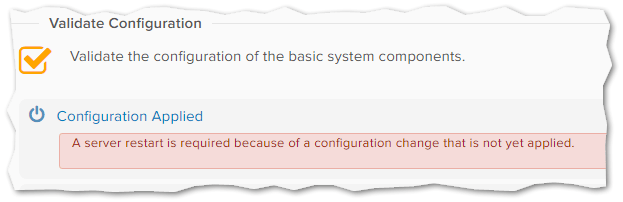
Step 8b – If a server restart is required, you’ll need to reboot the appliance.
To do this, navigate to https://your_orchestrator_server_IP_or_DNS_name:5480 and log in as root – use the password set during installation. Hit the Reboot button from the default page as shown next.

IMPORTANT: If you configured vRO to use vSphere authentication as per this post and the hostname specified for the vCenter Server does not match that specified in the SSL certificate (common name), you will not be able to connect to Control Center after rebooting the appliance. This KB article, which I tried, fixes the problem, however, note that you’ll have to go back and re-configure vRO from scratch.
Integrating vRO with vCenter Server
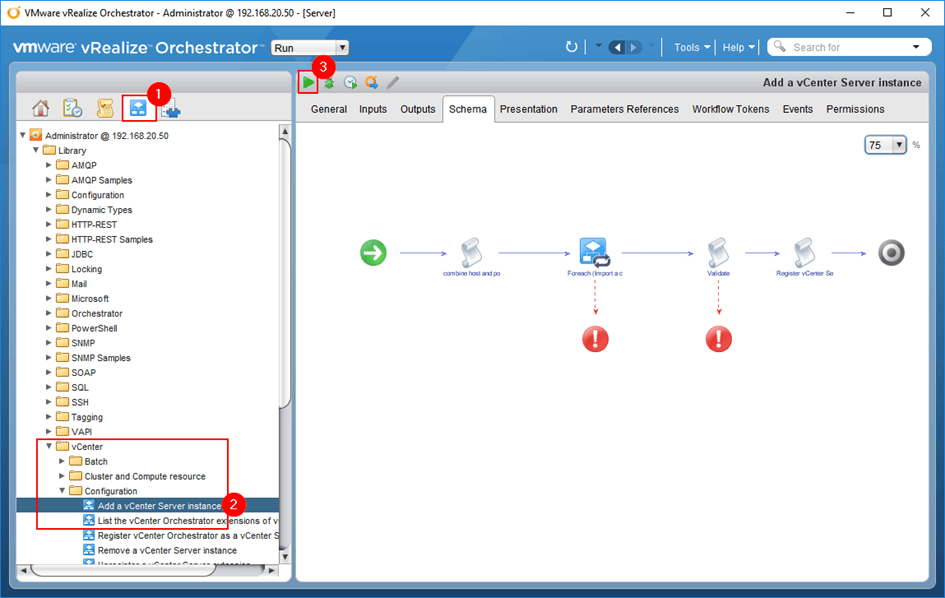
The next part of the configuration process will register vCenter Server with vRO to enable orchestration. This is a two-part process where we first add the vCenter Server instance to vRO and then register vRO as a vCenter Server extension. To do this, we need to use the standalone vRO client which can be downloaded from the vRO Server page. The client is what enables us to execute workflows against vCenter. Here’s how.
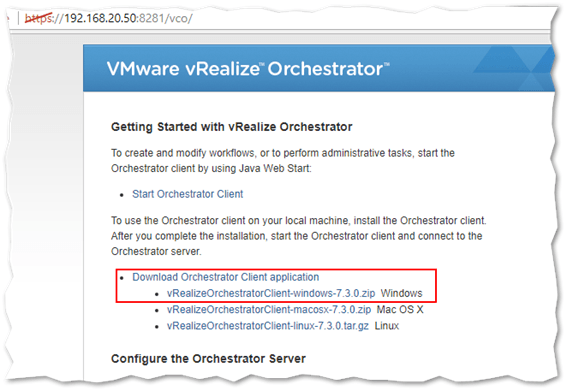
Step 1 – Download the Orchestrator client for the relevant OS (Windows, Linux and Mac) from https://your_orchestrator_server_IP_or_DNS_name:8281/vco/.
Step 2 – Unzip the archived contents to a folder. Execute vROWorkflowDesigner.exe if you’re running this on Windows. Once you do, type in the vRO’s IP address or hostname and the SSO credentials; the ones you usually use to log in vCenter.

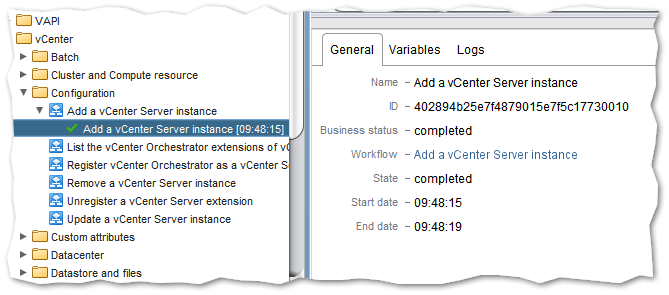
Adding a vCenter Server instance
Step 3 – Click on the Workflow tab and expand Configuration under the vCenter branch. Select the Add a vCenter Server instance workflow and hit the Play button.
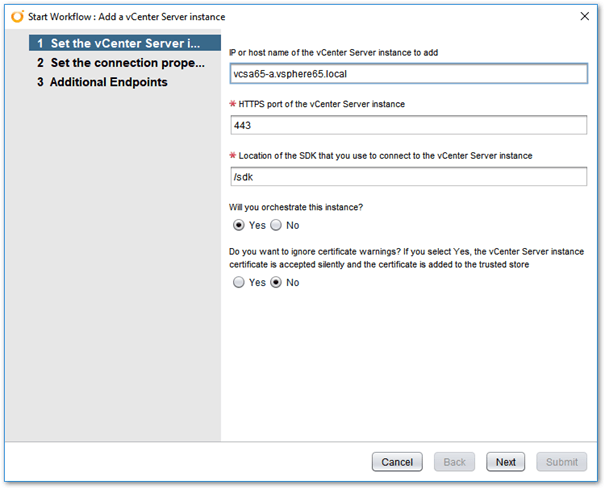
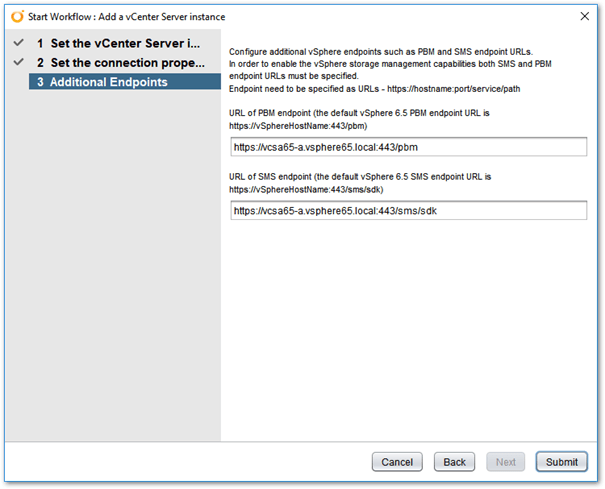
Step 4 – Type in the FQDN of the vCenter Server you want to add and make to answer Yes to the Will you orchestrate this instance option. You can choose to ignore any SSL warnings. Press Next.
Step 5 – Leave the session option set to Yes and type in the SSO credentials. Leave the domain value blank. Press Submit.

Step 6 – Check that there’s nothing wrong with the endpoint names – ex. incorrect FQDN – and press Submit.
If the details provided were correct, the workflow should complete successfully
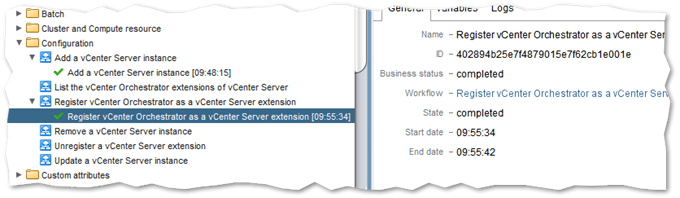
Registering vRO as a vCenter Server extension
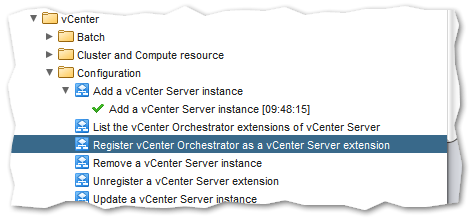
Next, we need to register vRO as an extension in vCenter. To do this, we simply execute a second workflow from the same workflow branch as before.
Step 1 – Select the Register vCenter Orchestrator as a vCenter Server extension workflow and press Play.
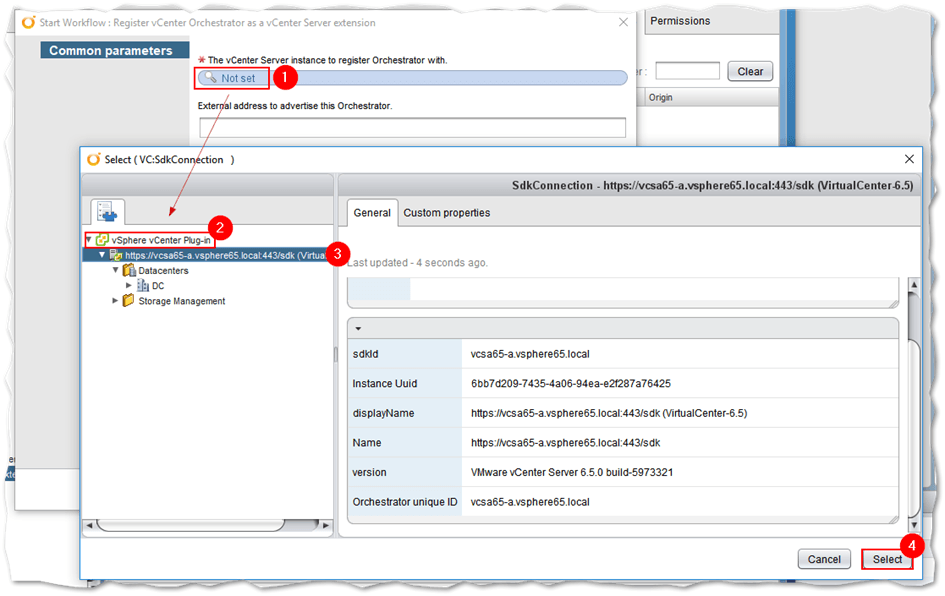
Step 2 – Click on Not Set in the vCenter Server instance field. Doing this takes you to a second screen. Expand vSphere vCenter Plug-Ins, highlight the https//<your-vCenter-Server> link as shown and press the Select button.
Step 3 – Leave the external address field blank and press Submit.
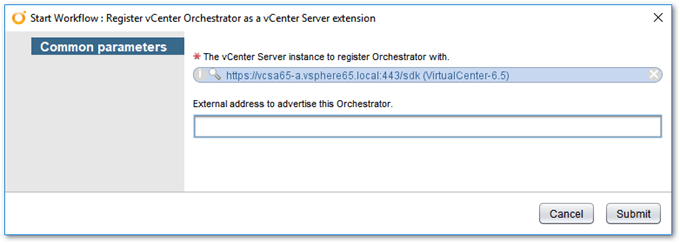
The workflow should successfully execute if all the details provided were correct.
Making sure it all works
In theory, at least, you should have a working instance of vRO readily integrated with the vCenter Server you want to orchestrate. In practice, however, the install is rarely plain sailing with some of the common ailments included a missing vRO interface in vSphere Web Client or a non-registered extension.
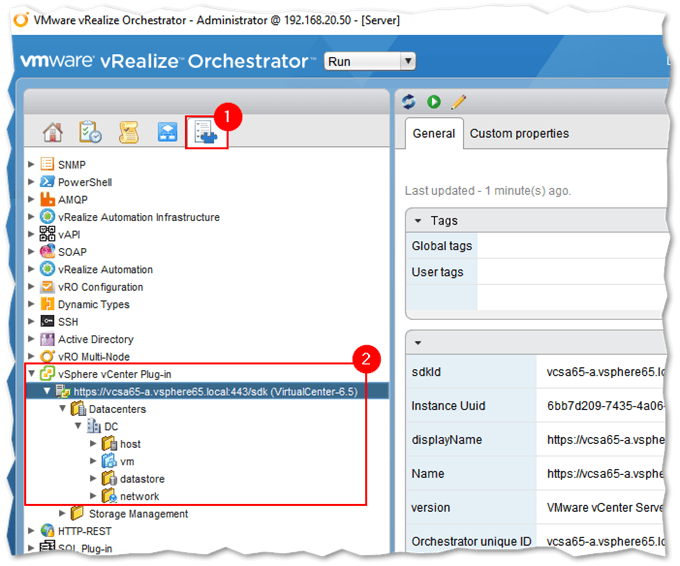
We first need to verify whether Orchestrator has vCenter Server visibility or not. To do this, we’ll keep on using the standalone client.
Step 1 – Change over to the Inventory tab and expand the vSphere vCenter Plug-in branch. You should be able to see the vSphere objects created in vCenter as shown next.
Step 2 – We need to restart the vCenter Server (the one you want to orchestrate) to make sure the extension registers correctly. If you have vCSA deployed, SSH to the appliance and run a reboot command from the shell. If you’re running the Windows version, just reboot the machine.
Step 3 – Once vCenter is back up, use vSphere Web Client to log in vCenter Server. Select Administration from the Home menu. Under Solution -> Client Plug-Ins, verify that the vCenter Orchestrator plugin has been successfully registered. You can also check the status bar or event monitoring for any events showing that the vRO extension has registered correctly.

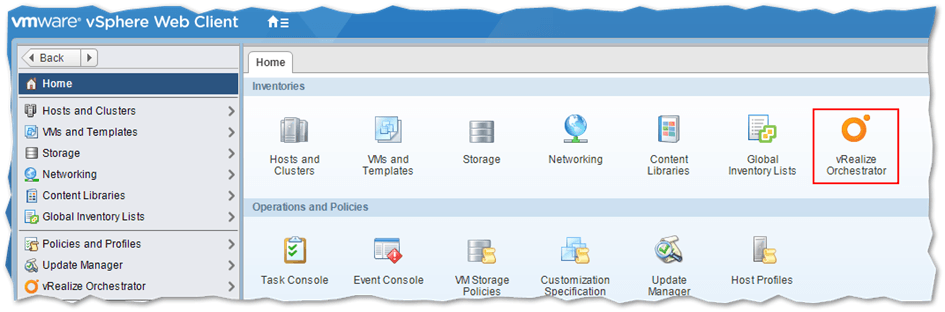
Step 4 – Go to the Home screen in vSphere Web Client, and verify that the vRealize Orchestrator is now listed under Inventories. Clicking on the icon will launch the Orchestrator plug-in inside vSphere client which essentially gives you access to the functionality provided by the standalone vRealize Orchestrator Client. If the vRO icon is still listed under Plug-ins for installation, you’ll then need to run the registration workflow again.
Testing it out by running a workflow
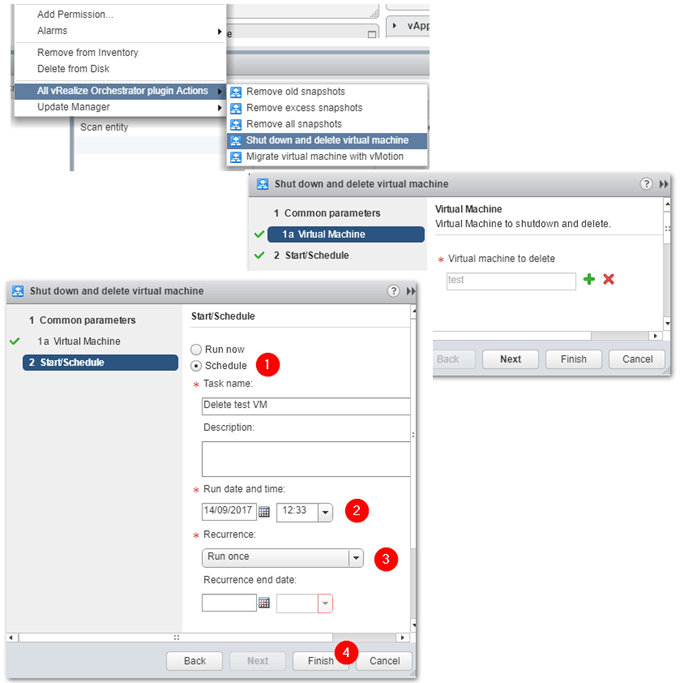
At some point, you’ll be prompted to delegate permission to vRO. Just tick the Remember my decision box so you won’t have to grant permission every time you use vRO.

As a basic test, I’m going to schedule the deletion of a VM I no longer need. To this, I simply right-click on the VM in question and select Shutdown and delete virtual machine. It’s then just a question of filling in the blanks as shown next. You can include multiple VMs to the job if required.
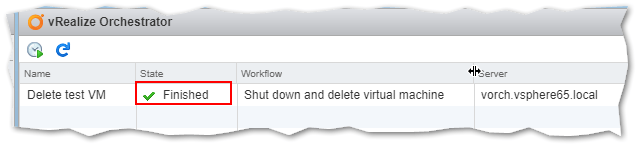
From the Orchestrator main page under Home, you’ll be able to view pending and completed workflows by clicking on Scheduled workflows as shown next.
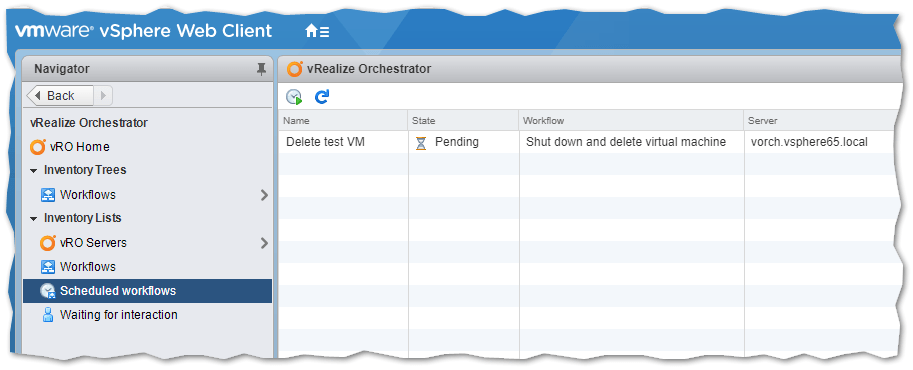
And sure enough, the test VM was deleted successfully.
Conclusion
This was quite a lengthy post and I must draw the line here. In terms of workflows and other functionality, there’s a ton more to cover once you have completed the install vRealize Orchestrator, which I’ll try to do in one or more future posts. In the meantime, I need to get up to speed with the product myself since it’s quite a handful. If you want to get a better idea of what you can use vRO for, have a look at this vRO blog.
For other posts on everything VMware, do have a look at the complete list of VMware articles on this blog.
[the_ad id=”4738″][the_ad id=”4796″]


Not a DOJO Member yet?
Join thousands of other IT pros and receive a weekly roundup email with the latest content & updates!
More in this category


About the Author
Jason Fenech


14 thoughts on "How to Install vRealize Orchestrator 7.3"
Jason, can’t thank you enough for taking the time to put this together. One comment. In Step 5, I had to spell out completely the “[email protected]” account to get it to register. I’m running V6.5 with the 7.3 Orchestrator Appliance
Hi, Thank you for your feedback! Yes, sometimes a step may differ slightly due to subtle differences in how environments are set up.
Jason,
Thank you so much for this wonderful document. it help me a lot to Implement VRO in my Enviorment.
I would like to know if there is any document which could help me to link ITSM tools for automation.
thanks
Thanks. Sorry, I don’t know of any. Have you tried looking up VMware’s fora?
I guess you are asking about “self service” Jason? I believe two of the primary solutions are Cisco CloudCenter and VMware vRealize Automation Suite. I haven’t got that deep with either of them, but I believe they have a self service component in each.
Hello Jason
I have a problem in STEP 4, just show me a messaje that told me “Error: Error while trying to retrieve certificate from url: ” could you please help me?
Hi. Most probably your vcenter was installed using an ip address instead of a FQDN so you end up with a certificate mismatch!