Save to My DOJO

Table of contents
With the utilization of Update Manager, ESXi patching is simply a routine method to maintain your VMware vSphere environment.
In a previous post, I wrote about how one can go about patching ESXi from the command line using the esxcli software vib command. This is all well and good when you only have a couple of hosts at hand. What would you do instead when faced with a significant number of esxi hosts you need to update? The short answer is, use vSphere Update Manager (VUM). I’ve written about VUM in the past, so I’m skipping the how to install and configure it bits. If you’d like to learn more, have a look at these:
One of the features I like most about vCSA 6.5, is that VUM comes readily installed with the appliance, something that was on everybody’s wishlist since the appliance first shipped out. If you’re running vCenter Server for Windows, well, you’re stuck with installing VUM manually.
Today, I’ll be using vCenter Server Appliance 6.5 to update an ESXi 6.5 GA host to 6.5.0 d. The 4-part update process is as follows:
-
- Import an ESXi image to VUM
-
- Create a baseline
-
- Attach the baseline
-
- Remediate
Undefined vSphere Update Manager
Update Manager comes as a vCenter plug-in that is accessible from a number of places within the vSphere Web client. To load it, click on the Update Manager icon from the Home screen or simply select the vCenter Server hostname in Navigator and change over to the Update Manager tab. The interface of vSphere update manager consists of two main views, Admin and Compliance. The Admin view allows you to configure various aspects of VUM itself as well as manage baselines, the patch repository and ESXi images. The Compliance view, on the other hand, is where you carry out tasks such as attaching baselines, scanning for applicable updates and remediating.
![]()
Figure 1 – The Update Manager icon on the Home screen in vSphere Web Client
Import esxi patching image
So, the first thing we need to do to update ESXi via VUM, is to download the respective image from my.vmware.com and import it to Update Manager.
Step 1 – Highlight the vCenter Server name in Navigator, select the Update Manager tab and click on the Go To Admin View button.

Figure 2 – Changing to VUM’s Admin view in vSphere Web client
Step 2 – Once in Admin view, select the ESXi Images tab and click on Import ESXi Image. Doing so loads another dialog box where you specify the ESXi image (ISO file) you want to be imported. Click on Browse and navigate to the folder where the image is stored. Select the ISO file and click OK. The file will upload as shown in Fig. 3. The upload progress bar shows the remaining time and the speed at which the file is being uploaded.

Figure 3 – Importing an ESXi ISO image to VUM
Step 3 – Once the ISO is uploaded, details about the ESXi image are displayed as per Figure 4.

Figure 4 – Product and version details for the ESXi image just imported
Creating a Baseline
Step 4 – Next, we create what’s called a Host Baseline. To do this, we simply right-click on the image just imported and select Create baseline as shown in Figure 5.

Figure 5 – Creating an ESXi host baseline
Step 5 – Type in a name for the baseline and press OK. The baseline should now be listed under the Hosts Baselines under Custom as per Fig. 6.

Figure 6 – The freshly created baseline as listed under the Hosts Baselines screen
Attaching the baseline and scanning the hosts
Step 6 – We’re almost there. The idea now is to attach the baseline to one or more hosts. We then run a compliance check to determine if the upgrade or update is actually required. To do this, one must change over to Compliance view. Just hit the Go to compliance view button at the top-right corner as shown in Fig. 7.

Figure 7 – Changing over to Compliance view
The baseline can in fact be attached to a number of objects including a datacenter, cluster or an individual ESXi host. This (esxi host configuration) is what allows you to patch multiple hosts. It is important to note though that you may inadvertently hit hosts not earmarked for updates so be careful when attaching baseline to higher-level objects.
In the example that follows, I’ve attached the baseline to one of three ESXi hosts forming a cluster.

Figure 8 – Attaching a baseline to a host
Step 7 – Next, we carry out a scan on the ESXi host to verify that the update/upgrade is in fact required. From the same screen, click on Scan for Updates and select Upgrades on the dialog that pops up followed by OK. This will initiate a scan the results of which are displayed under the Compliance Status column after the scan completes.

Figure 9 – Scanning a host for compliance
As expected, the host is found to be non-compliant, meaning that the 6.5.0d update is in fact applicable.

Figure 10 – A non-compliant result indicates that the host is missing one or more updates
ESXI patching with Remediate
In this case, remediating is the act of pushing a patch esxi or update to an ESXi host. A host is remediated by clicking on the Remediate button. Alternatively, right-click on the ESXi hostname (or IP address) in Navigator and select Remediate from the Update Manager menu.

Figure 11 – Remediating a host from the context menu
Step 1 – The remediation process starts by selecting the baseline image you want applied. In this case, I’ve selected the one created for the 6.5.0d upgrade.

Figure 12 – Remediation Step 1 – Select the baseline applied
Step 2 – Next, select the host you wish to remediate. In this case, only one host is listed which is the one highlighted in Navigator. If say, the baseline had been attached to a cluster, then you’d have all the hosts within that cluster listed as target objects.
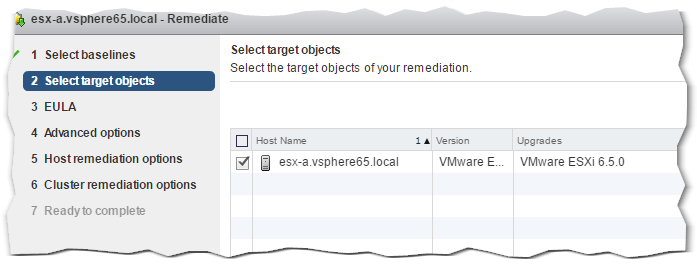
Figure 13 – Remediation Step 2 – Selecting the target to remediate
Step 3 – Accept the EULA by ticking the box at the bottom.

Figure 14 – Remediation Step 3 – Accept the End User License Agreement
Step 4 – The next screen, gives you the option to postpone remediation tasks to a later date and time. You can also set the task to ignore warnings in reference to unsupported devices and such.

Figure 15 – Remediation Step 4 – Scheduling the remediation task (Optional)
Step 5 – In all probability, the ESXi being remediated will be hosting VMs. This screen gives you control over what happens to the VMs currently powered on. You can choose to have them powered off, suspended or leave them in their current state, with no additional virtual backup available. Like it or not, powered on VMs must be migrated or shut down for the remediation process to complete. Your options are to migrate VMs manually to some other host or simply power them off prior to remediating. Alternatively, set the VMs to power down by selecting the Power Off virtual machines option from the VM Power State drop-down box as shown in Fig. 16. You can also set the task to disconnect removable media from any hosted VMs as this may cause the remediation task to stall.

Figure 16 – Remediation Step 5 – Configuring the host remediation options
Step 6 – If the VMware host being remediated is a cluster member, you can control various aspects related to clustering as shown in Fig. 17. Further details on each setting are available here.

Figure 17 – Remediation Step 6 – Configuring the cluster remediation options
Step 7 – The Pre-check Remediation tasks runs a series of checks and generates a report of what exactly is carried out on the ESXi host. Press Finish to initiate the remediation task.
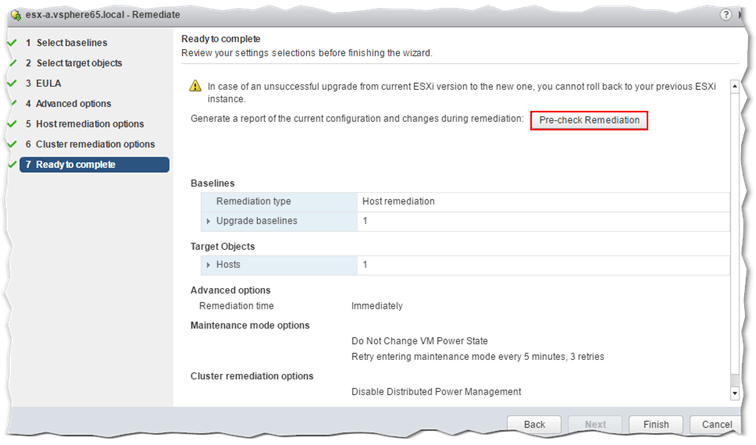
Figure 18 – Remediation Step 7 – Completing the remediation task
The remediation task’s progress is displayed in the Recent Tasks window in vSphere Web client.

Figure 19 – A remediation task in progress
The host should enter maintenance mode and later disconnect while the update is being applied. It should then reboot and re-connect automatically, assuming the remediation processes succeeded in updating the host.

Figure 20 – A host is disconnected while being updated as can be seen in vSphere client and DCUI.
Once remediation completes, you can easily verify that the esxi host is running the latest version by inspecting the host details on the Summary screen. Fig. 21 compares the host’s summary pre and post remediation.

Figure 21 – Comparing ESXi version details pre and post-remediation
This VMware KB article helps you correlate build and version numbers if needed. As per the partial table below, you can see that in our case, the ESXi host updated from 6.5 GA to 6.5.0d.

Figure 22 – Correlating ESXi version and build numbers
To properly protect your VMware environment, use Altaro VM Backup to securely backup and replicate your virtual machines. We work hard perpetually to give our customers confidence in their VMware backup strategy.
To keep up to date with the latest VMware best practices, become a member of the VMware DOJO now (it’s free).
Conclusion
ESXi patching is of utmost importance to any organization worldwide operating on vSphere.
Update Manager is a must-have if you want to easily and effectively implement patch management for ESXi. Incidentally, Update Manager is one other reason why you’d want to move over to vCSA 6.5 since VUM is now embedded with this vCenter release.


Not a DOJO Member yet?
Join thousands of other IT pros and receive a weekly roundup email with the latest content & updates!
Frequently Asked Questions
What is ESXi patching?
How do I update ESXi host manually?
What is latest version of ESXi?
How do I check ESXi version?
More in this category


About the Author
Jason Fenech


28 thoughts on "How to patch ESXi with Update Manager"
Excellent article well documented enjoyed reading and following it. Would you create a similar write up to update VMs, datastore and network Thank you.
Thanks! VMs can only have their hardware level and vmtools updated, at least using the latest version of VUM. Not sure what you mean by updating datastores and networks.
Thanks for your simple tutorial, i have done it on my lab environment.
Glad you found it helpful. Thanks.
Jason – what about patching/updating an esxi host when vCenter server appliance is installed on that same host?
Hi. Well, if possible vmotion it to another host assuming your setup is vmotion ready. If not you’ll have to schedule planned downtime.
Hope this helps.
Jason
good stuff . is it not good practice to put host in maintence mode manualy before starting the remediation process.
Thanks. You could if wanted to but the remediation process takes care of it.
How do I know which patch that I need to apply?
Release note doesn’t mention the required version of ESXi. For example, my ver of ESXi is 4887370, and there are 10 patches listed in Product Patches Portal.
The latest number is 8294253.
Hi. So, 4887370 -> ESXi 6.5.0 a, 8294253 -> ESXi 6.5 U2 GA.
Now download the latest patch (8294253 at your time of writing), add as a baseline and patch. Always check the release notes to verify that a direct upgrade path is supported.
Hope this helps.
If I use Vendor customized ESXi 6.5 ISO, Is it necessary to have Vendor Vibs in the VUM settings (e.g. HP Proliant) and to do the scan before remediation. Or in other words is it necessary to “scan” if I use Vendor specific ESXi 6.5 ISO, can’t I just create a baseline and do the Remediation, skipping the scan. Thanks.
Best to import the vendor’s ISO and scan.
Did the patching however after a reboot the ESX host was not accessible from vSphere. Had many unknown VMs shown.
Had to rebuild the VM from scratch
That is odd. You might try checking your underlying storage?