Save to My DOJO

In today’s post, I’ll be showing you how to install Windows Server 2016 on VMware ESXi with Desktop Experience on an ESXi 6.5 U1 host managed by a vCSA 6.5 U1 instance. This step-by-step how-to install Windows Server 2016 on VMware vSphere guide is aimed at readers who have yet to install a Windows OS on a VMware hypervisor. For something a little bit more advanced in relation to installing Windows Server on VMware, you can take your pick from the complete list of published posts to date.
Windows Server Flavors and Requirements
Windows Server 2016 comes in 3 flavors; Server Core (no GUI), Server with Desktop Experience (with GUI) and Nano Server. The latter is Microsoft’s headless server, one that is completely managed remotely with no local logon capabilities making it a perfect solution cloud deployments. Nano server has recently been refactored to primarily support and run containers.
Windows Server 2016 also comes in 3 editions; Essentials, Standard, and Datacenter. Have a look at this link to learn how each edition differs from the rest.
As far as hardware requirements go, Microsoft’s documentation suggests the following.
-
- Processor: 1.4 GHz 64-bit. The CPU must support NX, DEP, CMPXCHG16b, LAHF/SAHF, PrefetchW and second-level address translation.
-
- RAM: 512MB or 2GB for a Desktop Experience installation. 800 MB is the required minimum when installing Windows Server 2016 as a VM.
-
- Storage: 32GB absolute minimum
-
- NIC: 1 Gigabit
As often is the case, the minimum hardware requirements quoted by Microsoft rarely come close to mirror what’s actually needed to run production boxes. With that in mind, consider increasing the resources allocated in accordance with the role(s) assigned to the server and its anticipated workload.
Some optional requirements are;
-
- UEFI firmware to support secure boot where applicable.
-
- Trusted Platform Module (TPM) capabilities to enable encryption features such as BitLocker.
Creating the base VM
I’ll be using the new vSphere client (HTML5) to create the base VM. Here are the steps.
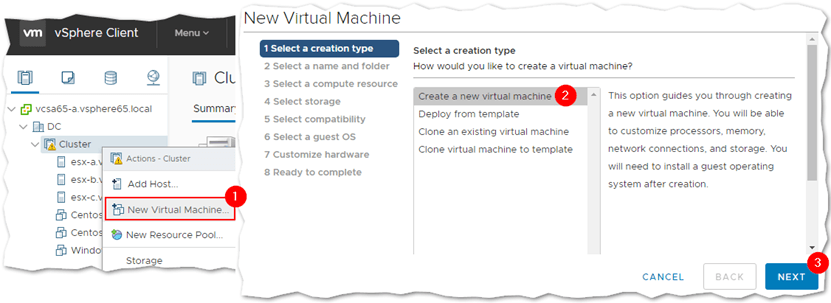
Step 1 – Right-click on a cluster, or host, and select New Virtual Machine (1). Select Create a new virtual machine (2) from the wizard. Click Next.
Step 2 – Type in a name for the virtual machine (1) and select a location (2), such as a datacenter, where you want it installed. The Windows folder shown is something I created.

Step 3 – Select the ESXi host where the VM will be deployed to. In the example, I selected a DRS enabled cluster (1) so placement is done automatically.

Step 4 – Select a datastore (2) where the VM will be created. If you’re using storage policies, make sure to select the correct one from the VM Storage Policy drop-down box (1).

Step 5 – Select the correct compatibility mode according to the ESXi version installed. In my case, I’ve selected ESXi 6.5 or later.

Step 6 – Select Microsoft Windows Server 2016 (64bit) guest OS Family and Version types. If you’re running this on older versions of ESXi, select Microsoft Windows Server 2012 (64 bit) instead.

Step 7 – For the hardware requirements, I’m sticking with the values suggested to me by the wizard. The only hardware settings I changed are the ones for the SCSI controller, which I set to VMWare Paravirtual, and the vNIC driver which I set to vmxnet3. This should improve the overall performance of the virtual machine. I also set the VMDK type to thin since I’m a bit short on storage space.

To use the Secure Boot feature, change the BIOS firmware setting to EFI by navigating to Boot Options -> Firmware under the VM Options tab.

Step 8 – Review the configuration and press Finish to create the VM.

Installing Windows Server 2016
Now that the VM has been created, it’s time to install the guest OS. For this task, I’ll be using the Remote Console client as I find it easier to use when mounting ISOs on VMs and such.
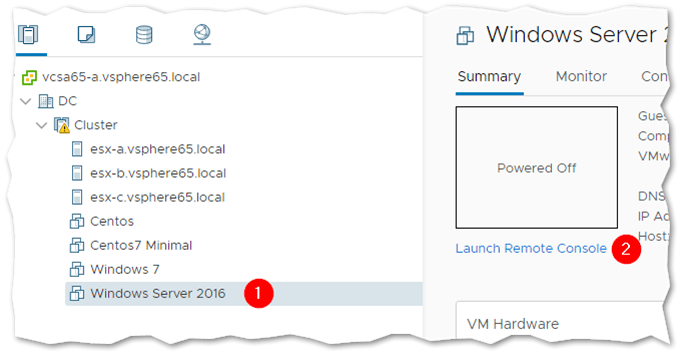
Step 1 – Highlight the VM just created and click on Launch Remote Console link.
Step 2 – Power up the VM and select Connect to Disk Image File (iso) from the VMRC -> Removable Devices -> CD/DVD drive 1. Navigate to the folder containing the Windows Server 2016 ISO image and select it.

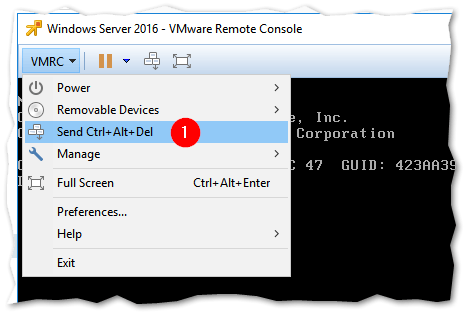
Step 3 – Select Send Ctrl+Alt+Del from the VMRC drop-down menu. You should see the Windows installer booting up.
Step 4 – Select the language and localization settings matching your time zone and country and click Next.

Step 5 – Click on Install now to kick off the installation.

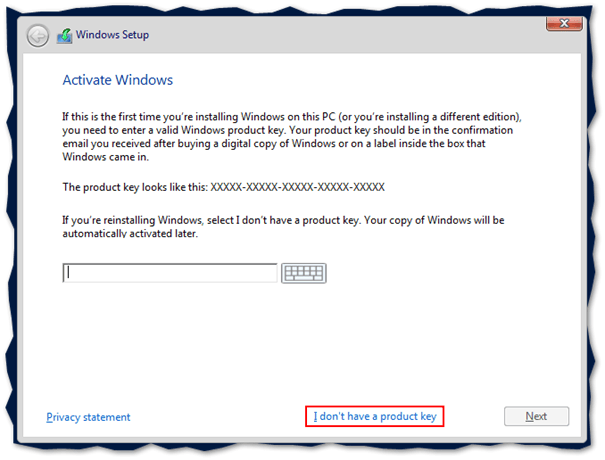
Step 6 – Type in the product key, if you have one, and press Next. If you don’t, just click on the I don’t have a product key link to install Windows Server in evaluation mode.
Step 7 – Select the Windows Server edition and deployment type. For this example, I’ve selected Windows Server 2016 Standard (Desktop Experience). Press Next.

Step 8 – Accept the license terms by ticking on the option at the bottom and press Next.

Step 9 – Select Custom: Install Windows only (advanced)

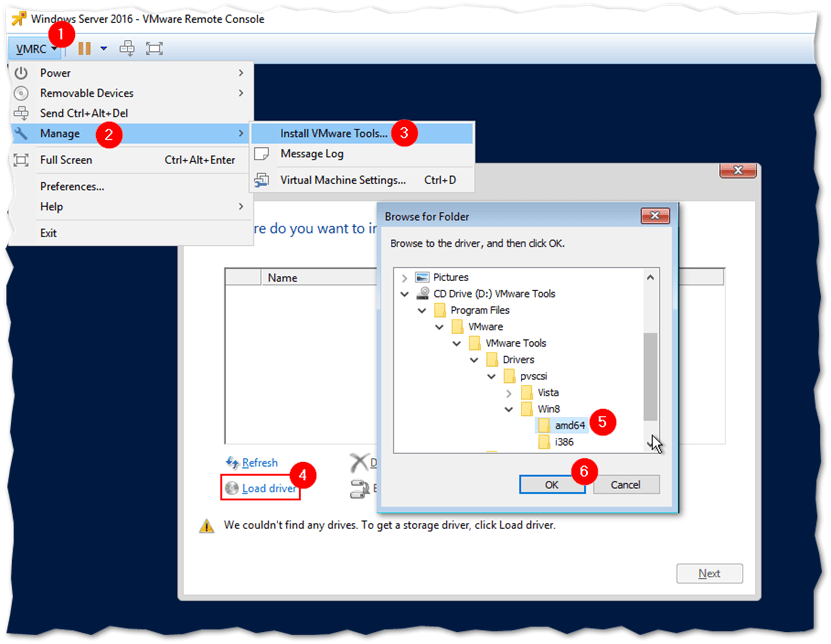
Step 10a – At this point on how to install Windows Server 2016 on VMware vSphere, I must mount the vmtools ISO image since I selected VMware Paravirtual as the SCSI controller. This step is not required if you stick by the default setting (LSI Logic SAS). To this, we simply select Install VMware Tools from VMRC -> Manage. This will mount the corresponding ISO image on the VM. Once you do, click on Load driver, select the CD drive labelled VMware Tools and drill down to the /Program Files/VMware/VMware Tools/Drivers/pvscsi/Win8/amd64 folder as shown next.
Step 10b – The VMware PVSCSI Controller driver is automatically selected for you. Click Next to continue.

Step 11 – If you see Drive 0 Unallocated Space listed, it means that the paravirtual driver has correctly detected the VMDK specified for the VM.
Before pressing Next, disconnect the VMware Tools ISO image and reconnect the one for Windows Server 2016. You won’t be able to proceed with the process of installing Windows Server on VMware unless you do this.

Once you reconnect the Windows Server ISO, press Refresh and make sure that the Windows can’t be installed … at the bottom clears. Press Next to use the entire disk for the Windows Server installation.

Step 12 – Wait for the installation of Windows to finish.

Step 13 – Set a password for the administrator account and press Finish.

Step 14 – Log in and install the VMware Tools. Disconnect the Windows Server ISO image as described and mount the VMware Tools ISO image still using the VMware Remote Console client (VMRC -> Manage -> Install VMware Tools). Click on the mounted DVD Drive or taskbar notification to run the vmtools installer. Follow the instructions and reboot the VM when done.

Congratulations! You now have Windows Server 2016 with Desktop Experience running on VMware. For production environments, you should go for the Server Core version for better performance and improved security. Also, note that the steps covered today apply to installing Windows Server 2016 on both physical ESXi hosts as well as nested ones. If you wish to learn how to set up a nested vSphere environment, have a look at this post.
What to do next?
Although these were easy steps, they were rather time-consuming, especially if you deploy several VMs a week. This is why installing Windows Server in a VM is usually done with the aim to convert it to a template afterwards. That way you can simply deploy a new VM from the template and ensure consistency in terms of custom configuration and installed applications.
Once you’ve installed Windows Server and the VMware Tools, it is usually a good measure to set whatever settings you want across the board when deploying a new VM.
A lot of these can be done via GPO or deployment tools but you may get the odd change you want to be done locally. For instance:
-
- Add a specific local user
-
- Add specific user in the remote desktop group
-
- Install agents for monitoring, backup, antivirus…
-
- Install tools such as BGInfo
-
- Run Windows Update and clean up files
-
- …
You can find interesting resources on how to prep a Windows environment with the VMware OS Optimization Tool that is used for Horizon Desktops.
Conclusion
Note that the steps on how to install Windows Server 2016 on VMware ESXi covered today also apply to installing Windows Server 2016 on both physical ESXi hosts as well as nested ones.
Installing Microsoft Windows Server 2016 on a virtual machine hosted on VMware ESXi is straightforward if you follow our steps and perform the operations explained above with illustrations.
The illustrated practices show how you can build a virtual machine for Windows hosted by VMware ESXi.
It is a fantastic opportunity for anyone willing to get started with virtualization.
If you wish to learn how to set up a nested vSphere environment, have a look at this post.


Not a DOJO Member yet?
Join thousands of other IT pros and receive a weekly roundup email with the latest content & updates!
Frequently Asked Questions
How do I install Windows 2016 from an ISO file?
How many VMs can I run on server 2019 standard and Datacenter?
What are the versions of Windows Server 2019?
What is the licensing model for Windows Server 2019?
More in this category


About the Author
Jason Fenech


30 thoughts on "How to Install Windows Server 2016 on VMware"
Hi Jason,
I had to follows Vladan’s first option to get Paravirtual controller installed as the “Refresh” in your article never found the re-mounted Windows 2016 iso ? – very strange.
Hi,
The couple of times I tried this, it worked just fine but again, different environments may yield different results. What option are you referring to?
Thanks
Jason
Hi Jason,
Step 11 – refresh fails for me each time.
Vladans Step 2 worked here:
https://www.vladan.fr/windows-server-2016-gui-install-how-to/
Hi,
Well, he’s installing it on Workstation and not ESXi. Perhaps that’s the reason for the discrepancy. If I find the time, I’ll try doing the same on Workstation and see how it goes.
Thanks
Jason
Using second CD/DVD to mount /vmimages/tools-isoimages/windows.iso is the clue. I’ve found it here https://4sysops.com/archives/windows-server-2016-vm-with-a-vmware-paravirtual-scsi-controller/#case-2-prepare-a-new-vm-with-vmware-paravirtual-for-a-boot-disk
Anyway thanks for your how to.
Tomas
Which product key do I enter? We’ve purchased Windows Server 2016 Datacenter so that we can run unlimited 2016 Standard VMs. However, we want the VMs to run on VMware. When we create a 2016 Standard VM within 2016 Datacenter Hyper-V, we can activate it without entering a key – it recognizes that it’s on Datacenter. But when we create a 2016 Standard VM in VMware, it needs a key and it won’t accept the Datacenter key. Any idea how to do this? Would we have to run a KMS server?
Hi Nathan,
Not terribly familiar with Microsoft licensing since it got somewhat complex especially when it comes to virtualizing Windows. See if this helps -> http://www.mirazon.com/windows-server-2016-licensing-cores-versions-and-virtual-machines/
Jason
Great article! Thanks for the help.
Thanks!
Hi,
Great article. Awesome thanks. I am trying to install ESXi 6.0 on a Win 2016 server. When I run the boot installer from a USB, it is prompting me to reformat the drive on which the Win 2016 is installed. Do we even need ESXi host or can we just install the VSphere web client to install the VMs on a single hardware server?
Best Regards,
Suryaa
The web client is part of the Host. You’ll get access to it after installation. You will want to make sure you dedicate a boot device for ESXi to install to.
Thank you SO MUCH for this article!! I wrecked my brain trying to get past the “Windows can’t be installed on this drive” message.
So how do you get to the very first step, running the vSphere client (HTML5) to create the base VM? Is that launched from a CD or USB drive?
Hi Martin,
The vSphere client is a web interface that you can get to by accessing the IP address of the ESXi sever or VCenter server in a web browser.
Hey Jason, I need a solution for this problem. The VMWare ESXi web interface shows that it’s updated but when I refresh on the Windows installation, it does not change and gives error message: 0x80300001
Hi Abraham,
Is this error showing up in your Windows Installation? If so, you may possibly have a bad Windows ISO. I’ve run into that a few times.