Save to My DOJO
Table of contents
Eventually, you’ll run out of free space on one or more disks attached to your vCenter Server Appliance. You can always delete redundant logs, shrink databases and perform other general maintenance tasks. The best solution, however, would be to expand the VMDK that’s run out of space. Ok, great, but how do I do this? In today’s post, I’ll be showing you just that, how to expand a VMDK attached to a vCenter Server 6.0 or 6.5 appliance using shell commands.
If you’re still thinking about migrating from the vCenter Windows version to the appliance, a quick look at upgrading to vCSA 6.5 will, hopefully, help you decide if this latest release is something you’d want to go for.
Of Disks and such
By default, vCSA 6.0 is deployed with no less than 11 VMDKs or virtual disks. With vCSA 6.5, an additional 12th disk is used as a patch and update repository by Update Manager which, as you probably know by now, is part and parcel of vCenter Server Appliance.
The following table lists all the disks associated with a vCSA 6.x instance. The disks numbered 1 to 11, are common to both vCSA 6.0 and 6.5. The one difference is that vCSA 6.5 reserves disk 11 for the imagebuilder service whereas in vCSA 6.0 it’s used by the Inventory Service.
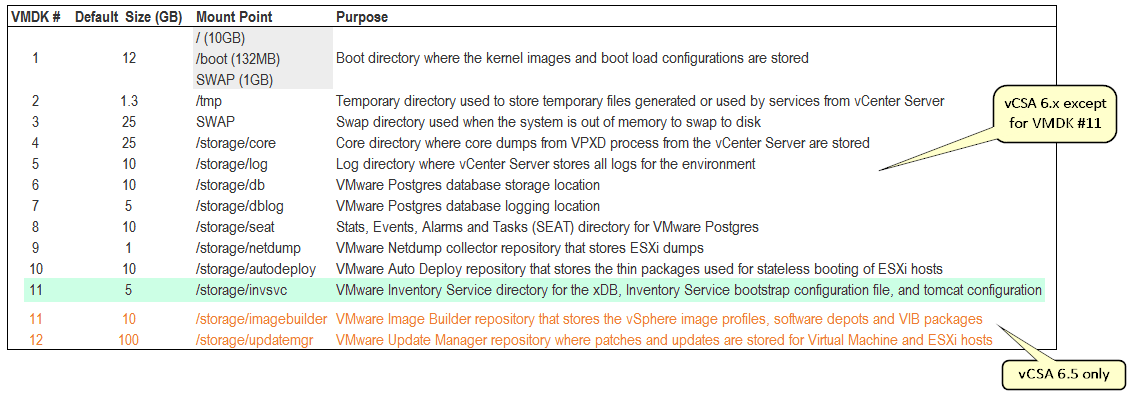
A list of disks created when vCSA 6.x is installed
The next screenshot lists the 12 disks associated with a vCSA 6.5 instance in vSphere Web client. These can be listed by selecting Edit Settings from the VM’s context menu and clicking on Manage other disks to reveal the remaining disks since only the first 2 are shown.
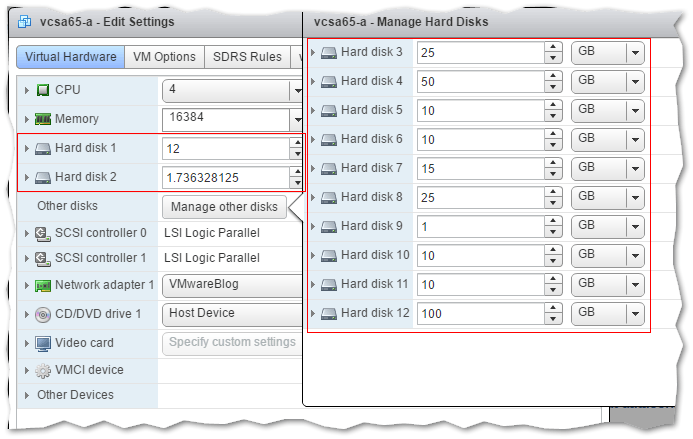
No less than 12 virtual disks are used by vCenter Server Appliance 6.5
Add disk space to vCenter via Bash
Adding space to a disk is done via the Web vSphere client in conjunction with vCSA’s shell or Bash commands. Let’s start with Bash first.
Note: You need to have SSH enabled for this to work. To enable SSH, you can use VAMI, DCUI, or the vSphere Web client.
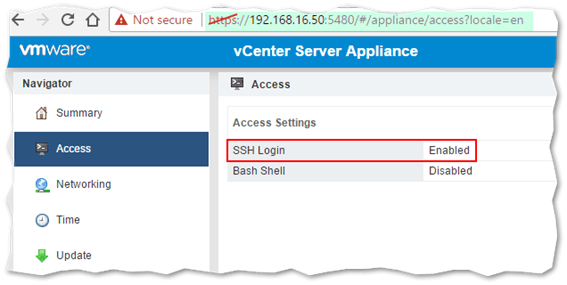
Enabling SSH on vCSA from VAMI
vCSA 6.5
In this example, I’ve added 10GB to disk 12 on my vCSA 6.5. Disk 12 is used as a patch repository for vSphere Update Manager.
Step 1 – Resize the disk from the VM’s virtual hardware settings as shown. Locate the vCSA VM, right-click on it and select Edit Settings.
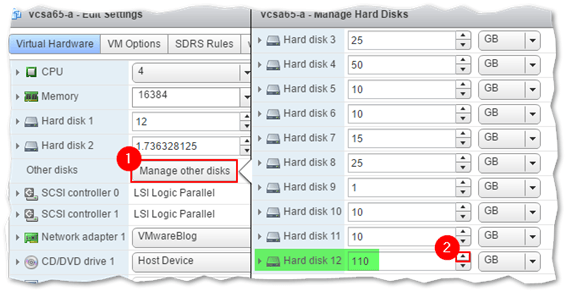
Resizing a disk in vSphere Web client
Step 2 – SSH as root on the appliance using putty or similar. Type shell or shell.set –enabled true at the prompt to enter BASH.
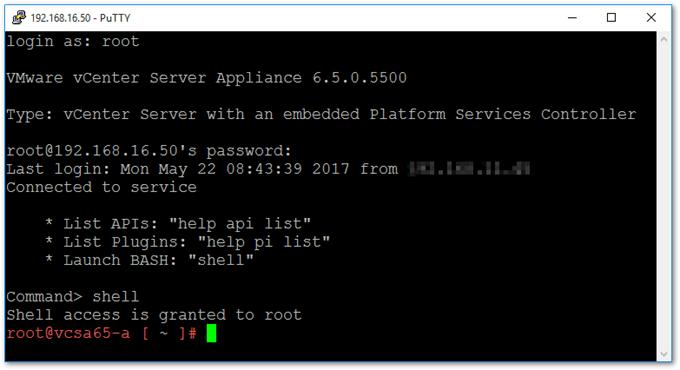
Establishing an SSH connection to vCSA and logging in as root
Step 3 – Run df -hl to display the current disk sizes and utilization. The disk we want to add space to is listed last as shown next.
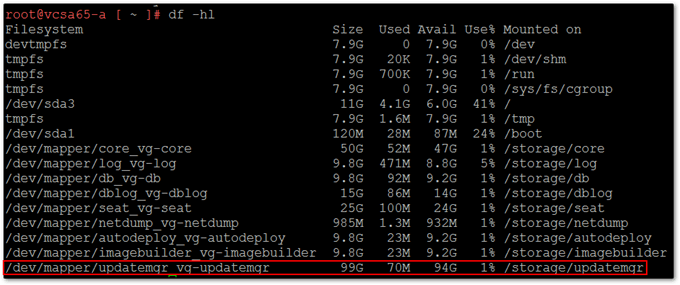
Using the DF command to display disk space utilization in BASH
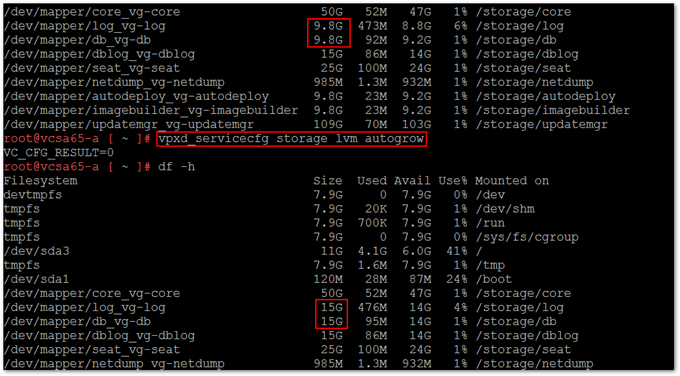
Step 4 – Run the following script after you’re done setting the new size.
/usr/lib/applmgmt/support/scripts/autogrow.sh
The autogrow.sh script scans all the drives and resizes the ones it finds marked for expansion. You should see something similar to the output shown next.

A logical disk that has just been resized
Step 5 – Run df -hl once more to verify that the disk has been correctly resized. We can see that the disk is now 10GB larger in size.

Verifying that the disk has been resized
vCSA 6.0
With 6.0, the large part of the steps is identical to the ones used to resize vCSA 6.5 disks. The only change is in step 4, where the command listed next is used instead of autogrow.sh.
vpxd_servicecfg storage lvm autogrow
In this example, I’ve added 5 GB to disks 5 and 6 which are respectively dedicated to storing the appliance’s logs and databases.
Resizing a disk from BASH on vCSA 6.0
Note: This command works on vCSA 6.5 as well. However, it’s best to stick to using autogrow.sh as previously outlined.
Using Shell
The second method uses Shell commands. Note that this method only works for vCSA 6.5.
Step 1 – Resize the selected VMDK by editing the virtual hardware of the vCSA’s VM with vSphere Web client.
Step 2 – SSH to the appliance, logging in as root. Run the following command:
com.vmware.appliance.version1.resources.storage.stats.list
This is the equivalent to running df -h under BASH. The step while optional nevertheless provides some disk utilization info even though the output is not as user-friendly as it is with df -h.

Listing disk info from Shell
Step 3 – Run the next shell command to expand the VMDK.
com.vmware.appliance.version1.system.storage.resize
Note: The command does not produce any output. To verify that the VMDK has been expanded, re-run the command from step 1. You can also change back to BASH and run df -h instead.
Conclusion
We’ve seen how using shell commands, any disk attached to a vCenter Server 6.x appliance can be resized. The operation is easy to carry out. First, resize the selected disk from the vCSA VM’s settings using the vSphere Web Client or otherwise. Then, SSH to the appliance and run the commands outlined in this post.
If you’re still running vCenter Server for Windows, have a look at How to install vCenter Server Appliance 6.5 from scratch and vCenter Server for Windows and vCSA compared. Though support will still be offered, vCenter Server for Windows is on its way out. In the long run, it pays to learn about vCSA and the new features it brings to the table.
[the_ad id=”4738″][the_ad id=”4796″]


Not a DOJO Member yet?
Join thousands of other IT pros and receive a weekly roundup email with the latest content & updates!
More in this category


About the Author
Jason Fenech


4 thoughts on "How to add disk space to vCenter Server Appliance"
Great Jason.
This is also a good reference for everyone out there:
https://community.spiceworks.com/how_to/144372-clear-log-files-vcenter-server-appliance
Clear the log files!