Save to My DOJO
So far in this series, we’ve talked about a number of different things. Including, container basics, supported platforms, and more! But with persistent Docker containers, this is where it starts to get really interesting!
The last several segments, we’ve been spending quite a bit of time on Docker, and with good reason. Docker is the core container engine used in the vast majority of container platforms. Today we’re going to continue talking about Docker, but before we get into that, let’s first recap where we’ve been thus far.
The Definitive Guide to Containers for MSPs
Part 1 – What are Containers
Part 2 – Platforms for Running Containerized Workloads
Part 3 – Introduction to Docker
Part 4 – 4 Pro tips for Working with Docker
Part 5 – How to Run Linux Containers on Windows Server 2019
So, as I mentioned, we’re going to continue talking about docker today. As you’ll know if you’ve read the previous parts of this series, containers have historically been used for hosting stateless applications. Basically, your containerized workload starts, does its job, and is then removed once done. This is great for worker processes, and things like simple web apps, but what if you want to containerize something that requires a static data set? How do you ensure that the data isn’t lost when the container stops? It’s the data that’s really important right? The application part of the container can easily be redeployed, so the challenge is in making sure the data stays “persistent”. As mentioned, this use-case wasn’t really considered until recently, and with Microsoft supporting workloads such as SQL in containers, it’s acceptance is becoming more mainstream.
So how do make sure the data stays persistent? This is where Docker Volumes come into play.
What is a Docker Volume?
The short version is that a Docker Volume is an external storage location that a container is attached too.
The long version from Docker’s website is:
A volume is a specially-designated directory within one or more containers that bypasses the Union File System. Volumes are designed to persist data, independent of the container’s life cycle. Docker therefore never automatically delete volumes when you remove a container, nor will it “garbage collect” volumes that are no longer referenced by a container. Also known as: data volume
The volume is first created using the “docker volume” group of commands, and then you attach a volume to a container by passing the –mount parameter at the time of running a container. Docker’s documentation will refer to what we’re using in this post as a “Named Volume”. You also have the ability to use what Docker calls Bind Mounts, which directly attaches the container to a typed-out specified directory on the container host. The problem with the bind mount method is you’re using a hardcoded path which may not exist on another container host in your environment.
Named Volumes allow you to create the volume and simply reference it with a simple name when working with the container. Showing you will give you a better idea of how it works. Let’s take a look
How to Attach a Named Volume to a Docker Container
In the below example we’re going to run a simple nano server container on my Windows 10 box.
Let’s say that I want some of the data used by this container to stick around after the container is gone. We’ll use a Named Volume for this.
NOTE: This how-to was conducted with Docker version 18.09.0, build 4d60b4
The first thing I need to do is create the volume by using the below command:
docker volume create nano-persistent-storage
I can then issue the following to make sure the volume now exists:
docker volume ls
And if we want even more detailed information on this newly created Docker volume we can pair this with the inspect command:
docker volume inspect nano-persistent-storage
As you can see in the image below, we’re given a good deal of information about this container. Most importantly, its mount point.
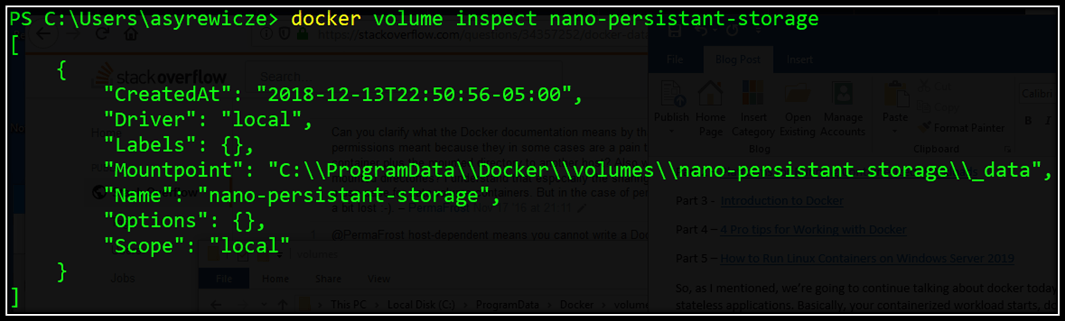
In the mount point field, we can see that this volume is associated with the path “C:\ProgramData\Docker\volumes\nano-persistent-storage\_data” on the container host (My Windows 10 machine in this case).
When we attach this volume to a container we have to define a target directory within the container. That directory is basically a symlink to this mount point. It’ll become more clear if you see it yourself.
We’ll spin up a nano server container in interactive mode so you can see it in action. To do so we run the below:
docker run -it --mount source=nano-persistent-storage,target=C:\KeepMyData --name persistent-nano Microsoft/nanoserver
You can see that we’re using -it for interactive mode. The –mount parameter requires a source (our volume created above) and a target (The directory within the container to attach to said volume).
Note: The source and target must be separated by a comma for proper syntax usage.
Finally, we’re using the –name parameter to name our new container, and then specifying which container image to use for this new workload.
Once we’re inside the container simply issuing a dir command will show us that the external storage has been attached as shown below!

Let’s grab a list of running process and save them to a text file in the persistent location to make sure it’s working. We can do so by issuing the below PowerShell command
Get-Process | Out-File C:\KeepMyData\ImportantData.txt
Now exit the container by typing exit (twice if you’re in Powershell in the container)
Make sure the container is no longer running by running:
docker container ls -a

The status should be Exited
Then let’s delete the container altogether
docker container rm persistent-nano
Let’s make sure it’s actually gone with:
docker container ls -a
Now let’s see if the data created by the container still exists in the volume. With file explorer, you should be able to browse to: C:\ProgramData\Docker\volumes\NAMEOFYOURVOLUME\_data and see the file we created!
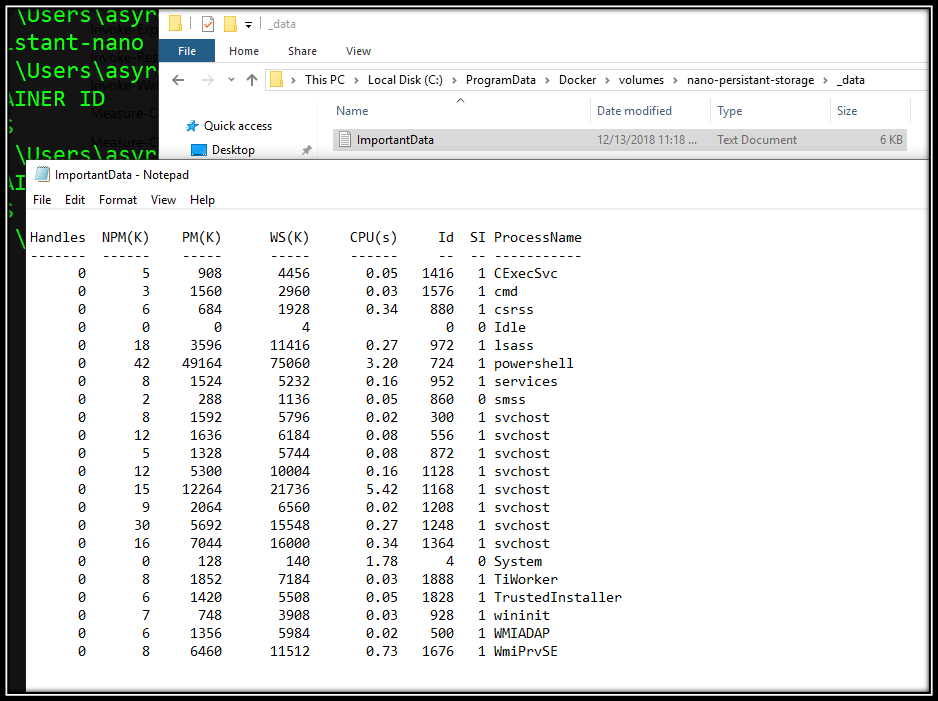
Success!
Wrap-Up
Now this example was of course quite simple but using this method can allow you to run SQL instances, persistent web apps, headless apps requiring data and more! No longer do you have to only use containers for stateless workloads, you can now use them for workloads with structured data, and have that data continue to exist long after the container is gone.
We’ll be covering a more advanced use-case of this in a future segment, but this should be enough to get you started for now.
One question I’d like to leave you with. Does this feature make you more likely to use containers? Was lack of persistence a big issue you had with containerized apps up to this point? I’d love to know in the comments section below!
Thanks for reading!


Not a DOJO Member yet?
Join thousands of other IT pros and receive a weekly roundup email with the latest content & updates!
More in this category


About the Author
Andy Syrewicze


62 thoughts on "How to Create Persistent Docker Containers"
thanks, Andy. Very helpful. Apparently, there’s no need to create a new tmp container with an older container’s volumes, delete the old container and then rename the container.