Save to My DOJO

Hello once again everyone! This article will serve as part 4 of our “Definitive Guide to Containers for MSPs” series. Once again, this series is focusing on containerization technologies through the lens of an MSP evaluating them for use in their solution stack. Today, we’ll be focusing a bit more on some docker basics.
First though, let’s take a look at where we’ve been thus far with this series.
The Definitive Guide to Containers for MSPs so far
Part 1 – What are Containers?
Part 2 – Platforms for Running Containerized Workloads
Part 3 – Introduction to Docker
Pro Tips for Working with Docker
In our last segment, we showed you how to install Docker and use it to pull and run a basic container. In this episode, we’ll look at doing a bit more with Docker so you can start to get used to it. In this article we’ll show you how to:
- How to Use Docker Help
- How to Get Container Image Information from Docker Hub
- How to Run Linux Containers on Windows
- How to Pull and Running Ready-to-go Apps
How to Use Docker Help
If you’ve read some of my PowerShell content on the Altaro Hyper-V or Altaro VMware Blogs, you’ll possibly know that my favorite PowerShell command is Get-Help. I can be honest with myself. I’m human. There are WAY too many commands and parameters for me to memorize and keep track of, and to be honest, my memory is terrible (just ask my wife). Chances are some of what I just said will apply to you as well.
With that in mind, it helps tremendously to have a good help system for any tool in your stack. Thankfully, due to the CLI nature of Docker, there is a fantastic help system baked in regardless of the platform you’re running it on.
Now some people will say, “how is documentation a pro tip?”, and I suppose, yes, it is something of a “grey area”. However, I’ve found that when people are learning Docker for the first time they are likely coming from the Windows world. The Help system for Docker follows syntax that is more akin to Linux and open source, so I’d like to at least show how to access and navigate the help system before we move further.
To start with, open up a CLI window on the machine you installed Docker on from the last segment.
To open the basic help menu run the following:
Docker –help
You’ll get a list like the below.
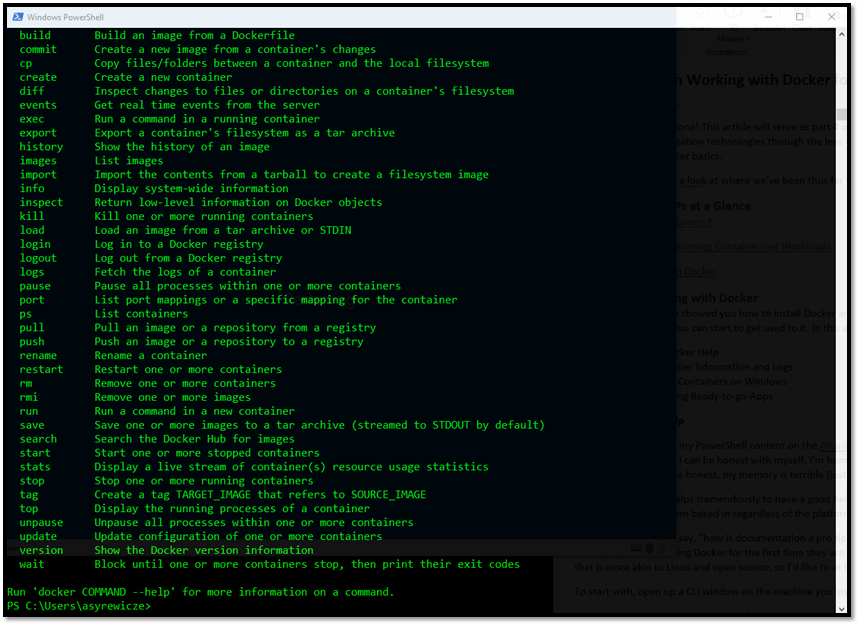
This list contains a full listing of the main commands for the Docker engine. Most of them will execute a task that is most likely self-explanatory. However, you can get further details for a given command by issuing the –help parameter with the command typed AFTER the docker command. For example, if I wanted to know more about how the search function works for looking up images, I would run the below:
Docker search --help
and it would provide the syntax and possible additional parameters as shown below
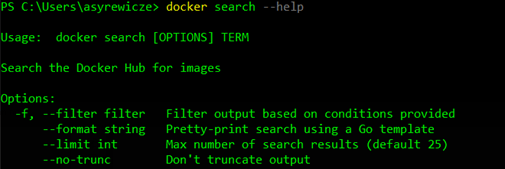
We can see the proper usage syntax and the various options that go along with it.
If you want a REALLY good example, run:
Docker run --help
I won’t post the picture here for the sake of screen real estate, but you can see by running it on your own system. The amount of documentation and information is highly useful.
If you find yourself in need of information over and above what you find with the built-in help, check out the reference section of Docker’s documentation platform for more information.
How to Get Container Image Information from Docker Hub
Now taking what we’ve learned above, let’s actually use some of the commands listed to retrieve some information about container images found on the Docker Hub, which is an online repository of container images.
So, in the above image, we looked at the help for docker’s search functionality. One thing that has often annoyed me with this search tool is it truncates the description field for the image results after running a search. Meaning, you might not fully understand what that image does. One of my favorite parameters here is the –no-trunc parameter. This tells Docker to leave the search results in an unfettered format, so you can read the full description as shown in the search results below by running:
docker search --no-trunc minecraft
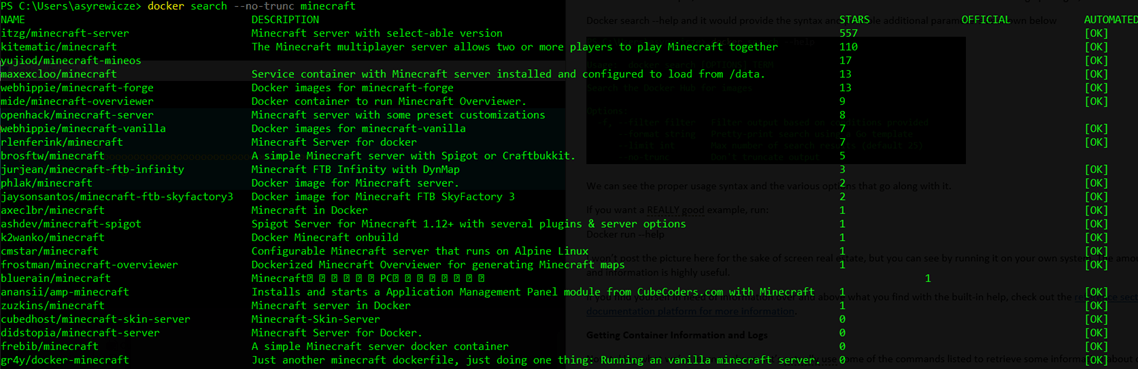
As you can see, the results do take up quite a bit of space, but it allows you to make a more informed choice about the container image that you’d like to pull down. A couple other things you’ll notice with the above image are the extra columns.
Stars: Think of this as a rating system. The more stars a container image has, the more popular it is
Official: While you don’t see any of these container images marked as official, this column indicates if a container image is an official software-vendor-created image. These would be more bug-tested and ultimately more supported for production environments
Automated: Is the container image’s payload automated? That’s what this column is all about. You’ll find that most container images will be automated because that’s what containers are all about right?
If you need more information about a container you find in the registry search for and locate that container image on the Docker Hub directly. For example, if I want to find out more information for the most popular Minecraft container image, I’d review this page as shown below.
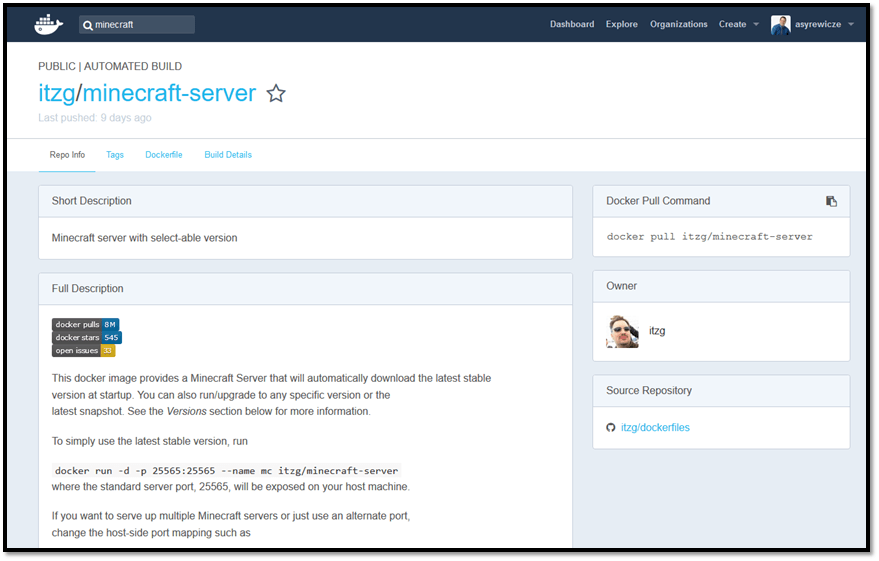
Here you can get a ton of information on a given container image, including who the author is and detailed instructions for what that image does and how to interact with it.
This information can help you make an informed choice about what container image to choose when you’re looking to address a specific need.
How to Run Linux Containers on Windows
So for the sake of example, we’re going to go ahead and run this Minecraft server image. I can tell by looking at the tags and dockerfile tabs on the Docker Hub that this is a linux based container image. I’m going to assume you’re running Docker on a Windows machine. By default, you’re able to run Windows-based container images on a Windows container host, but in order to run Linux containers, you’ll have to tell Docker to switch to Linux container mode.
If you’ve installed Docker on your workstation you can make this change by right-clicking the Docker icon in your system tray and clicking “Switch to Linux Containers”. It will take a few moments, and then be ready to run Linux based container images.
This process becomes more difficult however if you’re running a Server Core-based container host with Windows Server. You won’t have the UI to interact with, and the underlying bits are still changing rapidly while working towards more easily running both Windows and Linux containers at the same time. How do you make this change? Sadly, as of the time of this writing, there isn’t a super easy clear-cut way of doing this, like there is with the GUI tools. However, there is a great Howto you can follow on Github here.
How to Pull and Run Ready-to-go Apps
Now that you’re able to run Linux container images on your Windows container host, let’s simply pull and run what I would call a ready-to-go-app! This is one of the great benefits of containers. I can quickly pull down an image that is already configured to run the workload I want and run it with minimal CLI interaction and end-users can consume that service almost immediately. We’re big Minecraft fans in the Syrewicze household, so whenever we want a fresh server this Docker image makes things wildly simple for me.
As you can see from the documentation page for this image on the Docker hub shown above, this is a fully automated image and will run the latest stable build of Minecraft by default. Let’s give it a go by running the below command:
docker run -d -e EULA=TRUE -p 25565:25565 --name mc itzg/minecraft-server
The -d tells the container to run in the background by “detaching” the console from it
The -e is required by this container image to pass in an environment variable accepting the Minecraft EULA. If this isn’t done the container simply exits.
The -p specifies that the containers ports should be published to the container host. This container will be using the host’s IP (we’ll cover networking in a future segment)
We’re then naming the container with –name
Then we’re finally listing the image we want to run. This is what it should look like followed by a list of the running containers

I now spin up Minecraft and connect to it as a new server and it’s ready to go! A full working production workload in less than a few minutes.
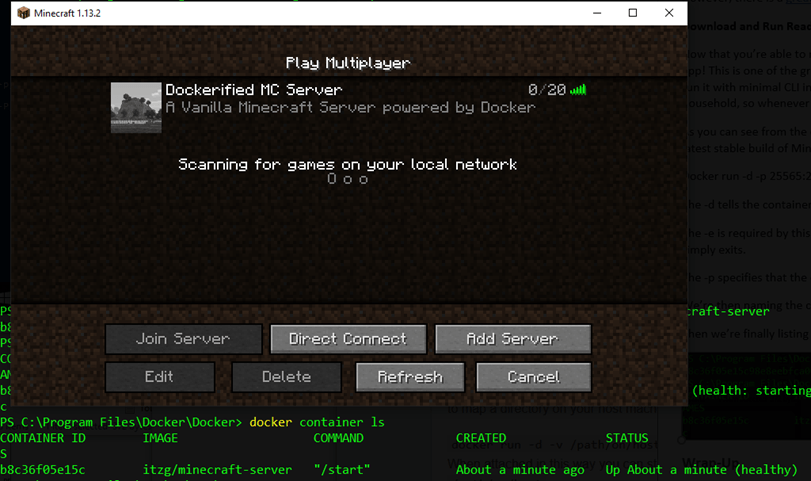
While Minecraft is far from a production workload, imagine doing this with as many applications in your environment as possible. Think of the time savings! THIS is the power of containers. Really, in the end, not much work went into this which is the benefits of using containers. We didn’t have to install an OS, we didn’t have to install patches, and we didn’t have to install an application. Speedy indeed.
Wrap-Up
Hopefully, this has been a useful article for you. Up to this article, we’ve covered a lot of theory, but now we’re starting to actually get into the nitty-gritty how-to section of the series, and there is going to be much more of that going forward!
Did you find this helpful? Can you see a use case for this in your MSP toolkit? Let us know in the comments section below!


Not a DOJO Member yet?
Join thousands of other IT pros and receive a weekly roundup email with the latest content & updates!
More in this category


About the Author
Andy Syrewicze

