Save to My DOJO
In the first part of this series we looked at storage architectures namely SAN and NAS and related protocols including iSCSI and NFS. We also covered the types of datastore you can set up in a VMware environment. In today’s post, I’ll be going over the process of creating NFS shares and iSCSI luns on Windows Server 2012 which I will later provision as datastores.
Flexibility is one of the great things I like about virtualization. It removes a truck load of constraints when it comes to provisioning environments that would otherwise be impossible to roll out unless you enjoy access to unlimited hardware. Such is the case here. I’m using a Windows Server 2012 vm, in absence of the “real” thing, to mimic SAN and NAS services via the File and Storage Services server role.
Anyway, let’s get the ball rolling.
Requirements
If you wish to replicate the steps described in this post, go ahead and add the features shown selected in the next screenshot using Server Manager. Needless to say, you must have Windows Server 2012 installed on either a virtual or a physical machine to accomplish this.
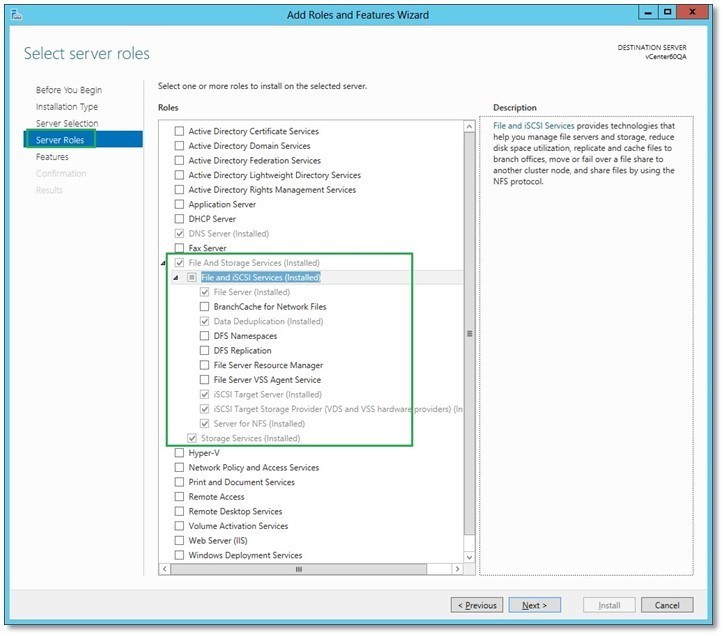
Adding new Server Roles in Windows Server 2012
You should also put aside some disk space for the iSCSI and NFS resources we will create. In my case, I added 2 extra virtual disks (vmdks), one for iSCSI and another for NFS, to the Windows Server vm. After adding the disks, you just need to rescan storage to make sure the change is picked up. This is shown in the following screenshot.
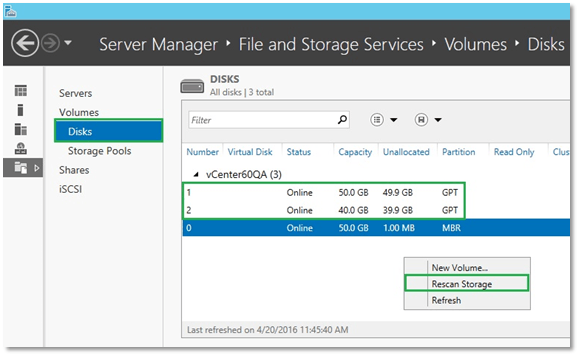
Rescanning storage on a Windows Server 2012 vm to the pick up the new vmdk drives added
How to create an NFS share
The easiest way to create an NFS share, once you’ve installed the Server for NFS feature in Windows Server, is as follows:
- Right-click on a folder (create a new one if required) you’d like to share and click on the “NFS Sharing” tab.
- Tick on the Share this folder checkbox and type in a name for the share name. You can leave all options as set by default. Click on the Permissions button.
- Tick on the Allow root access option and change the type of access to Read-Write.
- Take a note of the NFS network path. You’ll need this when mounting the corresponding NFS datastore.
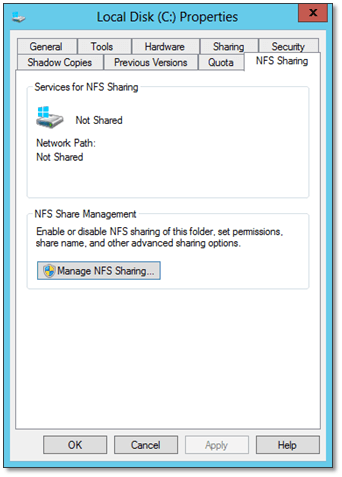 1 – Select a folder to share |
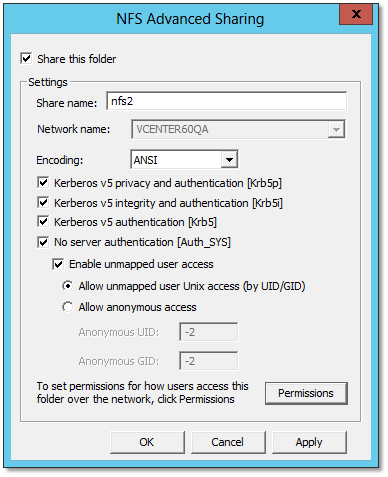 2 – Set the share name and set authentication methods |
|
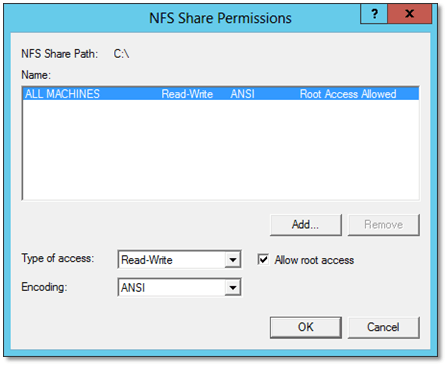 3 – Grant root and R/W access |
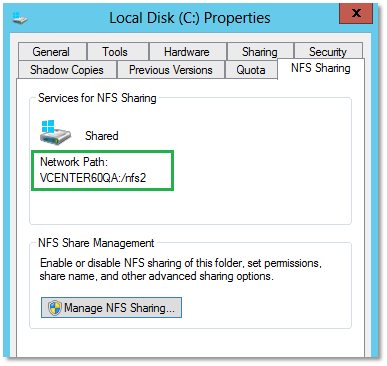 4 – NFS share created |
|
If you’re the impatient type and can’t wait to try this out, fire up a vSphere client, select an ESXi host and click on the Configuration tab. Next, select Storage from Hardware. In the right-hand pane, click on Add Storage and enter the details as shown next.

Creating datastores on ESXi
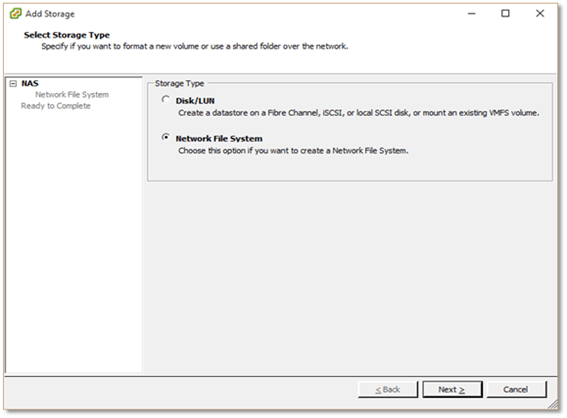 Choose between a VMFS and an NFS datastore |
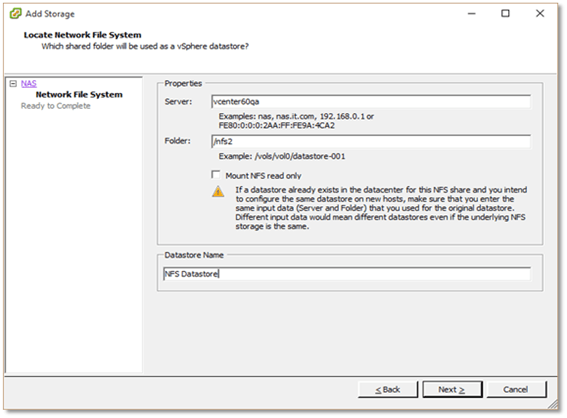 Creating an NFS datastore |
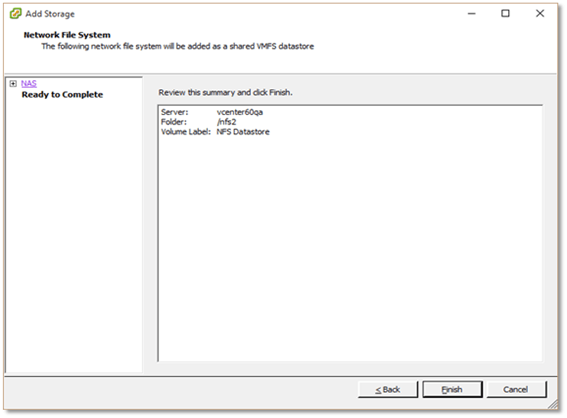 NFS datastore created |

The “NFS Datastore” just created
And there you have it, an NFS based datastore ready for use.
Setting up disks on Windows Server for NFS and iSCSI
Following the steps outlined below, you should be able to create disks on Windows Server that will serve as NFS shares and iSCSI luns for vSphere consumption. Incidentally, the procedure is identical to setting up both NFS and iSCSI save for the last bit where the actual shares and luns are created. I am aware that there are a ton of screenshots to go through but, as the saying goes, a picture is worth a thousand words!
First things first, we need to create a storage pool.
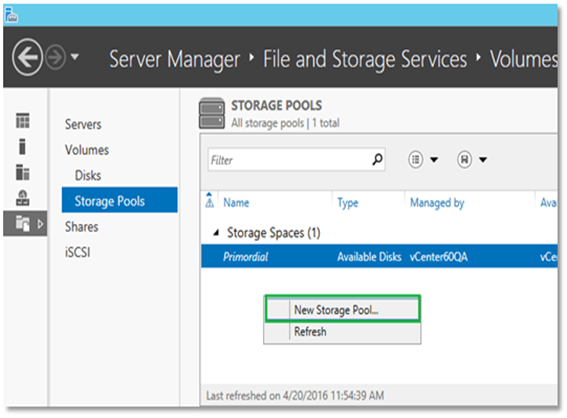
Creating a new storage pool on Windows Server 2012
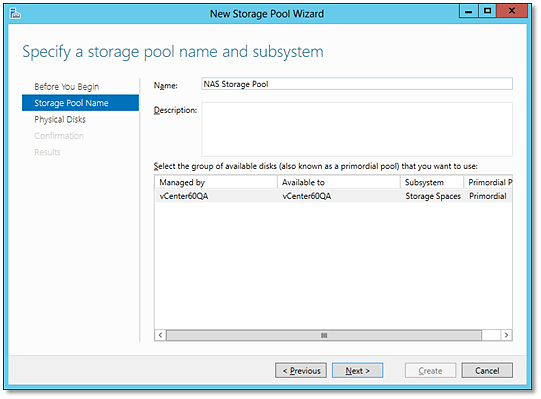 1. Assign a name to the new storage pool |
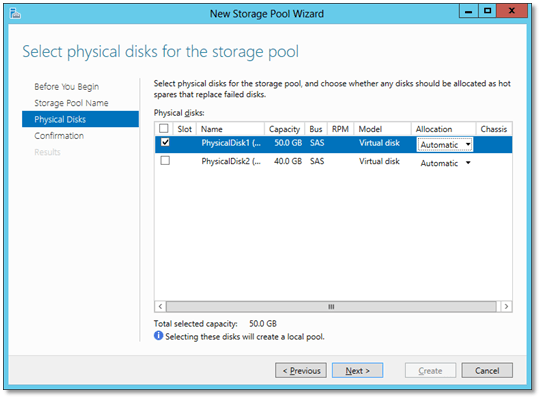 Select the disk(s) to add to the storage pool |
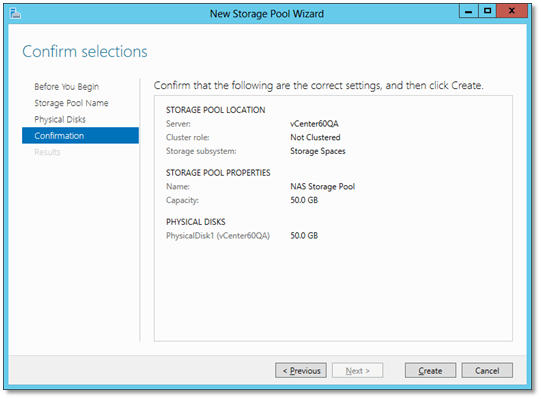 3. Confirm and create the storage pool |
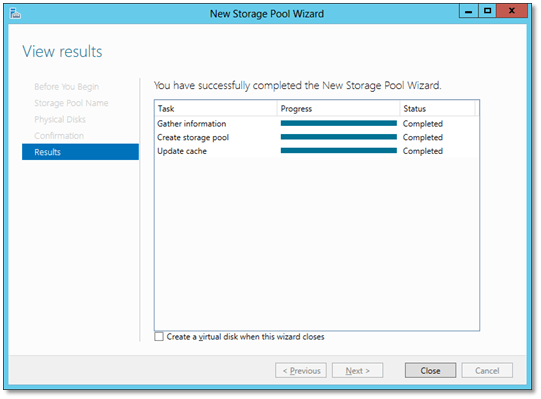 4. Storage pool created |
Next, we create a virtual disk.
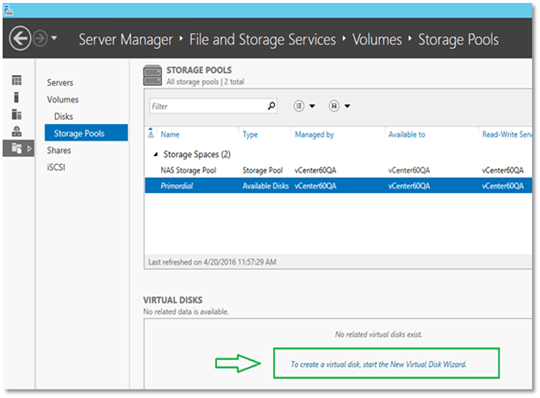
Creating a virtual disk
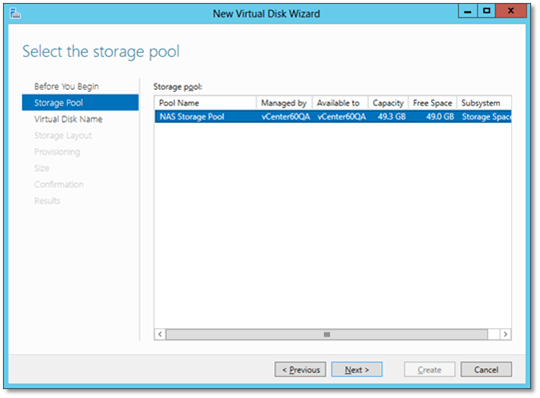 1. Select the storage pool in which the virtual disk will be created |
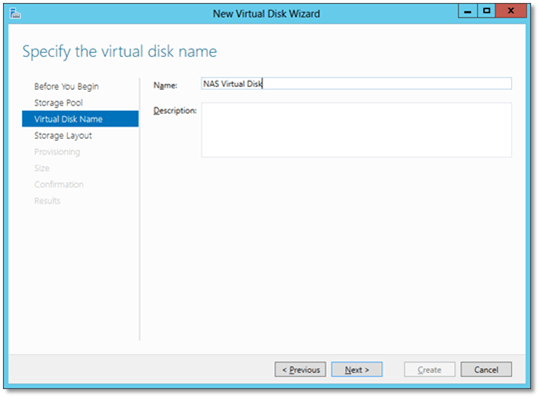 2. Assign a name to the virtual disk |
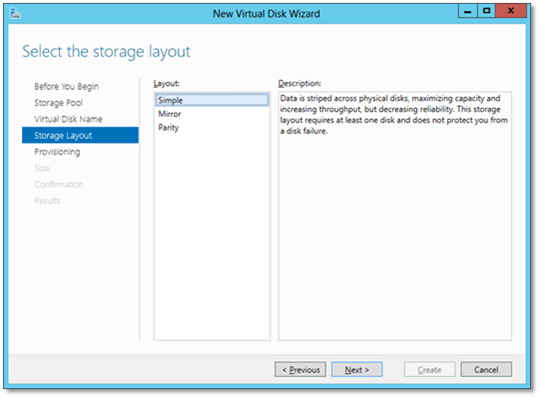 3. Select the storage layout for your virtual disk |
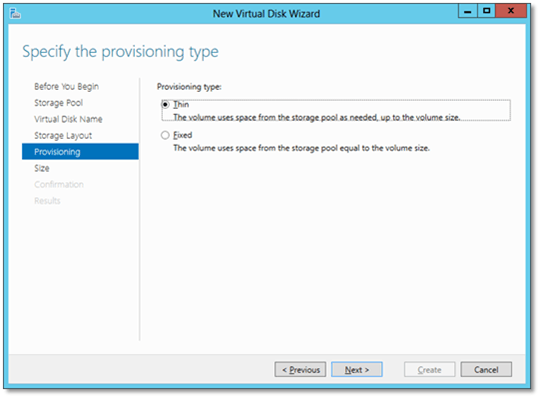 4. Select the provisioning type (Thin assigns space on request, Thick assigns all the space immediately) |
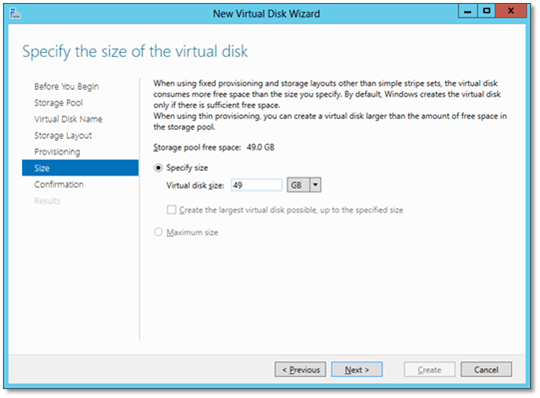 5. Specify the virtual disk’s size |
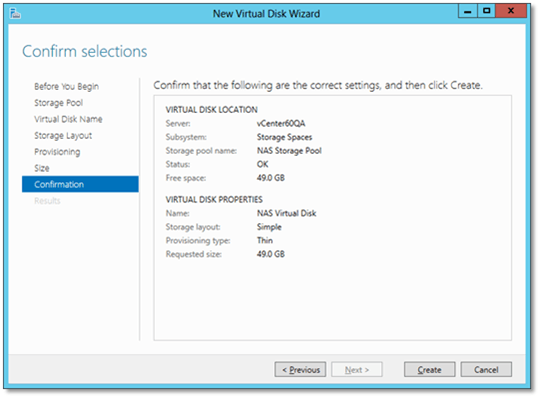 6. Confirm and create |
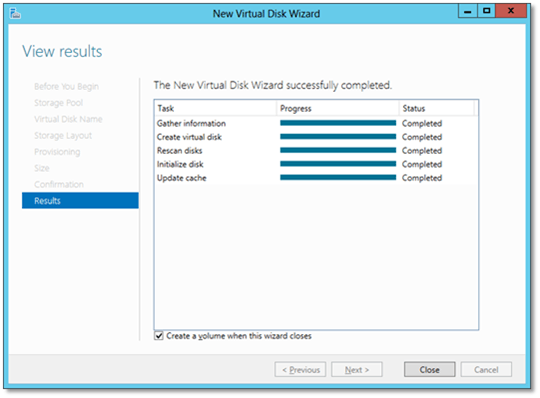 7. Virtual disk created |
This step, sees us create the volume where the NFS share(s) or iSCSI lun(s) will reside. The setup wizard starts automatically when the “Create a volume when this wizard closes” check-box is selected as per default setting (see previous screenshot). Think of this step as formatting the virtual disk.
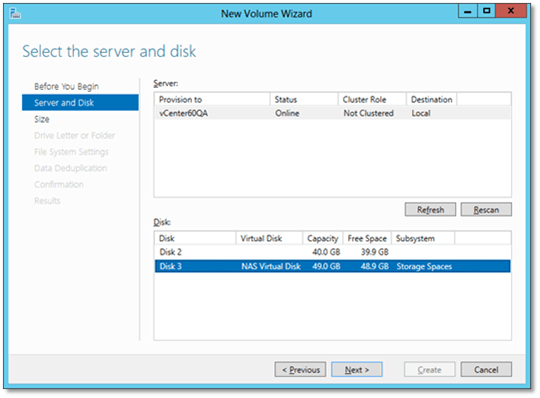 1. Select the virtual disk on which the volume will be created |
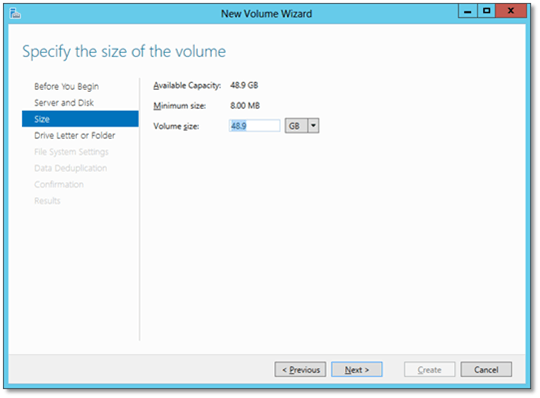 2. Set the size of the volume |
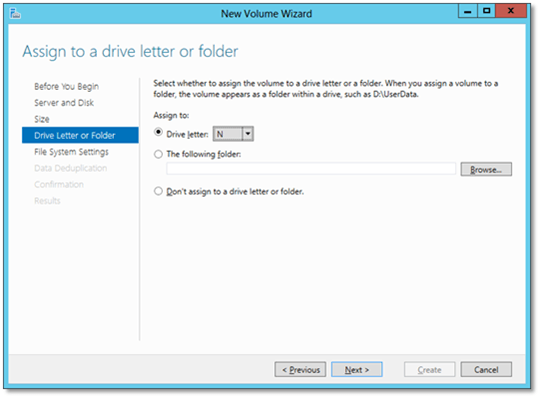 3. Assign a drive letter to the volume |
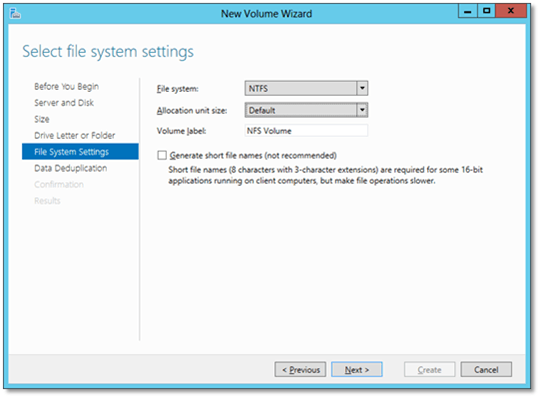 4. File system settings (keep the default settings) |
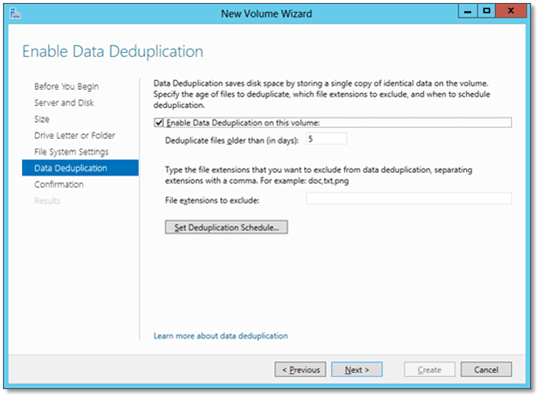 5. Enable data deduplication if desired |
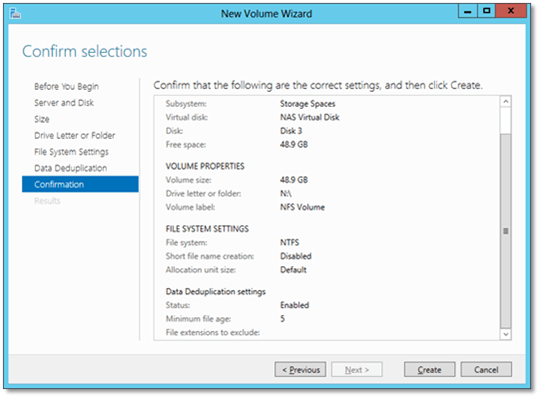 6. Confirm and create |
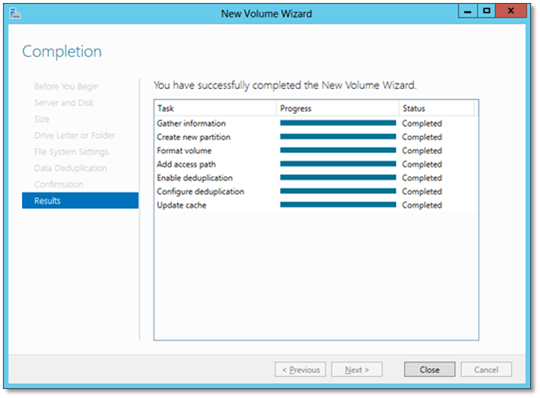 7. Volume created |
Finally, we create the NFS share.
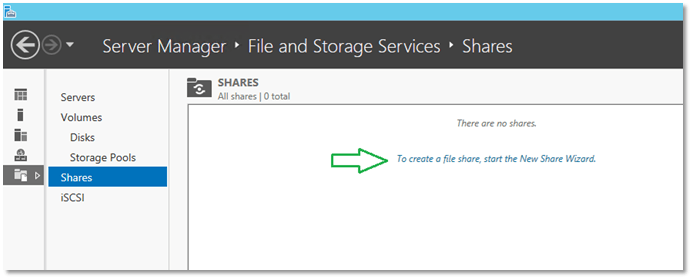
Creating a new share on Windows Server 2012
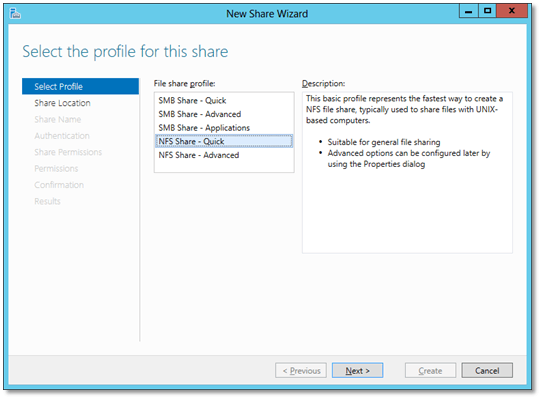 1. Select NFS Share – Quick |
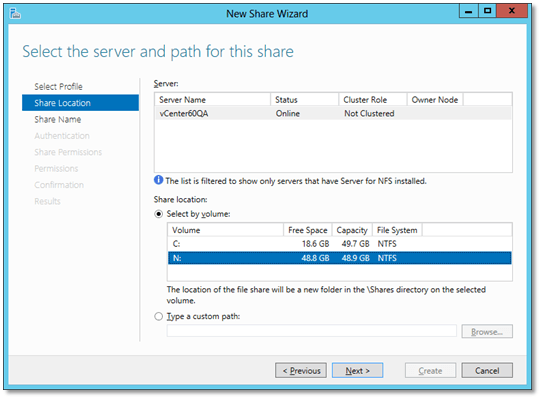 2. Choose the volume on which the share will be created |
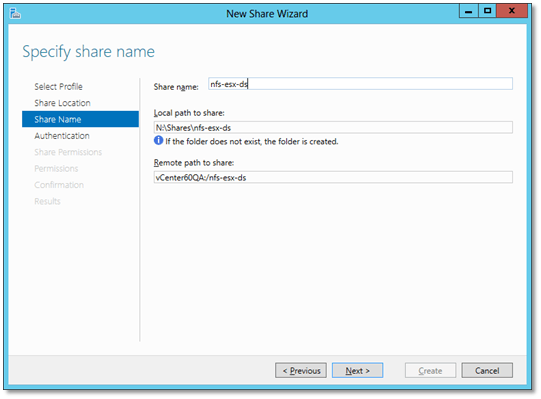 3. Specify a name for the share taking note of the remote path |
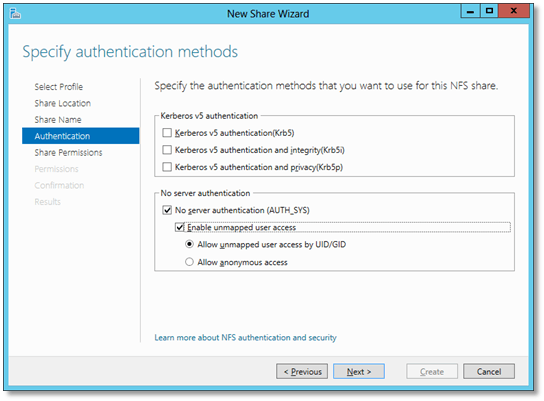 4. Select the server authentication method desired (for ESXi in this case) |
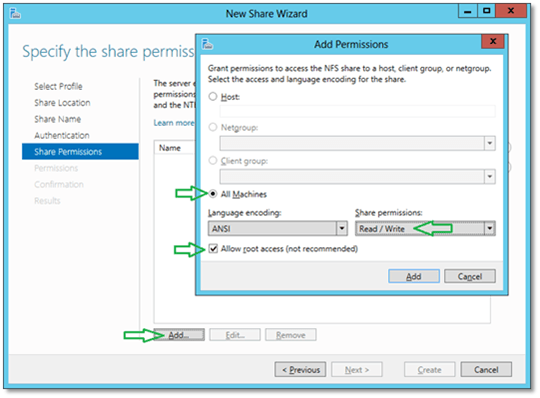 5. Setting up the share permissions |
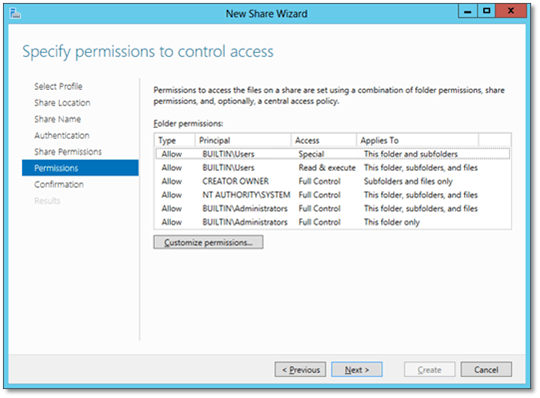 6. Setting up share permissions at the user-level (keep the default settings) |
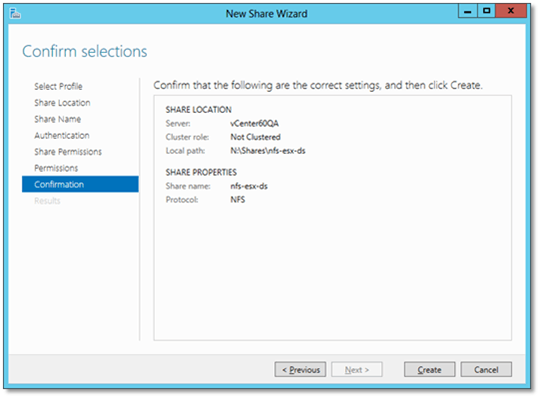 7. Confirm and create |
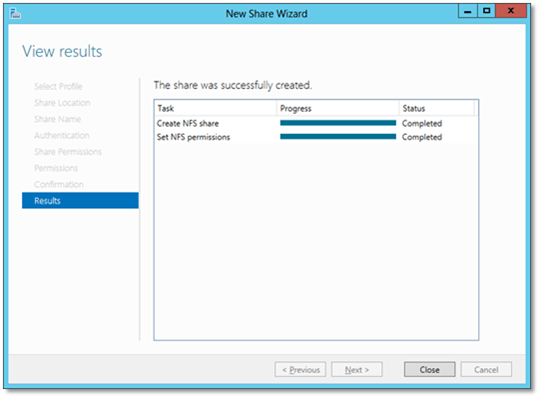 8. Share created |
And here’s how to create an iSCSI virtual disk. Bear in mind that I’m using a second disk prepared in advance. The same procedure, as outlined above, is once again used.
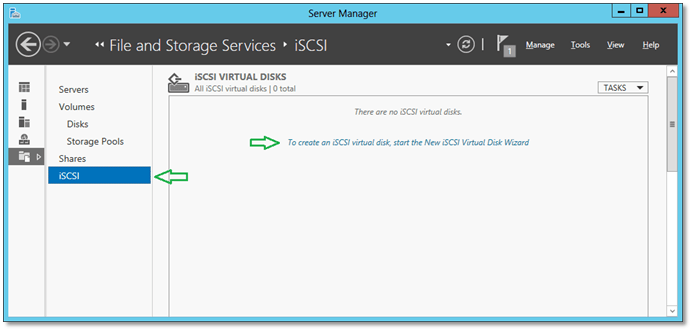
Creating an iSCSI virtual disk
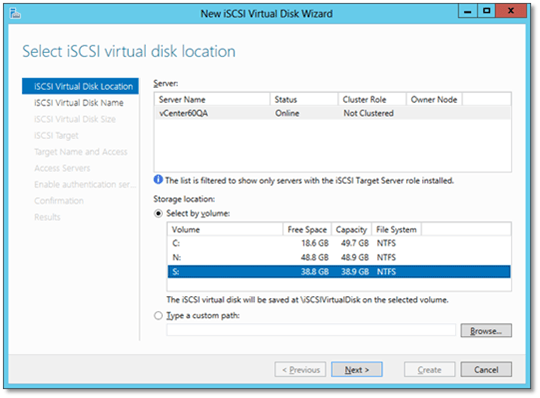 1. Select the volume on which the virtual disk will be created |
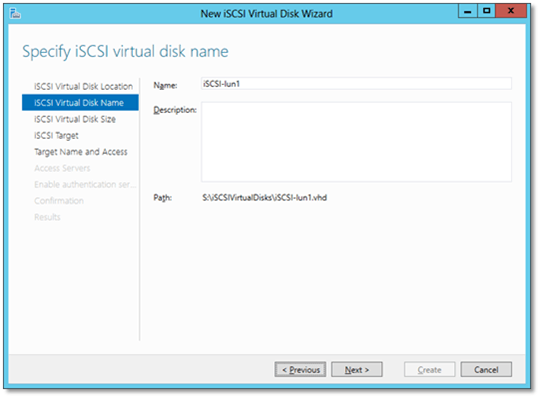 2. Assign a name to the virtual disk |
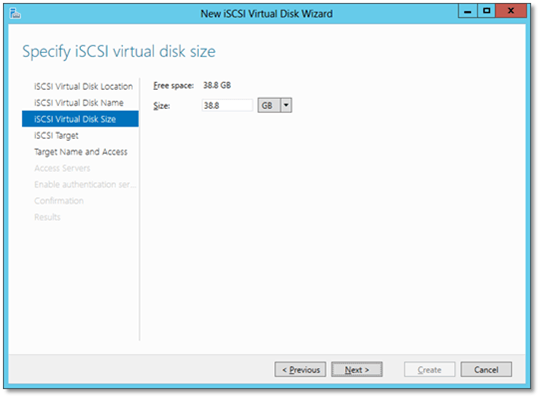 3. Set the virtual disk size |
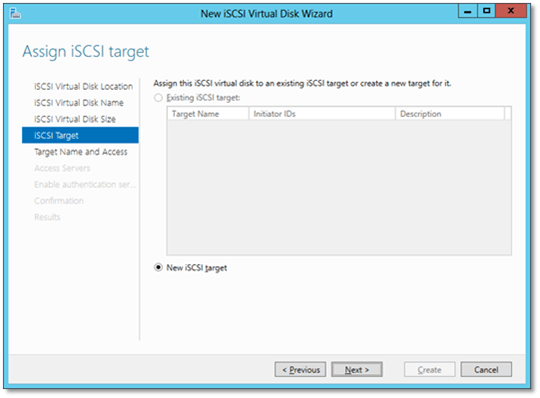 4. Create a new iSCSI target |
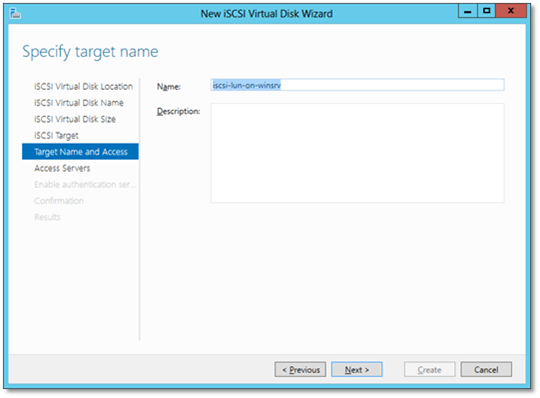 4. Assign a name to the iSCSI target |
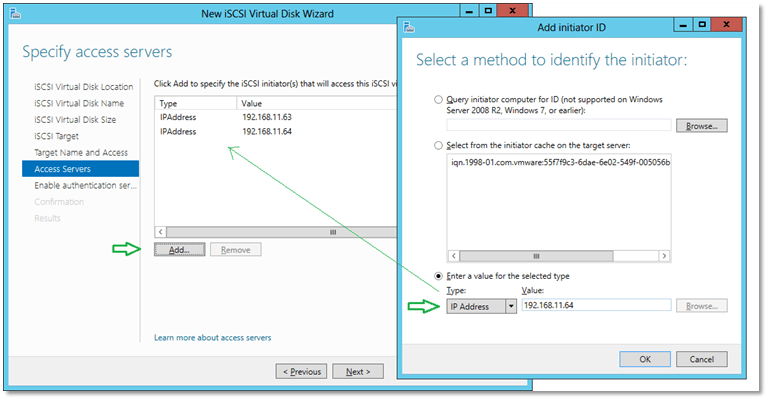
5. Add the iSCSI initiators (IQN or IP addresses)
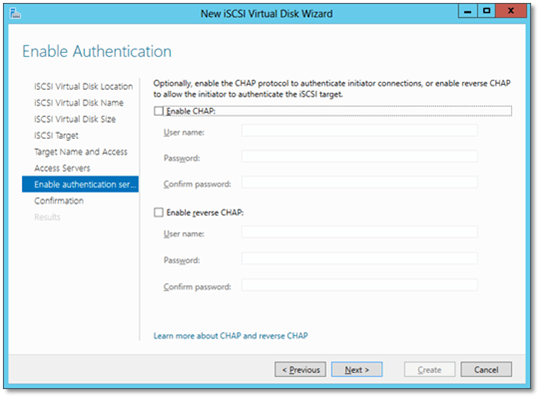 6. Enable authentication if required |
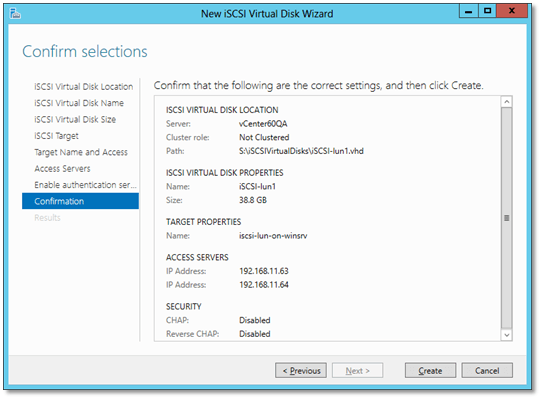 7. Confirm and create |
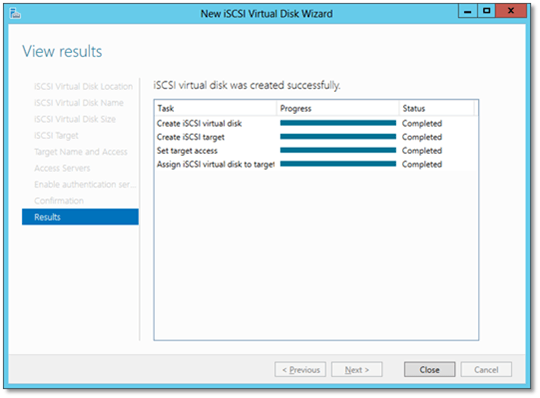 8. iSCSi virtual disk created |
Creating datastores on ESXi
The video at the end of this post goes over the steps I’m about to list. The video demonstrates how NFS and iSCSI based datastores are set for use by a two ESXi host vSphere cluster.
iSCSI
- Firstly, I configure the iSCSI software adapter on both ESXi hosts. This step is mandatory when running iSCSI over conventional Ethernet nics (as opposed to iSCSI HBAs). Here you’ll find more information on how to activate the adapter. I finalize the configuration by adding the target’s IP address (Windows Server) using the default iSCSI network port i.e. 3260.
- Re-scan storage as prompted.
- Next, I mount the lun as a datastore on one of the hosts. This is done by clicking on Add Storage, choosing Disk/LUN and selecting the lun you wish to mount.
- The iSCSI datastore is automatically added to the second ESXi host.
- Finally, I browse the datastore just created to verify that both hosts have read/write access to it.
NFS
- Similarly, I mount the NFS share as a datastore on both ESXi hosts. To do this, click on Add Storage, choose Disk/LUN and select Network File System. Type in the NFS Server’s IP address and the path to the NFS folder. This step is repeated on both hosts.
- Next, I migrate an existing vm to the NFS datastore to verify correct functionality.
- I then switch over to the Windows 2012 Server vm serving the NFS and iSCSI resources. I navigate to the NFS drive (N:) showing the NFS share (nfs-esx-ds) previously created. Here you’ll be able to see the CentOS32 vm folder, migrated from the previous step, and its constituent files.
- Finally, I change over to the iSCSI drive (S:) to show the corresponding vhd file.
Conclusion
We’ve seen that setting up NFS and iSCSI resources on Windows Server, which we then mount as datastores on ESXi, is a relatively straight forward process. The same methodology applies when carving out datastores from “physical” NAS and SAN implementations. Any added complexity is a side-effect of having to work with proprietary operating systems and command-line such as Data ONTAP from NetApp and SAN management software.
Lastly, I did not bother showing how to create datastores on local storage since it’s just a matter of selecting a local disk and creating a VMFS datastore on it. Hopefully, I’ll be covering Virtual Volumes in a future post since I haven’t as yet had the opportunity to test them out properly.
[the_ad id=”4738″][the_ad id=”4796″]


Not a DOJO Member yet?
Join thousands of other IT pros and receive a weekly roundup email with the latest content & updates!


