Save to My DOJO

Workload mobility is a term you’ve probably heard a number of times that got increasingly popular as years go by. Nowadays environments require some level of flexibility regarding the physical location where the virtual machines can run.
This need in flexibility drove innovations that resulted in products like NSX, stretched vSAN, VMC on AWS… The Cross vCenter vMotion feature has been helping companies move their workloads across vCenter servers for several years now, and it keeps bettering with age like good wine.
What is Cross vCenter vMotion
As the name implies, Cross vCenter vMotion happens when you need to move a virtual machine managed by a different vCenter than the current one. Now there are 2 angles to this topic as vCenter servers can work independently or together with the Enhanced Linked Mode feature.
Later on, we will demonstrate the vMotion process in both situations.
-
- Independent SSO domains: There are environments that don’t share a vSphere SSO domain, i.e., not configured in Enhanced Linked Mode. Meaning you connect to each vCenter independently to manage the underlying environment.
-
- Shared SSO domains: Enhanced Linked Mode lets you manage multiple vCenter servers from a single pane of glass as well as automatically replicating roles, permissions, tags and more. Making it ideal for environments running several vCenter servers such as distributed locations. (Note that things have changed in vSphere 7 since the blog linked above).

“Enhanced Linked Mode simplifies management and lets you use the same SSO domain on multiple vCenter servers.”
Use cases
There is a number of instances where you might need to migrate virtual machines across vCenter and there will be others that I failed to mention. You will most often find cross-vCenter vMotion used in the following scenarios:
-
- Infrastructure Migration
In-place upgrades aren’t always possible or wanted and moving to a new version sometimes turns into a migration. Many IT pros prefer “fresh” installs rather than upgrading as you ensure that you don’t carry potential problems over to the new instance. Meaning you end up with a vCenter to migrate from and a vCenter to migrate to. If the option to connect the old hosts to the new vCenter for the duration of the moves is not an option, cross-vCenter vMotion will solve that problem for you.
-
- Hybrid-Cloud moves
Hybrid Cloud topologies such as VMware Cloud on AWS are increasingly popular as they offer a great level of flexibility and access to cloud resources without rocking the boat in how your applications run. Cross vCenter vMotion will let you migrate workloads between your on-premise and Cloud SDDC(s).
-
- Migration to VMware Cloud Foundations (VCF)
VCF provides a hybrid cloud platform for both traditional and modern apps. It is based on the complete software-defined stack with compute, storage, network security, Kubernetes, and cloud management. More and more companies go down that route to ensure a supported architecture, respect of best practices and ease of deployment. Cross vCenter vMotion is an option to move the workloads from your legacy environment to VCF.
Considerations and prerequisites
If you are having trouble getting Cross-vCenter vMotion to work, review the following prerequisites to ensure your environment supports it. And because there is no point in re-writing everything here, refer to the documentation for an exhaustive list of the various caveats. Below are the main ones.
vSphere License
An Enterprise Plus license is required to use Cross-vCenter vMotion.
Versions
Note that the type of migration you can do (clone, cold or live) will depend on the versions you run. More information in the documentation.
-
- Enhanced Linked Mode: vSphere version 6.0 or later.
-
- Different SSO domains: Advanced Cross vCenter vMotion, introduced in vSphere 7.0 U1c, is only supported between vSphere (vCenter and ESXi) versions 6.5 or greater. The source vCenter must run vCenter 7.0 U1c or later.
Network
Ports
The communication on the following ports must be open in order for the migrations to work.
| Source | Destination | Port |
| vSphere ESXi | vSphere ESXi | 8000, 902 |
| vCenter Server | vSphere ESXi | 443 |
| vCenter Server | vCenter Server | 443 |
Virtual Machine networking
Ensure that the port groups on the destination hosts have access to the same network resources or the VM will lose network connectivity. NSX-T can help you with that by overlaying layer 2 should you cross the layer 3 boundary.
Migration from a distributed switch (DVS) to a standard switch or between different DVS versions is not supported.
Time synchronization
The source and destination vCenter servers must be time-synchronized if they are configured in Enhanced Linked Mode.
XVM with Enhanced Linked Mode
As mentioned previously, Enhanced Linked Mode lets you manage multiple vCenter environments from the same pane of glass and facilitates VM migrations across them among other things.

“Enhanced Linked Mode lets you seamlessly migrate VMs across vCenter servers.”
In this section, we will demonstrate how Cross-vCenter vMotion happen in this topology. We will not cover the process of configuring Enhanced Linked Mode as this is out of the scope.
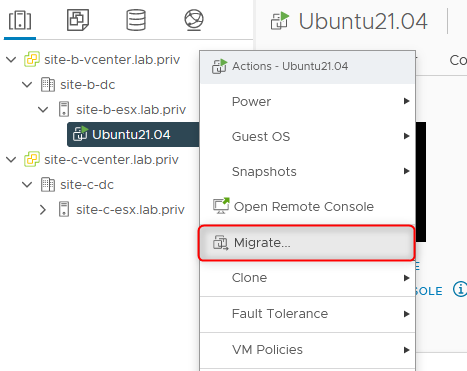
Note that the following procedure is similar to Hybrid Linked Mode when working with VMware Cloud on AWS. As you can see the vCenter servers in the example (site-b-vcenter and site-c-vCenter) are configured in Enhanced Linked Mode so they both appear in the vSphere client.
-
- Right click on the VM to move and click Migrate.
-
- You can move only the compute of the VM by selecting the first choice if its datastore is available at both ends. Otherwise, check Change both compute resource and storage. The latter will be the most common choice as sharing datastores across vCenter servers is not best practice.

-
- Expand the topology of the destination vCenter server and select the resource to migrate it to (a host in my case as this is a basic lab environment).

-
- I skipped the next pages which are the same as a normal vMotion. In the summary pane, you can review the destination and the source by clicking on VM origin in the top right corner.

-
- As you can see in the screenshot below, I didn’t lose a single ping, just like a standard vMotion. There was a slightly longer response time on 2 pings during the switchover but nothing unmanageable.

XVM without Enhanced Linked Mode
If you don’t have Enhanced Linked Mode configured, fear not. Cross vCenter vMotion has been around for a while and could already be achieved in such environments with the help of the API/SDK.
The main options then were either PowerCLI or a great java-based community fling that would run a small web server on your computer.
Advanced Cross vCenter vMotion (vSphere 7 U1c and above)
In vSphere 7 Update 1c, VMware decided to integrate this fling natively in the vSphere Client and called it Advanced Cross vCenter vMotion. It is now easier, safer and faster to perform these actions.

“VMs can be migrated across vCenter servers even if they are not on the same SSO domain.”
In this section, we will review the migration process using Advanced Cross vCenter vMotion in vSphere 7 Update 2. As mentioned previously, the source vCenter must run vSphere 7 U1c or above and the destination must be on version 6.5 or greater.
If the virtual machine that you migrate has an NVDIMM device and uses PMem storage, verify that the destination host or cluster have available PMem resources.
Export virtual machine
Initiating a cross vCenter vMotion from the source vCenter server is referred to as an Export operation.
-
- Right click on the VM to move and click Migrate like a regular vMotion.

-
- Select Cross vCenter Server export in the list. This won’t appear if you run a version older than vCenter 7 U1c.

-
- Enter the details to connect to the destination vCenter Server, then click Login and accept the certificate thumbprint in the popup if it isn’t signed by a trusted root CA.
You can check Save vCenter Server address so you just have to select it from the list of saved vCenter servers the next time you need it.

-
- The next few steps are very similar to a regular migration so I will skip to the last pane of the wizard. Review the details and click Finish.
Note that the same prerequisites as regular vMotion apply regarding compatible hosts, vSwitches, datastores…

-
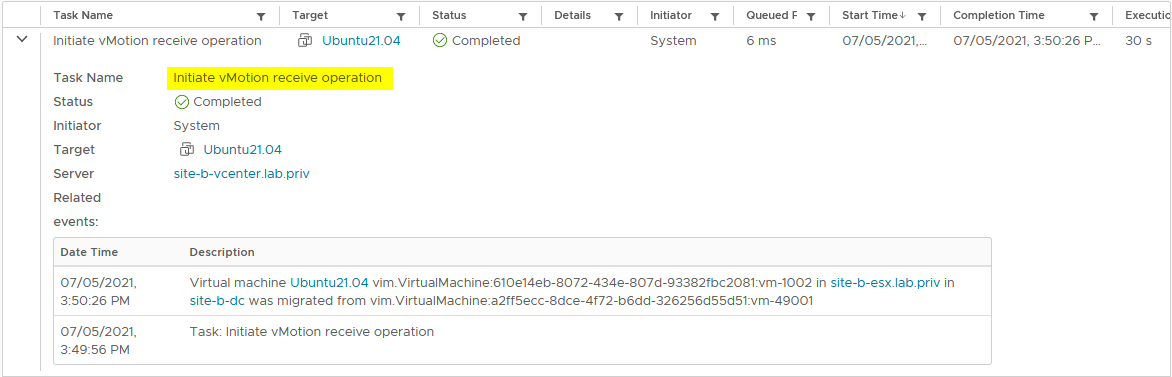
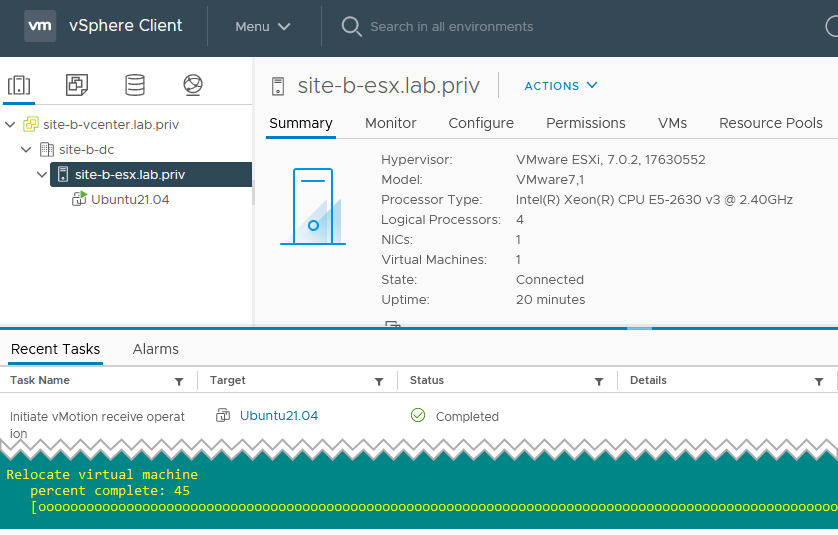
- You will see, on the destination vCenter, an Initiate vMotion receive operation task that should complete successfully.
Import virtual machine
vSphere 7 U1c also added an Import capability to initiate a cross vCenter migration from the destination vCenter. This is particularly useful if the source vCenter is running an older version that doesn’t have the feature in the vSphere client.
-
- Right-click on the resource you want to migrate the VM to (a host in my case), and click Import VMs.

-
- You now need to select the source vCenter server. As you can see the remote vCenter we saved earlier is available in the list.

-
- In the next step you select the virtual machine(s) you want to import. You can select multiple VM which suits batch migration scenarios.

Once again, I will spare you the following steps in this section as they are the usual compute, storage, folder…
PowerCLI (vSphere 6.0 and above)
If you haven’t upgraded to, at least, vCenter 7U1c, you can still migrate VMs to a vCenter in a different SSO domain using the methods mentioned earlier. You can either use the community fling or PowerCLI. We will demonstrate the latter in this section.
You will find examples in the help section of the Move-VM cmdlet in PowerCLI.

“The help of the Move-VM cmdlet provides guidance on how to perform a cross vCenter vMotion.”
We are demonstrating here a basic migration with the minimum requirements. You can always tune it if you use storage policies, distributed switches and so on.
-
- First, you need to ensure you can be connected to multiple vCenter servers.
| Set-PowerCLIConfiguration -DefaultVIServerMode Multiple -Confirm:$False |
-
- Connect to both vCenter servers in your PowerCLI session.
| $SourceVC = Connect-VIServer ‘core-vc.lab.priv’ -Credential (Get-Credential -Message “Source vcenter creds”)
$DestVC = Connect-VIServer ‘site-b-vcenter.lab.priv’ -Credential (Get-Credential -Message “Destination vcenter creds”) |
-
- Select the virtual machine and its virtual NIC. You can use the -Server parameter to ensure the VM is on the source vCenter.
If the VM has multiple vNICs, make sure you know the order as the destination portgroups will need to be in the same order (vNIC[0] goes to PG[0], vNIC[1] goes to PG[1] and so on).
| $vm = Get-VM -Server $SourceVC -name ‘Ubuntu21’
$vNIC1 = Get-NetworkAdapter -VM $vm |
-
- Select the host on the destination vCenter server along with the portgroup(s) and the datastore. Your mileage will vary here if you use distributed switches.
| $DestVMHost = Get-VMHost -Server $DestVC -name “site-b-esx.lab.priv”
$DestPG1 = $DestVMHost | Get-VirtualPortgroup ‘VM Network’ $DestDS = $DestVMHost | Get-Datastore ‘Datastore1’ |
-
- You can then execute the migration with Move-VM.
| Move-VM -VM $VM -Destination $DestVMHost -NetworkAdapter $vNIC1 -PortGroup $DestPG1 -Datastore $DestDS |
“You can initiate a cross vCenter vMotion operation with PowerCLI.”
Wrap up
Even though Cross vCenter vMotion has been around for a long time through Enhanced Linked Mode and the API, VMware keeps on adding improvements. The feature was brought to maturity in vCenter 7U1c with the integration of Advanced cross vCenter vMotion in the vSphere client.


Not a DOJO Member yet?
Join thousands of other IT pros and receive a weekly roundup email with the latest content & updates!
More in this category


About the Author
Xavier Avrillier

