Save to My DOJO

Note: this article is connected to our on-demand webinar on vSphere automation. If you want a neat overview of PowerCLI/Terraform plus some cool vSphere automation tips watch the free webinar vSphere Automation Masterclass. If you’re here for the webinar Q&A, you’ll find it at the bottom of this post or just jump straight there.
In our previous articles, we have shown you how to install Terraform, deploy a VM with Terraform and how to implement Azure DSC into our VM builds. Let’s take it a step further into managing our infrastructure like a developer and put our configurations into an Azure DevOps repo to create a pipeline to deploy from source code. We will also set up a Key Vault in Azure with all of our passwords and we’ll configure our pipeline to grab those keys and use them in our Terraform configuration. Let’s get going!
Why use Terraform in a Pipeline?
Let’s first answer the question, why would I want to use Terraform in a pipeline? This will give us the following benefits:
- High level of automation to create infrastructure right from source code
- Utilize the pipeline architecture to allow for in-depth testing and review of code before deploying infrastructure
- Built-in approval processes which can allow for build’s to be approved by an engineer before building. This can allow for the requester to simply input what they want and the engineer just has to review and approve.
Saving Terraform Configuration To Azure Repos
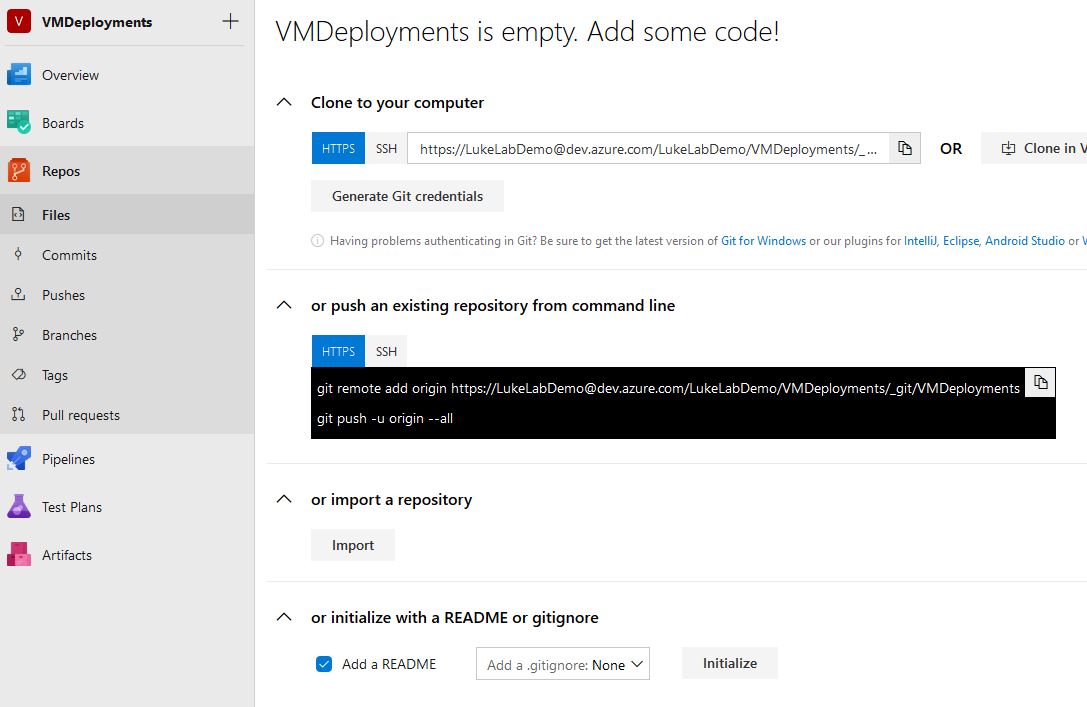
Let’s get our Terraform configuration saved into Azure Repo. You may also use other popular source code vendors if you don’t want to use Azure DevOps. The beauty of Azure DevOps is that it integrates with so many other applications. If you don’t have an Azure DevOps account sign up for the free one and create an organization. I created the LukeLabDemo organization and a project called “VMDeployments”. To create our source control repo, we could choose the various options such as cloning an existing repo. But to get started quickly, and for the purpose of the demo, I’ll choose the option to Initialize with a README or gitignore.
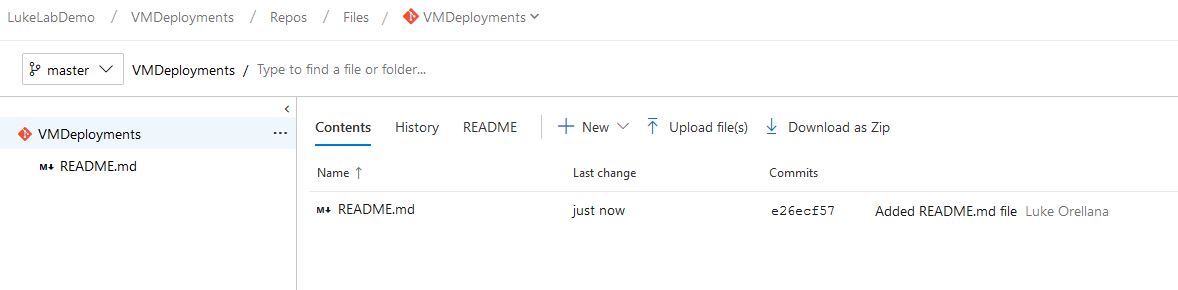
This creates a README.md file in our repo to get it started. Now we need to create the folder for our VM and create our Terraform configuration file:
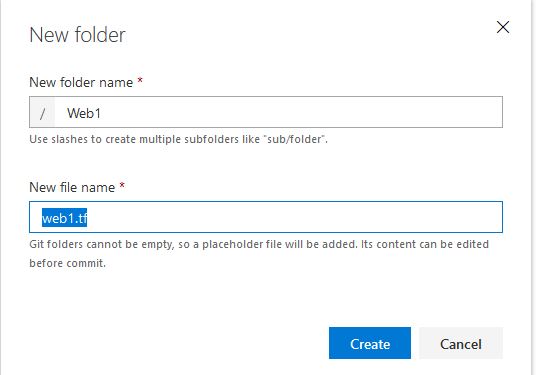
Click New and I’ll name the folder the same as the VM that I”ll be deploying. With Git source control, you can’t have an empty folder, so we’ll create the Terraform configuration file at the same time, I’ll name it “web1.tf”:
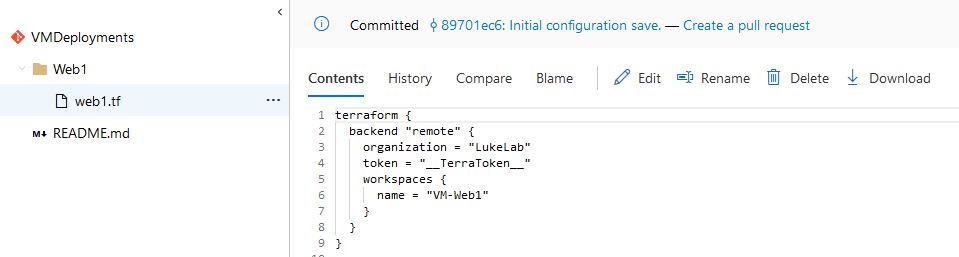
Next, I will edit the web1.tf file and paste in the following code for our configuration. Note that I have variables marked with __ before and after, this is because our release pipeline will replace these variables with the actual values from our Azure Key Vault:
terraform {
  backend "remote" {
    organization = "LukeLab"
    token = "__TerraToken__"
    workspaces {
      name = "VM-Web1"
    }
  }
}

provider "vsphere" {
  user           = "[email protected]"
  password       = "__VCenter__"
  vsphere_server = "192.168.0.7"
  version = "~> 1.11"

  # If you have a self-signed cert
  allow_unverified_ssl = true
}

#Data Sources
data "vsphere_datacenter" "dc" {
  name = "LukeLab"
}

data "vsphere_datastore" "datastore" {
  name          = "ESXi1-Internal"
  datacenter_id = "${data.vsphere_datacenter.dc.id}"
}

data "vsphere_compute_cluster" "cluster" {
  name          = "Luke-HA-DRS"
  datacenter_id = "${data.vsphere_datacenter.dc.id}"
}

data "vsphere_network" "network" {
  name          = "VM Network"
  datacenter_id = "${data.vsphere_datacenter.dc.id}"
}

data "vsphere_virtual_machine" "template" {
  name          = "VMTemp"
  datacenter_id = "${data.vsphere_datacenter.dc.id}"
}

#Virtual Machine Resource
resource "vsphere_virtual_machine" "web1" {
  name             = "Web1"
  resource_pool_id = "${data.vsphere_compute_cluster.cluster.resource_pool_id}"
  datastore_id     = "${data.vsphere_datastore.datastore.id}"

  num_cpus = 2
  memory   = 4096
  guest_id = "${data.vsphere_virtual_machine.template.guest_id}"

  scsi_type = "${data.vsphere_virtual_machine.template.scsi_type}"
  firmware = "efi"

  network_interface {
    network_id   = "${data.vsphere_network.network.id}"
    adapter_type = "vmxnet3"
  }

  disk {
    label            = "disk0"
    size             = "${data.vsphere_virtual_machine.template.disks.0.size}"
    eagerly_scrub    = "${data.vsphere_virtual_machine.template.disks.0.eagerly_scrub}"
    thin_provisioned = "${data.vsphere_virtual_machine.template.disks.0.thin_provisioned}"
  }

  clone {
    template_uuid = "${data.vsphere_virtual_machine.template.id}"

    customize {
      windows_options {
        computer_name  = "Web1"
        workgroup      = "home"
        admin_password = "__LocalAdmin__"


      }

      network_interface {
        ipv4_address = "192.168.0.46"
        ipv4_netmask = 24
      }

      ipv4_gateway = "192.168.0.1"
    }
  }
}
Now we have our configuration for Web1 in our source control repo:
Setting Up Azure Devops Agent
In order to use Azure Pipelines to deploy to our VMware environment on-premise, we are going to need to build a server to configure as our self hosted Azure pipelines agent. This agent will be used to run our pipeline processes and run terraform. This can be either a Linux or Windows server, in my example, I set up a 2016 Windows Core Server. First, we will need to install the AZ modules on the agent server by running the following commands in PowerShell:
Install-module AZ -Force
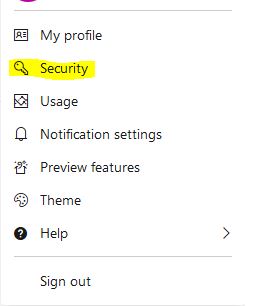
Next, we need to make sure that .Net Framework 4.7.2 is installed on the server for the AZ commandlets to be used. So download it here and install it on the agent server. Before we configure the agent server to report into Azure DevOps, we will need to create a token to allow the connection. To do this click on your username in Azure DevOps and select Security:
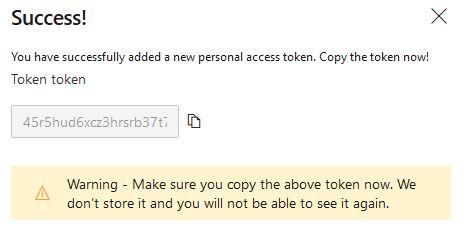
Select New Token and fill out the top information. Select Custom Defined and select the following custom defined scopes:
Agent Pools – Read & Manage
Deployment Groups – Read & Manage
Lastly, click Save:

Now we have our Token, copy it and keep it somewhere, we will use it soon!
We need to download the agent to run on our agent server. To get the download, navigate to project settings then select agent pools and select the default pool. Select New Agent:

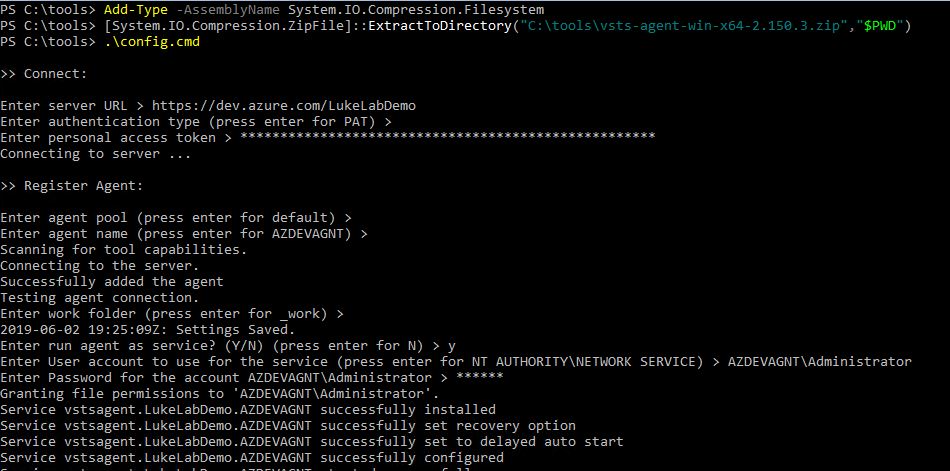
We get an instructional pop up with directions on how to download and install the agent, select the download button and transfer the file to the agent server. Run the commands specified in the pop up to extract the zip file, then run .\config.cmd to set up the agent:

You’ll get a prompt for each setting. The first prompt is for the URL of your Azure DevOps server which will be https://dev.azure.com/YOUR ORGANIZATION. So in my example, it’s https://dev.azure.com/LukeLabDemo. Then paste in the PAT token that we created previously. This will allow the agent server to authenticate with Azure DevOps. I choose the defaults for the rest except for the service user account. You can select which user account to run the service as this is important if you plan on running pipelines that traverse your on-prem network:
Once the setup is complete the server will start reporting into Azure DevOps under the default Agent Pool (or whatever pool you specify during set up):

Azure Key Vault
Now we have an agent server set up we need to configure our Key Vault in Azure in order to store our credentials in a secure place. We are going to want to store our credentials to connect to VCenter, our Local Administrator password, and since we are using Terraform Enterprise Cloud Free Tier to store our remote state we will need to save our Terraform API Token as well. The Terraform API token is used to make a connection back to our Terraform Enterprise Cloud account for saving and modifying our Terraform state file.
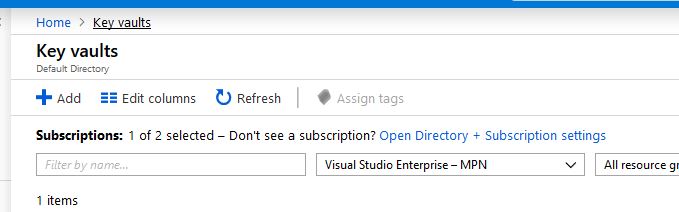
To create our Key Vault, login to the Azure Portal and search for the Key Vaults service. Select Add:
Select your preferred Key Vault information such as the resource group, name, Subscription, and location. Select Create to deploy the new Key Vault. Once the Key Vault has been successfully created, select the Key Vault name and select Secrets. We will create the following 3 secrets:
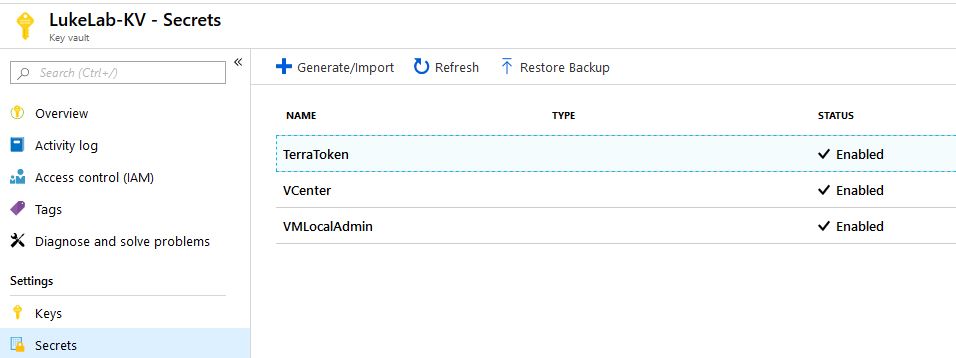
Once we create our build and release pipelines, we will then need to return to our key vault in azure and assign the proper access to our Azure DevOps pipeline so that it can access these secrets.
Remaining Steps
So far we set up an Azure Repo with our Terraform configuration code, set up an Azure DevOps pipeline agent server, and created an Azure Key Vault with our sensitive passwords stored as secrets. Whew! On the next post, we will finally get to the good stuff where we will be setting up our release and build pipelines and deploying a VM with our Azure pipelines. We will start to see the power of creating a pipeline and the creativity you can have when designing them.
Additional Resources
Looking for more? Watch out our webinar vSphere Automation Masterclass which runs down the best practices when using PowerCLI and Terraform plus drops some really cool vSphere automation tips! Below we have posted a full list of the Q&A from that webinar, so if you asked a question during that session and we didn’t have time to answer it, you’ll find your answer here. See any information below that still doesn’t answer your question? Post it to the comments form below and we’ll be sure to get it answered!
Watch the webinar – vSphere Automation Masterclass
Webinar Q & A
Q: Working in terraform. is it necessary to know about scripting?
A: No, Terraform is meant to be very easy to learn in human/readable language. You can learn the basics in merely a few days.
Q: Does PowerCLI work with Powershell Core?
A: Yes, as of PowerCLI 10.0 it is now compatible with PowerShell Core
Q: Can I See what devices are connected to a VM eg. via USB redirect?
A: Yes, any information you can get from the vSphere console you can get with PowerCLI
Q: can you use terraform to deploy templates from content libraries?
A: As of right now, no, but it looks like the team who managed the GO library for the VMware vSphere API will be adding it in the future. Check here for more info.
Q: Terraform doesn’t allow for user input? If the user wants a customized config of VM?
A: The customizations for the VM are done through the configuration file, you can add different configurations. For more info on what you can customize check out Terraform’s VMware provider page.
Q: what is the difference between vRealize Automation and Terraform?
A: The biggest difference is that Terraform can be used with many different tools and applications. Also Terraform is free 😊
Q: Does Power CLI Work with AWS?
A: For managing AWS you would use the AWS PowerShell module.
Q: Terraform can work on-premises infrastructure as well as Azure?
A: Absolutely, in fact, it comes built into the Cloud Shell now.
Q: How do we automate templates automation – ex: monthly patch updates
A: You can do this with PowerShell and PowerCLI. We might have a blog post in the future on this 😊
Q: Can you talk more about how to organize VMs in terraform, separate folders for each VM or group VMs by application type?
A: This is very circumstantial to your environment and its size, but it’s recommended to split up configurations by component, such as networking, Virtual Machines, storage. This reduces the risk of affecting too much of your infrastructure if a configuration file has an issue.
Q: Can it be accessible only to a security group to review access? without write privileges?
A: Yes, source control is the best place to do this.
Q: I saw you have edited a file in visual basic. is there a way to create TF config file automatically or template?
A: I was using Visual Studio code with the Terraform Extension installed. It works very well. I would recommend taking a look at the Terraform Providers documentation, they have templates already posted on each resource, it’s very easy to copy and get started.
Q: Any suggestions for getting up to speed on Powercli and PS?
A: I highly recommend reading the book Learn PowerShell in a Month of Lunches, it’s a classic. Once you get through that book, the PowerCLI module will become very easy to navigate through and use in writing your own scripts.


Not a DOJO Member yet?
Join thousands of other IT pros and receive a weekly roundup email with the latest content & updates!
More in this category


About the Author

Luke Orellana

