Save to My DOJO
Infrastructure as code is a bread and butter practice of the DevOps culture. This has redefined the way we deploy infrastructure in the cloud and has made its way back to on-prem infrastructure with products like Terraform.
What is Terraform for VMware?
Terraform is an orchestration tool that VMware admins can take advantage of to provide more agility and stability to their vSphere environments. Let’s take a look at how you can get started using Terraform with your own vSphere environment.
How to Install Terraform
First, we need to download the executable for Terraform. Download the binary here for whatever OS you are going to be running it from. In my example, I’ll be using a Windows 10 machine. Extract the executable “terraform.exe” to a folder:

The best practice is to add the path of the executable file to the PATH environmental variable. You can easily do this with an administrative PowerShell console by typing the following syntax. The location of the Terraform binary is in C:\Configurations\Terraform so it will look like the following:
setx PATH "$env:path;C:\Configurations\Terraform" -m

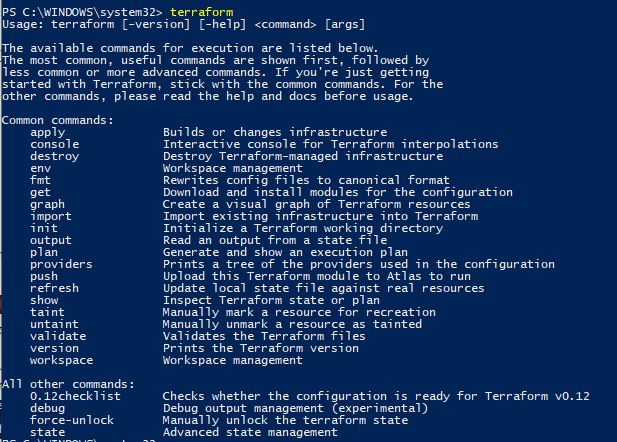
Now if we restart the PowerShell console, we can type Terraform and automatically call the binary:
Now that terraform is installed we are ready to start provisioning some of our vSphere environment.
Using the VMware vSphere Provider
Terraform uses providers in order to interact with different infrastructure resources like AWS, VMware, Azure, etc. Each provider is designed to interface with each resources API in order to allow terraform to create and manage these resources. The VMware vSphere provider is what Terraform uses to work with Vcenter and ESXi. In order to use a provider in Terraform, we will need to specifically call it out in our code. To get started we’ll create a main.tf file in the same folder as our Terraform executable:

We will add our snippets of code to this file and Terraform will automatically look for the .tf file and build out the various items that we specify in our code. First, we will specify our provider configuration by creating a provider block. So we’ll edit the main.tf file and enter the following syntax. The provider is made up of the user, password, and vsphere_server arguments and their expressions indicate the values for each argument. These arguments are required while the allow_unverified_ssl argument is optional. This argument should only be used for a lab environment where a valid cert isn’t actually being used. Also note: for this example, we are hard coding our username and password. This is just to simplify the example, we will go through how to properly secure credentials later:
provider "vsphere" {
  user           = "[email protected]"
  password       = "P@ssw0rd"
  vsphere_server = "192.168.0.7"

  # If you have a self-signed cert
  allow_unverified_ssl = true
}
Now that we have our provider configured, save the “main.tf” file and browse to its location in the console. We will initialize terraform and download our provider:
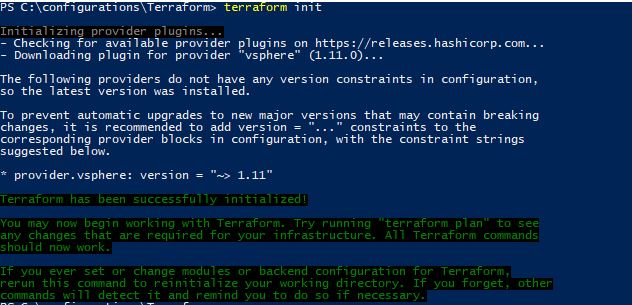
We now have our vSphere provider downloaded, but we don’t have any configurations declared yet. Also, note that Terraform is recommending that we include the Version argument in our provider configuration. This is in case the provider gets updated, we want our builds to always have the same provider version that we tested on. This helps guarantee that we are getting a stable deployment each time. So we would add the recommended version like this:
provider "vsphere" {
  user           = "[email protected]"
  password       = "P@ssw0rd"
  vsphere_server = "192.168.0.7"
  version = "~> 1.11"

  # If you have a self-signed cert
  allow_unverified_ssl = true
}
How to Config Data Sources
Data sources are data blocks defined by the provider that contains the information that is then used among the Terraform configuration. So for our example of deploying a VM, in order to use our “vsphere_virtual_machine” resource to deploy a VM, we need to specify the required data sources. We will need to create a data source to locate the data center that we want to deploy to, then locate the datastore to deploy the VM on, specify the cluster as well as the network to attach to the VM. Lastly, since we are deploying from a template, we will need to specify the template. The VM resource documentation provides the required data sources that we need to configure.
The syntax for our data sources can look a little strange at first. Data sources are defined in a Data block. There are expressions that are wrapped in ${} like ${data.vsphere_datacenter.dc.id}. This is called interpolation and it’s a huge part of Terraform. It allows you to reference data from other variables and attributes. We can also do some fancier tricks with the interpolation strings like conditional logic and simple math however to keep things simple we won’t be covering them in this example. We are accessing the values from our data previously set and building upon that information. Our data source syntax will look like the following:
#Data Sources
data "vsphere_datacenter" "dc" {
  name = "LukeLab"
}

data "vsphere_datastore" "datastore" {
  name          = "ESXi1-Internal"
  datacenter_id = "${data.vsphere_datacenter.dc.id}"
}

data "vsphere_compute_cluster" "cluster" {
  name          = "Luke-HA-DRS"
  datacenter_id = "${data.vsphere_datacenter.dc.id}"
}

data "vsphere_network" "network" {
  name          = "VM Network"
  datacenter_id = "${data.vsphere_datacenter.dc.id}"
}

data "vsphere_virtual_machine" "template" {
  name          = "VMTemp"
  datacenter_id = "${data.vsphere_datacenter.dc.id}"
}
Configuring the Virtual Machine Resource
Now that we have our data sources defined, we can go ahead and configure our virtual machine resource. In this example, I am going to deploy a VM by cloning a template that I have created called “VMTemp”. The VM will be a windows VM called Web1. After the cloning is complete, we will customize the OS with the computer name, workgroup, IPv4 address, and local admin password. Also, keep in mind for the simplicity of the example we are hard-coding the password, there are better ways to do this which we will go over in the next post. My virtual machine resource syntax will look like below:
#Virtual Machine Resource
resource "vsphere_virtual_machine" "web1" {
  name             = "Web1"
  resource_pool_id = "${data.vsphere_compute_cluster.cluster.resource_pool_id}"
  datastore_id     = "${data.vsphere_datastore.datastore.id}"

  num_cpus = 2
  memory   = 4096
  guest_id = "${data.vsphere_virtual_machine.template.guest_id}"

  scsi_type = "${data.vsphere_virtual_machine.template.scsi_type}"
  firmware = "efi"
  network_interface {
    network_id   = "${data.vsphere_network.network.id}"
    adapter_type = "${data.vsphere_virtual_machine.template.network_interface_types[0]}"
  }

  disk {
    label            = "disk0"
    size             = "${data.vsphere_virtual_machine.template.disks.0.size}"
    eagerly_scrub    = "${data.vsphere_virtual_machine.template.disks.0.eagerly_scrub}"
    thin_provisioned = "${data.vsphere_virtual_machine.template.disks.0.thin_provisioned}"
  }

  clone {
    template_uuid = "${data.vsphere_virtual_machine.template.id}"

    customize {
      windows_options {
        computer_name  = "Web1"
        workgroup      = "home"
        admin_password = "VMw4re"
      }

      network_interface {
        ipv4_address = "192.168.0.46"
        ipv4_netmask = 24
      }

      ipv4_gateway = "192.168.0.1"
    }
  }
}
Deploying The VM
We will combine our provider, data sources, and resource configurations together and save our main.tf file:
provider "vsphere" {
  user           = "[email protected]"
  password       = "P@ssw0rd"
  vsphere_server = "192.168.0.7"
  version = "~> 1.11"

  # If you have a self-signed cert
  allow_unverified_ssl = true
}

#Data Sources
data "vsphere_datacenter" "dc" {
  name = "LukeLab"
}

data "vsphere_datastore" "datastore" {
  name          = "ESXi1-Internal"
  datacenter_id = "${data.vsphere_datacenter.dc.id}"
}

data "vsphere_compute_cluster" "cluster" {
  name          = "Luke-HA-DRS"
  datacenter_id = "${data.vsphere_datacenter.dc.id}"
}

data "vsphere_network" "network" {
  name          = "VM Network"
  datacenter_id = "${data.vsphere_datacenter.dc.id}"
}

data "vsphere_virtual_machine" "template" {
  name          = "VMTemp"
  datacenter_id = "${data.vsphere_datacenter.dc.id}"
}

#Virtual Machine Resource
resource "vsphere_virtual_machine" "web1" {
  name             = "Web1"
  resource_pool_id = "${data.vsphere_compute_cluster.cluster.resource_pool_id}"
  datastore_id     = "${data.vsphere_datastore.datastore.id}"

  num_cpus = 2
  memory   = 4096
  guest_id = "${data.vsphere_virtual_machine.template.guest_id}"

  scsi_type = "${data.vsphere_virtual_machine.template.scsi_type}"
  firmware = "efi"

  network_interface {
    network_id   = "${data.vsphere_network.network.id}"
    adapter_type = "vmxnet3"
  }

  disk {
    label            = "disk0"
    size             = "${data.vsphere_virtual_machine.template.disks.0.size}"
    eagerly_scrub    = "${data.vsphere_virtual_machine.template.disks.0.eagerly_scrub}"
    thin_provisioned = "${data.vsphere_virtual_machine.template.disks.0.thin_provisioned}"
  }

  clone {
    template_uuid = "${data.vsphere_virtual_machine.template.id}"

    customize {
      windows_options {
        computer_name  = "Web1"
        workgroup      = "home"
        admin_password = "VMw4re"
      }

      network_interface {
        ipv4_address = "192.168.0.46"
        ipv4_netmask = 24
      }

      ipv4_gateway = "192.168.0.1"
    }
  }
}
Now we will run the following syntax to create a plan of our main.tf file. Terraform reviews the main.tf and compares it with the current state and then creates a report on the necessary actions to “make it so”. An execution plan is a great way to determine if the expected results will occur when running a config. The plan can then be reviewed and deployed at a later time. This is the best practice when creating and modifying Terraform configurations in a production environment. We will use the -out flag to save our plan as deployVM :
terraform plan -out=deployvm
A report is then run and we see that the VM resource has not been created yet as indicated by the + sign. It’s very similar to Git:
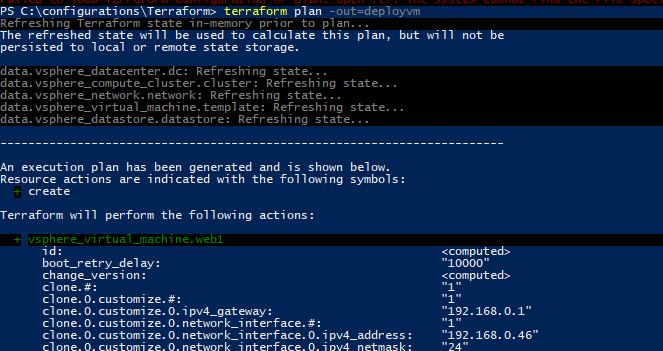
At the bottom of the display we get the plan results which is to make 1 add:
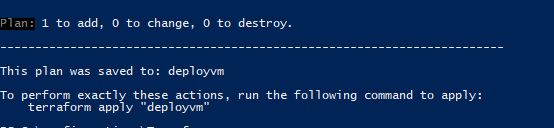
Now to go ahead and deploy our VM we will run the command:
terraform apply deployvm
The display will show the progress of our VM deployment and indicate if successful:
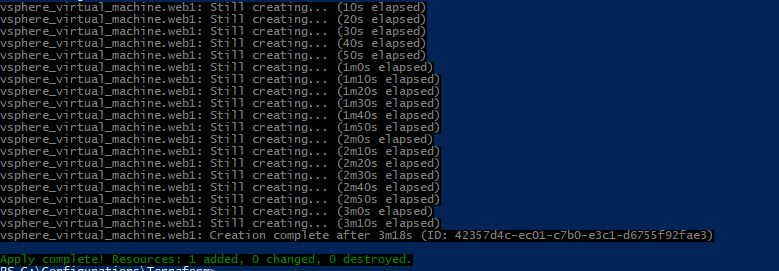
When we check our vCenter we can see the new VM is now there:

As you can see Terraform is extremely powerful for deploying infrastructure. It is simple enough to jump into instantly and start using, yet in-depth enough where you can customize your infrastructure with endless possibilities. Be sure to check out my next post where we will take this deployment a step further by securing our credentials with best practices.
Any questions! Be sure to let us know in the comments section below!


Not a DOJO Member yet?
Join thousands of other IT pros and receive a weekly roundup email with the latest content & updates!
More in this category


About the Author

Luke Orellana


15 thoughts on "How to Install Terraform for Use with vSphere"
[…] our previous articles, we have shown you how to install Terraform, deploy a VM with Terraform and how to implement Azure DSC into our VM builds. Let’s take it […]