Save to My DOJO

Desired State Configuration (DSC) can be a powerful tool for defining your VMware infrastructure by code. Let’s walk through deploying VMs through DSC the Azure DSC service acting as the pull server.
Previously we walked through the steps on how to set up an Azure Automation account and how add a node for LCM (Local Configuration Manager). So, if you need to set up a DSC pull server yet, be sure to check out the mentioned article. The LCM node will act as our proxy by receiving the DSC configuration from Azure and then running the PowerCLI commands to perform said configuration in our VMware environment. VMware has created some DSC resources for vSphere that they are actively developing on GitHub, however, there currently isn’t a DSC resource for deploying VMs, so we will just make our own custom DSC resource.
Template and VM Customization
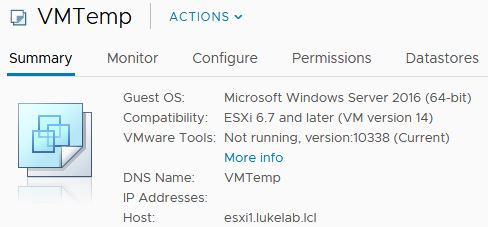
We’re going to use the typical VMware VM deployment method by using a VM Template and a Custom OS configuration so we’ll need to set these two items up before we create our custom DSC Resource. I have a template created called VMTemp. If you don’t know the steps on how to create a template, be sure to check out Jason Fenech’s walkthrough.:
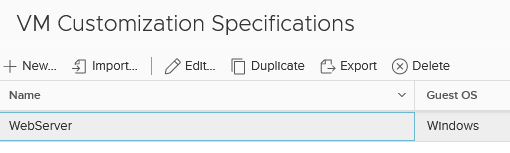
Now we need to create a VM Customization in order to customize the desired settings for the OS. I’m naming mine WebServer since I’m going to be creating 2 VM’s for hosting a web application:
Now that we have our VM Customization and Template created, we can now create our DSC Resource module and upload it into Azure Automation.
Creating the DSC Custom Resource
Our DSC Custom Resource for deploying VM’s will consist of a module file (.psm1) and a manifest file (.psd1). To create the module file, copy the code below and save it as a .psm1. I saved mine as “DeployVM.psm1”:
[DscResource()]
class DeployVM {

        [DscProperty(key)]
        [String]$VMname
        [DscProperty(Mandatory)]
        [String]$VCenter
        [DscProperty(Mandatory)]
        [PSCredential]$Credentials
        [DSCProperty()]
        [String]$Template
        [DscProperty(Mandatory)]
        [String]$Customization
        [DscProperty()]
        [int]$CPU
        [DscProperty()]
        [int]$MemoryGB
        [DscProperty(Mandatory)]
        [String]$VMhost
        [DscProperty(Mandatory)]
        [String]$datastore
        [DscProperty(Mandatory)]
        [String]$cluster
        hidden [PSObject] $Connection

        #Create VM or update with settings if its already created
        [void] Set(){
            Try{

                $this.ConnectVIServer()
                $vm = $this.getvm()

                if ($null -eq $vm){
                        #if VM doesnt exist, create it, if it does check Mem and CPU
                    Write-Verbose "Creating $($this.VMname)"
                    $result = $this.CreateVM()
                    if ($result -eq $true){
                        Write-Verbose "$($this.VMname) has been created "
                    } else {
                        throw "There was an issue creating the VM"
                    }
                }else{

                        #Set Memory
                    if ($vm.MemoryGB -ne $this.MemoryGB) {

                        #verify if VM is powered off or on if so check for hot add
                        if ($vm.PowerState -eq 'Poweredon'){
                            Write-Verbose "$($this.VMname) is powered on, checking for Hot Add"

                            #if hot add is enabled and memory is less than what is declared
                            if($vm.ExtensionData.Config.MemoryHotAddEnabled -eq $true -and $vm.MemoryGB -lt $this.MemoryGB){

                                Write-Verbose "Hot add is enabled, adding memory"
                                $this.UpdateMemory()
                            } else {

                                Write-Error "Cannot set Memory while VM is powered on"
                            }

                        } Else{
                            $this.UpdateMemory()

                        }else {Write-error "Unable to set memory while VM is powered on"}

                    }
                        #Set CPU
                    if ($vm.NumCpu -ne $this.CPU) {

                        #verify if VM is powered off or on if so check for hot add
                        if ($vm.PowerState -eq 'Poweredon'){
                            Write-Verbose "$($this.VMname) is powered on, checking for Hot Add"

                            #if hot add is enabled and CPU is less than what is declared
                            if($vm.ExtensionData.Config.CpuHotAddEnabled -eq $true -and $vm.NumCpu -lt $this.CPU){

                                Write-Verbose "Hot add is enabled, adding CPU"
                                $this.UpdateCPU()
                            } else {

                                Write-Error "Cannot increase CPU while VM is powered on"
                            }

                        } Else {
                            $this.UpdateCPU()

                        }

                    }

                }

            } Catch{
                Write-Verbose "There was an issue with setting the resource: $($_.Exception.Message)"
            }

        }


        #Check if current settings of VM equal settings of the DSC config
        [bool] Test() {
            $this.ConnectVIServer()

            Write-Verbose "Looking for VM: $($this.VMname)"
            $VMConfig = $this.getvm()

            return $this.Equals($VMConfig)


        }

        #Get the current settings of the VM
        [DeployVM] Get() {
            $result = [DeployVM]::new()
            $this.ConnectVIServer()

            Write-Verbose "Looking for VM: $($this.VMname)"
            $vm = $this.getvm()


            $result.VMname = $vm.name
            $result.VCenter = $this.VCenter
            $result.Credentials = $this.Credentials
            $result.template = $this.Template
            $result.Customization = $this.Customization
            $result.CPU = $vm.NumCpu
            $result.MemoryGB = $vm.MemoryGB
            $result.VMhost = $vm.VMHost
            $result.datastore = (get-datastore | where-object {$_.id -eq $vm.DatastoreIdList}).Name
            $result.cluster = (get-cluster -vm $vm).name

            return $result


            }

        #Helpers


        #Import modules and connect to VC
        [void] ConnectVIServer() {
            $savedVerbosePreference = $global:VerbosePreference
            $global:VerbosePreference = 'SilentlyContinue'
            Import-Module -Name VMware.VimAutomation.Core -ErrorAction SilentlyContinue
             $global:VerbosePreference = $savedVerbosePreference
            if ($null -eq $this.Connection) {
                try {
                    $this.Connection = Connect-VIServer -Server $this.vcenter -Credential $this.Credentials -ErrorAction Stop
                }
                catch {
                    throw "Cannot establish connection to server $($this.vcenter). For more information: $($_.Exception.Message)"
                }
            }
        }


        #create VM if doesnt esxist, if it does set the CPU and Memory
        [bool] CreateVM() {


                $VMcluster = Get-Cluster -Name $this.cluster

                $props = @{

                    Name = $this.VMname
                    template = $this.Template
                    OSCustomizationSpec = $this.Customization
                    VMhost = (Get-VMHost -name $this.vmhost)
                    Datastore = $this.datastore
                    Server = $this.VCenter
                    resourcepool = $VMcluster

                }
                $VM = New-VM @props

                if($vm.NumCpu -ne $this.CPU){ set-vm $vm -NumCpu $this.cpu -Confirm:$false }
                if($vm.MemoryGB -ne $this.MemoryGB){ set-vm $vm -MemoryGB $this.MemoryGB -confirm:$false}

                Start-vm $vm

                if ($null -ne $vm){

                    return $true
                } else {
                    return $false
                }

            }


        [PSObject] GetVM(){

             try{
                $VM = Get-VM -Name $this.VMName -verbose:$false -ErrorAction SilentlyContinue | select -First 1
                return $vm
            }
            catch{
            write-verbose "VM is not there"
            return $null

            }
        }

        [void] UpdateMemory(){
            Try{

                 set-vm $this.VMname -MemoryGB $this.MemoryGB -confirm:$false

            }
            Catch{
                Throw "there is an issue setting the Memory"
            }
        }

        [bool] Equals($VMConfig) {
                $vm = $this.getvm()

                #Check if VM exists
                if ($null -eq $vm){
                    Write-Verbose "$($this.VMname) does not exist"
                    return $false
                }
                #Check CPU
                if ($VMConfig.NumCpu -ne $this.CPU){
                    Write-Verbose "$($this.VMname) has $($vmconfig.NumCpu) vCPUs and should have $($this.CPU)"
                    return $false
                }
                #check Memory
                if ($VMConfig.MemoryGB -ne $this.MemoryGB){
                    Write-Verbose "$($this.VMname) has $($vmconfig.MemoryGB) Memory and should have $($this.MemoryGB)"
                    return $false
                }

                return $true
        }

        [void] UpdateCPU(){
            Try{
                 set-vm $this.VMname -NumCpu $this.CPU -confirm:$false
            }
            Catch{
                Throw "there is an issue setting the CPU"
            }

        }

}
Now we need to create the manifest file which is the file that provides the information about our module. Copy the code below and save it as a “.psd1” file. I saved mine as “DeployVM.psd1”:
#
# Module manifest for module 'DeployVM'
#
# Generated by: Luke
#
# Generated on: 5/10/2019
#

@{

# Script module or binary module file associated with this manifest.
RootModule = 'DeployVM.psm1'

# Version number of this module.
ModuleVersion = '1.0'

# Supported PSEditions
# CompatiblePSEditions = @()

# ID used to uniquely identify this module
GUID = '389099d3-aa57-49f8-a4dc-f0f0bfc8b5cb'

# Author of this module
Author = 'Luke'

# Company or vendor of this module
CompanyName = 'Unknown'

# Copyright statement for this module
Copyright = '(c) 2019 Luke. All rights reserved.'

# Description of the functionality provided by this module
Description = 'Deploy VMwawre VM Module'

# Minimum version of the Windows PowerShell engine required by this module
# PowerShellVersion = ''

# Name of the Windows PowerShell host required by this module
# PowerShellHostName = ''

# Minimum version of the Windows PowerShell host required by this module
# PowerShellHostVersion = ''

# Minimum version of Microsoft .NET Framework required by this module. This prerequisite is valid for the PowerShell Desktop edition only.
# DotNetFrameworkVersion = ''

# Minimum version of the common language runtime (CLR) required by this module. This prerequisite is valid for the PowerShell Desktop edition only.
# CLRVersion = ''

# Processor architecture (None, X86, Amd64) required by this module
# ProcessorArchitecture = ''

# Modules that must be imported into the global environment prior to importing this module
# RequiredModules = @()

# Assemblies that must be loaded prior to importing this module
# RequiredAssemblies = @()

# Script files (.ps1) that are run in the caller's environment prior to importing this module.
# ScriptsToProcess = @()

# Type files (.ps1xml) to be loaded when importing this module
# TypesToProcess = @()

# Format files (.ps1xml) to be loaded when importing this module
# FormatsToProcess = @()

# Modules to import as nested modules of the module specified in RootModule/ModuleToProcess
# NestedModules = @()

# Functions to export from this module, for best performance, do not use wildcards and do not delete the entry, use an empty array if there are no functions to export.
FunctionsToExport = '*'

# Cmdlets to export from this module, for best performance, do not use wildcards and do not delete the entry, use an empty array if there are no cmdlets to export.
CmdletsToExport = '*'

# Variables to export from this module
VariablesToExport = '*'

# Aliases to export from this module, for best performance, do not use wildcards and do not delete the entry, use an empty array if there are no aliases to export.
AliasesToExport = '*'

# DSC resources to export from this module
DscResourcesToExport = 'DeployVM'

}
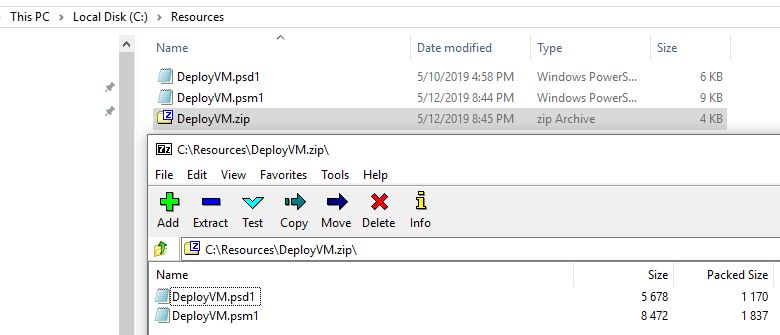
Note: at the bottom of the Manifest file, you need to make sure the “DSCResourcesToExport” matches the name of your module file. Also, when we zip the name of the folder, the zip file needs to match the name. So in my example, I have the name of my module as DeployVM, since my .psm1 is named the same:
![]()
Zip the two files together, now we are ready to upload our custom resource into Azure.
Log into your Azure Subscription. Navigate to your Azure Automation account and select Modules and choose the Add a module button. Upload the .zip file we created and choose Ok. Wait a few minutes for the module to import, when complete you should see it in the list of your modules with the “available” status:

Now we are ready to create a configuration and assign it to our LCM node.
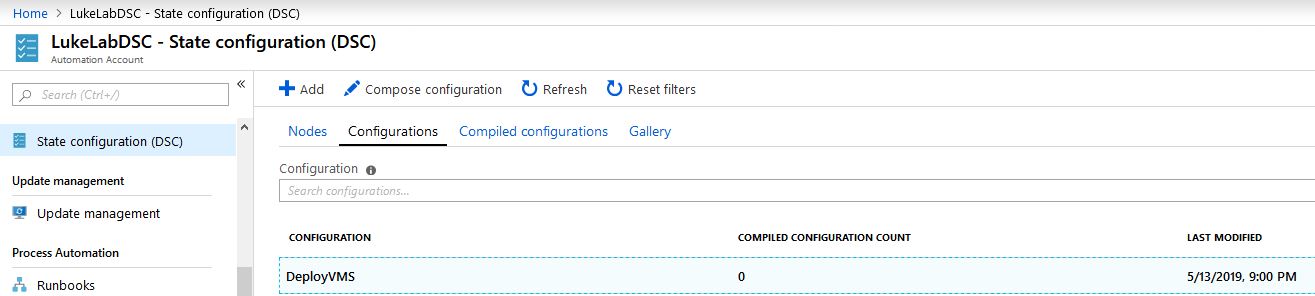
Creating and Compiling the Configuration
I want to create a configuration to deploy two VM’s “web1” and “web2”. So I will create my config file like below. I specify the CPU and MemoryGB, the datastore and host to deploy to, and template/customization to use. This is how we are defining our VM build with code:
Configuration DeployVMS {


    Import-DscResource -ModuleName DeployVM

    Node localhost {

        #Credentials from Azure
        $Cred = Get-AutomationPSCredential 'ESXi Password'
        $vccreds = New-Object System.Management.Automation.PSCredential ("[email protected]", $cred.password)

        #Apply Config to each host
        foreach ($VMname in @("web1","web2")) {

            DeployVM "VMConfig_$($VMName)" {
                VMName = $VMName
                VCenter = "192.168.0.7"
                Credentials = $vccreds
                Template = "VMTemp"
                Customization = "WebServer"
                CPU = 2
                MemoryGB = 6
                VMhost = "ESXi1.lukelab.lcl"
                Datastore = "ESXi1-Internal"
                Cluster = "Luke-HA-DRS"
            }


        }
    }
}
Also, note that I am using the Get-AutomationPSCredential cmdlet. This is because I am storing the VCenter credentials in the Azure Automation password vault and retrieving it safely when compiling the MOF files in Azure. This is one of the benefits to using a pull server in Azure DSC, not only do you get an already set up pull server, but you also can store your credentials safely and call them in your scripts. Just make sure you specify the name of the credential you are storing, for example, mine is “ESXi Password” so, in my config file, I reference the same credential:

Save the config file to a .ps1. Now we can upload it as a configuration into Azure DSC. Under the Automation Account, select State Configuration (DSC) and select the configurations tab. Then click the Add button and upload the configuration file (.ps1). Click refresh and it will appear as a list of configurations. Select Compose Configuration to create our Mof file for our node:
Select Compile to begin the compiling process:

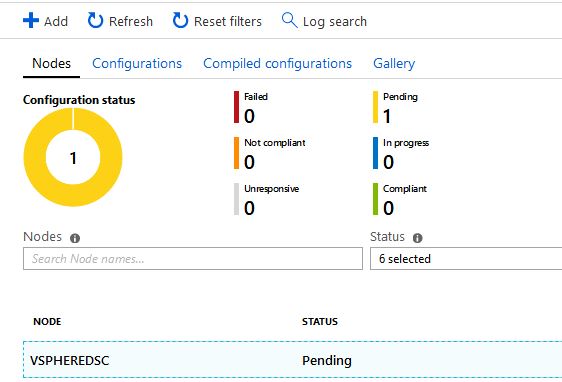
This process will take 3 to 5 minutes. Once done it will show as “complete”. Now we are ready to assign the new compiled configuration to our LCM node. Select the LCM node under the Nodes tab:
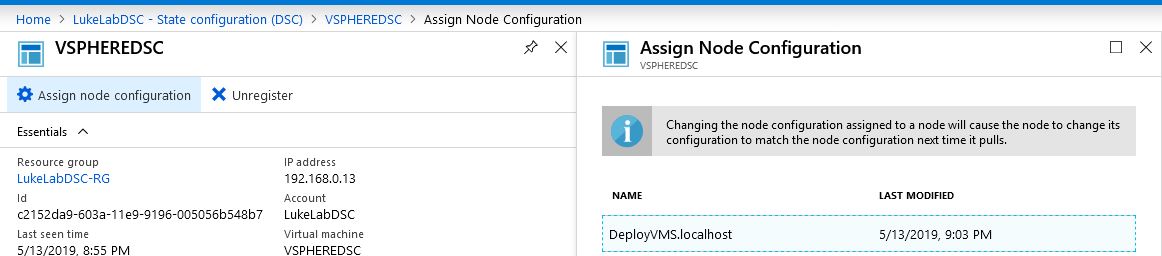
Select Assign Node Configuration and we’ll choose our “DeployVMS.localhost” configuration:
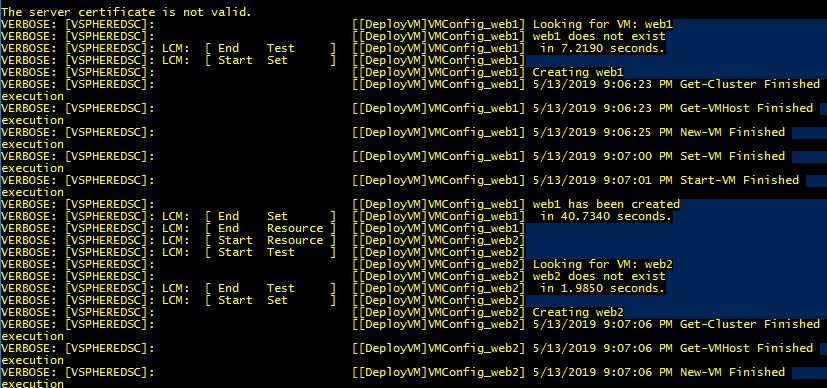
We can either wait for the next pull interval on our VsphereDSC node, or we can remote into the node and run the following command to have it update the configuration:
Update-DSConfiguration -wait -verbose

We can see that it’s looking for web1 and web2 and since they are not there, they will automatically be created:
After a few minutes we can see our VMs we declared in the config file now exist:

If we delete a VM, change the CPU, or modify the Memory it will automatically get recreated/reconfigured again in 15 minutes during the next poll. This can be extremely powerful and we can get as granular with the configuration file and custom resources as we want. With a stateless web server, we could essentially configure the IIS configuration and VM build entirely with just code. Azure DSC is still in it’s infancy stage but it is a great platform for managing and maintaining DSC configurations. It allows for IT Pros to quickly jump into DSC without the hassle of setting up and securing their own pull server. Microsoft will be investing a lot into this platform in the future and it will be interesting to see the evolution in just a year.
Have you done much with Desired State Configuration? Has it worked well if you have? If you haven’t do you have questions or barriers to getting started?
Let us know in the comments section below!


Not a DOJO Member yet?
Join thousands of other IT pros and receive a weekly roundup email with the latest content & updates!
More in this category


About the Author

Luke Orellana


1 thoughts on "How to Deploy VMware VMs with Azure DSC"
[…] Engineer positions and is typically listed as a requirement for some of the larger companies today. Desired State Configuration is Microsoft’s configuration management platform that many vendors such as Chef and Puppet […]