Save to My DOJO
In today’s post, we’ll have a look at how to deploy VMware Tools (vmtools) to virtual machines running Linux as the guest OS. The reason we install vmtools, is to improve VM performance and manageability. In fact, the vmtools package contains virtualization optimized drivers replacing those of the guest OS one such example being the vmxnet3 network card driver. In addition, the tools provide api frameworks such as VIX allowing you to programmatically manage VMs as well as expose information in vSphere clients, such as a VM’s IP address, that would otherwise be unavailable to the user.
VMware Tools are supported on a number of 32-bit and 64-bit operating systems from vendors such as Microsoft, Apple, Netware, Solaris, RedHat and other Linux providers. The Guest OS Compatibility Guide is the perfect place to discover which guest operating systems are supported.
Moving on, let’s see how one can deploy vmtools to a couple of Linux distros such as Centos and Debian. At the end of the post you will find a number of links on how to install vmtools on other Linux variants.
Installation Methods
Depending on the Linux guest OS, there are a couple of methods you can use to install vmtools. The first and most commonly used method is that of the ISO package. This package contains all the vmtools binaries (installation files, scripts, etc) which is mounted as a virtual optical drive on the VM. The drive is then mounted using the mount Linux command whereby a packaged Perl script is used to install vmtools.
The second method, which is gaining traction, is the Open-VM-Tools (OVT) initiative spearheaded by VMware. This affords vendors the freedom to bundle vmtools in their respective OS release meaning vmtools are automatically provisioned as part of the guest OS installation. Alternatively, vmtools can be installed at a later stage using OS media or from a repository using package-management utilities such as YUM or APT.
As of February 2016, the Linux distros supporting OVT are;
- Fedora 19 and later releases
- Debian 7.x and later releases
- openSUSE 11.x and later releases
- Recent Ubuntu releases (12.04 LTS, 13.10 and later)
- Red Hat Enterprise Linux 7.0 and later releases
- CentOS 7.0 and later releases
- Oracle Linux 7.0 and later releases
- SUSE Linux Enterprise 12 and later releases
The ISO method
I’ll be covering both methods starting with the ISO one. To illustrate the installation process, let’s first deploy vmtools to a Centos 6.x 32-bit virtual machine. As can be seen in Fig. 1 – Not running (Not Installed) -, vmtools have yet to be deployed to this VM.
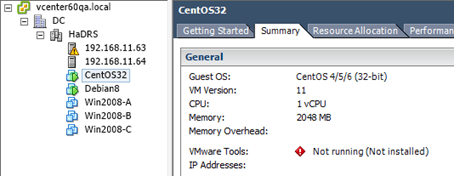
Figure 1 – CentOS VM without vmtools
To install vmtools, right-click on the VM name, select Guest and click on Install/Upgrade VMware Tools. Press OK to confirm.
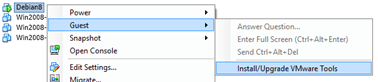
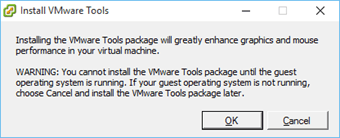
Figure 2 – Initiating the vmtools installation
This will mount the correct vmtools ISO image for the corresponding Linux guest OS set for the VM. To this effect, ensure that the correct guest OS been selected for the VM in question. You can verify the correct OS type from the Options tab of the selected VM under General Options as shown next. Anytime the OS type is changed, the VM must be powered off first.
Figure 3 – Verifying the OS type
After the ISO image is mounted, log in as root, using sudo or otherwise and carry out the following steps and commands. The commands, or syntax, may differ slightly according to the Linux guest OS at hand.
- Create a directory and mount the ISO image.
mkdir /vmtools
mount /dev/cdrom /vmtools
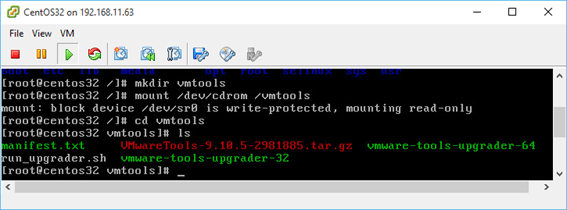
Figure 4 – Mounting the ISO image
- Next, unzip the vmtools tarball (.tar.gz) and copy the distribution folder to the /tmp directory.
tar -zxf /vmtools/VMwareTools-*.tar.gz -C /tmp
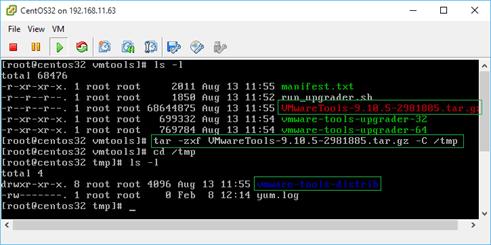
Figure 5 – Extracting the vmtools distribution directory
- As is sometimes the case, the OS might be missing some dependencies more so on freshly installed VMs. For this example, I first had to run the following YUM command to download and install the missing dependencies needed by the vmtools installer and package.
yum -y install kernel-devel gcc dracut make perl eject
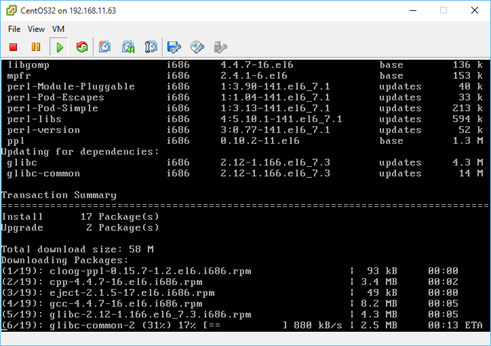
Figure 6 – Installing missing dependencies using YUM
- Now, change over to the /tmp directory and run the vmware-install.pl Perl installation script. If you include the –default parameter, the script will run using the default settings which is recommended unless you wish to customize the installation process.
/tmp/vmware-tools-distrib/vmware-install.pl --default
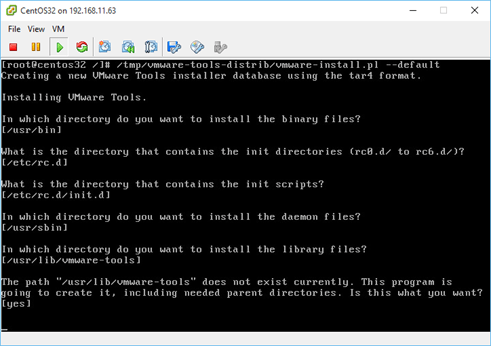
Figure 7 – Installing vmtools using the Perl script…
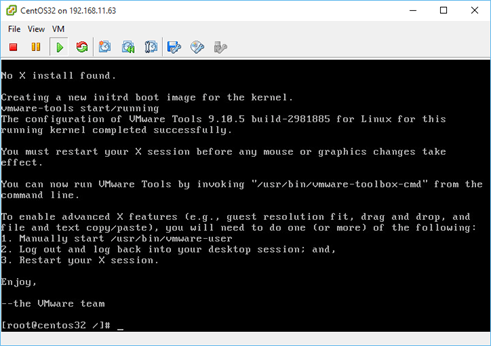
Figure 8 – Finalized Perl script vmtools install
- To verify that vmtools have installed successfully, have a look at the VM’s VMware Tools status in vSphere client as per Fig. 9.
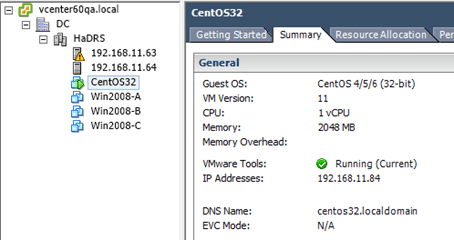
Figure 9 – Verifying the that vmtools have installed correctly
In some instances you may come across a missing compiler error while executing the vmware-install.pl installation script. This article explains why this happens and how to fix it.
- This next step is optional, but if like me you have a compulsive need to keep things tidy, run the commands below to clean up any redundant installation files. If the mount point is not removed automatically, use the umount command listed.
umount /vmtools
rm –r –f /tmp/vmware-tools-distrib
- If for any reason you need to remove vmtools, run the following script.
/usr/bin/vmware-uninstall-tools.pl
The following video recaps the installation procedure just described.
Installing open-vm-tools from a repository
In this next example, I’m installing open-vm-tools on a Debian 8 64-bit distro. The process is illustrated in this straight forward walk-through on VMware’s website. To avoid reinventing the wheel, so to speak, I put together the next video showing how open-vm-tools are installed. You’ll notice that, unlike the instructions found in the walk-through, I don’t use sudo since I logged in as root.
After installing OVT, notice how the vmtools status for the VM is set to Running (Guest Managed) as seen in Figure 10. Also note that the status for other third party vmtools installs will read as Running (3rd-party/Independent). This expected behavior is a result of the OSPs (Operating System Specific Packages) framework which uses the underlying guest OS software packaging and distribution mechanisms to install, update, and upgrade vmtools.

Figure 10 – vmtools status for guest managed agent
What about other Linux variants?
VMware maintains an updated list of Linux and all other operating systems that support vmtools. A complete list is available here. If a particular Linux distro is unlisted, do have a look at provider’s website to check if vmtools are supported natively. Arch Linux is one such example.
To conclude, here are some links related to today’s topic which I think you’ll find useful.
- Manually building VMware Tools kernel modules in Ubuntu guests
- Installing VMware Tools in an Ubuntu virtual machine
- Installing VMware Tools in a Linux virtual machine using Red Hat Package Manager (RPM)
- Installing VMware Tools in a Linux virtual machine using a Compiler
- VMware support for open-vm-tools
- Guest Operating System Compatibility Guide
- Manually Install or Upgrade VMware Tools in a Linux Virtual Machine
If you found this post useful do have a look at the complete list of VMware articles on this blog.
[the_ad id=”4738″][the_ad id=”4796″]


Not a DOJO Member yet?
Join thousands of other IT pros and receive a weekly roundup email with the latest content & updates!
More in this category


About the Author
Jason Fenech


7 thoughts on "Learn how to deploy VMware Tools on Linux"
Once installed, does the update work without interference?
Hi,
If by update you mean VMware tools, then the answer is no. If anything, the VM as a whole should perform better.
Jason
ye, I mean if you check vcenter for outdated vmware tools, can you click update vmware tools, and the tools on the guest os will update itself without interference