Save to My DOJO
In between writing posts, I found myself testing a great feature now included in Altaro VM Backup 7, the latest version of our backup software. The feature, Boot From Backup, allows you to instantly boot a VM from a backup location and, optionally, have it restored in the background without losing any changes. In my opinion, this a must have tool as it helps you mitigate downtime by bringing up downed VMs in a matter of seconds.
For this feature to work correctly, the Altaro backup agent and ESXi must be able to talk to each other over specific network ports. This means having to fiddle around with the ESXi firewall and others in between. For the uninitiated, the ESXi firewall is enabled by default. What you will quickly learn is that adding new firewall rules is all but easy. I’ve written about creating new rules here something I return to anytime some new rule is needed.
I’m somewhat jumping the gun here but there are two things you need to learn about; VIB packages and the VIB Author tool. No worries. Both are covered in today’s post along with how to set up a VIB authoring environment which you’ll use to create ESXi firewall rules, especially ones that persist when ESXi is rebooted.
Requirements
I’ll be basing the environment on a VM running SUSE Linux server. This is what you’ll need:
- SUSE Linux Enterprise Server 11 with SP2 DVD 1. Download from here.
- The VIB Author RPM package. Download from here.
- A text editor such as NotePad++. Download from here.
- SSH and SCP clients. I personally use Putty and WinSCP.
- A hypervisor. I’ll be using VMware Workstation 12 Player but any other will do just fine: Download from here.
- An ESXi 5.x/6.x host. You can download the free version from here.
- Patience and a generous supply of caffeine!
Note: The methods covered here are supported on ESXi 5.x to 6.x as per this KB article.
Essential Reading
I suggest you read the material referenced below. This will give you a better understanding of the VIB Author tool and VIB format.
- Customizing VIBs with VIB Author
- Creating a Custom VIB
- Creating Custom VIBs For ESXi 5.0 & 5.1 with VIB Author Fling
- Manually installing a (persistent) Firewall Rule to allow IPFIX on the ESX Host
- Anatomy of a vSphere Installation Bundle
Setting up a VIB Authoring environment
Installing SUSE Linux Server
In theory you can run VIB Author on any Linux distro but I prefer to stick with VMware’s recommendation, so SUSE it is. As a side note, it would be interesting to try this using Docker, preferably a readily configured container for VIB authoring. This article explains the process of setting one up. Those of you running VMware Fusion, the Mac equivalent of VMware Workstation for Windows, will find the article especially interesting.
Setting up a VM running SUSE involves the following:
- Create a bare vm. If you’re using Player, just click on New Virtual Machine. A single CPU, 1GB of RAM and 20GB of disk space should suffice.
- Mount the SUSE ISO image.
- Supply a username and password. The same password is used for root so note it down.
- Specify the VM folder and disk capacity. If required customize the vm hardware.
The installer will do the rest for you.

Figure 1 – Creating a new VM and mounting an ISO using VMware Player

Figure 2 – SUSE Automated Installation
Installing the VIB Author Tool
Once SUSE is up and running, connect to it using WinSCP, or similar, so you can transfer the VIB Author RPM to it. The left-side of Fig.3, is a listing of the folders of my computer’s drive while the right-side shows that found on the SUSE VM’s drive. To copy the RPM file, simply locate the holding folder and drag it over to a folder, say tmp.

Figure 3 – Using WinSCP to transfer an RPM package to a Linux vm
After the file is copied, log in using the user and password specified during the installation, open a terminal (right-click on the desktop) and run the commands listed below. To simplify matters, log in as root since most of the commands require elevated privileges anyway.

Figure 4 and 5 – Logging in SUSE and launching a terminal window
We also need to install a couple of Python dependencies used by VIB Author. We use Zypper do this which is the YUM equivalent on SUSE. After the dependencies are taken care of we can proceed to install VIB Author using RPM. The install takes a few seconds. Just type vibauthor to verify that it’s actually been installed.
The last step sees us creating the staging folder structure. This is where the two XML files are placed as explained in the upcoming section.
The commands we need to execute are listed as follows:
su

zypper install python-lxml
zypper install python-urlgrabber

cd /tmp
rpm -ivh vmware-esx-vib-author-5.0.0-0.0.847598.i386.rpm
cd /

mkdir stage
mkdir stage/payloads
mkdir stage/payloads/payload1
mkdir stage/payloads/payload1/etc
mkdir stage/payloads/payload1/etc/vmware
mkdir stage/payloads/payload1/etc/vmware/firewall
The Descriptor and Firewall Rule XML files
Once again, I suggest you give both the Customizing VIBs with VIB Author and Creating a Custom VIB documents a good read before moving on, unless you already did. This section deals with the creation of the descriptor.xml and <rule name>.xml files.
Both XML files are processed by VIB Author which in turn generates the VIB package containing the firewall rule which is then installed on the ESXi host where you want the rule enabled.
A vSphere Installation Bundle (VIB) package consists of 3 components namely a payload, an XML descriptor file and a signature file. In an ESXi context, a VIB is the format used to distribute patches and updates, drivers and other components.
You can create and edit the XML files directly in SUSE using vi or similar. Alternatively, create the files using something like Notepad++ and then transfer the whole lot to SUSE using scp.
The following is a sample descriptor.xml file created for this post.
<vib version="5.0">

<type>bootbank</type>
<name>AltaroBootFromBackup</name>
<version>5.0.0-6.5.0</version>

 <vendor>Altaro</vendor>
 <summary>Altaro Boot From Backup</summary>
 <description>Adds outbound ports required by the Boot from Backup feature</description>

 <relationships>
  <depends></depends>
  <conflicts/>
  <replaces/>
  <provides/>
  <compatibleWith/>
 </relationships>
 <software-tags>
 </software-tags>
 <system-requires>
  <maintenance-mode>false</maintenance-mode>
 </system-requires>
 <file-list>
  <file></file>
 </file-list>
 <acceptance-level>community</acceptance-level>
 <live-install-allowed>true</live-install-allowed>
 <live-remove-allowed>true</live-remove-allowed>
 <cimom-restart>false</cimom-restart>
 <stateless-ready>true</stateless-ready>
 <overlay>false</overlay>
 <payloads>
  <payload name="payload1" type="vgz"></payload>
 </payloads>

</vib>
The firewall rule XML file is created in pretty much the same fashion.
<ConfigRoot>

<service id='0100'>
 <id>AltaroBootFromBackup</id>
  <rule id='0000'>
   <direction>outbound</direction>
   <protocol>tcp</protocol>
   <porttype>dst</porttype>
    <port>
     <begin>35200</begin>
     <end>35220</end>
    </port>
  </rule>
 <enabled>true</enabled>
 <required>false</required>
</service>

</ConfigRoot>
Figure 6 show both files being edited in Notepad++. The values you would generally add are labelled accordingly and are explained as follows:
- Name – This is the name of the firewall rule specified in the descriptor.xml file. It must match the ID value specified in <rule name>.xml. You must also name <rule name>.xml accordingly. In my case, I named the firewall rule file AltaroBootFromBackup.xml. Incidentally, this is how you’ll find the rule listed in vSphere client.
- Vendor, Summary and Description provide extra information about the rule and its use.
- Payload – It is important that this matches exactly the name of the payload directory created on SUSE. In our case, this corresponds to payload1. The subfolders under payload1, in fact, reproduce the /etc/vmware/firewall path present on ESXi. This is the path where you’ll find the corresponding firewall rule XML file after the VIB package is installed.
- This section deals with the networking side of the rule:
- Direction: Outbound or Inbound
- Protocol: TCP or UDP
- Port Type: DST or SRC
- Port: Represents a single port or range of ports, the latter enclosed by the <Begin> and <End> tags.
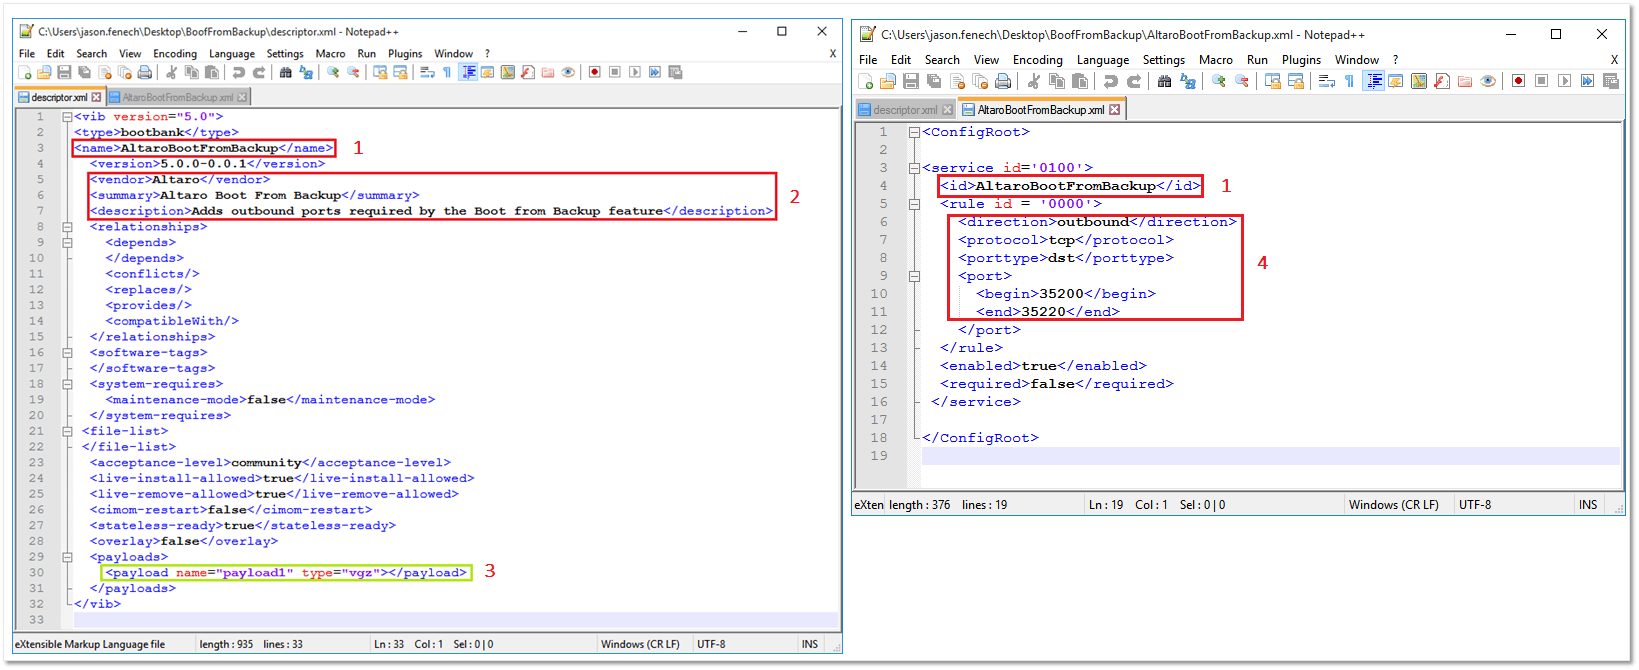
Figure 6 – Creating the XML files in Notepad++
You may need to go back and edit the XML files a number of times before you get it right. Regardless, the XML files must be copied to their respective staging folder every time you make a change:
- descriptor.xml must be copied to /stage
- <rule name>.xml must be copied to /stage/payloads/payload1/etc/vmware/firewall
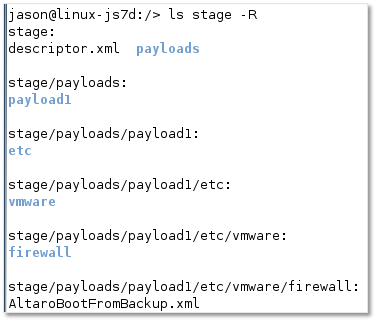
Figure 7 – Staging folder structure on the SUSE server
Running VIB Author
Now that the XML files are done, it’s time to let VIB Author do its magic. While logged in as root on SUSE, fire up terminal and run the following:
vibauthor -C -t stage -v AltaroBootFromBackup -f
If compilation succeeds, a <rule name>.vib file is created under the working folder as per Figure 8. Once the VIB package is created, you just need to copy it over to ESXi and install it. Once again, I used WinSCP to copying files to and from ESXi.
Alternatively, you can use the scp command from a SUSE terminal like so:
scp AltaroBootFromBackup.vib [email protected]:/tmp

Figure 8 – Creating a VIB package and copying it to ESXi via the scp command
This is where most of the testing takes place when creating a VIB package. This includes flushing out typos in the XML, revisit settings, recompiling (for lack of a better word) and copying the VIB file to ESXi and re-testing.
Adding the firewall rule to ESXi
Now that the firewall rule VIB is finalized, it’s time to add it to ESXi.
Step 1 – Using putty or otherwise, SSH to the ESXi host as root and run the following:
esxcli software vib install -v /tmp/AltaroBootFromBackup.vib -f
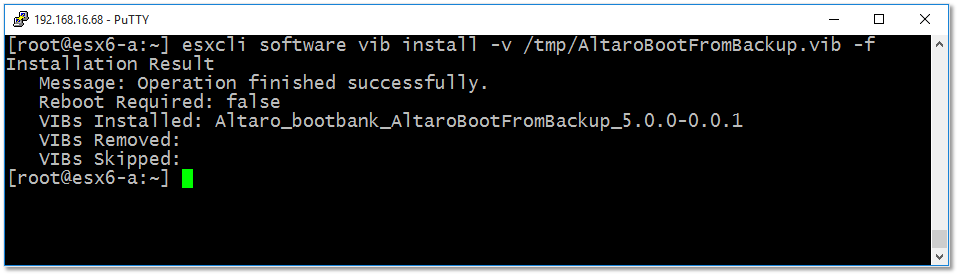
Figure 9 – Installing the firewall rule on ESXi
Step 2 – You may need to temporarily lower the software acceptance level if the VIB addition process fails:
esxcli software acceptance set --level=CommunitySupported
Step 3 – Verify that the VIB package has installed correctly by running the following:
esxcli software vib list | grep 'Altaro'

Figure 10 – Using esxcli to check if a VIB package is installed on ESXi
One other way you can use to verify if the rule has been installed is to look for the <rule name>.xml file under /etc/vmware/firewall as shown in Figure 11. If it exists, all is good.
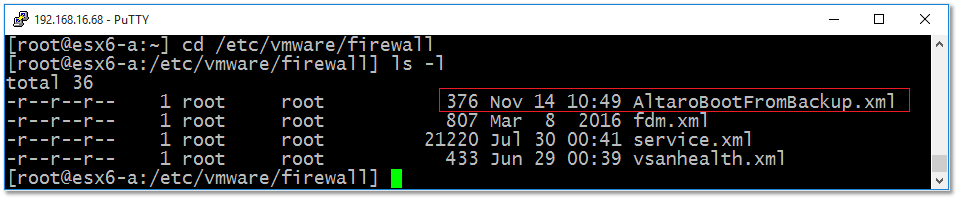
Figure 11 – The firewall rule XML file is created under /etc/vmware/firewall
Last but not least, you can remove the rule at a later stage by running the following:
esxcli software vib remove -n=AltaroBootFromBackup
You can manage the rule using any of the vSphere clients after it has been installed. As per Fig. 12, I used the vSphere C# client but the vSphere Web or ESXi Host clients work equally well.
To manage the rule in vSphere C# client, select the ESXi host from the inventory. Next, from the Configuration tab, navigate to Software -> Security Profile and click on Properties as shown in Fig. 12. The rule just installed should be visible where you can enable or disable it.

Figure 12 – Managing firewall rules from vSphere Client

Figure 13 – The newly created rule listed in ESXi Host Client
PowerCLI can also used to verify that the rule is installed and enabled. To do this, run the following:
Connect-VIServer -Server 192.168.16.68
(get-esxcli).network.firewall.ruleset.list() | where {$_.Name -like 'Altaro*'}

Figure 14 – Using PowerCLI to retrieve firewall rule information
Conclusion
There you have it. Creating a persistent firewall rule for ESXi is anything but plain sailing. This method allows custom firewall rules to persists when an ESXi host is rebooted. Keep this post handy, as I do, whenever you need to set up new rules. I would love to see a future release of vSphere which allows you to create new firewall rule straight out of the box. Until then, we have to settle to doing things the hard way!
In the meantime, enjoy your firewalling activities!
[the_ad id=”4738″][the_ad id=”4796″]


Not a DOJO Member yet?
Join thousands of other IT pros and receive a weekly roundup email with the latest content & updates!
More in this category


About the Author
Jason Fenech


14 thoughts on "How to create persistent firewall rules on ESXi"
Hi and Thanks for your useful information , step by step is very good , but i have one question , i have already VMWare 6.5 (Update 1) , when i want download VIB Author (wrote this file deprecated) , so i must do and install SUSE and other step or i can add firewall in another way?
also i want block P2P Network (Like Bittorrent , Torrent , uTorrent , etc) , can you help me which ports must be closed and how ?
Thanks
Hi,
I am afraid that the only method is the one I described. There’s another method but any custom rules created are lost once you reboot ESXi. All ports are blocked unless explicitly allowed via rules so you don’t have to worry about torrents. Have a look at the following links: 1, 2
regards
Jason
so you tell me already torrents ports are blocked by default no need any actions from me?
so why i get alert my client use torrent , i got some email from datacenter used torrent , i already added ports in firewall , but firewall allow them not blocking them , i want block ports not get allow them
I have no idea how things are set up at your end and what you are trying to accomplish. Perhaps you’re talking about VMs running torrent software inside your environments cause quite frankly I can’t see how you can run torrent software on ESXi. Anyway, as I said, ports are blocked by default unless explicitly allowed.