Save to My DOJO
Table of contents
This blog post shows you how to set up a DSC Pull Server in Azure for our vSphere DSC node. Let’s get started!
What is vSphereDSC?
vSphereDSC is an open source community project that brings PowerShell’s Desired State Configuration to the VMware stack. It allows us to adopt a more “DevOps” mentality when managing our infrastructure and can provide the following benefits to VMware administrators:
- Cattle vs Pets – When you build your environment using a configuration management system like DSC, you’ve taken a huge step into treating your VMware infrastructure like cattle. That sentimental attachment to your ESXi hosts or VMs that you built by hand is now gone, and it is no longer a “pet” but just a configuration that is pushed from code.
- Infrastructure as Code – Having the infrastructure generated and enforced by code not only provides a deep form of “documentation” of the environment, but we can now also implement source control into the configuration changes that we make for our environment. This provides many benefits such as “event tracking” and “code revision” to our configurations.
- Scalability – Having a configuration manager in place, allows for management time of one node to be the same as if there were 10,000 nodes. This prevents companies from following the traditional IT process of having to scale out their operations team along with the infrastructure.
- Enforced Configurations – Most outages are caused by changes made to the environment. Having some form of enforcement and monitoring of each change is huge with ensuring stability.
The vSphere DSC methodology requires that there be a Local Configuration Manager (LCM) running Windows Management Framework 5.1 and PowerCLI 10.1.1 or higher. Because you can’t install an LCM on vCenter or ESXi, the LCM on native Windows acts as a proxy between VMware and DSC. A pull server will host the configuration file for the LCM. The configuration file will have different configurations for the VMware environment which will then be enforced using PowerCLI. The image below from VMware’s Website gives a great example of the layout :

Setting Up the Azure Automation DSC Pull Server
There are many solutions in place for an on-premise pull server. However, Microsoft has stated that while they are still supporting their Pull Server windows feature, they aren’t going to be focusing on any more new features or capabilities with this service. Microsoft’s attention has shifted over to Azure Automation which can be configured as an “in the cloud” Configuration Manager. Since Microsoft is now recommending to use Azure Automation instead of an on-premise pull server, we are going to be using Azure Automation Configuration Management as our pull server in this article. Here are some of the advantages that we get with running our pull server in Azure:
- Certificates – All client certificates are generated and managed automatically, no more having to hassle with creating our own certificates.
- Secrets Store – We can manage credentials and passwords and feed them into our scripts.
- Reporting – We now get a fancy dashboard for managing our configurations.
- Central Management – We can now manage all LCM configurations from one place in the cloud.
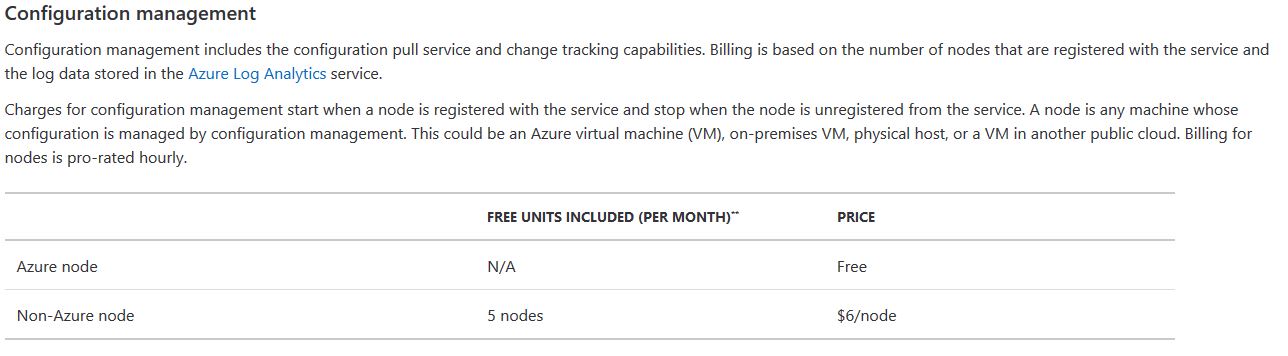
As of right now, we can manage up to 5 “on-premise” nodes for free through Configuration Management in Azure, and since we only need one node to set up VMware DSC, this is a perfect no-cost solution to test and dabble in DSC with VMware:
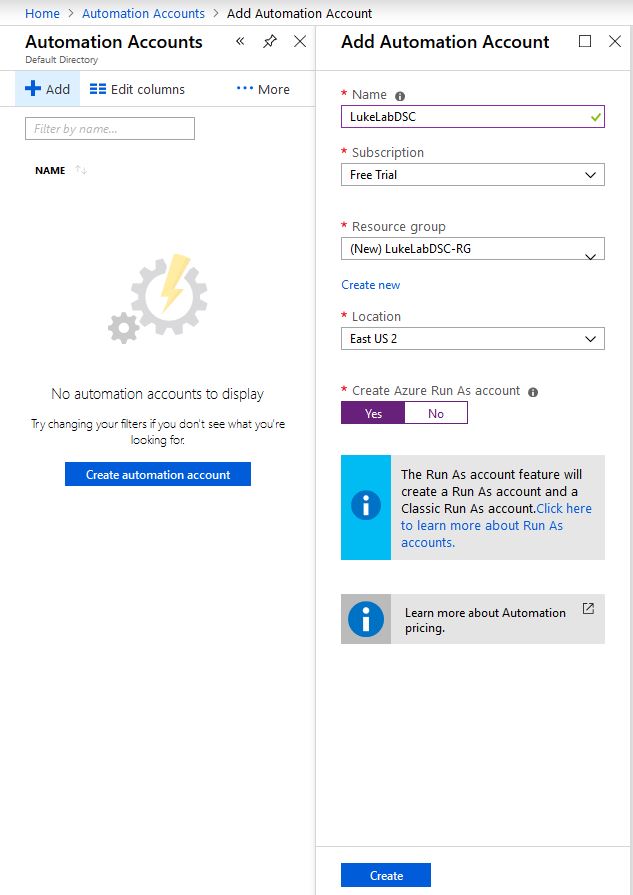
To get started with setting up our LCM in Azure Automation, we need to create an Automation Account. So log into Azure, or if you don’t have an account, start a free trial account. At the home screen, do a search for Automation Accounts. Then select Add to create our account. Next, fill out the blade with your account name, resource group, and location. Keep the option for Azure Run As Account on Yes and select Create:
Now that we have our account and resource group created, we need to install some modules. We will go along with the default LCM settings for Azure DSC which will save us some steps and will simplify the process for setting this up. You can install these modules on the LCM node itself or on a management workstation. We will need these modules in order to add our LCM node into Azure Automation Configuration Management. We will need the AzureRM.Automation modules so type the following in an administrative PowerShell console to install them from the PowerShell Gallery:
Install-Module AzureRM.Automation -Force
![]()
Next, we will need the DSC modules in order to configure our LCM to report into Azure, so type in the following syntax:
Install-Module -name xPSDesiredStateConfiguration -Force
![]()
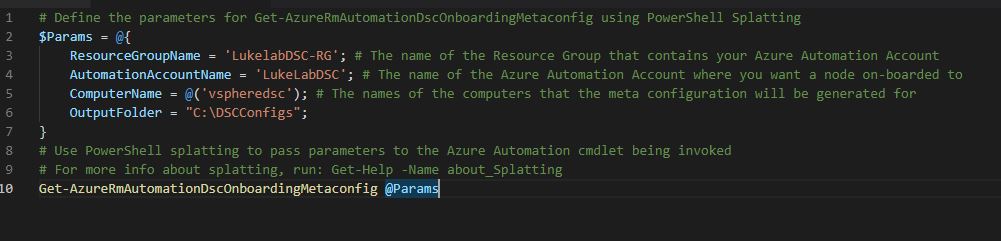
Now paste the following code from Microsoft’s Website into either PowerShell ISE or VSCode. We will need to fill out the parameters to match our newly created automation account. I created a folder at the root of C for the DSC config files. Make sure that the computername field matches the name of the LCM node that we are using for vSphere DSC or we won’t be able to configure the LCM:
# Define the parameters for Get-AzureRmAutomationDscOnboardingMetaconfig using PowerShell Splatting
$Params = @{
    ResourceGroupName = 'LukelabDSC-RG'; # The name of the Resource Group that contains your Azure Automation Account
    AutomationAccountName = 'LukeLabDSC'; # The name of the Azure Automation Account where you want a node on-boarded to
    ComputerName = @('vspheredsc'); # The names of the computers that the meta configuration will be generated for
    OutputFolder = "C:\DSCConfigs";
}
# Use PowerShell splatting to pass parameters to the Azure Automation cmdlet being invoked
# For more info about splatting, run: Get-Help -Name about_Splatting
Get-AzureRmAutomationDscOnboardingMetaconfig @Params
Now that we have the information filled out, in whatever tool your using, connect to Azure, by typing in:
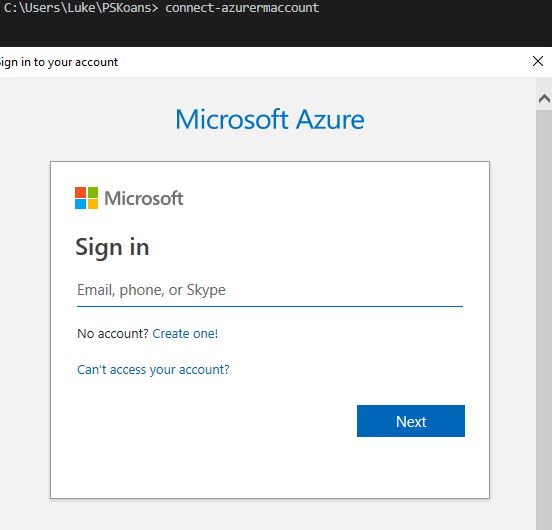
connect-azurermaccount
We will then get a prompt to log in to Azure, it will look like this:
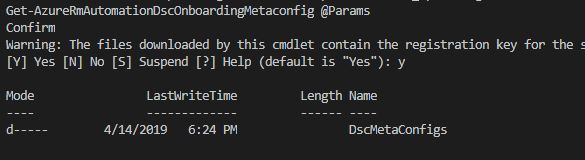
Once you’re logged in, run the snippet of code we filled out previously, this will create our meta.mof file, which is the file that configures the LCM engine. This will basically tell our vsphereDSC node to report into Azure for its configuration file:

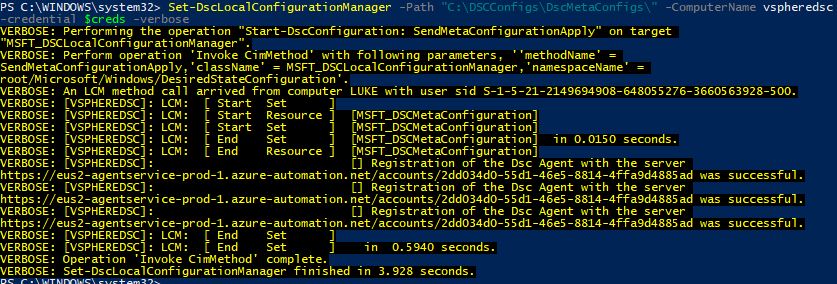
Now it’s time for the magic. You can either copy the .meta.mof file to the LCM node itself and run Set-DSLOcalConfigurationManager locally or use PSRemoting to push the configuration straight to the node. Specify the path to the meta.mof file that we created. Also, I always use the -verbose parameter so that I can see all the details of what is happening:
Set-DSCLocalConfigurationManager -path "C:\DCSConfigs\DSCMetaConfigs\" -Computername vspheredsc -credential $creds -verbose
We can see with the verbose logging that the LCM has been successfully configured:
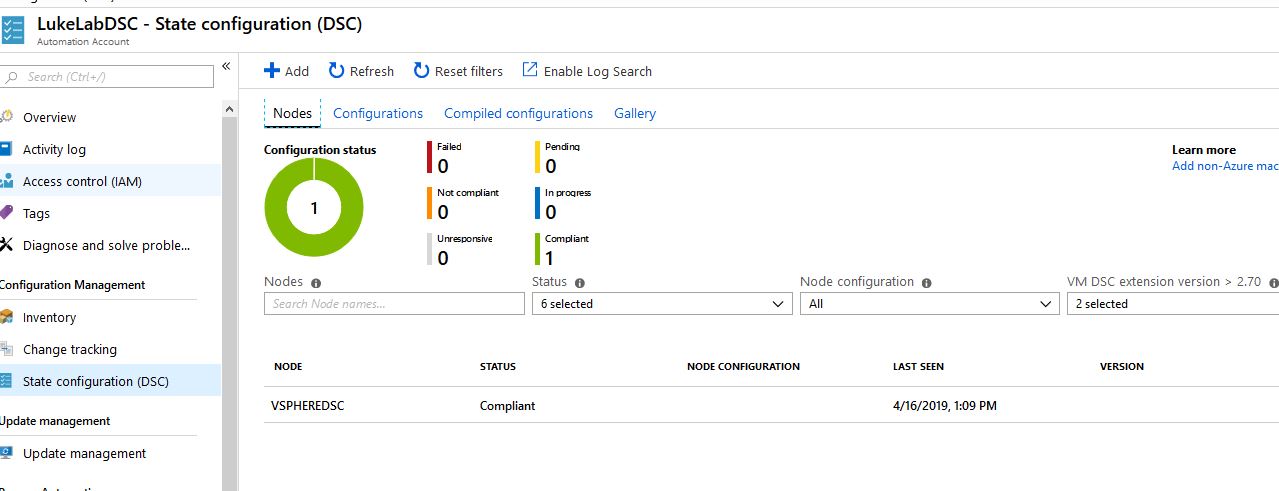
Now, when we take a peek at our Automation Account in Azure, and select State Configuration (DSC), we can see our added node and a pretty graph for managing all of our nodes:
So now we’ve set up a DSC Pull Server in Azure for our vSphere DSC node. Be sure to check out the next post where we will create a DSC configuration for our ESXi environment and deploy the configuration to the node. Also, note that the LCM node cannot be a part of a domain, the Local Configuration Manager will error out when configuring with a “returned unexpected response code Unauthorized” error.
What about you? Do you find this type of management for vSphere at scale helpful? Have you tried something similar? Did it work well, or not? Let us know in the comments section below.
Thanks for reading!
[the_ad id=”4738″][thrive_leads id=’18673′]


Not a DOJO Member yet?
Join thousands of other IT pros and receive a weekly roundup email with the latest content & updates!
More in this category


About the Author

Luke Orellana

