Save to My DOJO
This post is part of a series. Skip to part 2
Hello everyone!
I wanted to put together a post that provides a bit more comprehensive look at GitHub along with its underlying core tool, GIT.
Enjoy!
Introduction to Source Control
When I started writing PowerShell scripts, I never thought I would need to have my own Source Control platform. I figured that was for developers, and saving my scripts to a folder would be enough for my needs. Well, a few years went by, and as I began developing more and more PowerShell scripts, the management of my scripts became a mess. I ended up with a script folder structure like this:
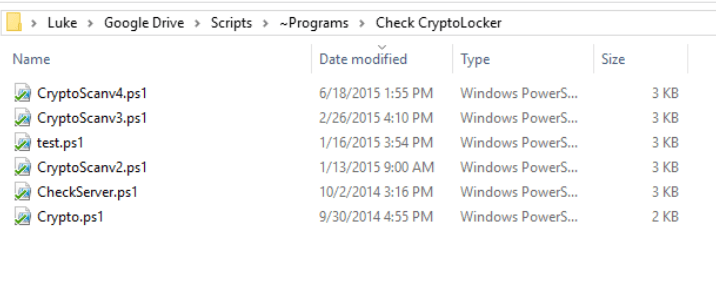
Each time I wanted to test a new change, I would put a “v#” at the end of the script or rename it as “test.” I quickly found that I would lose track of what my script did or what each revision was for. Imagine this scenario but with a whole team of people creating and saving their own PowerShell scripts for their company.
Therefore, having some sort of source control platform in place for your MSP is imperative to having a successful environment for developing automation. There is a good chance that you have at least heard or seen a reference to GitHub within the past few years. GitHub is a popular web-hosted version control service that uses GIT.
GIT is a source control system that was created by Linus Torvalds (the creator of Linux), who used it as his own version control for developing the Linux Kernel. The greatest feature of GitHub is the community. Anyone can put the source code out on the web and have multiple people contribute to improve it. It really is an amazing concept and works incredibly well. Let’s see how to get started with GIT.
Getting Started with GIT
For me, the best way to learn is to get my hands on it. So, let’s get started with a tutorial on using Git with GitHub.
Install GIT here (if you need instructions for installing GIT, look here). Create a free GitHub Account here. For this demo, we will create a public repo which is free, if you want to start creating private repos, then you can upgrade your account to a paid plan.
First, we want to create a new project. In GitHub, that is called a “repo” or repository. In this demo, we will take one of our PowerShell scripts, save it to a local directory, and then make it into a GIT repo. Below I made a directory in C:\repo\deploywindowsupdates and placed one of my PowerShell scripts that I’d like to upload to GitHub into the repo folder:
 Now, open an administrative PowerShell console and browse to the directory with the following command: Cd c:\repo\deploywindowsupdates Then, we run the following command to “initialize” or turn our directory into a git repository: Git init
 Now if we look into the directory, we have a .git folder with all our git files. These files contain all the information about our repository:
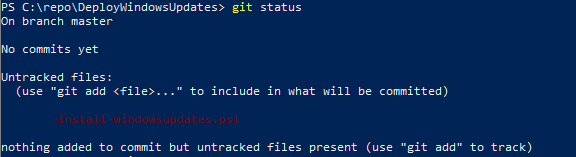
 Now we can run the following command to see which files Git knows are there. The notice at the bottom basically states that the file is there, but nothing will be done with it unless we run a “git add”: Git status
One of the hardest concepts to grasp when starting to use Git with your PowerShell scripts is the staging environment. A commit is like a “snapshot” of the files you have changed since the previous commit. It allows you to revert to previous points in time. But remember, this is a staging environment, so the process is to add the file to the staging environment and then commit the file.
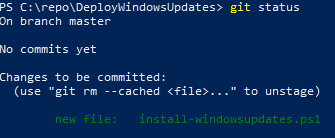
So first, we run the following syntax to add the file using “git add”: git add C:\repo\DeployWindowsUpdates\install-windowsupdates.ps1. Now when we run git status, we can see the script is added onto the staging environment:
Before we can commit our changes, we need to set up an identity so that Git can track who did what. So, we use the following syntax: git config –global user.name “Luke Orellana.” Now it’s time to commit the script file to our Repo.
We run the following command using the -m parameter to specify a message about our commit. Make sure your commit message is something meaningful and relates to what the commit change is for. This is a part of documenting your code, so make sure it’s good: Git commit -m “This is the first commit for the Windows Update script”

Uploading our Repo to GitHub
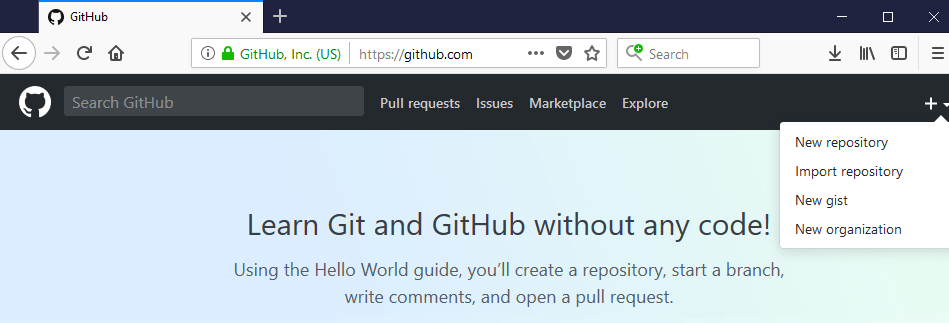
You can keep track of your code locally this way and leave it at that. Or you can benefit from GitHub by uploading your newly created repository on GitHub. So, let’s log in to GitHub with our account and go to the home page. On the right-hand side, there will be a button to create a new repository:
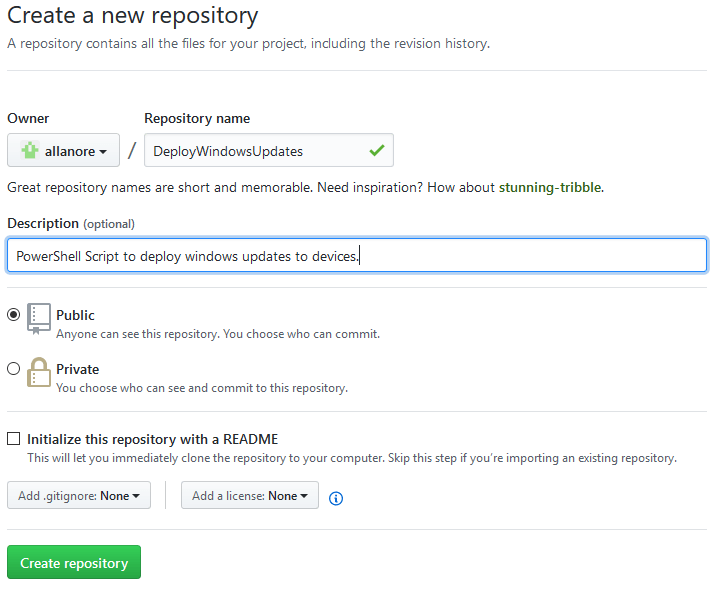
 Now, we will name our repo. For this demo, I created the repo DeployWindowsUpdates (as shown below) so that I have a place to upload my script. Click Create Repository when you’re done:
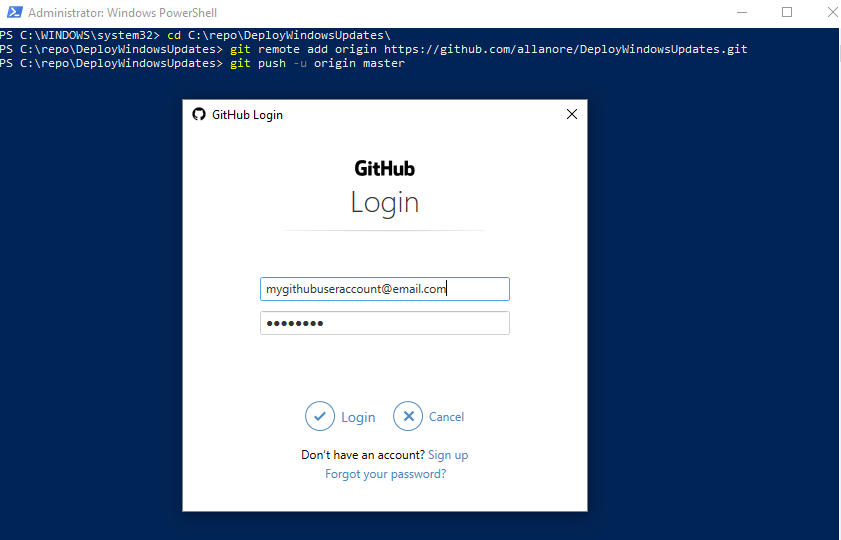
 Now we are prompted with some options for setting up the newly created repo. Since we’ve already created the repo locally on our workstations, we will follow the steps for the option to push an existing repo. So, we make sure we are consoled into the directory we created locally, and we will run the commands to push this local repo up to the one we created in GitHub. You will be prompted for your GitHub login credentials. Input them and select Login: git remote add origin https://github.com/allanore/DeployWindowsUpdates.git git push -u origin master
Now, when we go back into our repo in GitHub, we can see our newly uploaded script is there! Congratulations, you’ve now uploaded your PowerShell script into a GitHub repo! Be sure to check out part 2, where I will go over some more functions we can do with Git, such as branching, merging, and pull requests: PowerShell Tools for MSPs – Getting Started with Source Control Part 2 – a deeper look at GithHub: ho
w to do branching, merging, and pull requests.
Q & A
Q: While it’s easy to quantify the benefits of automation from a time perspective, how do you help an owner or C-Level manager see the benefits from a fiscal perspective?
A: It’s often best in this situation to assign a dollar amount to your hourly work. How long does it take you to do that manual task? Take that, assign your dollar amount and compare it to the hours that it would take once automated. Often the results will speak for themselves.
Q: What are some good resources for learning how to use GitHub?
A: The GitHub documentation is well-written and provides all the detail you could ever want in a use guide. Highly recommend you check it out.
Q: As MSPs, where does our RMM toolset enter the automation discussion?
A: An RMM system is a great utility. While there are ways of distributing your scripts to endpoints without it, the task is made MUCH easier if you have an RMM platform. Essentially when we’re talking about scripts, an RMM tool is used as the delivery mechanism to get those scripts to the endpoints for execution.
Q: Why PowerShell Specifically? Can I use other scripting Languages?
A: Absolutely! We see PowerShell most frequently due to its integration with all facets of the Microsoft Server Stack. However, all other scripting languages have their own benefits and use cases as well! That wraps up things for us today!
Thanks for reading!

Not a DOJO Member yet?
Join thousands of other IT pros and receive a weekly roundup email with the latest content & updates!
More in this category


About the Author

Luke Orellana


2 thoughts on "PowerShell Tools for MSPs – Getting Started with Source Control Part 1"
Hi Luke, that was nice article. Just would like to check how a wintel administrator(can be Hyper-V Admin or VMware Admin or Citrix Admin) can start using DEVOPS tools (Like Puppet , GIT, CHEF, ANSIBLE, Docker etc). With PowerShell,yes we are already automated few of our daily jobs and started using it. As a wintel Administrator I am looking for some information how I can switch to DEVOPS Admin and implement in my organization. This is one big question, I am looking for answer for many days and I am not getting much information from Internet as well. May be I ma not searching with right key words. Can you please shed some light on this? If my question is irrelevant, please ignore it. Thank You.
If you want to implement more “devops” tools into your organization, I would start by learning the technologies that you listed. For example, check out if you want to learn how docker works, its such an amazing technology and I believe it will slowly become the standard for the way we run apps in the future. Git Hub has tons of good material on their site on how to use Git. The more knowledge you have with these technologies the more opportunities you will find to implement them in your company. Thanks for the comment and good luck!