Save to My DOJO
Nano Server is a headless server first introduced with the Microsoft Windows Server 2016 line. Headless is the term used for anything that can only be managed remotely.
The name Nano is indicative of the server’s tiny footprint, circa 500MB, as opposed to the 10GB+ taken up by the GUI version. Nano was touted as being the best thing since sliced bread due to the small footprint and less baggage should mean you spend less time patching, uninstalling bloatware, rebooting, and so on. A smaller footprint equals a reduced attack surface making the security guys, and gals, a happy bunch. Compute resource requirements are significantly lower when compared to those required by Nano’s heavier siblings; Server Core and Server with Desktop Experience. You can run things like IIS, Hyper-V, Failover Clustering and other infrastructure roles on Nano.
So far, so good were it not for the fact that Microsoft decided to change course, completely. Much to the disappointment of many, all infrastructure features have been dropped to make Nano’s footprint even smaller; see the latest 1709 Windows Server 2016 release. You can also wave goodbye to installing Nano on physical servers. Instead, Microsoft is now re-focusing all its energy to make Nano the number one container base OS image.

With that said, today’s post tackles the process of deploying Nano server, as shipped with pre-1709 releases, to ESXi.
Note: From release 1709 forward, the deployment process is completely different since Nano is pulled as an image from Docker Hub and hosted on a container host. I had started working on this post prior to learning about Microsoft’s plans for Nano, but nevertheless, installing it proved a bit challenging so I think sharing the experience is worth the effort. I should also mention that users running Nano in their environments will continue enjoying MS support for the coming 5-6 years. Some may want to run Nano in their environments regardless of support, so here it goes.
Requirements
There are the requirements if you’re planning on replicating the process outlined in this post.
- A Windows Server 2016 Server physical or VM. In theory, the process described will also work on Windows 8, 10 and Server 2012 R2 though I had issues on both 10 and 2012.
- A pre-1709 Windows Server 2016 ISO image. Download an evaluation copy from www.microsoft.com.
- VMware Tools for Windows, 64-bit in-guest installer. Download from my.vmware.com.
- WinImage. Download from www.winimage.com
Extracting the Nano Server binaries
Nano Server is not actually installed. Instead, you build a VHD disk which you then attached to a VM running under Hyper-V. In our case, we go one step further by converting the VHD file to VMDK thus allowing for it to be attached as a disk to a VM hosted on ESXi.
To extract Nano from the Windows Server 2016 ISO, do the following:
- Mount the Windows Server 2016 ISO image as a drive on the Windows Server 2016.
- Create a root folder called Nano.
- Create the folder c:\nano\drivers.
- Copy the contents from <Drive:>\NanoServer to c:\Nano.
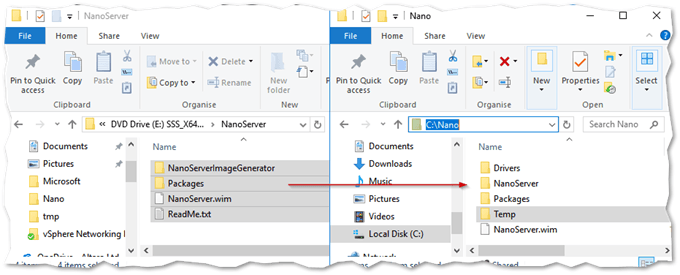
Copying the Nano distribution files from a Windows Server 2016 ISO
Extracting and Injecting VMware Tools Drivers
Nano Server does not come with inbuilt drivers. We therefore need to inject our own. Since we’ll be running Nano as a virtual machine on ESXi, for better performance I opted to include the Paravirtual SCSI adaptor and VMXNET 3 network drivers.
To extract the drivers from the VMware Tools package previously downloaded, do the following:
Step 1 – Open a command prompt and run VMware-tools-10.1.7-5541682-x86_64.exe /a. This command performs an administrative install. This basically means that the package contents are extracted to a folder which you can then share for remote installs.
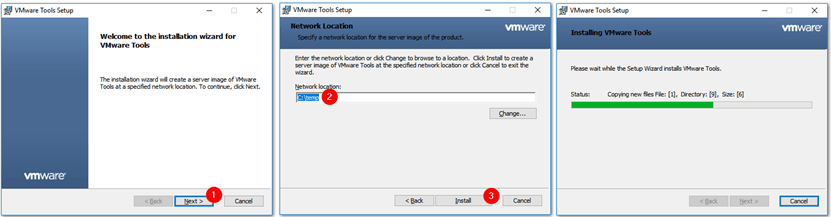
Running a VMware Tools administrative install
Step 2 – Navigate to the folder where you installed vmtools, c:\temp in our case, and drill down to C:\temp\VMware\VMware Tools\VMware\Drivers.
Step 3 – Copy the pvscsi and vmxnet3 folders to c:\nano\drivers.
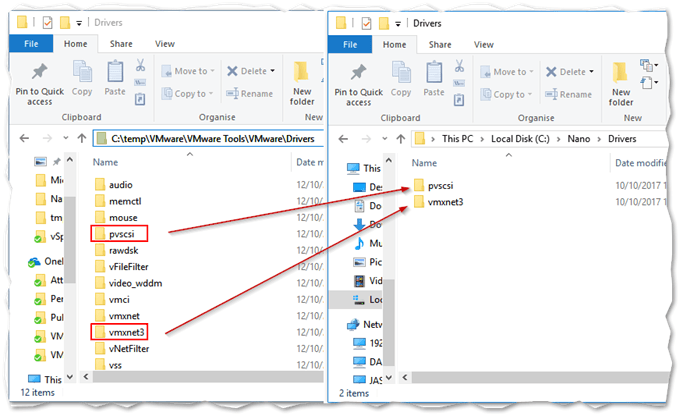
Copying VMware drivers to the Nano distribution folder
Building a Nano Server image
We’re going to use PowerShell to create a bootable VHD file. The steps are as follows.
Step 1 – Open an administrative PowerShell console on the Windows Server 2016 machine.
Step 2 – Run mkdir c:\tmp to create a temporary folder for the script’s output and VHD file.
Step 3 – Run Set-ExecutionPolicy Unrestricted to allow script execution. You can change it back to the original settings once you’re done.
Step 4 – Navigate to C:\nano\NanoServer\NanoServerImageGenerator and run Import-module NanoServerImageGenerator.psm1
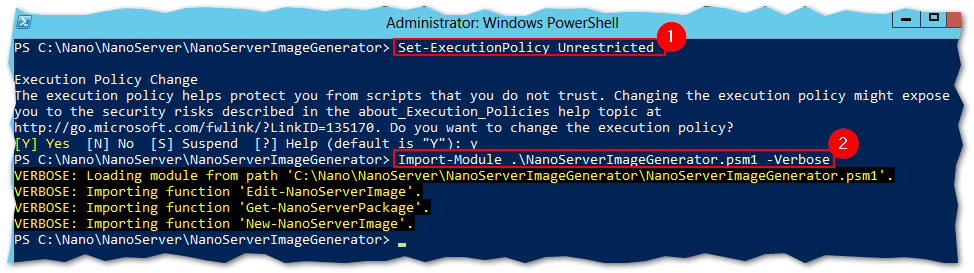
Importing the Nano Server Image Generator module in PowerShell
Step 5 – It’s time to create the Nano VHD using the New-NanoServerImage command. The parameters used, will depend on the intended server use. For instance, adding the -compute parameter create a VHD for a Nano Hyper-V host.
In this example below, I’m creating a Nano IIS server VHD by adding the -Package Microsoft-NanoServer-IIS-Package parameter. Here’s the complete command over several lines for better reading. Note that all the parameters are mandatory.
New-NanoServerImage `
-Edition "Datacenter" `
-MediaPath C:\Nano `
-BasePath C:\tmp `
-TargetPath C:\tmp\NanoServer.vhd `
-ComputerName NanoServer `
-EnableRemoteManagementPort `
-DriverPath C:\Nano\Drivers `
-AdministratorPassword (ConvertTo-SecureString -String "VMw@reRule5" -AsPlainText -Force) `
-DeploymentType Host `
-Package Microsoft-NanoServer-IIS-Package `
-verbose
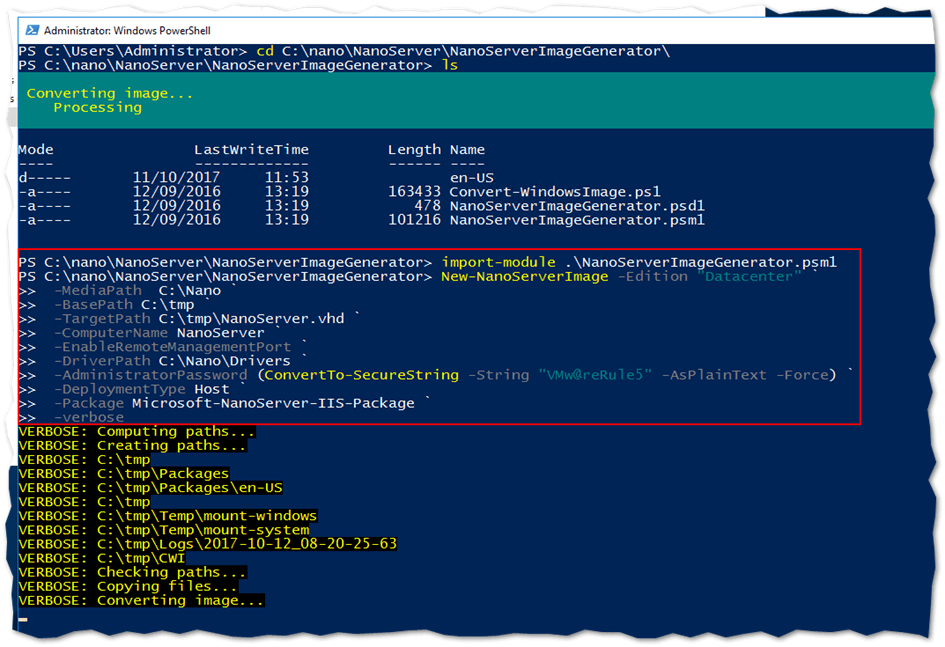
Creating the Nano Server VHD using the New-NanoServerImage command
The command must complete without any errors otherwise the VHD won’t boot or not be created at all. When I tried this on my Windows 10 HP laptop, I kept running into a disk error probably due to a misbehaving HP driver. I also tried the same on a Windows Server 2012 R2 server but the process failed due to an older version of DISM which you can update by downloading the latest version from Microsoft.
Converting from VHD to VMDK
Under the c:\tmp folder you will find the file NanoServer.vhd. If you wanted to, you could simple attach this to a VM running on Hyper-V and be done with it, but since we prefer ESXi to Hyper-V, we need to convert it to VMDK format. Here’s how.
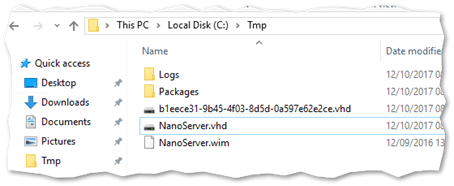
The generated Nano VHD file
Step 1 – Install WinImage and run it.
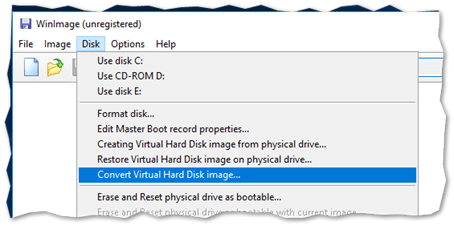
Step 2 – Select Convert Virtual Hard Disk image from the Disk menu. Navigate to c:\tmp and select NanoServer.vhd.
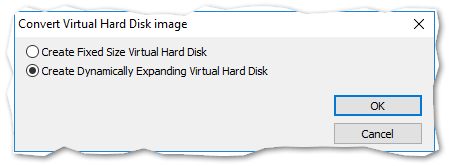
Step 3 – Select the Create Dynamically … option and press OK.
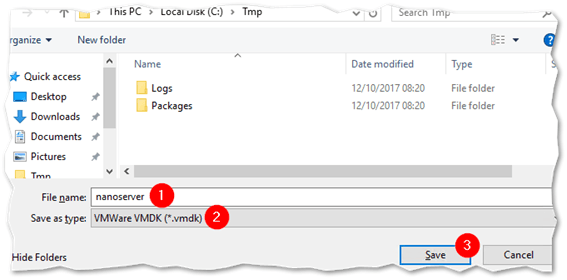
Step 4 – Type a name for the VMDK file and set Save as type to *.vmdk. Press Save.
Step 5 – WinImage will first read the VHD and will finally prompt you to select a partition to connect to. When it does, just press OK. You should find a nanoserver.vmdk file under the C:\tmp folder.
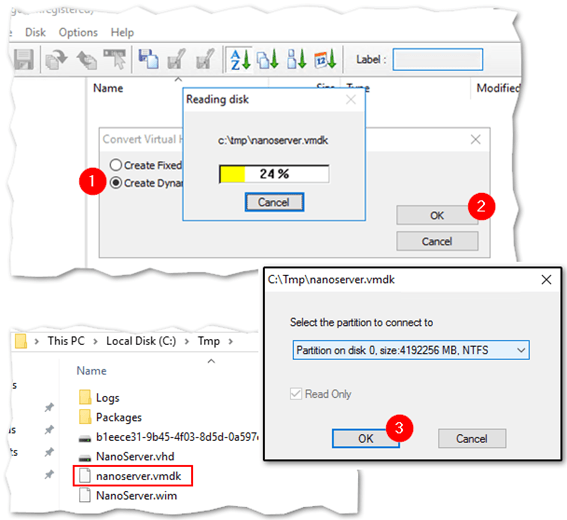
Converting a VHD file to VMDK format using WinImage
Hosting Nano Server on ESXi
Let’s go ahead and create a VM for Nano Server. I’ll be hosting it on ESXi 6.5 and using the vSphere Web Client to create it. Since the process is straight-forward, I’m only including the salient screenshots showing the settings I changed.
Step 1 – Create a new VM. On the Select a guest OS screen, select Windows Server 2016 (64-bit) or Windows Server 2012 (64-bit) on older version of ESXi.
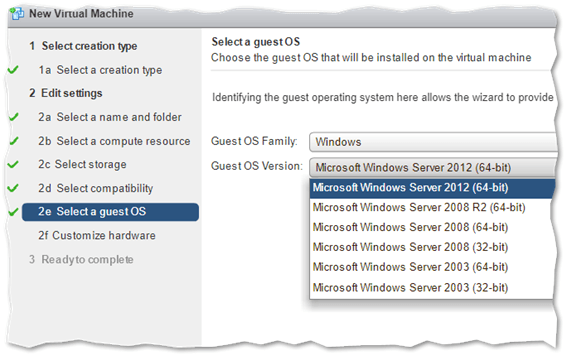
Selecting Windows Server 2012/2016 as the OS Family / version for the Nano Server VM
Step 2 – On the Customize hardware screen, do the following:
- Delete the default hard disk, CD-ROM and Floppy drive.
- Change the SCSI controller type from LSI Logic SAS to VMware Paravirtual.
- Change the network driver type from E1000 E to VMXNET 3.
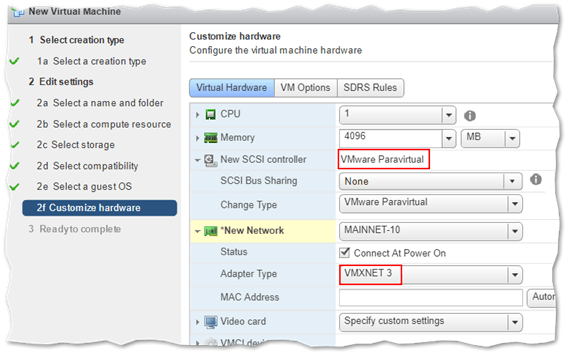
Replacing default drivers with ones offering better performance
Step 3 – Press Finish to create the VM. Using the datastore browser, navigate to the VM’s folder. Using the Upload button locate the converted VMDK file and upload it to the VM’s folder on the selected datastore.
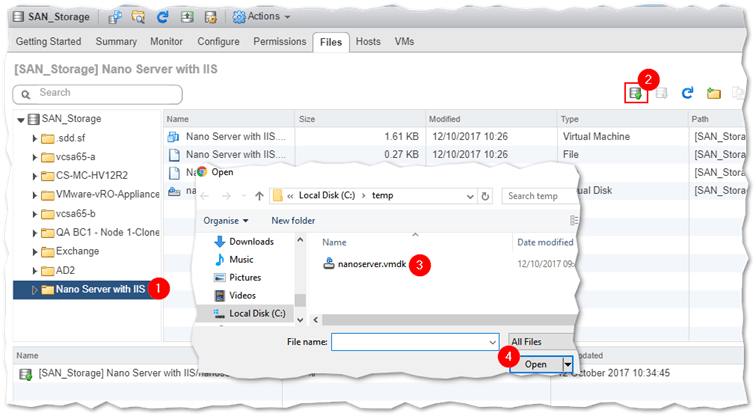
Uploading a VMDK to the VM’s folder using datastore browser
Step 4 – From the VM settings, attach the uploaded VMDK to the VM by selecting Existing Disk from the New Device drop-down box. Select the uploaded VMDK from the datastore browser dialog as shown next.
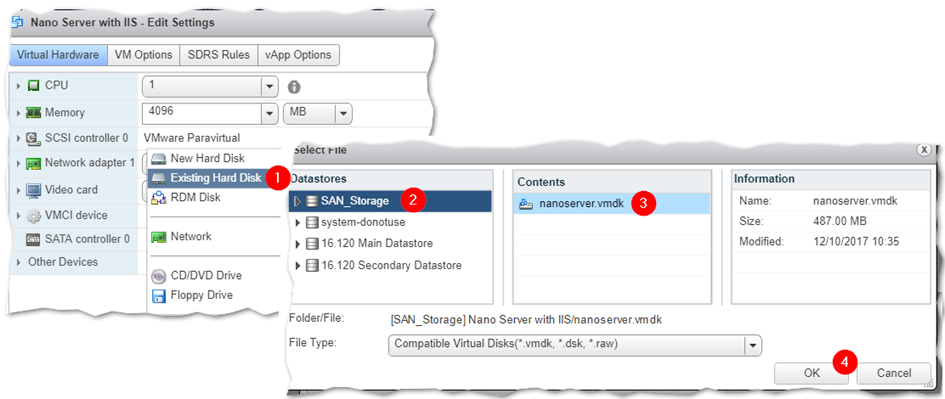
Attaching the Nano Server VMDK to the VM just created
Step 5 – Power up the VM and launch Remote Console. You should see the recovery console for Nano Server in no time at all.
Step 6 – Log in as administrator using the password specified in the PowerShell command line. Leave Domain empty unless you specified that the server should join a domain when generating the VHD.
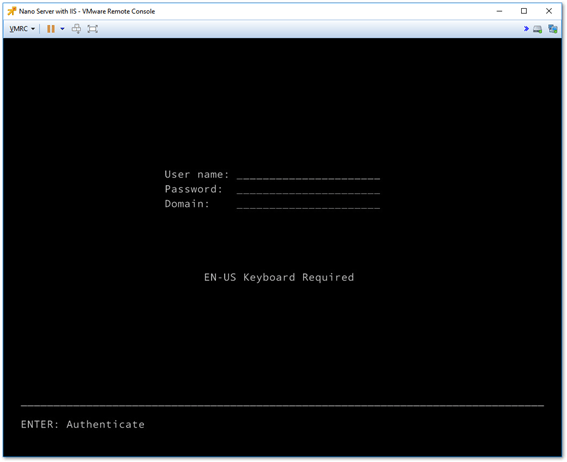
Nano Server’s Recovery Console log on screen
Step 7 – From the recovery console, you can now configure the IP settings from the Networking menu. You can also reset WinRM to the default settings if you’re unable to connect to the server remotely. For this example, I’ve configured Nano’s IP4 static settings as shown.
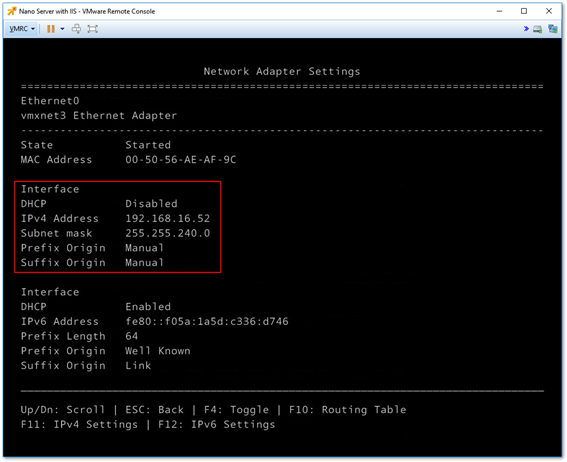
Manually setting the network configuration via the recovery console
Step 8 – To verify that the server is responding, I simply point a browser to it. The IIS splash screen should be returned which is indeed the case.
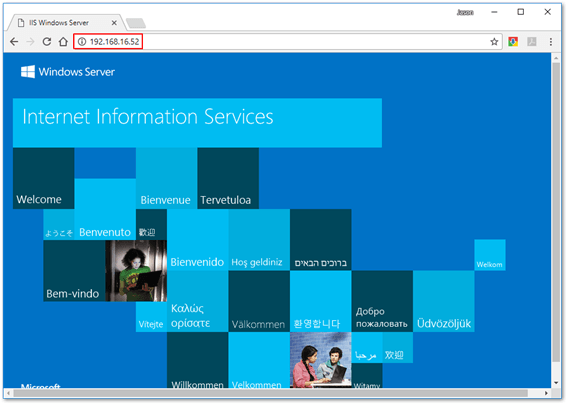
Testing IIS running on Nano Server
Step 9 – While we’re at it, let’s verify that we can connect to the server remotely via PowerShell. To do this, we first add the server’s IP to the trusted hosts list using Set-Item WSMan. This allows us to establish remote PowerShell sessions using Enter-PSSession.
Set-Item WSMan:\localhost\Client\TrustedHosts "192.168.16.52"
Enter-PSSession -ComputerName 192.168.16.52 -Credential administrator
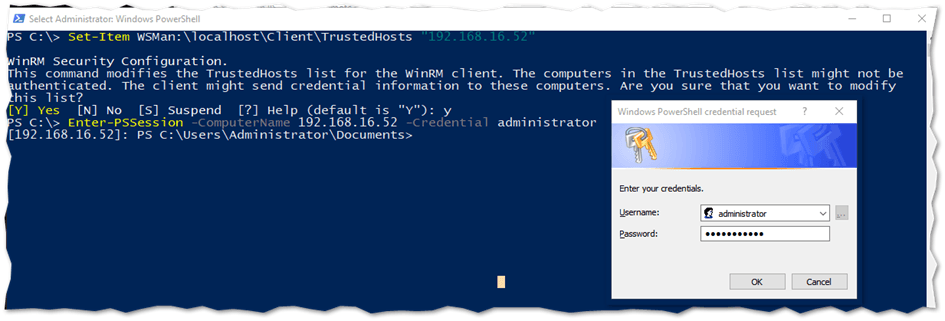
Establishing a remote PowerShell session on Nano from a Windows client
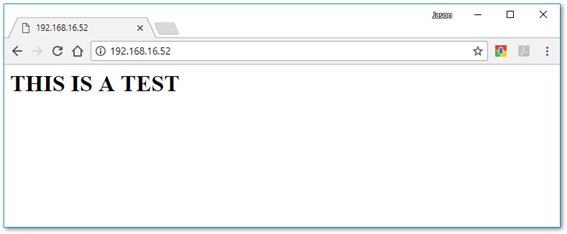
For further testing, run the following command at the remote PowerShell prompt.
echo "<h1>THIS IS A TEST</h1>" > C:\inetpub\wwwroot\default.htm
Refreshing the browser window previously used to verify IIS functionality, you should now get this:
Testing IIS running on Nano Server
Have a look at Microsoft’s official documentation to learn how to manage Nano using other methods. I should also mention that there are a couple more methods you can use to deploy Nano Server using a WIM file and Nano Server Image Builder.
Conclusion
With Nano Server, Microsoft was heading in the right direction. It gave users a robust yet lightweight server capable of hosting infrastructure roles making it the ideal candidate for virtualization within the data center. Containers are a big thing and, probably, this is why Microsoft changed course abruptly, refactoring Nano solely for containerization use.
Nevertheless, you can still run Nano on both Hyper-V and ESXi as a virtual machine. End-of-support is still a few years away if you still want to go for it though this is not something Microsoft would suggest unless of course, they change route once more.
In today’s post, we saw how to create a Nano Server VHD disk using the New-NanoServerImage cmdlet which we then converted to a VMDK using WinImage, one of many freely available conversion tools. We then created a VM and attached the VMDK to it. Powering it up, we configured the network settings and performed a few simple tests to verify functionality.
In the meantime, I’ll look into the possibility of running a Nano image using VMware containers something you can read about here.
[the_ad id=”4738″][the_ad id=”4796″]


Not a DOJO Member yet?
Join thousands of other IT pros and receive a weekly roundup email with the latest content & updates!
More in this category


About the Author
Jason Fenech


4 thoughts on "How to Install Windows Nano Server on ESXi"
I know this will sound like a daft question but ignoring IIS what can you actually do or use Nano for?
Having a reduced footprint is great and everything but what about using it for DNS, DC, Veeam, Exchange etc etc?
It just sounds really limited at this stage.
I’m also curious to hear your thoughts on Windows Server 1709 (the one without desktop experience), again, what do you use this for? I can’t use it for Citrix, RDS, Exchange, Veeam, so whats the point?
Just a bit confused as to where this is all heading!
Actually, that’s a question I asked myself. Nano 1709 is now only available as a container image. More on this here. Can’t say I used it that much tbh, so can’t really provide first-hand feedback.
thank you for sharing the info. same question in 1709 no longer come with Nano folder, I don’t see nothing about how to install Nano server moving forward.
That’s because moving forward, Nano server is only available as a container image meaning you have to pull it from something like Docker Hub. With 1709, you can only install Windows Server core. Here it is straight from the horse’s mouth:
Q: I heard Server Core is the only installation option available. Is this true?
A: Yes. Server Core is the installation option recommended for the two scenarios above. For that reason, we decided to have Server Core as the only installation option for this channel. For customers who want a GUI for administration purposes, we highly recommend checking out Project “Honolulu”, a new management experience for Windows Server.