Save to My DOJO
In How to install vRealize Orchestrator 7.3, I describe how to install and configure vRealize Orchestrator (vRO) to manage vSphere environments. As it turns out, vRO can be used to manage a whole lot more than just VMware products. A cursory look at the plug-ins included with vRO will give you an idea of what the product can do.
In this post, I’ll focus on one particular plug-in that has probably caught your eye anyway. I’m referring to the Active Directory plug-in. Well, yes, you can use vRO to manage Active Directory and more. Microsoft’s popular directory services technology is a cornerstone of many, if not all, MS-based infrastructures. You’ll also often find that VMware offerings such as vSphere are tightly AD integrated to leverage its AAA capabilities. I suggest you have a look at How to join vCenter Server to Active Directory as an example of how to integrate vSphere with AD.
I’ll start by showing you how to upgrade the AD plug-in just so you have the latest version installed.
Updating a vRO plug-in
Below is a screenshot of Orchestrator Control Center’s Plug-ins page. The AD plug-in, as it so happens, is listed topmost. I’ve also included a snippet of a preconfigured Active Directory instance listed shown listed under the inventory.
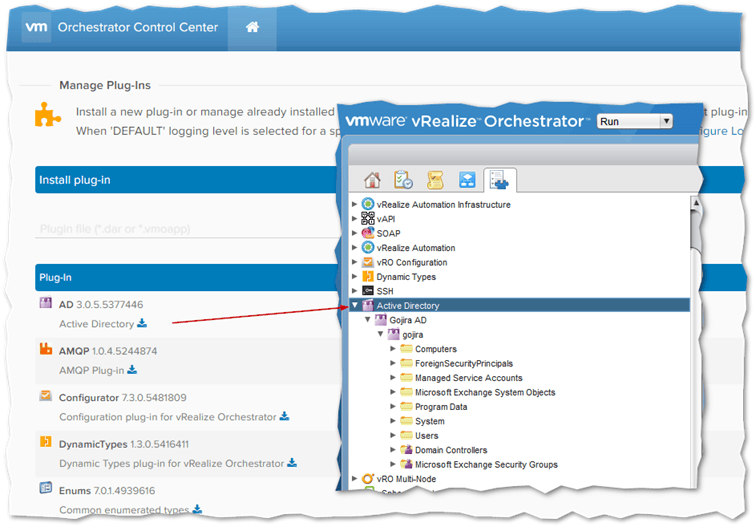
List of plug-ins as listed in vRO Control Center. An AD workflow was used to add an AD instance to vRO.
Before we dive in, let’s have a look at how to upgrade the plug-in since these tend to get updated from time to time. At the time of writing, 3.0.5.5377446 is the version of the AD plug-in shipping with vRO 7.3 as you can see in the screenshot above. I must admit that vRO is pretty new to me, which means I’m still getting used to the nuts and bolts as I’m writing these posts. To update the AD plug-in proceed as follows:
Step 1 – Download the latest plug-in.
Step 2 – Unzip the plug-in to a folder. You should find a file with a vmoapp or dar extension. In this case, the filename also includes the version of the plug-in.
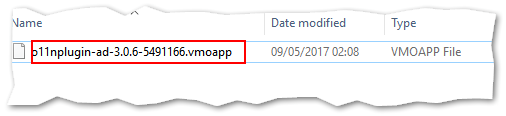
An extracted vmoapp vRO plug-in file
Step 3a – Load Control Center (https://your_vRO_IP_or_DNS_name:8281/vco/) and scroll down and click on the Manage Plug-ins icon.
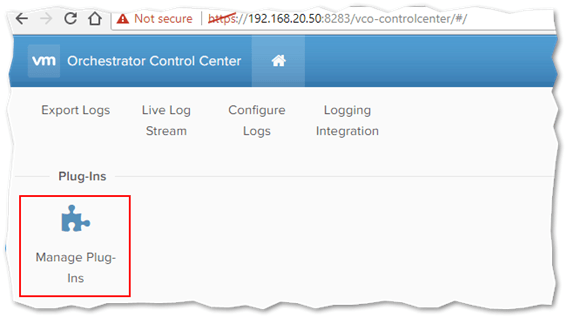
Use Manage Plug-Ins in Control Center to list, install, and add or enable vRO plug-ins
Step 3b – Click on Browse and navigate to the plug-in file previously unzipped. Select it and click Install.
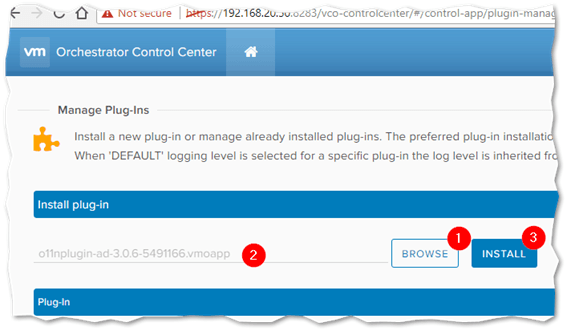
Updating a vRO plug-in by installing the latest version over an existing one
Step 4 – Read and accept the EULA and click on Install once more.
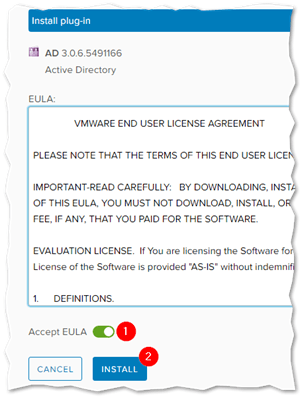
Accepting the EULA before installing a plug-in
Step 5 – Shell to the vRO server using putty and run service vco-configurator restart && service vco-server restart.
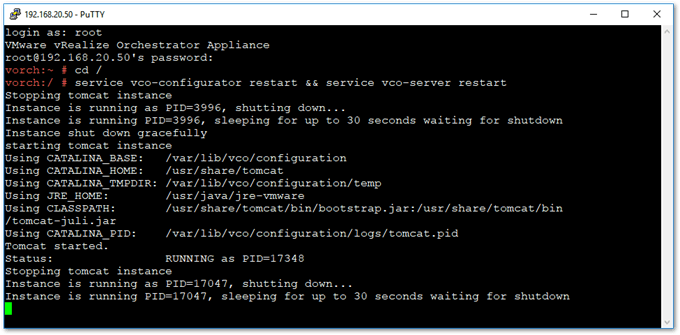
Some vRO services need to be restarted after a change has been committed
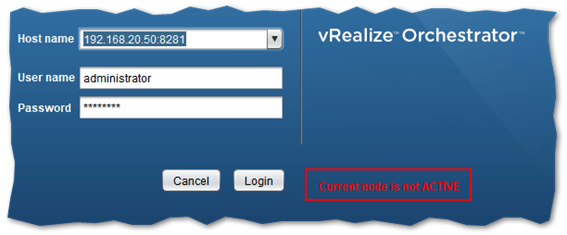
Note: In my case, I had to reboot the server completely – run reboot from shell – since vRO kept complaining about a pending service restart. Additionally, logging in via the standalone client failed due to a Current node is not active error.
Sometimes, you won’t be able to an connect to vRO. Restarting the vRO server will often fix this.
Step 6 – Returning back to Control Center’s plug-ins page, go ahead and verify that the plug-in has indeed been updated.
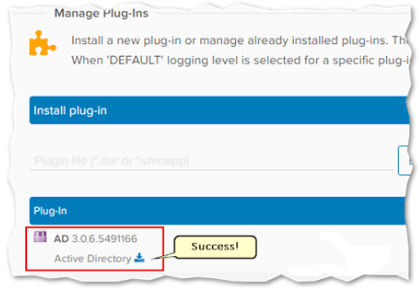
The AD vRO plug-in successfully updated to the latest version
Adding an Active Directory instance to vRO
To add an Active Directory instance, we’ll use the standalone Orchestrator client. You can download this from https://your_vRO_IP_or_DNS_name:8281/vco/.
Once you do, run vROWorkflowDesigner.exe and log in using an SSO account. If you opted for vRO authentication instead of SSO, log in as root. Following the steps listed next, you should be able to add an AD instance so can manage it via Orchestrator using the corresponding workflows.
Step 1 – Making sure that Run mode is selected, click on the Workflows tab (1) and expand the branch named Microsoft. Drill down to Active Directory -> Configuration and select the Add an Active Directory server workflow (2). Click on the Run button (3).
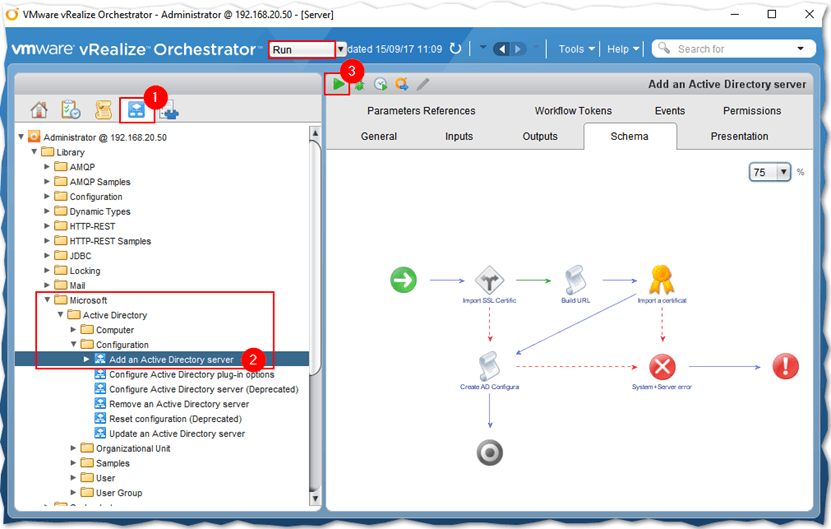
Executing the workflow to add Active Directory to vRO
Step 2 – On the first screen, type in the following details:
- Configuration Name: This is how the AD instance will be listed in the inventory. Type in a name that makes it to easy to identify an instance if your plan is to add more later on.
- Host: Type in the IP address of a domain controller, or its FQDN, participating in the AD instance you’ll be managing using vRO.
- Port: Use the default LDAP port or type in 3268 if using Global Catalog.
- Base: Type in the LDAP root element of AD setup. In the example below, my domain is called gojira.local hence the corresponding LDAP entry will be DC=gojira,DC=local.
- Use SSL: Select Yes if your AD is configured for it otherwise stick with the default No setting.
- Default domain: Type in the name of the root domain of the AD forest.
Press Next when done.
Note: I used the above settings when testing against an AD forest consisting of one domain on Windows Server 2012 R2. The online documentation does not provide much in terms of examples so you might have to experiment a bit before getting it right.
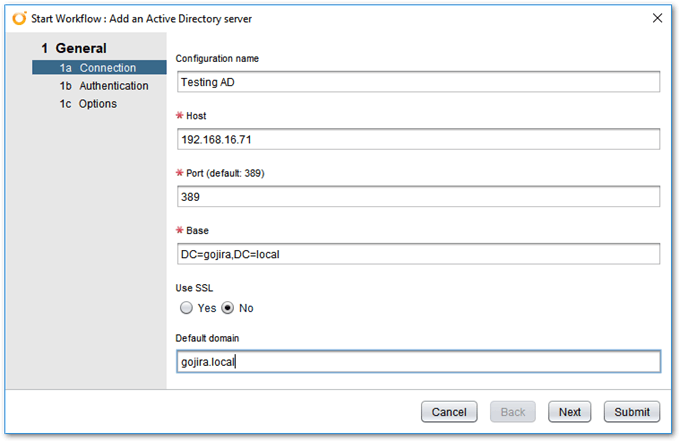
Typing in the details needed to establish a connection to AD
Step 3 – Select Yes for the Use a shared session option and type in the credentials of a domain administrator or similarly privileged account. Type in the user using the UPN format shown below. Press Next.
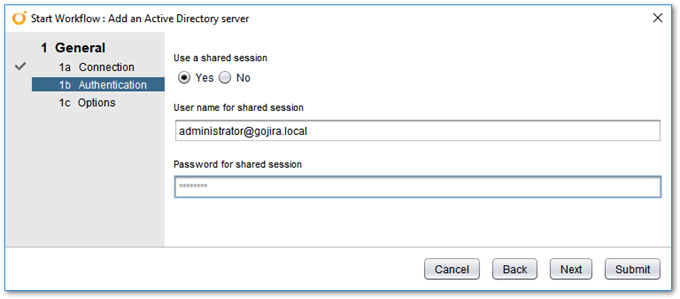
Supplying the credentials needed to establish a connection to AD and thereby manage it
Step 4 – Leave the Follow referrals option as set and specify a connection timeout value. In this example, I set it to 5 seconds. Pressing Submit completes the AD addition process. The workflow should complete successfully assuming the information provided was correct.
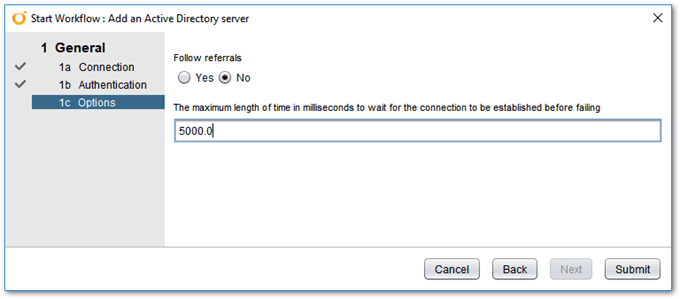
Setting a wait for connection time limit
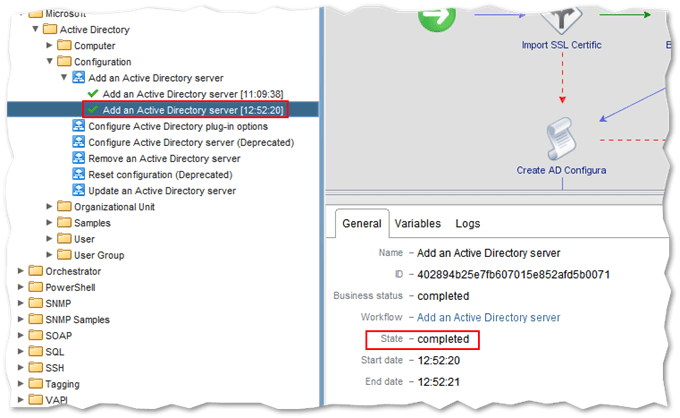
A green marker next to the workflow name as well as a completed State indicate that the workflow outcome was successful
Step 5 – To verify that Orchestrator has access to the AD instance, click on the Inventory tab and expand Active Directory. You should find the recently added AD instance under the name supplied to the Add an Active Directory server workflow. Expanding further, you should be able to list the AD objects residing in your domain as shown next.
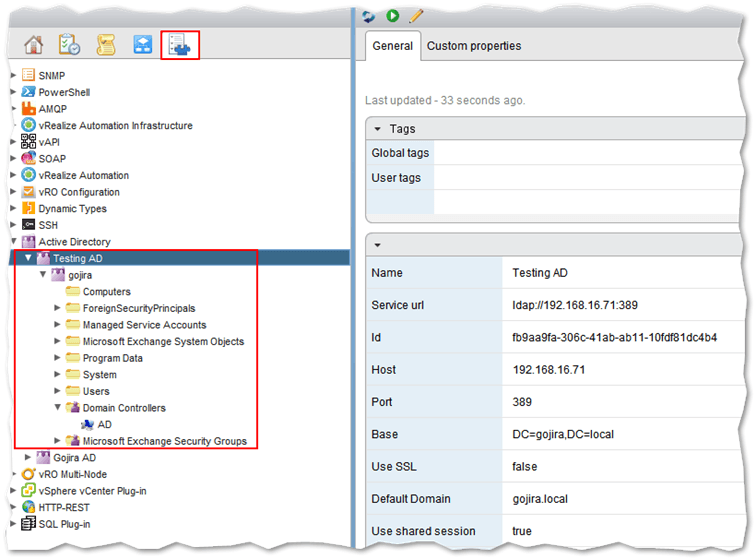
Viewing the AD object hierarchy from the Inventory tab
Testing it out
Now that you have visibility of Active Directory from Orchestrator, you can use the in-built AD workflows or create your own, though the latter involves some learning. As an example, I’ll be going through the steps to create a new Organizational Unit (OU) at root.
Creating a new OU under root
I chose this example as an excuse to demonstrate how to import workflows to vRO. The driver for this is that the workflow I’ll be using – Create an organizational unit – cannot be used to create OUs at the root of a domain. The workaround to this limitation is to import a revised workflow that I picked up from this thread. Here’s the import procedure outlined for you.
Step 1 – Unzip the downloaded workflow to a folder.
Step 2 – Using the Orchestrator stand-alone Java client, drill down to Microsoft -> Active Directory and right-click on Organizational Unit. Select Import Workflow from the menu and navigate to the extracted workflow file. You should be able to see the new workflow listed.
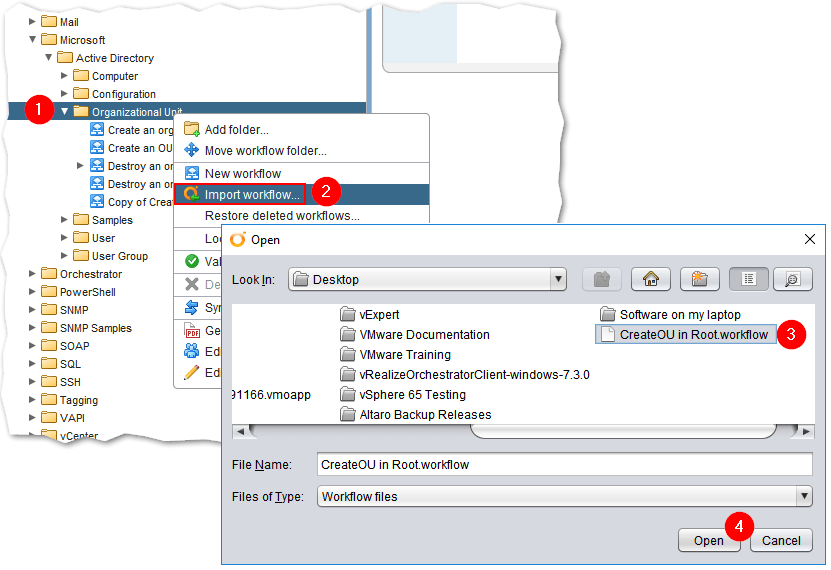
Importing a workflow to vRO
Step 3 – Highlight the imported workflow – I renamed it to Create OU under Root – and press the Play button.
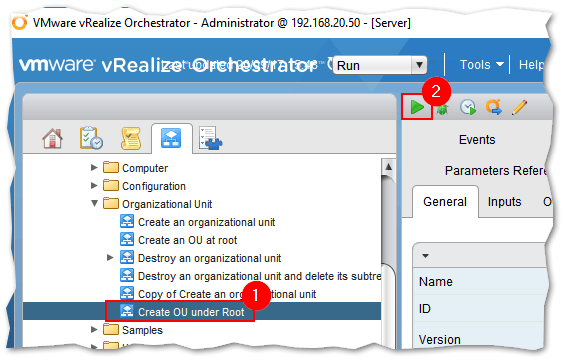
Running a workflow
Step 4 – In the second field (ouName), type in a name for the OU you want to be created. Click on Not Set, expand Active Directory until you reach root and press Select. Press Submit to complete the OU creation process.
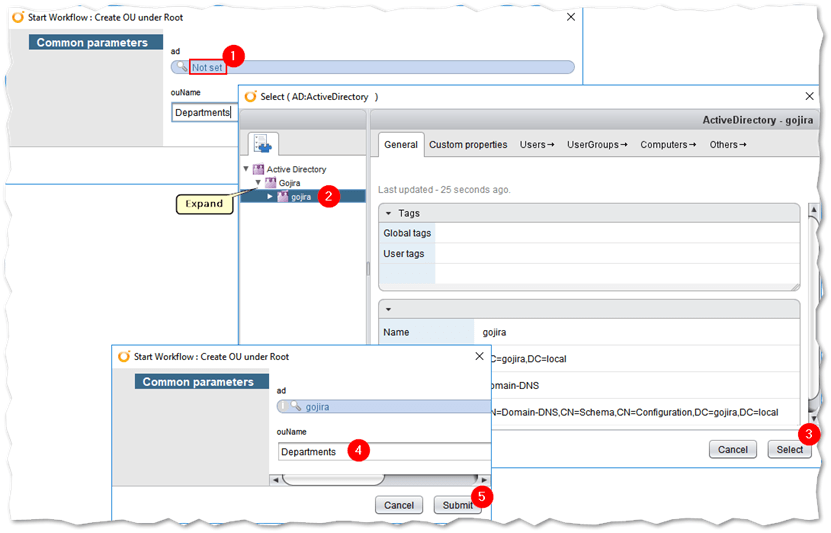
Setting the parameters for the OU creation workflow
You can obviously verify that the OU was created from the ADUC MMC snap-in as shown below. In addition, have a look at workflow result under Logs.
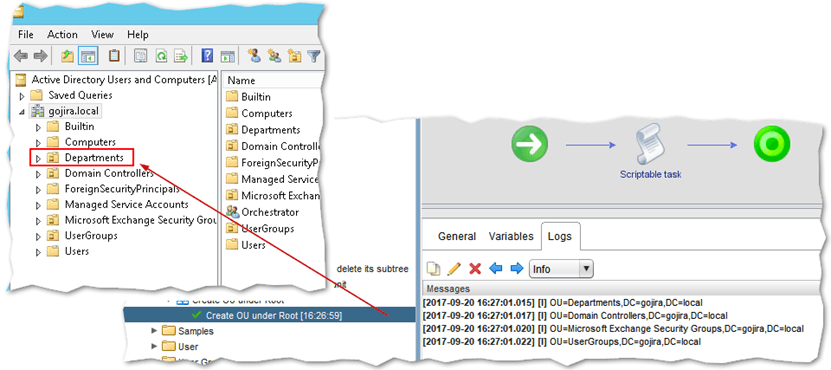
The Departments OU is successfully created under root. This is shown in ADUC and in the vRO client’s Logs tab
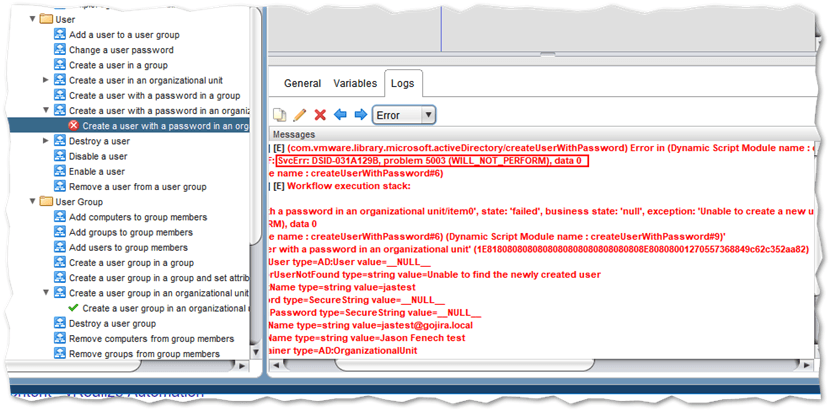
Important: There are a few gotchas you need to know about when using AD workflows. For instance, if you don’t have Active Directory set up for SSL and/or have password policies in place, you will run into issues when using workflows that change or create passwords. The Create a user with a password … workflow in one such example. In the example shown next, I’m getting a 5003 error since my AD setup is not configured for SSL. This article shows you how to configure vRO to talk to AD over SSL. In a nutshell, you need to export an SSL certificate from a DC and import it to vRO.
Conclusion
We’ve seen how vRO plugins extend the reach of vRealize Orchestrator to help you manage products and technologies that transcend VMware products to include Active Directory, SQL Server, Netapp, and even Amazon AWS. Vendors such as Brocade, HP, and F5 develop their own extensions which they distribute for free or commercially. The VMware marketplace is a good starting point to learn about the plugins that are available.
This is my second post on vRO. I plan on trying to cover a few more aspects of this complicated yet popular automation tool, so please do give this channel a look for current and future VMware posts.
[the_ad id=”4738″][the_ad id=”4796″]


Not a DOJO Member yet?
Join thousands of other IT pros and receive a weekly roundup email with the latest content & updates!
More in this category


About the Author
Jason Fenech


6 thoughts on "How to Manage Active Directory with vRealize Orchestrator"
Great Post Thanks a Lot Jason.