Save to My DOJO

As of this writing, vCenter 6.5.0d has been released which gives me the opportunity to update my lab’s vCSA (vCenter Server Appliance) to this latest release and write about it as well. The update process has been greatly simplified thanks to the Appliance Management tool which is also used to manage the appliance’s configuration or parts of it. In today’s post, I’ll take you through the three methods you can use to update vCSA using the Appliance Management tool.
Backup First
Before trying out any of these methods, make sure to snapshot and/or take a backup of the appliance just in case the update fails. While writing this post, I successfully reverted back to snapshot a number of times not because any of the update methods failed but because I had to make sure that each of the methods covered here worked flawlessly. So, do yourself a favor and snapshot your appliance more so if it’s being used for production.
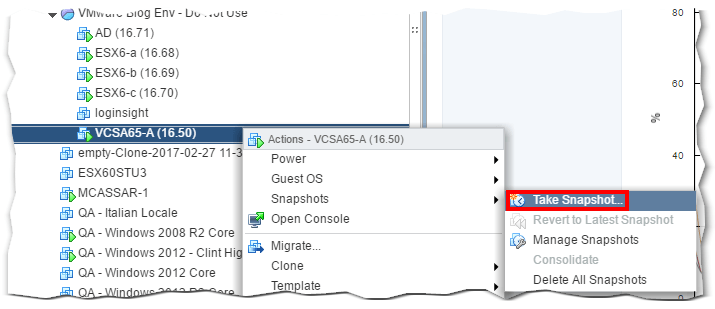
Figure 1 – Taking a snapshot of vCSA
If you have an Internet facing vCSA
This method works only if the appliance has Internet connectivity (ports 80,443) which it needs to connect to VMware’s online repositories.
To start with, point your browser to https://<vCSA IP Address or hostname>:5480 and log in as root. Remember that we’re accessing the appliance itself and not the vCenter Server component so user accounts like [email protected]l will not work.
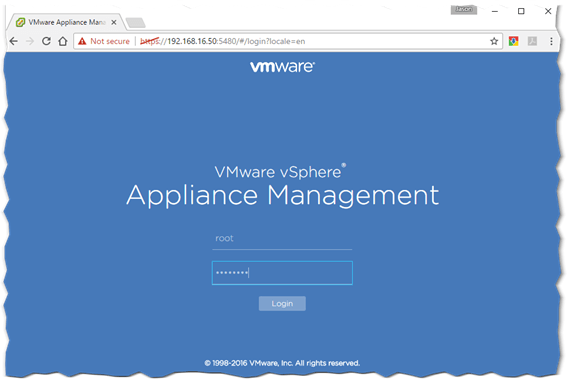
Figure 2 – The Appliance Management tool used to configure and update vCSA
After you log in, click on Update and hit the Settings button as shown in Fig. 3.
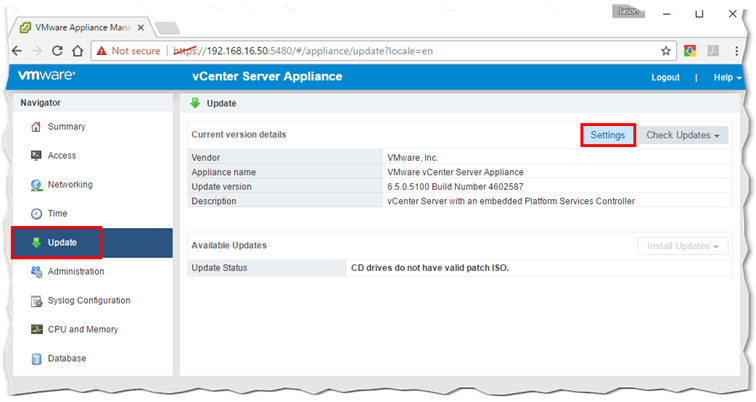
Figure 3 – Update settings page
From the Update Settings dialog, you can either use the default VMware repository URL or specify one yourself. The default repository is automatically points to the latest appliance update as shown in Fig. 4. You can also schedule the time at which the vCSA polls for updates. This, however, does not imply that updates are automatically downloaded.
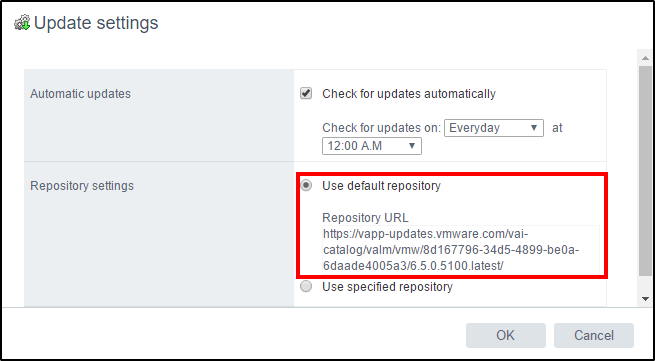
Figure 4 – Link to the latest available vCSA update is set automatically
If the Check for updates automatically option is ticked off, click on Check Updates and select Check Repository. This will poll the VMware repository for the latest available update and display the link as such. Expanding More Details, will reveal more information on the update being installed along with a link to the KB article describing it. When required, use this link to correlate the current version with that being updated.
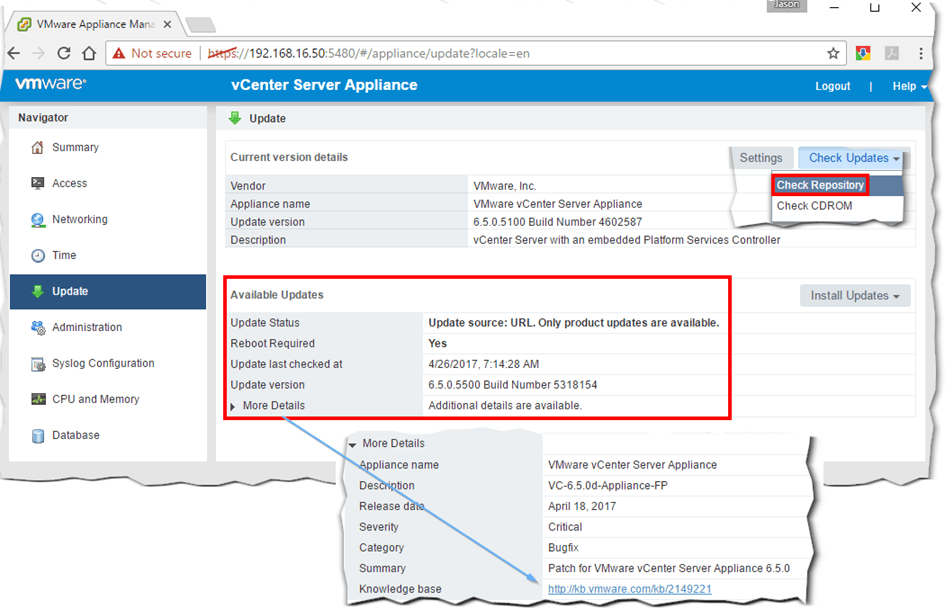
Figure 5 – Manually checking for the latest update. Full details for update are also displayed.
Updating the appliance, is a simple matter of clicking on Install Updates and selecting Install All Updates as per Fig. 6.
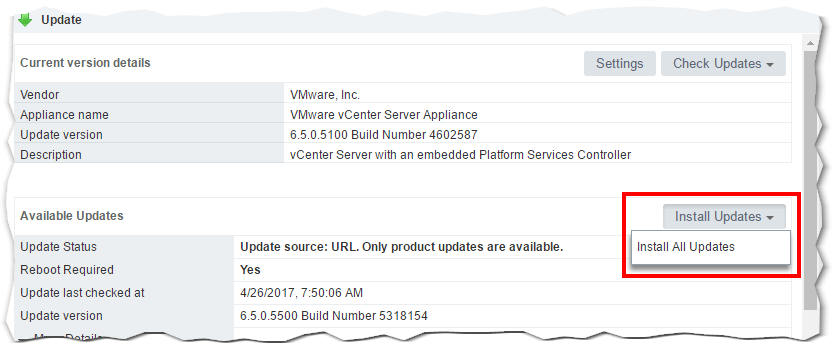
Figure 6 – Ready to update vCSA
The upgrade process may take a while and at times you may think it’s actually stuck. Just remember that the process needs to download 1.5GB worth of file which can take time depending on the environment, available bandwidth and what not. In my case – nested environment on a heavily used ESXi host – , 40 minutes into the update and the installer was still stuck at 40%.
To verify that the vCSA was actually doing something, I logged on the vCenter Server hosting it using the vSphere Web Client. I then checked the vCSA VM’s network performance graph for any signs of activity. As shown in Fig. 7, the VM was pretty busy on the networking front with activity spiking immediately as soon as the update kicked in.
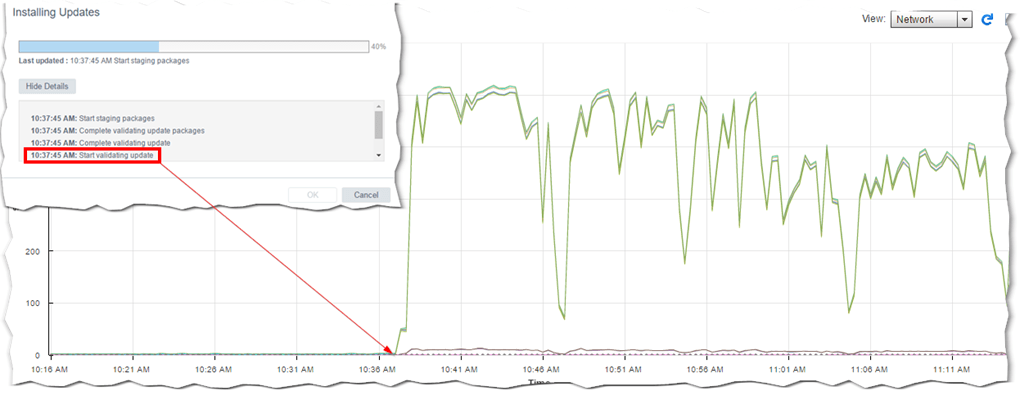
Figure 7 – Network activity on the vCSA’s VM indicating that the update is being downloaded
At one point, the installer lost connectivity to the appliance – probably because it timed out – so I wasn’t quite sure if the update completed successfully. If this happens, SSH to the vCSA and check the contents of a log file called software-packages.log which you’ll find under /storage/log/vmware/applmgmt. Run the following command:
cat /storage/log/vmware/applmgmt/software-packages.log | grep 'Packages upgraded successfully'

Figure 8 – Checking the software-packages log file to determine the result of the update
If the update completed successfully, you should see a line containing Packages upgraded successfully, reboot is required. If that’s the case, proceed with rebooting the appliance so the changes can take root. If not, scour the log file for hints as to what went wrong and revert back to snapshot. This is all shown in the video below. The appliance’s version will read to the latest even though the appliance needs to be rebooted. You can verify this from the Appliance Management tool and the vCSA’s console.
For Non-Internet facing vCSAs
If Internet access is denied to the appliance, which is pretty normal in production environments, you’ll need to download the update manually and use one of the two methods described next.
The ISO Method
You first need to download the vCSA update – as an ISO file – from https://my.vmware.com/group/vmware/patch#search. To download the update, you need to sign up for a VMware account unless you already have. Once you do that, select VC followed by the latest version from the drop-down menus as shown in Fig.9, marked 1 and 2. Then, select the latest available update by ticking the box next to it (3) and click on Download (4).
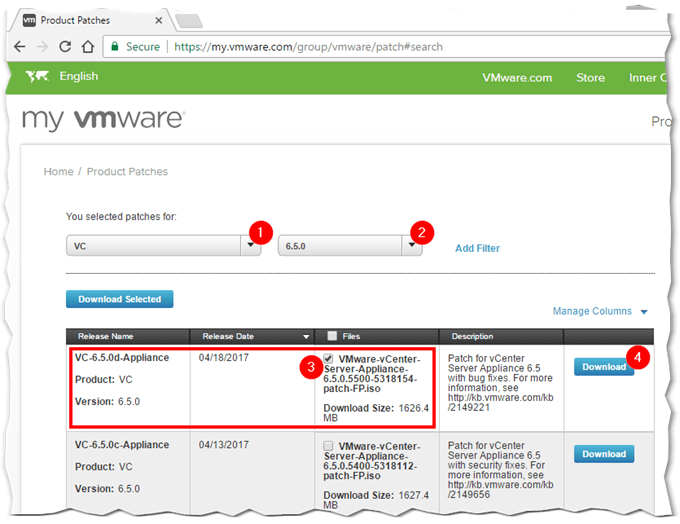
Figure 9 – Downloading the vCSA update as an ISO image
As shown in Fig. 10, I’ve uploaded the ISO file to a datastore on the ESXi host where the vCSA VM resides. I then mounted it as a CD/DVD drive from the vCSA VM’s settings. The same update process is repeated using the Appliance Management tool.
Select the Check CDROM update option to verify the ISO image, the details for which are displayed on the Update screen. If all’s well and good, select Install CDROM Updates (4) to run the update process.
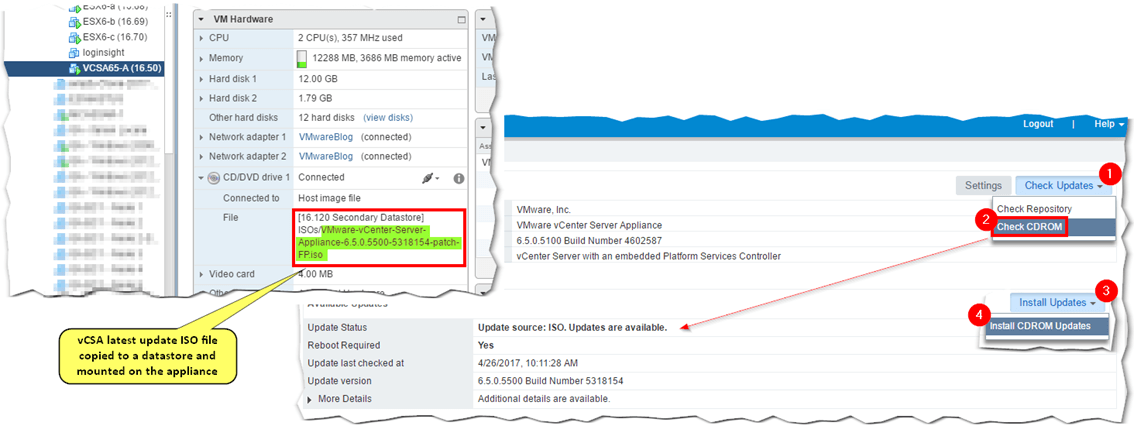
Figure 10 – Updating the appliance using a locally mounted ISO image
Updating from ISO, reduces the time taken to update the appliance mainly because there are no update files to download.
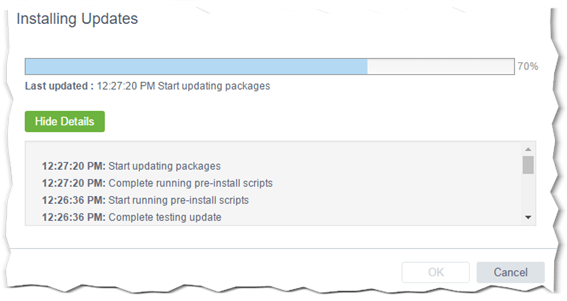
Figure 11 – The update process in progress
This time round, there were no time-outs and the appliance update took only 5 minutes to successfully complete. The appliance is then rebooted by clicking OK – which brings up another dialog box prompting for a reboot – or via the Reboot button on the Summary page.

Figure 12 – A successful update! An appliance reboot is mandatory.
The Web Server Method
If complicating matters is your thing, here’s an alternative method you can try. This time, you need to download the vCSA update bundle which is a zipped archive. This, pretty much, contains the same RPM packages comprising the ISO file save for a couple of manifest files. The zip file is downloadable from my.vmware.com from the VMware vCenter Server 6.5.0d downloads section.
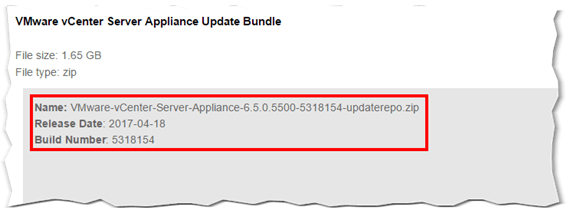
Figure 13 – The vCSA update bundle downloadable from my.vmware.com
The bundle is then extracted to the root folder of a web server. For this example, I’ve used IIS. I extracted the archive’s contents to c:\inetpub as shown in Fig. 14 and modified the Default Web Site to point directly to it. Directory Browsing must be enabled for Default Website unless the setting is inherited.
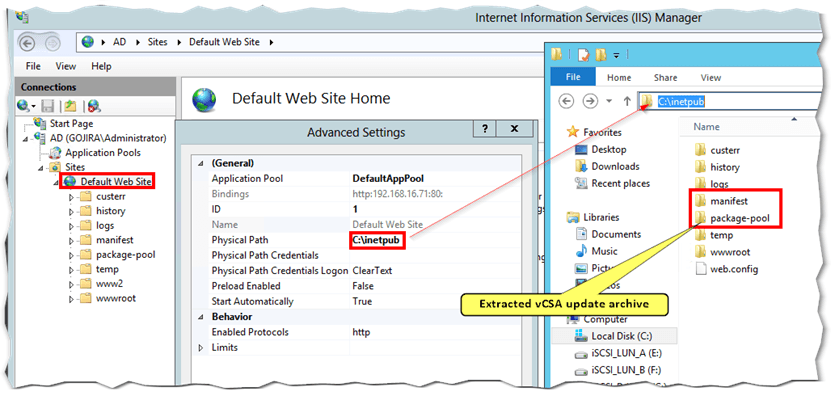
Figure 14 – Extracting the update bundle to an IIS server and setting the default website to point to it
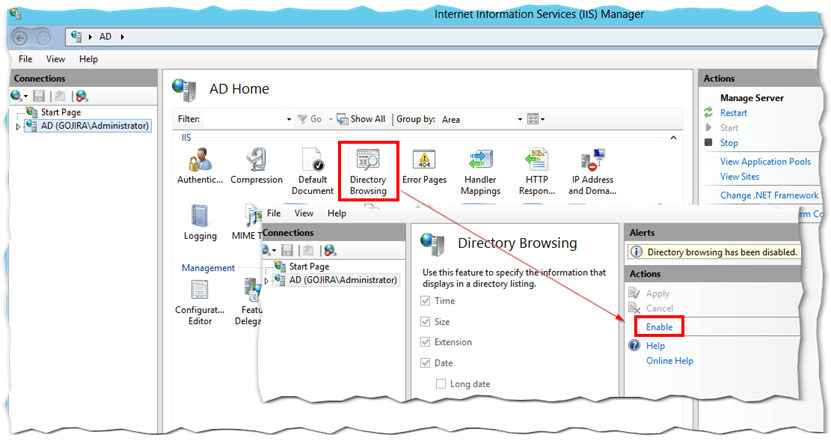
Figure 15 – Enabling directory browsing on IIS
Lastly, you need to create MIME types for the .sign and .json files which the vCSA reads from the files present under the two folders – package-pool and manifest – extracted to c:\inetpub.
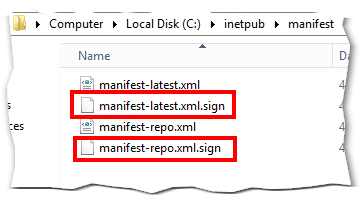
Figure 16 – Manifest files from the extracted update bundle
To add new MIME types, just click on the MIME Types icon and add them via the Add link at the top-right corner or by right-clicking on the MIME Types page in IIS. Add the 2 new mime types as shown in Figure 17.
Note: This was tested on IIS 8 running on Windows Server 2012. Additional MIME types, perhaps for the RPM packages, may need to be created.
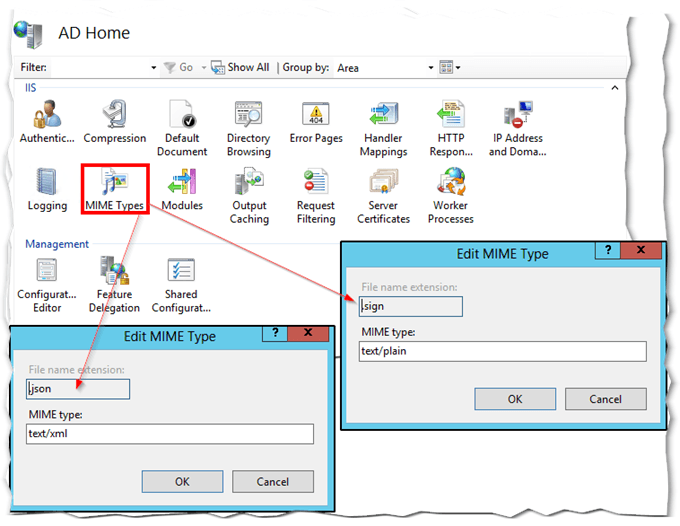
Figure 17 – Creating MIME types in IIS 8
That’s all there is to it as far as IIS configuration is concerned. For authentication, I used anonymous which is enabled by default. You may wish to use other forms of authentication if security is a concern.
To update vCSA from the IIS repository, click on Updates, Settings and type in the IP address of the IIS server as shown below. Optionally, add a username and password if you set up any other form of authentication other than anonymous.

Figure 18 – Point the vCSA to download the update bundle from the IIS server
The appliance will upgrade identically to the previous methods used. On completion, you are once again asked to reboot.
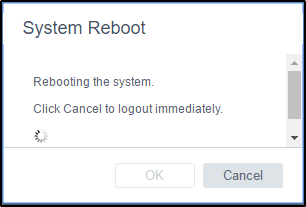
Figure 19 – Rebooting the appliance after updating
Troubleshooting
You may come across a Download Failed error message when testing this method for the first time. This generally occurs due to 401 or 404 errors on the Web Server’s side. While testing this method, I took hints from the software-packages.log on the vCSA to iron out any problems I ran into. For instance, 404 errors told me that I needed to create mime types for the .sign and .json files since IIS, by default, doesn’t know about them which leads to a file not found error.
Below is an example of what you’ll see in the log file. The entries point to something wrong with how authentication is set up on IIS; I intentionally disabled anonymous authentication to reproduce the error.
2017-04-27T07:05:57.117 [11235]DEBUG:vmware.vherd.base.software_update:Extracting installed package information
2017-04-27T07:05:57.117 [11235]DEBUG:vmware.vherd.base.software_update:/storage/core/software-packages directory created successfully
2017-04-27T07:05:57.117 [11235]DEBUG:vmware.vherd.base.software_update:WGET: http://192.168.16.71/manifest/manifest-latest.xml
2017-04-27T07:05:57.117 [11235]DEBUG:vmware.vherd.base.software_update:Failure:

out=
error=--2017-04-27 07:05:57-- http://192.168.16.71/manifest/manifest-latest.xml

Connecting to 192.168.16.71:80... connected.
HTTP request sent, awaiting response... 401 Unauthorized
Username/Password Authentication Failed.
Conclusion
As we’ve seen, updating vCenter Server Appliance is pretty easy, something you can do using any of the three methods outlined in this post. Regardless of the method used, it is always important to take a backup of the vCSA, and any other critical component for that matter, before updating or upgrading. There’s no guarantee that an update will succeed, so at the risk of repeating myself, being able to recover from a failed update or upgrade is paramount to business continuity and your sanity!
[the_ad id=”4738″][the_ad id=”4796″]


Not a DOJO Member yet?
Join thousands of other IT pros and receive a weekly roundup email with the latest content & updates!
More in this category


About the Author
Jason Fenech


30 thoughts on "3 ways to update vCenter Server Appliance 6.5"
Thanks for the guide, but I have one small correction to suggest — the URL for Appliance Management must be https, not http. Your screenshot is correct, though.
Keen eye, fixed! Thank you for spotting it and letting me know.
Jason
very good and useful for me. so many thanks friend
Glad you found it useful!
We have externel PSCs, will these method works for same.
The steps will be similar but you will have to perform an extra step to upgrade the PSC. VMware has some good documentation on the process: https://docs.vmware.com/en/VMware-vSphere/6.5/com.vmware.vsphere.upgrade.doc/GUID-30485437-B107-42EC-A0A8-A03334CFC825.html
While the update is easy, how do you manage to get notifications on updates?
There is nothing inside VCSA and also Update Manager does not help. I only found this website https://my.vmware.com/group/vmware/patch#search, then search for “VC” and “6.5.0”. But it’s a java applet and I did not find a way to select both things with a parser. Then there’s the Patch Alert, but it does not specify Vcenter Server: https://my.vmware.com/group/vmware/profile?p_p_id=myProfilePortlet_WAR_itusermanagement&p_p_lifecycle=0&p_p_state=normal&p_p_mode=view&p_p_col_id=column-3&p_p_col_count=1&_myProfilePortlet_WAR_itusermanagement_action=communicationDetails
So I am baffled how customer should get updates in real time.
Hi. If you work predominately with VMware, you’d definitely know that a new release is on it’s way especially if you keep to date by visiting techsites, etc. But yes, I agree that there could be a better way to inform customers.
Hi Jason
just a question about Vmware tools and virtual hardware update of the vcsa appliance itself.
I just updated my entire infrastructure to 6.5U1g so now ALL our ESXi hosts are “VMware ESXi, 6.5.0, 7967591” while vcenter version is “8024368”
Just after that, we updated all virtual machines (vmware tools virtual hardware) to the latest version that now display:
Virtual hardware: Compatibility: ESXi 6.5 and later (VM version 13)
Vmware Tools:Running, version:10287 (Current)
But…I noticed that VCSA is instead:
Virtual hardware: Compatibility: ESXi 5.5 and later (VM version 10)
Vmware Tools: Running, version:10277 (Guest Managed)
Question:
Should I update the VCSA itself? My doubt is that while I could easily change the virtual hardware itself powering off the VM and reboot, I have not idea how to update vmware tools and, even more important, if this is supported or not. Even more strange is that I didn’t find discussion about that topic in forum or other blogs neither in the vmware documentation. What do you usually do in your environment and what is the best practice?
bye
Marco
Hi Marco. Nothing to worry about since what you’re seeing is normal behaviour. Vcsa is using open-vm-tools so it won’t automatically upgrade. If you click on vcsa -> summary -> vmtools you’ll see something like this “A VMware Tools implementation is installed on the guest operating system, but it is not managed by VMware. The VMware Tools status is unknown.” … you can still upgrade it manually but I’d leave it as is.
Hi Jason
thanks for your kind reply and sorry for the delay but I was on holiday.
OK, understood that VCSA is a closed box 🙂
what if there is a VCSA HA? will it sync the update to the passive node?
Hi, it wont automatically sync. You’ll want to check this KB out. https://docs.vmware.com/en/VMware-vSphere/6.7/com.vmware.vcenter.upgrade.doc/GUID-98EB2800-DED8-4268-AB6C-54D2A9B34B9F.html
thanks for the article, i have vCenter 6.5 with external PSC,i am planing to upgrade it to 6.5 u2 does this method apply to my scenario,
regards
This post focuses on an embedded PSC, you will have to update your external PSC as well. VMware has additional documentation for that here: https://docs.vmware.com/en/VMware-vSphere/6.5/vsphere-esxi-vcenter-server-652-upgrade-guide.pdf
Hi Jason,
Your posts are always a huge help.
I’ve tried the internet-facing option and the ISO option, but I can’t get my VCSA to recognize that there are updates out there. It’s currently running 6.5.0.5500 Build Number 5318154, and I’ve tried the current version of 6.5 u2 (the ~3.4GB ISO dated December 2018) and a corresponding patch ISO (~1.6GB and dated the same date).
The weird thing is that I have to go through a process of checking the CD-ROM, then going back to checking the repo, and when I do this, it says I do have an update to do. Version “6.5.0.22000 Build Number 9451637” and the description says “VC-6.5.0U2c-Appliance-FP” but when I attempt to do this, after I accept the terms, I get a progress bar for a few seconds, then it says that I’ve installed all the available updates. Not sure how to proceed.
This could be a long shot, but check to see if the root password needs to be changed. I’ve seen random issues with it being expired.
https://kb.vmware.com/s/article/59659
I found this same information elsewhere and this solved the problem. I just ran the individual commands manually from the script. Cheers.
Except that doesn’t work either. What a crapshoot that VMware makes it so you can’t upgrade via ISO
I agree. Upgrades haven’t always been the best experience in VCenter. At least it’s better than it used to be back in the 5.x days.