Save to My DOJO
Table of contents
- An Overview of Hyper-V Migration Options
- It Isn’t Called Storage Live Migration
- What Can Be Moved with Hyper-V Storage Migration?
- What Can’t Be Moved with Hyper-V Storage Migration?
- Uses for Hyper-V Storage Migration
- Turning the VM Off Makes a Difference for Storage Migration
- How to Perform Hyper-V Storage Migration with PowerShell
- How to Perform Hyper-V Storage Migration with Hyper-V Manager
- How to Perform Hyper-V Storage Migration with Failover Cluster Manager
New servers? New SAN? Trying out hyper-convergence? Upgrading to Hyper-V 2016? Any number of conditions might prompt you to move your Hyper-V virtual machine’s storage to another location. Let’s look at the technologies that enable such moves.
An Overview of Hyper-V Migration Options
Hyper-V offers numerous migration options. Each has its own distinctive features. Unfortunately, we in the community often muck things up by using incorrect and confusing terminology. So, let’s briefly walk through the migration types that Hyper-V offers:
- Quick migration: Cluster-based virtual machine migration that involves placing a virtual machine into a saved state, transferring ownership to another node in the same cluster, and resuming the virtual machine. A quick migration does not involve moving anything that most of us consider storage.
- Live migration: Cluster-based virtual machine migration that involves transferring the active state of a running virtual machine to another node in the same cluster. A Live Migration does not involve moving anything that most of us consider storage.
- Storage migration: Any technique that utilizes the Hyper-V management service to relocate any file-based component that belongs to a virtual machine. This article focuses on this migration type, so I won’t expand any of those thoughts in this list.
- Shared Nothing Live Migration: Hyper-V migration technique between two hosts that does not involve clustering. It may or may not include a storage migration. The virtual machine might or might not be running. However, this migration type always includes ownership transfer from one host to another.
It Isn’t Called Storage Live Migration
I have always called this operation “Storage Live Migration”. I know lots of other authors call it “Storage Live Migration”. But, Microsoft does not call it “Storage Live Migration”. They just call it “Storage Migration”. The closest thing that I can find to “Storage Live Migration” in anything from Microsoft is a 2012 TechEd recording by Benjamin Armstrong. The title of that presentation includes the phrase “Live Storage Migration”, but I can’t determine if the “Live” just modifies “Storage Migration” or if Ben uses it as part of the technology name. I suppose I could listen to the entire hour and a half presentation, but I’m lazy. I’m sure that it’s a great presentation, if anyone wants to listen and report back.
Anyway, does it matter? I don’t really think so. I’m certainly not going to correct anyone that uses that phrase. However, the virtual machine does not necessarily need to be live. We use the same tools and commands to move a virtual machine’s storage whether it’s online or offline. So, “Storage Migration” will always be a correct term. “Storage Live Migration”, not so much. However, we use the term “Shared Nothing Live Migration” for virtual machines that are turned off, so we can’t claim any consistency.
What Can Be Moved with Hyper-V Storage Migration?
When we talk about virtual machine storage, most people think of the places where the guest operating system stores its data. That certainly comprises the physical bulk of virtual machine storage. However, it’s also only one bullet point on a list of multiple components that form a virtual machine.
Independently, you can move any of these virtual machine items:
- The virtual machine’s core files (configuration in xml or .vmcx, .bin, .vsv, etc.)
- The virtual machine’s checkpoints (essentially the same items as the preceding bullet point, but for the checkpoint(s) instead of the active virtual machine)
- The virtual machine’s second-level paging file location. I have not tested to see if it will move a VM with active second-level paging files, but I have no reason to believe that it wouldn’t
- Virtual hard disks attached to a virtual machine
- ISO images attached to a virtual machine
We most commonly move all of these things together. Hyper-V doesn’t require that, though. Also, we can move all of these things in the same operation but distribute them to different destinations.
What Can’t Be Moved with Hyper-V Storage Migration?
In terms of storage, we can move everything related to a virtual machine. But, we can’t move the VM’s active, running state with Storage Migration. Storage Migration is commonly partnered with a Live Migration in the operation that we call “Shared Nothing Live Migration”. To avoid getting bogged down in implementation details that are more academic than practical, just understand one thing: when you pick the option to move the virtual machine’s storage, you are not changing which Hyper-V host owns and runs the virtual machine.
More importantly, you can’t use any Microsoft tool-based technique to separate a differencing disk from its parent. So, if you have an AVHDX (differencing disk created by the checkpointing mechanism) and you want to move it away from its source VHDX, Storage Migration will not do it. If you instruct Storage Migration to move the AVHDX, the entire disk chain goes along for the ride.
Uses for Hyper-V Storage Migration
Out of all the migration types, storage migration has the most applications and special conditions. For instance, Storage Migration is the only Hyper-V migration type that does not always require domain membership. Granted, the one exception to the domain membership rule won’t be very satisfying for people that insist on leaving their Hyper-V hosts in insecure workgroup mode, but I’m not here to please those people. I’m here to talk about the nuances of Storage Migration.
Local Relocation
Let’s start with the simplest usage: relocation of local VM storage. Some situations in this category:
- You left VMs in the default “C:ProgramDataMicrosoftWindowsHyper-V” and/or “C:UsersPublicDocumentsHyper-VVirtual Hard Disks” locations and you don’t like it
- You added new internal storage as a separate volume and want to re-distribute your VMs
- You have storage speed tiers but no active management layer
- You don’t like the way your VMs’ files are laid out
- You want to defragment VM storage space. It’s a waste of time, but it works.
Network Relocation
With so many ways to do network storage, it’s nearly a given that we’ll all need to move a VHDX across ours at some point. Some situations:
- You’re migrating from local storage to network storage
- You’re replacing a SAN or NAS and need to relocate your VMs
- You’ve expanded your network storage and want to redistribute your VMs
Most of the reasons listed under “Local Relocation” can also apply to network relocation.
Cluster Relocation
We can’t always build our clusters perfectly from the beginning. For the most part, a cluster’s relocation needs list will look like the local and network lists above. A few others:
- Your cluster has new Cluster Shared Volumes that you want to expand into
- Existing Cluster Shared Volumes do not have a data distribution that does not balance well. Remember that data access from a CSV owner node is slightly faster than from a non-owner node
The reasons matter less than the tools when you’re talking about clusters. You can’t use the same tools and techniques to move virtual machines that are protected by Failover Clustering under Hyper-V as you use for non-clustered VMs.
Turning the VM Off Makes a Difference for Storage Migration
You can perform a very simple experiment: perform a Storage Migration for a virtual machine while it’s on, then turn it off and migrate it back. The virtual machine will move much more quickly while it’s off. This behavior can be explained in one word: synchronization.
When the virtual machine is off, a Storage Migration is essentially a monitored file copy. The ability of the constituent parts to move bits from source to destination sets the pace of the move. When the virtual machine is on, all of the rules change. The migration is subjected to these constraints:
- The virtual machine’s operating system must remain responsive
- Writes must be properly captured
- Reads must occur from the most appropriate source
Even if the guest operating does not experience much activity during the move, that condition cannot be taken as a constant. In other words, Hyper-V needs to be ready for it to start demanding lots of I/O at any time.
So, the Storage Migration of a running virtual machine will always take longer than the Storage Migration of a virtual machine in an off or saved state. You can choose the convenience of an online migration or the speed of an offline migration.
Note: You can usually change a virtual machine’s power state during a Storage Migration. It’s less likely to work if you are moving across hosts.
How to Perform Hyper-V Storage Migration with PowerShell
The nice thing about using PowerShell for Storage Migration: it works for all Storage Migration types. The bad thing about using PowerShell for Storage Migration: it can be difficult to get all of the pieces right.
The primary cmdlet to use is Move-VMStorage. If you will be performing a Shared Nothing Live Migration, you can also use Move-VM. The parts of Move-VM that pertain to storage match Move-VMStorage. Move-VM has uses, requirements, and limitations that don’t pertain to the topic of this article, so I won’t cover Move-VM here.
A Basic Storage Migration in PowerShell
Let’s start with an easy one. Use this when you just want all of a VM’s files to be in one place:
Move-VMStorage -Name testvm -DestinationStoragePath C:LocalVMs
This will move the virtual machine named testvm so that all of its components reside under the C:LocalVMs folder. That means:
- The configuration files will be placed in C:LocalVMsVirtual Machines
- The checkpoint files will be placed in C:LocalVMsSnapshots
- The VHDXs will be placed in C:LocalVMsVirtual Hard Disks
- Depending on your version, an UndoLog Configuration folder will be created if it doesn’t already exist. The folder is meant to contain Hyper-V Replica files. It may be created even for virtual machines that aren’t being replicated.
Complex Storage Migrations in PowerShell
For more complicated move scenarios, you won’t use the DestinationStoragePath parameter. You’ll use one or more of the individual component parameters. Choose from the following:
- VirtualMachinePath: Where to place the VM’s configuration files.
- SnapshotFilePath: Where to place the VM’s checkpoint files (again, NOT the AVHDXs!)
- SmartPagingFilePath: Where to place the VM’s smart paging files
- Vhds: An array of hash tables that indicate where to place individual VHD/X files.
Some notes on these items:
- You are not required to use all of these parameters. If you do not specify a parameter, then its related component is left alone. Meaning, it doesn’t get moved at all.
- If you’re trying to use this to get away from those auto-created Virtual Machines and Snapshots folders, it doesn’t work. They’ll always be created as sub-folders of whatever you type in.
- It doesn’t auto-create a Virtual Hard Disks folder.
- If you were curious whether or not you needed to specify those auto-created subfolders, the answer is: no. Move-VMStorage will always create them for you (unless they already exist).
- The VHDs hash table is the hardest part of this whole thing. I’m usually a PowerShell-first kind of guy, but even I tend to go to the GUI for Storage Migrations.
The following will move all components except VHDs, which I’ll tackle in the next section:
Move-VMStorage -Name testvm -VirtualMachinePath C:LocalVMstestvm -SnapshotFilePath C:LocalVMstestvm -SmartPagingFilePath C:LocalVMstestvm
Move-VMStorage’s Array of Hash Tables for VHDs
The three …FilePath parameters are easy: just specify the path. The Vhds parameter is tougher. It is one or more hash tables inside an array.
First, the hash tables. A hash table is a custom object that looks like an array, but each entry has a unique name. The hash tables that Vhds expects have a SourceFilePath entry and a DestinationFilePath entry. Each must be fully-qualified for a file. A hash table is contained like this: @{ }. The name of an entry and its value are joined with an =. Entries are separated by a ; So, if you want to move the VHDX named svtest.vhdx from \svstoreVMs to C:LocalVMstestvm, you’d use this hash table:
@{'SourceFilePath' = '\svstoreVMsvhdx'; 'DestinationFilePath' = 'C:LocalVMssvtest.vhdx'}
Reading that, you might ask (quite logically): “Can I change the name of the VHDX file when I move it?” The answer: No, you cannot. So, why then do you need to enter the full name of the destination file? I don’t know!
Next, the arrays. An array is bounded by @( ). Its entries are separated by commas. So, to move two VHDXs, you would do something like this:
@(
   @{'SourceFilePath' = '\svstoreVMstestvm.vhdx'; 'DestinationFilePath' = 'C:LocalVMstestvm.vhdx'},
   @{'SourceFilePath' = '\svstoreVMstestvm2.vhdx'; 'DestinationFilePath' = 'C:LocalVMstestvm2.vhdx'}
)
I broke that onto multiple lines for legibility. You can enter it all on one line. Note where I used parenthesis and where I used curly braces.
Tip: To move a single VHDX file, you don’t need to do the entire array notation. You can use the first example with Vhds.
A Practical Move-VMStorage Example with Vhds
If you’re looking at all that and wondering why you’d ever use PowerShell for such a thing, I have the perfect answer: scripting. Don’t do this by hand. Use it to move lots of VMs in one fell swoop. If you want to see a plain example of the Vhds parameter in action, the Get-Help examples show one. I’ve got a more practical script in mind.
The following would move all VMs on the host. All of their config, checkpoint, and second-level paging files will be placed on a share named “\vmstoreslowstorage”. All of their VHDXs will be placed on a share named “\vmstorefaststorage”. We will have PowerShell deal with the source paths and file names.
Get-VM | foreach {
	$VHDs = @()
	Get-VMHardDiskDrive -VM $_ | foreach {
		$ThisVhd = @{}
		$ThisVhd.Add('SourceFilePath', $_.Path)
		$ThisVhd.Add('DestinationFilePath', ('\vmstorefaststorage{0}' -f [System.IO.Path]::GetFileName($_.Path)))
		$VHDs += $ThisVhd
	}
	$MoveVMStorageParams = @{
		'VM' = $_;
		'VirtualMachinePath' = '\vmstoreslowstorage';
		'SnapshotFilePath' = '\vmstoreslowstorage';
		'SmartPagingFilePath' = '\vmstoreslowstorage'
	}
	if($VHDs.Count)
	{
		$MoveVMStorageParams.Add('Vhds', $VHDs)
	}
	Move-VMStorage @MoveVMStorageParams
}
I used splatting for the parameters for two reasons: 1, legibility. 2, to handle VMs without any virtual hard disks.
How to Perform Hyper-V Storage Migration with Hyper-V Manager
Hyper-V Manager can only be used for non-clustered virtual machines. It utilizes a wizard format. To use it to move a virtual machine’s storage:
- Right-click on the virtual machine and click Move.
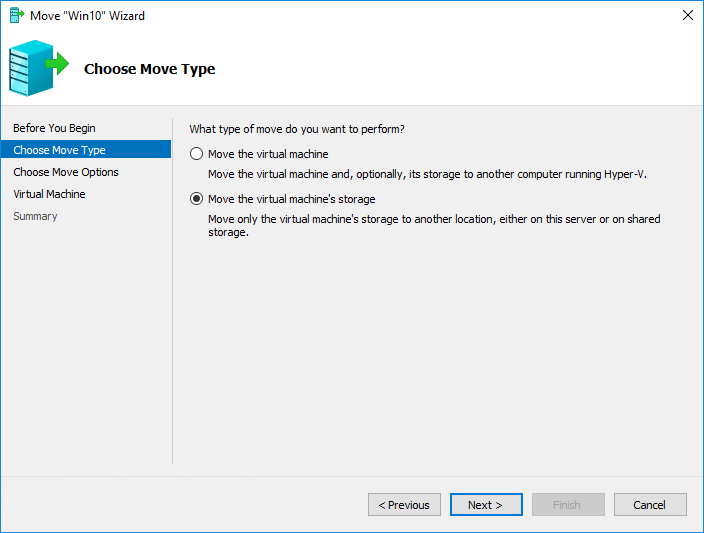
- Click Next on the introductory page.
- Change the selection to Move the virtual machine’s storage (the same storage options would be available if you moved the VM’s ownership, but that’s not part of this article)
- Choose how to perform the move. You can move everything to the same location, you can move everything to different locations, or you can move only the virtual hard disks.
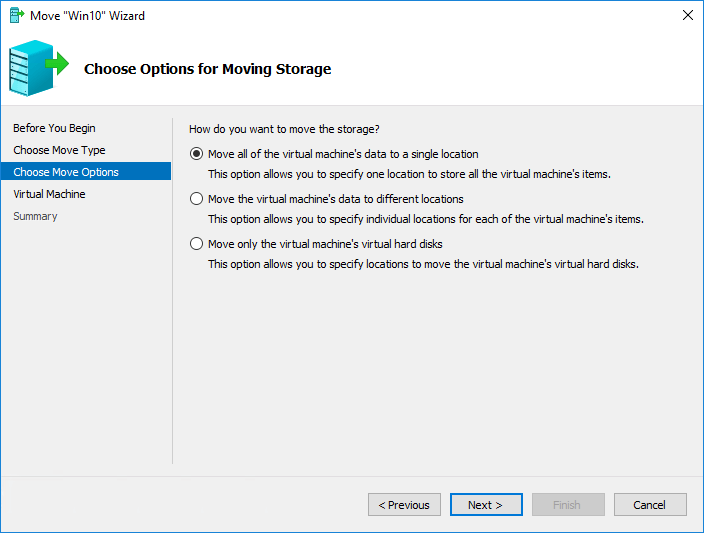
- What screens you see next will depend on what you chose. We’ll cover each branch.
If you opt to move everything to one location, the wizard will show you this simple page:

If you choose the option to Move the virtual machine’s data to different locations, you will first see this screen:
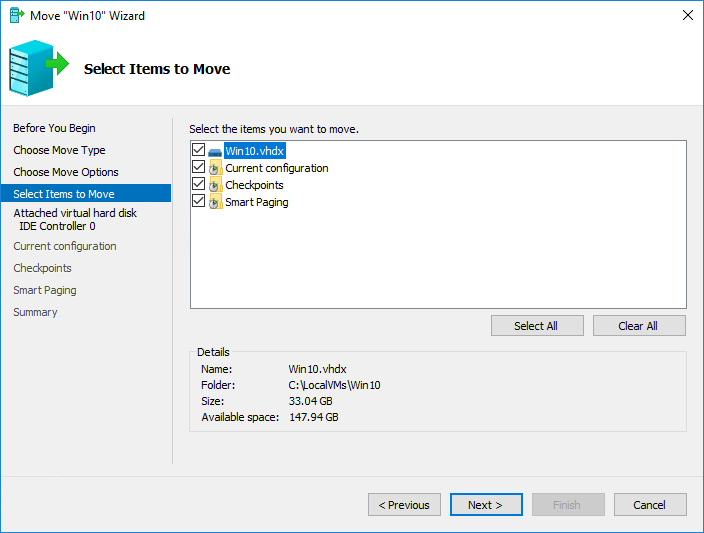
For every item that you check, you will be given a separate screen where you indicate the desired location for that item. The wizard uses the same screen for these items as it does for the hard-disks only option. I’ll show its screen shot next.
If you choose Move only the virtual machine’s virtual hard disks, then you will be given a sequence of screens where you instruct it where to move the files. These are the same screens used for the individual components from the previous selection:

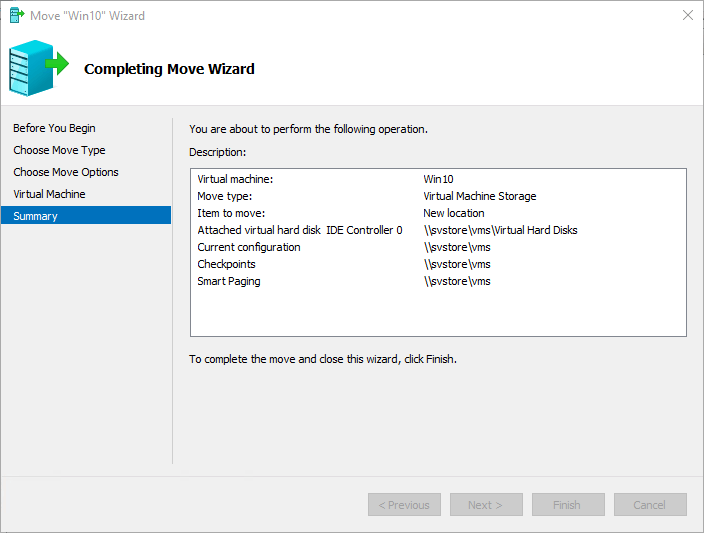
After you make your selections, you’ll be shown a summary screen where you can click Finish to perform the move:
How to Perform Hyper-V Storage Migration with Failover Cluster Manager
Failover Cluster Manager uses a slick single-screen interface to move storage for cluster virtual machines. To access it, simply right-click a virtual machine, hover over Move, and click Virtual Machine Storage. You’ll see the following screen:
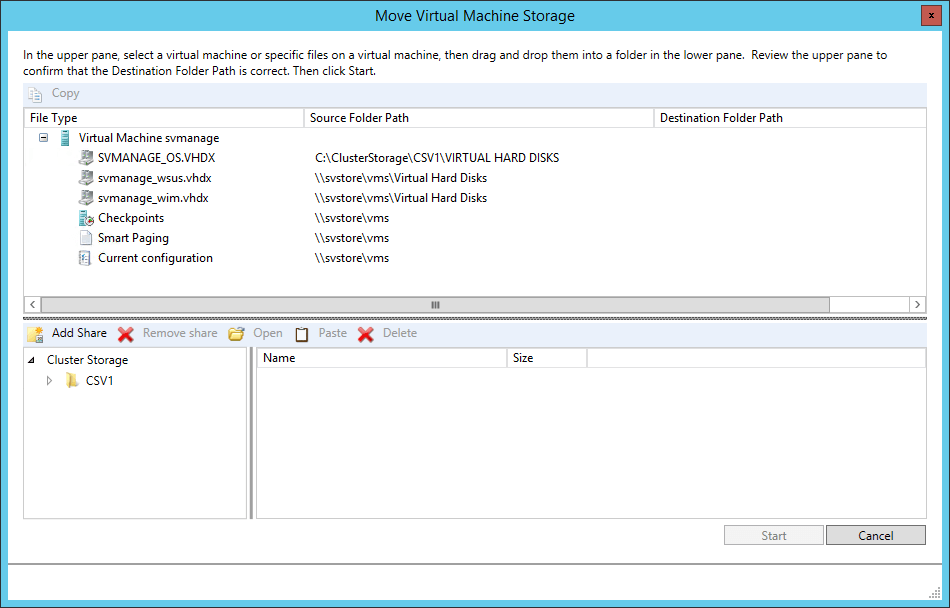
If you just want to move the whole thing to one of the display Cluster Shared Volumes, just drag and drop it down to that CSV in the Cluster Storage heading at the lower left. You can drag and drop individual items or the entire VM. The Destination Folder Path will be populated accordingly.
As you can see in mine, I have all of the components except the VHD on an SMB share. I want to move the VHD to be with the rest. To get a share to show up, click the Add Share button. You’ll get this dialog:
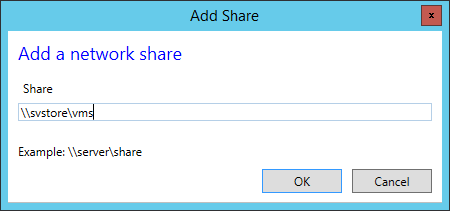
The share will populate underneath the CSVs in the lower left. Now, I can drag and drop that file to the share. View the differences:
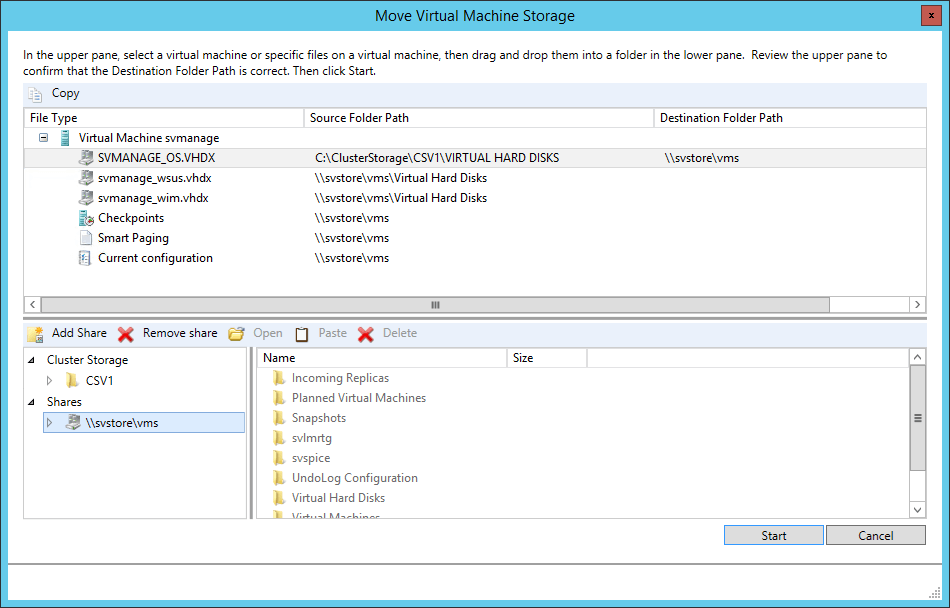
Once you have the dialog the way that you like it, click Start.


Not a DOJO Member yet?
Join thousands of other IT pros and receive a weekly roundup email with the latest content & updates!
More in this category


About the Author

Eric Siron


11 thoughts on "How to Perform Hyper-V Storage Migration"
Good article, but is there anyway to mimic VMWare’s SDRS with Hyper-V (SCVMM) to migrate entire CSV’s to new storage with storage load balancing?
There is no 1:1 equivalent for SDRS, especially when looking only within the Hyper-V/VMM stack. It can do intelligent placement, and it can rebalance VMs to different compute nodes based on aggregate I/O loads, but it won’t dynamically move VMs from one storage location to another. … unless there’s a feature that I don’t know about. I haven’t gotten up to speed on VMM 2016 yet.
However, for Microsoft to bring that functionality to Hyper-V would mean duplicating a lot of work done by other teams. If I were to architect a Hyper-V-based solution with the idea of achieving something similar to that component of SDRS, I would architect around the idea that the storage layer should deal with storage problems. Storage Spaces, S2D, and many SANs perform load-based rebalancing. It’s not the same thing that SDRS does, though.
If you’re looking to match SDRS exactly, then SDRS is it. If your goal is to keep I/O reasonably balanced, that can be done. Just not with Hyper-V/VMM alone.
Hi. Great article. I want to convert our clustered blades with VMs on shared CSVs to standalone servers with local storage. Is it possible to perform a storage migration from C:ClusterStorageVolume1 to d:VMStore on the blade? When I try to the Migrate Storage Wizard or PowerShell, VMM does not see the blade’s local storage. I don’t have this problem when the blade is not clustered. Is copying the files myself the only option? Thanks -Gary
You can do it, but I don’t believe that VMM is smart enough to help you.
Delete the VM in Failover Cluster Manager; that removes the clustered flag but doesn’t hurt the VM.
Then use Hyper-V Manager to perform the storage migration.
I think you’ll then have to repair it in VMM.
Hi, I am use my Hyper-v with cluster Failover, them there are some volumes to a storage.
I need to move the disk to another volume, and my doubts that is the virtual Machine have the state offline or
Can I move the disk with another volume with the virtual machine running?
Yes
I am Updating may SAN with larger drives but not sure if I should move the 6 VMs to the local nodes via storage migration while the SAN gets updated or off to a older machine with a bit more hardware to support the VMs. As far as read and write goes. The nodes only have two drives that can support them but disk speed will be an issue. We run 24 7 but work load is very little on 3rd shift. Thoughts or ideas?
If the disks are slow, then migrations to/from will also be slow. You probably want to run from a location that has a chance of maintaining minimum acceptable levels of performance. If you have a worst-case scenario where you can’t move back to the upgraded SAN, then you might be running from the alternative location for longer than expected.
Hi it’s a year later I guess but I have a test environment and I need to replace the hard disk that the host sits on do I just migrate the whole thing to the new hard disk
Hi,
I have tried to migrate storage of one of my VM (just the hard drive-50 GB) 2 days back. I can see the storage space changing but cannot see the progress of the movement in event logs. Is there a way to know When it will be completing ?
Elevated PowerShell:
gcim -Namespace root/virtualization/v2 -ClassName CIM_Job | select Name, PercentComplete