Save to My DOJO
Table of contents
The purpose of this article is to demonstrate the various methods for performing Live Migrations in Hyper-V. You can check out our previous article that provides a step by step guide to how Hyper-V Live Migration works, or you can check out our troubleshooting guide to Hyper-V Live Migration in case you ran into any errors.
What is Live Migration?
Live Migration is the name of Hyper-V’s technology that moves virtual machines between physical hosts without service interruption. This feature appears in multiple forms:
- Live Migration: While often used as an umbrella term, the most precise meaning for these two words is the transfer of ownership of a clustered virtual machine from one node to another node within the same cluster.
- Storage Live Migration: A Storage Live Migration transfers one or more of a virtual machine’s constituent files from one location to another without interrupting service to the owning virtual machine. A Storage Live Migration might or might not occur in conjunction with a Live Migration.
- Shared Nothing Live Migration: A Shared Nothing Live Migration is similar to a standard Live Migration in that it transfers a virtual machine from one host to another without interruption, but the primary difference is that the virtual machine cannot be clustered. The most common utilization for a Shared Nothing Live Migration is moving a virtual machine from one standalone host to another. However, it is possible to transfer from a node that is a cluster member, provided that the virtual machine is not a cluster role at the time of transfer. Shared Nothing Live Migration typically occurs in conjunction with a Storage Live Migration, but it is not necessary if the virtual machine’s files are on an SMB 3 share accessible by both the source and target physical hosts.
What is Quick Migration?
Quick Migration is an earlier technology that moved virtual machines between cluster nodes but does cause a brief service interruption. Live Migration is preferred for running virtual machines, but because the active state of the virtual machine is saved to disk instead of transferred and actively synchronized over the network, Quick Migration usually enjoys a noticeably lower total operation time. Quick Migration is the only way for non-running virtual machines to be transferred.
PowerShell vs. GUI Methods
This article will demonstrate both PowerShell and GUI methods (via Hyper-V Manager and Failover Cluster Manager). While I normally make it a point to encourage everyone to learn and use PowerShell whenever possible, I make no particular preference on Quick and Live Migrations. I recommend that you at least learn how the PowerShell techniques work, especially if you are considering building any automated solutions. For day-to-day operations, the GUI is easier. I’ll show you the PowerShell techniques first with the GUI methods following.
Quick Migrations in PowerShell
PowerShell can easily move virtual machines:
Move-ClusterVirtualMachineRole -Name svmanage -Node svhv1 -MigrationType Quick
If you do not specify –Node, the cluster decides where to place the virtual machine(s).
To move multiple virtual machine simultaneously, you can use this cmdlet in a loop or pipe in output from Get-VM.
Live Migrations in PowerShell
The PowerShell syntax for Live Migrations is even easier than Quick Migrations:
Move-VM -Name svmanage -Node svhv1 -MigrationType Live
If you do not specify –Node, the cluster decides where to place the virtual machine(s).
To move multiple virtual machine simultaneously, you can use this cmdlet in a loop or pipe in output from Get-VM.
For Live Migrations, you can also use Move-VM:
Move-VM -ComputerName svhv2 -Name svmanage -DestinationHost svhv1
Move-VM will fail if the virtual machine is not on and it requires a destination host to be specified. If not run from the source host, it will also fail if delegation is not enabled. See the Troubleshooting section.
Storage Live Migrations Using PowerShell
Another capability of the Move-VM cmdlet is relocation of a virtual machine’s storage. That usage is probably better explained by its relation to Shared Nothing Live Migration, so that section will explain it further. However, there is a cmdlet just for Storage Live Migration: Move-VMStorage. This cmdlet has quite a few options, not all of which will be discussed here. Use Get-Help to see the full list or read the related page on TechNet. The cmdlet does have four separate parameter sets, but there are only two major variants. Your major decision is whether you want to move all of the VMs files to the same location or if you want to specify locations for individual components. You can make either of these moves by specifying the VM by its name or by using its VM object (as in, from Get-VM). The examples shown here only specify the virtual machine by its name.
Using Move-VMStorage to Relocate All of VM’s Files to a Single Location
Using a single location is the easiest:
Move-VMStorage svtest -DestinationStoragePath G:
The above example moves all of the files for the virtual machine named “svtest” to the G: drive. In this case, that is a Cluster Disk (not a CSV) that has been specifically assigned to the virtual machine svtest. This usage results in the following:
- If a folder named Snapshots does not exist on G:, it will be created. Any VM configuration files that belong to an existing checkpoint for the VM will be placed there.
- If a folder named Virtual Hard Disks does not exist on G:, it will be created. Any virtual hard disks attached to the VM will be placed there.
- If a folder named Virtual Machines does not exist on G:, it will be created. The VM’s XML description file will be placed in it. A subfolder named with the virtual machine’s ID will be created. The VM’s BIN and VSV will be placed there.
Using Move-VMStorage to Separate a VM’s Files
Multiple locations can be somewhat complicated because the VHD/X files need to be in an array of hash tables. Each hash table in this array needs to be in the format of: @{‘SourceFilePath’ = ‘G:Virtual Hard Diskssvtest.vhdx’; ‘DestinationFilePath’ = ‘C:ClusterStorageCSV1Virtual Hard Diskssvtest.vhdx‘}. The locations and VHDX files are specific to my installation, of course, but the “SourceFilePath” and “DestinationFilePath” key names are required. Notice the @{} wrapper; this is what makes this a hash table. Every VHD/X set that you’re going to move needs to be placed inside one of these, and then all of those (even if it’s only one), needs to be placed inside a standard PowerShell array. The wrapper for that is @(). Separate VHDX hash tables inside the array with commas. An example of such an array of hash tables:
@(@{'SourceFilePath' = 'G:Virtual Hard Diskssvtest_os.vhdx'; 'DestinationFilePath' = 'C:ClusterStorageCSV1Virtual Hard Diskssvtest_os.vhdx'}, @{'SourceFilePath' = 'G:Virtual Hard Diskssvtest_data.vhdx'; 'DestinationFilePath' = 'C:ClusterStorageCSV1Virtual Hard Diskssvtest_data.vhdx'})
A more complete example:
Move-VMStorage svtest -VirtualMachinePath C:ClusterStorageCSV1 -Vhds @(@{'SourceFilePath' = 'G:Virtual Hard Diskssvtest_os.vhdx'; 'DestinationFilePath' = 'C:ClusterStorageCSV1Virtual Hard Diskssvtest_os.vhdx'}, @{'SourceFilePath' = 'G:Virtual Hard Diskssvtest_data.vhdx'; 'DestinationFilePath' = 'C:ClusterStorageCSV1Virtual Hard Diskssvtest_data.vhdx'})
Notice that I used neither the SnapshotFilePath nor the SmartPagingFilePath parameter. Whereas the Failover Cluster Manager tool will leave any files that you did not specifically instruct it to move in their original location, the cmdlet the way that I have issued it will move all unspecified components to the same location as the VirtualMachinePath parameter, if it is specified.
Preparing a Clustered Virtual Machine for a Shared Nothing Live Migration Using PowerShell
Before you can move a clustered virtual machine, you must remove it from its cluster. This operation does not cause downtime for the virtual machine, but it may cause issues for other applications. For instance, System Center Virtual Machine Manager will mark any virtual machine on a Cluster Shared Volume that isn’t clustered as “unsupported configuration” and will refuse to allow you to manipulate it within that console. Also, running a non-clustered virtual machine on a cluster member’s shared storage (besides SMB 3) can have other undesirable effects if any failures should occur, so do not perform these steps until you are ready to start the Shared Nothing Live Migration.
To prepare a clustered virtual machine for Shared Nothing Live Migration using PowerShell:
Remove-ClusterGroup -Name svtest -RemoveResources
Note 1: The name of the virtual machine’s cluster group does not always match its cluster group name. This is especially likely to be true if you created the virtual machine using System Center Virtual Machine Manager. You can use Get-ClusterGroup to view all clustered roles.
Note 2: Remove-VMFromCluster is an alias for Remove-ClusterGroup.
Shared Nothing Live Migration Using PowerShell
Shared Nothing Live Migration is enabled by using Move-VM. It works almost exactly like Move-VMStorage, but adds a DestinationHost parameter. In fact, everything you learned from Move-VMStorage above (in the Storage Live Migrations Using PowerShell section) applies to Move-VM.
Move-VM svtest -ComputerName svhv2 -DestinationHost svhv1 -VirtualMachinePath C:ClusterStorageCSV1 -Vhds @(@{'SourceFilePath' = '\svstorevmsVirtual Hard Diskssvtest.vhdx'; 'DestinationFilePath' = 'C:ClusterStorageCSV1Virtual Hard Diskssvtest.vhdx' }
Performing a Quick Migration in Failover Cluster Manager
Failover Cluster Manager is the only native GUI tool that can perform a Quick Migration.
- Switch to the Roles tree node.
- To move multiple VMs, use CTRL+Click to select them.
- Right-click the VM(s) to be moved.
- In the context menu, go to Move and Quick Migration.
- To allow the cluster to select the destination, click Best Possible Node.
- To manually choose the destination, click Select Node… This will cause a dialog to appear with all cluster nodes displayed. Double-click one or highlight it and click OK.
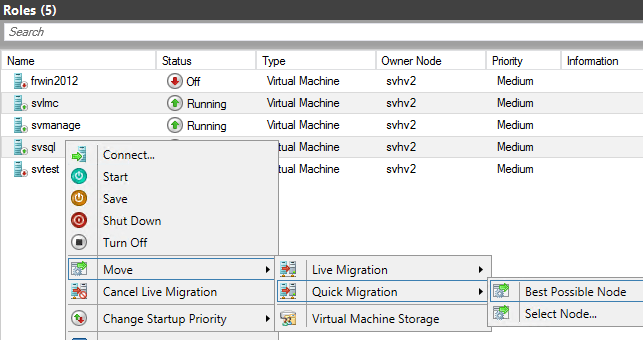
Quick Migration in Failover Cluster Manager
Performing Live Migrations in Failover Cluster Manager
As with Quick Migrations, Failover Cluster Manager is the only native GUI tool that can perform a Quick Migration.
- Switch to the Roles tree node.
- To move multiple VMs, use CTRL+Click to select them.
- Right-click the VM(s) to be moved.
- In the context menu, go to Move and Live Migration.
- To allow the cluster to select the destination, click Best Possible Node.
- To manually choose the destination, click Select Node… This will cause a dialog to appear with all cluster nodes displayed. Double-click one or highlight it and click OK.
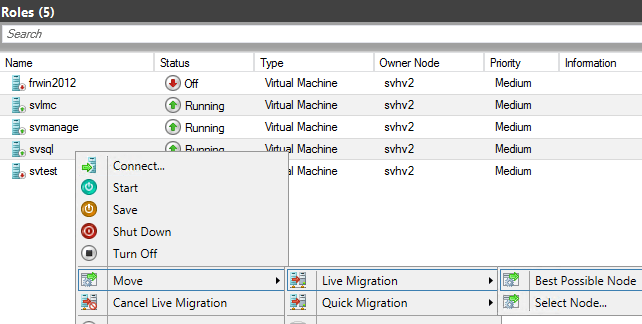
Live Migration Example
If you have selected more virtual machines than can be migrated at once, the cluster will choose the maximum number and begin moving them. The rest will show a status of Migration queued.
Performing a Storage Live Migration
A Storage Live Migration can be performed for non-clustered virtual machines using Hyper-V Manager. Only Failover Cluster Manager can handle them for clustered virtual machines.
Storage Live Migrations in Hyper-V Manager
For non-clustered virtual machines:
- Right-click on the virtual machine in the list and select Move…
- The Move Wizard will open. The first screen is informational. Click Next when ready.
- On the Choose Move Type screen, choose Move the virtual machine’s storage and click Next.
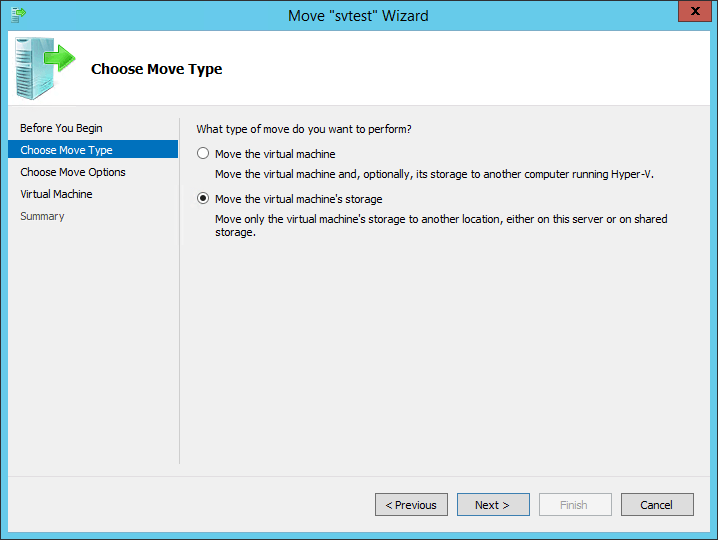
Storage Live Migration Selection
- Now, you’ll need to make a generic choice of what you want to move. There are three options:
- Move all of the virtual machine’s data to the same location. This will place all of the virtual machine’s files except its VHD/Xs in a ‘Virtual Machines’ folder at the target location. All of the hard disks will be placed in a ‘Virtual Hard Disks’ subfolder.
- Move the virtual machine’s data to different locations. You’ll be prompted for the location of each component. This is the only option we’ll go through in this walk-through as it is a superset of the other two.
- Move only the virtual machine’s hard disks. This will skip the component section and have you pick which VHD/X files to move and where to put them.
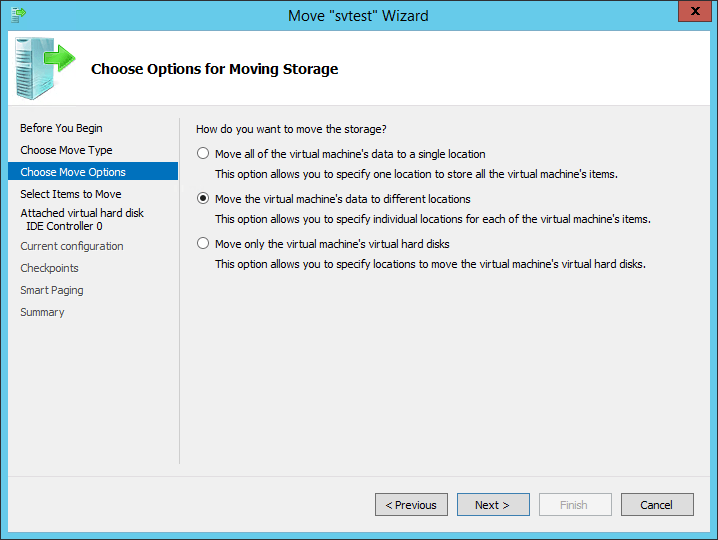
Move Options
- After that, you’ll make more specific decisions about what to move. If you picked the first option in step 4, you’ll just have a single target location. Otherwise, you’ll have the screen as shown in the following screen shot. Whether or not the components are visible depends on whether you chose the second or third option in step 4. Uncheck anything that you want to leave behind.
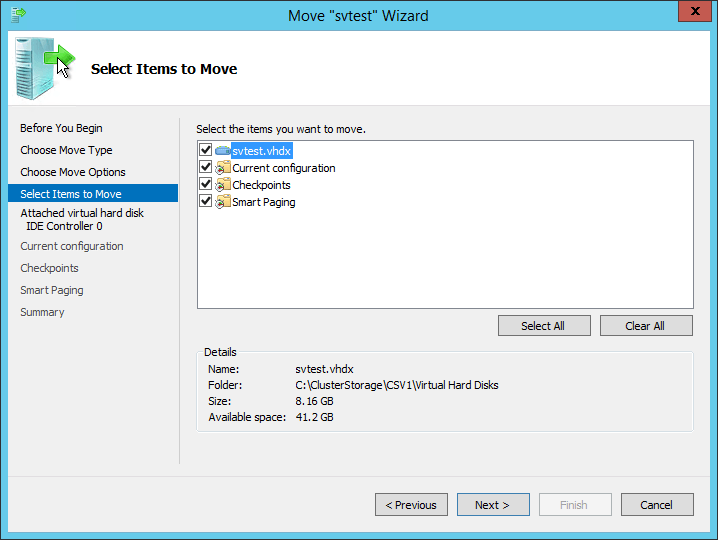
Move Components
- You will now progress through a series of screens that ask you where to place each individual item. How many of these screens you see depends on your selections in steps 4 and 5. Each looks similar to the following, and you will not be allowed to proceed until you have selected a suitable destination for the current item. When the wizard validates the target location, it will fill in the Available space field. If you’re manually typing, it attempts to validate the storage location after each letter, so results are immediate.
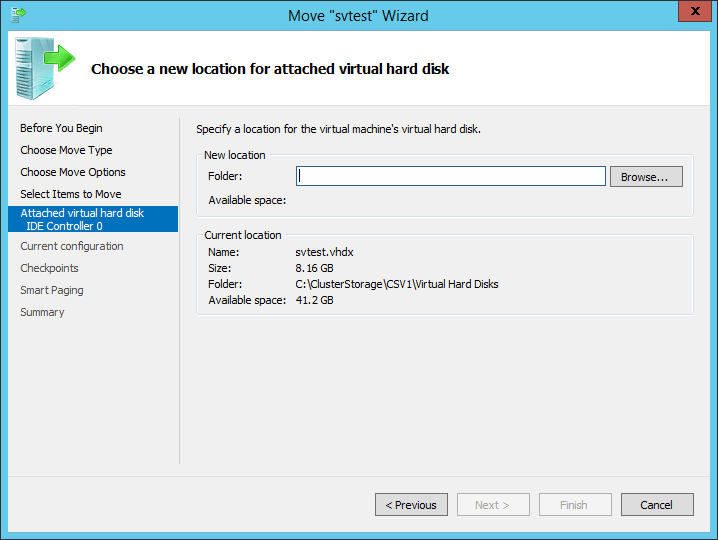
Destination Path Selection
- Once you have made all of your selections, you will be presented with a summary screen. If all of your selections are correct, click Finish to start the move.
Storage Live Migrations in Failover Cluster Manager
Failover Cluster Manager is the tool to use for clustered virtual machines.
- Switch to the Roles tree node.
- To move multiple VMs, use CTRL+Click to select them.
- Right-click the VM(s) to be moved.
- In the context menu, go to Move and Virtual Machine Storage.
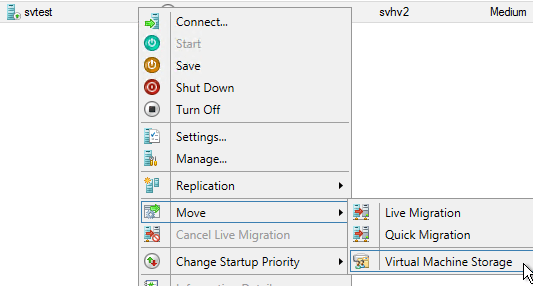
Starting Failover Cluster Storage Live Migration
- The Move Virtual Machine Storage dialog will open. Select destination(s) for the virtual machine’s files and click Start to begin the move. This dialog and its components are explained below.
The Storage Live Migration window has quite a few pieces to give you fine-grained control over the placement of your virtual machine’s files. The following is an index that matches with the numbers I’ve super-imposed on the screenshot:
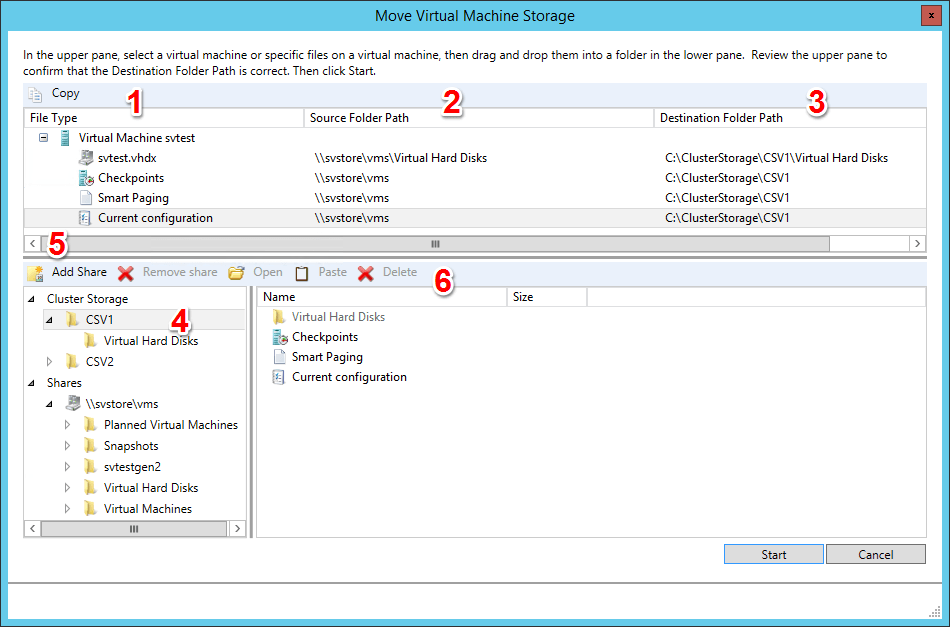
Failover Cluster Manager Storage Live Migration Window
Legend for the Preceding Screenshot
- In the first column, you’ll find the virtual machine(s) that you selected to move. In this screenshot, I’ve expanded the virtual machine, which shows its constituent components. If I had selected other virtual machines to move, they would be listed below this one.
- This column shows you where the components of the virtual machine currently are.
- The Destination Folder Path is initially empty. As you select target locations, they will be indicated here.
- The box at the lower left shows valid destinations. Initially, only Cluster Shared Volumes will be visible. If a Cluster Disk has been assigned directly to a selected virtual machine, that will appear as well. You can expand any of the items here to show their subfolders. You can drag-drop any item from the top to any location that appears here. Alternatively, you can highlight an object in the top and click the Copy button (near the number 1 in the screenshot) and then use the Paste button (above and to the left of the number 6 in the screenshot) to set that as the item’s target location.
- The Add Share button shows a small dialog that allows you to manually type the name of a share. If it is reachable, it will then appear in the bottom left box under a Shares tree. It can then be used as described in number 4.
- Items in the lower-right box in black font are components that will be moved into the currently highlighted location on the left. Items in gray font are components that are already present. This output can be a little confusing because only VHD/X files are named. Items such as Checkpoints and Current configuration do not indicate which virtual machine they are for. Take caution when moving virtual machines simultaneously and be mindful of the contents of the third column. If an item in black font is highlighted, the Delete button (above the number 6 in the screenshot) will remove its current move target (meaning that it will be left where it is when the move is started).
One of Storage Live Migration’s powers is that the virtual machine doesn’t need to have all of its components in a single place. This window allows you to design the precise layout of its constituent files. However, remember that:
- The Checkpoints location does not affect AVHD/X files. Those will always be placed in the same location as their parent VHD/X files.
- If a Virtual Machines folder does not exist at the designated target location for Current configuration and Smart Paging, it will be created.
- If a Snapshots folder does not exist at the designated target location for Checkpoints, it will be created.
- Virtual disk files will be placed exactly where they are targeted without creation of any subfolders.
- The source folder structure will not be altered.
Preparing a Clustered Virtual Machine for a Shared Nothing Live Migration
Before you can move a clustered virtual machine, you must remove it from its cluster. This operation does not cause downtime for the virtual machine, but it may cause issues for other applications. For instance, System Center Virtual Machine Manager will mark any virtual machine on a Cluster Shared Volume that isn’t clustered as “unsupported configuration” and will refuse to allow you to manipulate it within that console. Also, running a non-clustered virtual machine on a cluster member’s shared storage (besides SMB 3) can have other undesirable effects if any failures should occur, so do not perform these steps until you are ready to start the Shared Nothing Live Migration.
To prepare a clustered virtual machine for Shared Nothing Live Migration using Failover Cluster Manager, right-click on the virtual machine in the Roles section and click Remove. You’ll be prompted to remove its cluster resources. The virtual machine is not affected, only its status within the cluster.
Shared Nothing Live Migration in Hyper-V Manager
The only freely-provided GUI tool from Microsoft that can perform a Shared Nothing Live Migration is Hyper-V Manager. The process is similar to that of a Storage Live Migration, so you’ll likely notice some similarities between the two processes.
- Right-click on the virtual machine in the list and select Move…
- The Move Wizard will open. The first screen is informational. Click Next when ready.
- On the Choose Move Type screen, leave Move the virtual machine selected and click Next.

Move Type
- Choose the host that you wish to migrate the virtual machine to. You can type it in or Browse to it. Click Next.
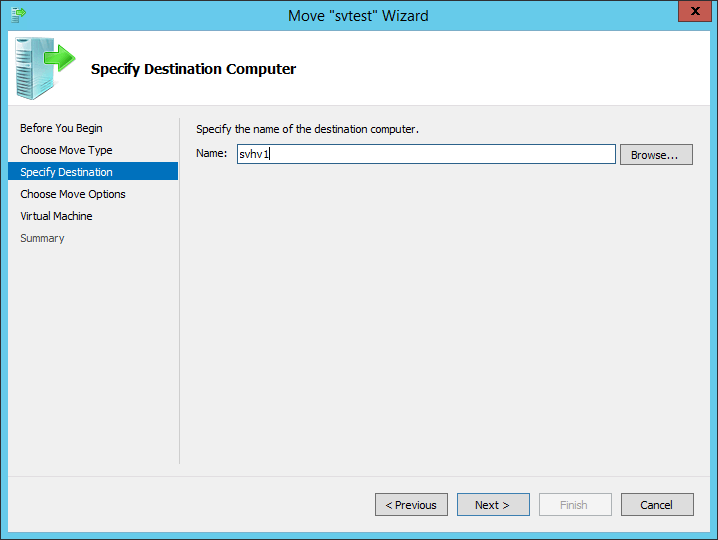
Destination Host
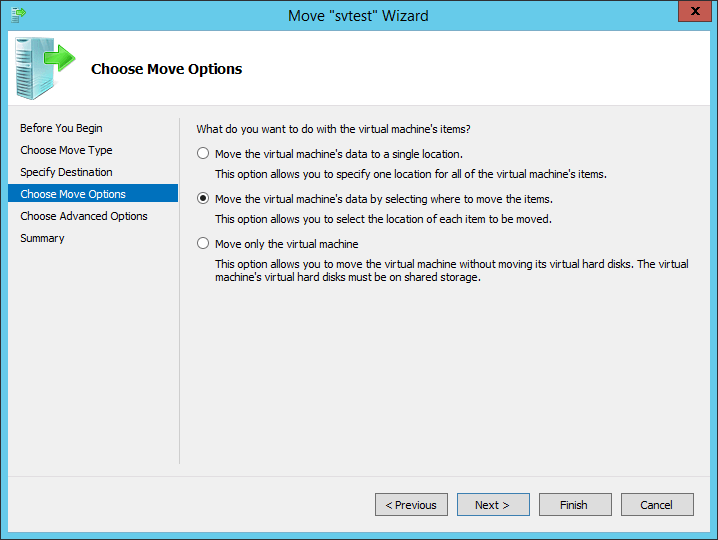
- The Move Options dialog deals with the general placement of the virtual machine’s components.
- Move the virtual machine’s data to a single location. If you choose this option, the next window will ask you for the location to place the virtual machine files. The VHD/X files will be placed in a ‘Virtual Hard Disks’ subfolder of that location. All others will be placed in a ‘Virtual Machines’ subfolder. The Browse button operates from the perspective of the VMMS service on the target machine.
- Move the virtual machine’s data by selecting where to move the items. This option will cause a series of dialogs to be generated that will ask about each component separately. This is the only option that will be further explored in this walkthrough.
- Move only the virtual machine. If you choose this option, you will not be given any options for file placement. The wizard will attempt to swap the XML file registration from the source to the destination without making any other changes, just as it does with a cluster Live Migration. This can only work if the files are in an SMB 3 share opened to both the source and destination hosts or if they are in a Cluster Shared Volumes and both hosts are members of the same cluster.
Move Options
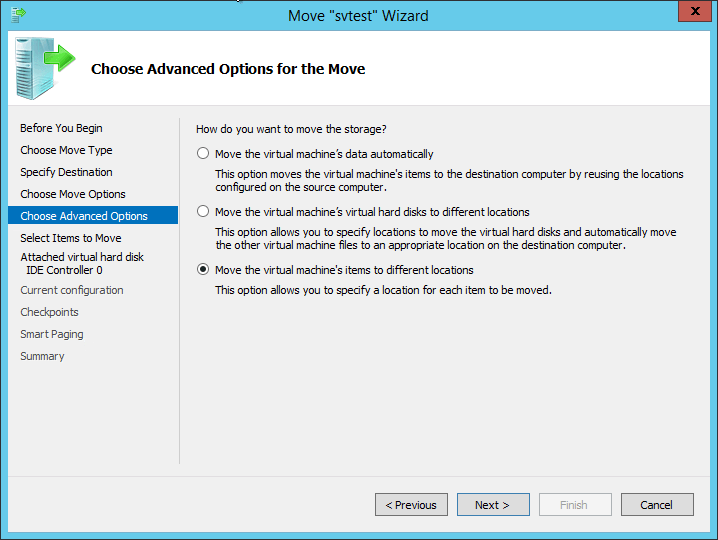
- If you chose the second option in step 5, you’ll be presented with a dialog that further inquires how you wish to distribute the virtual machine’s data on the target host. It has three options.
- Move the virtual machine’s data automatically. The first option is the simplest. It will place the files in the same folder structure that they use on the source host.
- Move the virtual machine’s virtual hard disks to different locations. This choice is almost identical to the third option, except that it only deals with virtual hard disk files.
- Move the virtual machine’s items to different locations. If you choose this option, you’ll be presented with a series of dialogs that ask you to place each individual component, including the virtual hard disks.
Advanced Move Options
- If you chose the third option in step 6, you’ll be presented with a dialog asking which of the components you wish to move. If you chose the second option, you’ll get the same dialog but it will only contain the VHD/X files. For a Shared Nothing Live Migration to succeed, all of the source files must either be moved or be in a location that both hosts can reach.
Move Components
- If you made any choices in previous steps that involve moving items, you will now progress through a series of screens that ask you where to place each individual piece. How many of these screens you see depends on your earlier selections. Each looks similar to the following, and you will not be allowed to proceed until you have selected a suitable destination for the current item. When the wizard validates the target location, it will fill in the Available space field. If you’re manually typing, it attempts to validate the storage location after each letter, so results are immediate. Because you’re moving to a different host, all of these destinations are taken from the perspective of that host.
Destination Path Selection
- Finally, you will be presented with a summary screen. If all looks well, press Finish to begin the transfer.
- If necessary, re-cluster the virtual machine with the Configure Role wizard in Failover Cluster Manager or with the Add-ClusterVirtualMachineRole cmdlet.
If all goes well, the files will be removed from the source location upon completion. Sometimes, these files are left behind even on success. Source folder structures will not be modified.


Not a DOJO Member yet?
Join thousands of other IT pros and receive a weekly roundup email with the latest content & updates!
More in this category


About the Author

Eric Siron


15 thoughts on "Hyper-V Live Migration methods in 2012 and 2012 R2 VMs"
Hello Eric,
great overview!
Do you know a method how to do a shared nothing live Migration including storage with different switches on source and target?
If the switch name does not match, the gui is asking about the target switch name. But what about when the target switch is different name, and on target my nic needs a vlan tag? Is there any way to avoid a downtime?
Thanks in advance,
Holger
Use Compare-VM: https://www.altaro.com/hyper-v/using-compare-vm/
Hi Eric,
first – thanks for all the great posts!
Can compare-vm help with adding a vlan tag as well? The article you mentioned talks about moving to a host with a different switch name ,but not about the vlan thing.
thanks again.
Hi Uri,
Yes!
For example:
Edit: apparently, code blocks are invisible in our comments — hopefully standard formatting doesn’t destroy anything…
$CR = Compare-VM FunnyVM -DestinationHost DestHost
$CR.Incompatibilities | where MessageID -eq 33012 | % { Connect-VMNetworkAdapter $_.Source -SwitchName vSwitch -Passthru | Set-VMNetworkAdapterVlan -Access -VlanId 20 }
Move-VM -CompatibilityReport $CR