Save to My DOJO

Table of contents
As developers are slowly starting to adopt containerization of applications, it is very important for VMware administrators to know a little bit about them. What is a container? It’s an open source software platform. Deploying applications on a container platform gives them the ability to package applications inside “containers” and provides them with the following benefits:
- deploy updates on the fly
- lightweight – containers share the os components (kernel)
- portability
- stability
- flexibility
One of the biggest advantages gained from deploying an application in a container platform is that it gives better availability for cloud applications and more agile development. It also speeds up application development and testing time since developers don’t have to meddle with platform compatibility. With containers, your application is isolated into its container with only the dependencies that it needs to run, which is optimizes the application and allows it to load faster and consume fewer resources, as opposed to the traditional hypervisor VM method where the app is running on the OS with all the other 3rd party applications and services bloating up performance and resources.
VMware’s vSphere Integrated Containers feature allows for VMware Admins to host and manage their VMware workloads within vSphere. Why would I care about running my container workloads on my hypervisor? With vSphere integrated Containers, you get the benefits of ESXi such as HA and vMotion with your containers. For example, your containers are no longer tied down to docker VMs, you can migrate them between Virtual Container Hosts and split them up within vSphere instead of having to cater to the actual VM that’s hosting docker services.
Running a Plex Media Center as a Container
In order to showcase how a container workload would look like inside Vsphere Integrated Containers, I’m going to demo how easy it is to bring up a container using VMware’s Integrated Container feature. We’ll demo spinning up a Plex Media Server in our VIC environment. There is more than one way to deploy and manage containers now, but in this example, we will be creating the container using Docker for Windows. So we’ll first install docker for windows here.
We already have a Virtual Container Host created if you would like to see how this is done, be sure to check out our guide here. As you can see when you create a VCH, a resource pool gets created and the VCH is stood up as a VM running VMware’s Photon OS which is their open-source platform developed specifically for hosting containers:

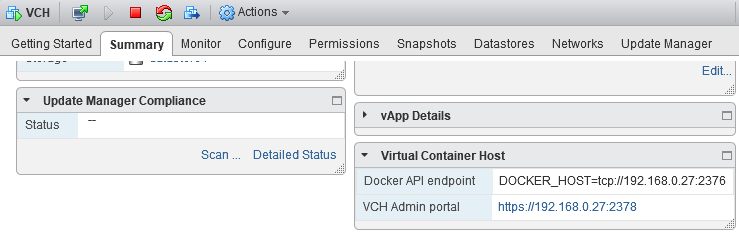
Now, the real magic that we want from this Virtual Container Host is the Docker API Endpoint address. This address is what we would essentially give to our container developers to access and deploy their container images:
Since we have Docker for Windows installed on our Windows 10 machine, let’s open up a PowerShell command prompt. We can simply call the docker client by just typing in “docker”. We’ll type in the following syntax to see which container host we are currently looking at with our PowerShell console:
docker info
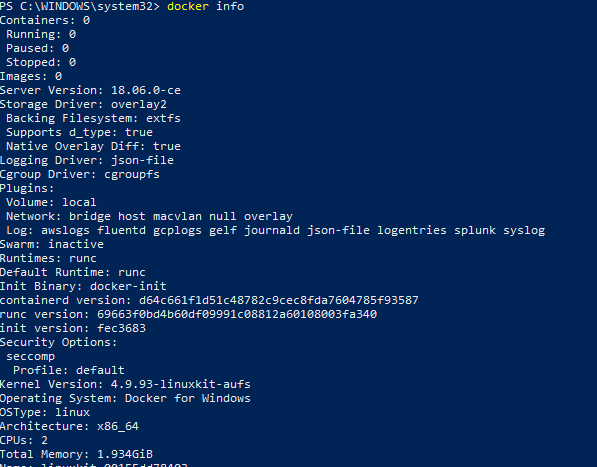
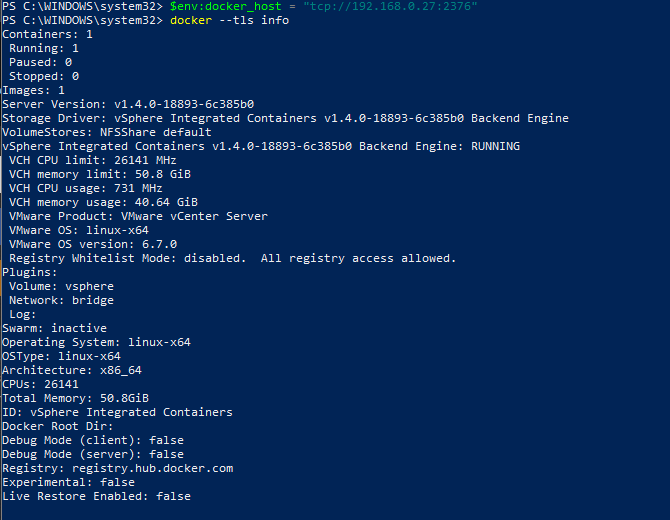
You can see that we are looking at our Docker for Windows platform on our Windows 10 machine. Let’s change that by adding a new environmental variable to our PowerShell console so that we can point docker to our VCH’s Docker API Endpoint address:
$env:docker_host = "tcp://192.168.0.27:2376"
Now that we have the environmental variable loaded into the PowerShell session, when we run “docker info” again we can see we are now looking at the vSphere Integrated Containers platform. Also, note that we need to use the –tls parameter to specify that we are using TLS. By default the VCH uses TLS:
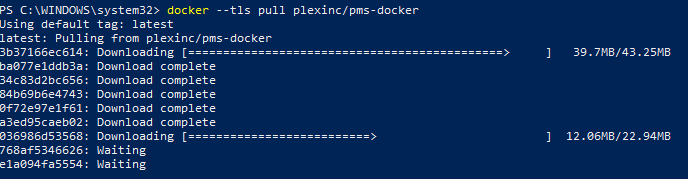
Now, let’s download a container image of Plex Media Server. A container image is an executable packaged up, sort of like applications that are thin-installs. Its a snapshot of the application at that point in time with all the dependencies included. So we will use the following syntax to grab the latest Plex image, there are a few out there but for this example, we are using the plexinc/pms-docker image:
docker --tls pull plexinc/pms-docker
After the image has downloaded, we can now start setting up the storage for our container. I want to use an NFS Share so that we can later share the volume with other containers. So I have a datastore mounted to my hosts called “NFS”. We will create the first container volume for all our Plex media files. If I run “docker –tls info”, I can see that I have a volume store already mounted on my VCH when I created it called “NFSShare”, so I’ll reference that when I create my volumes:
docker --tls volume create --opt volumestore=NFSShare --name plexdata
![]()
I want to specify a separate folder for the config and transcoding of Plex, so we’ll type in the following to create two more volumes:
docker --tls volume create --opt volumestore=NFSShare --name plexconfig

docker --tls volume create --opt volumestore=NFSShare --name plextranscode

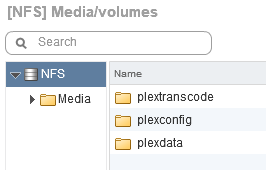
When I look at my NFS datastore in vSphere, I can see the docker volumes I just created:
Now its time to start up the container with our configuration. We will run the following syntax:
docker --tls run `
-d `
--name plex `
-p 32400:32400/tcp `
-p 3005:3005/tcp `
-p 8324:8324/tcp `
-p 32469:32469/tcp `
-e TZ="US/Eastern" `
-e ADVERTISE_IP="http://192.168.0.27:32400/" `
-h plexserver `
-v plexdata:/data `
-v plexconfi:/config `
-v plextranscode:/transcode `
plexinc/pms-docker

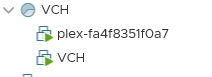
Now we can see that the container is created inside our VCH resource pool:
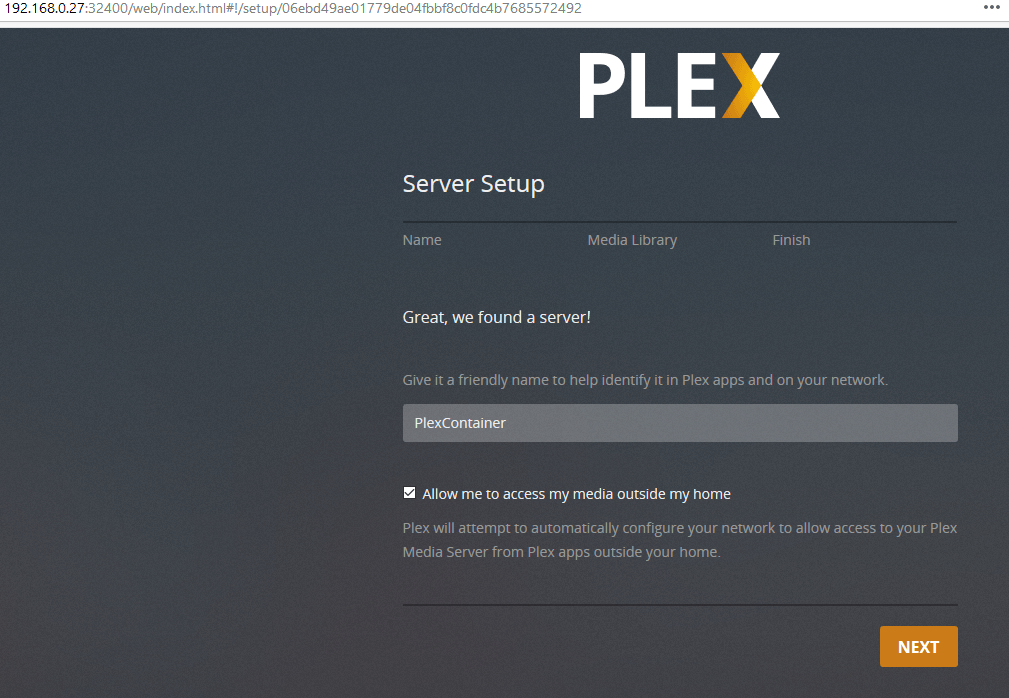
When I browse to the configured IP and port (http://192.168.0.27:32400/web), we now have a running Plex Media Server:
Once you have a good grip on how to launch your container image with all the required config settings, you can see its very quick and effortless to deploy containers through vSphere Integrated Containers. Like I said, there many numerous ways to deploy and manage your containers, vSphere Integrated Containers even has it’s own built-in portal for deploying them. However, I wanted to demonstrate a little more about using the docker for windows client to manage and create our containers. vSphere Integrated Containers is definitely still a baby in its product life cycle but I can definitely see this becoming a standard in the near future for running applications. Let me know in the comments below on what you’ve built and deployed so far with vSphere Integrated Containers, and what your experiences have been with it thus far!
Thanks for reading!
[the_ad id=”4738″][thrive_leads id=’18673′]


Not a DOJO Member yet?
Join thousands of other IT pros and receive a weekly roundup email with the latest content & updates!
More in this category


About the Author

Luke Orellana

