Save to My DOJO
In An Overview of vSphere 6 Content Libraries, I discuss the benefits of using content libraries to manage VM templates and ISOs from a single repository. Content libraries, in theory at least, are a far cry from the traditional way of managing templates and other file types by simply putting them on one or more datastores. How many times have you placed an ISO image on a datastore only to forget where the minute you need to mount it?
When content libraries were first released, they lacked some basic functionality which made them not particularly suited for the job. To begin with, mounting an ISO file from a content library to a VM, was not supported. Another let down was the inability to update library templates and apply guest customization to a VM deployed from a library template.
With vSphere 6.5, VMware has addressed these shortcomings in response to user feedback. Today’s post is thus aimed at showing if content libraries are now truly a viable solution to centrally managing templates and other content.

Creating a new Content Library
For this example, I’m using vCSA 6.5 U1 and a vSAN datastore which I’ll use as the storage for the library. Let’s go quickly through the steps.
Step 1 – From the Home menu, click on Content Libraries. Click on Create new content library.
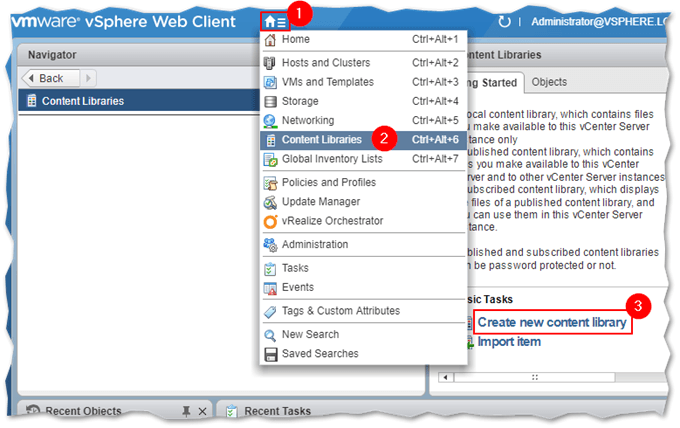
Creating a new library in vSphere 6.5
Step 2 – Type in a name for the new content library. If you have multiple vCenter Servers in enhanced linked mode, select the one you want the library deployed to from the vCenter Server drop-down box. Press Next.
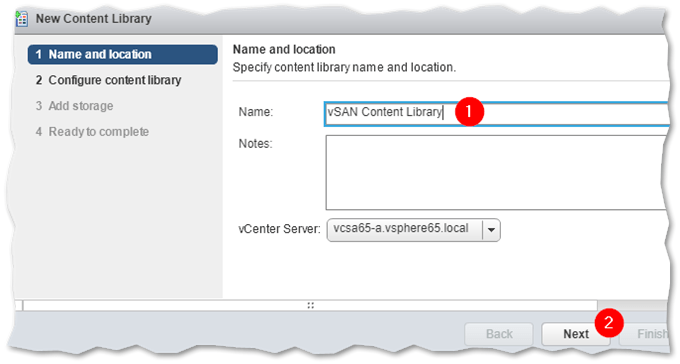
Naming a content library and selecting a vCenter Server instance
Step 3 – Select Local content library as shown and press Next. Tick on the Publish externally option if you plan on sharing the library with other vCenter Server instances. You can also limit access to the library by enabling authentication.
Note: The Optimize for syncing over HTTP is used when publishing libraries to remote vCenter Server that are not linked (enhanced linked mode). The library is optimized for lower CPU usage and faster streaming but the drawback is that you won’t be able to deploy VMs.

Selecting between a local and subscribed content library
Step 4 – Select a storage location for the library. I opted for a datastore but you could use a Windows or NFS share as described in the parent post.
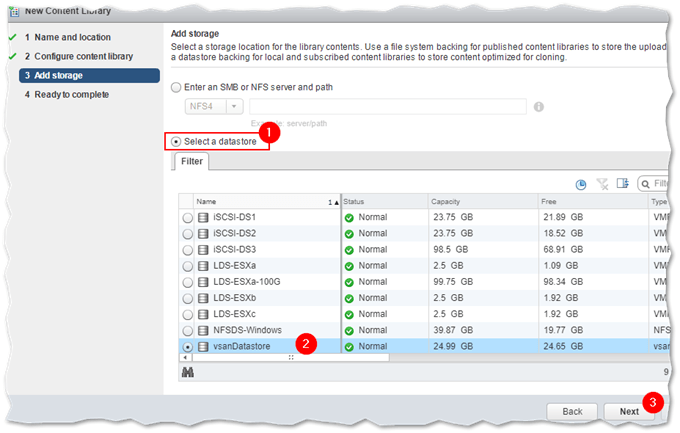
Selecting the storage where the content library will be created
Step 5 – Press Finish to complete the library creation process.
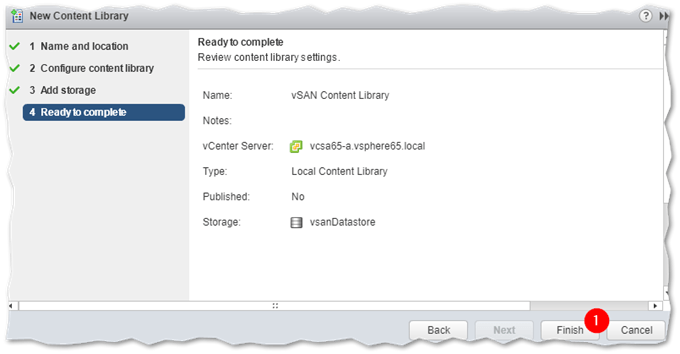
Completing the content library provisioning process
Step 6 – Verify that the library has been created by refreshing the Content Libraries page.
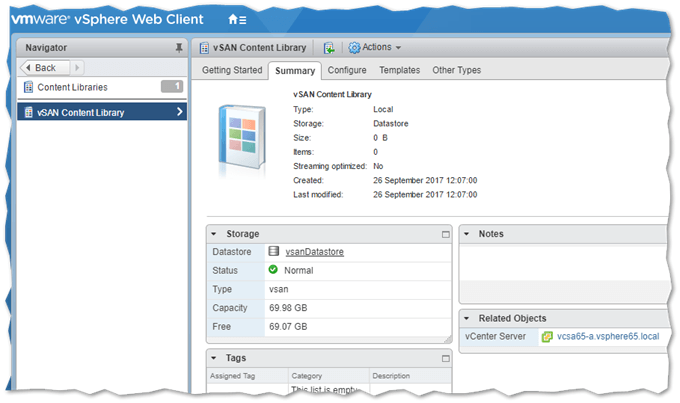
Verifying that the new content library has been created
Uploading and booting off an ISO
The first thing I’m going to verify is whether you can really mount a library ISO image onto a virtual machine and then boot from it. For this test, I’ve uploaded a Centos 7 Minimal ISO image which I’ll attach to a newly created VM.
Step 1 – To upload an ISO image to the library, select the content library (1) and click on the Other Types (2) tab. Click on Import Item (3) and navigate to the folder holding the ISO image using the Browse (4) button. Select the ISO file and press OK (5) to upload it.
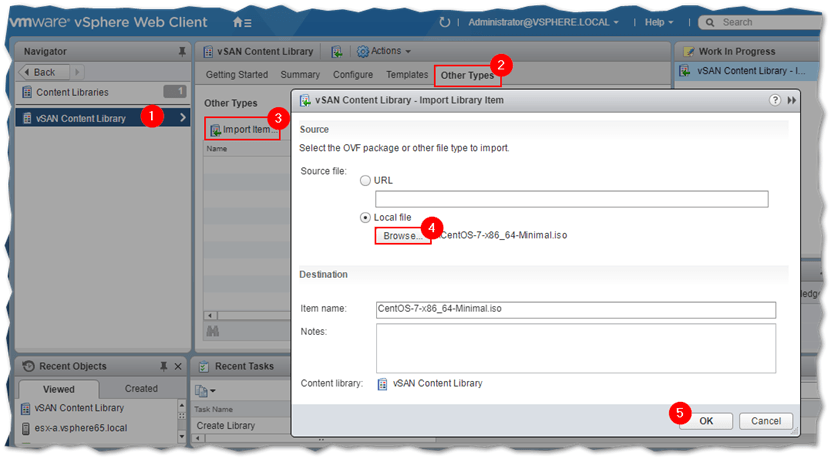
Uploading an ISO image to a content library
Step 2 – Create a VM as you would normally do. Edit the settings of the VM and select Content Library ISO File (1) from the CD/DVD drive drop-down box. Select the ISO image (2) you want the VM to boot from and press OK (3). Tick on the Connect option from the VM’s settings if it is disabled (4).
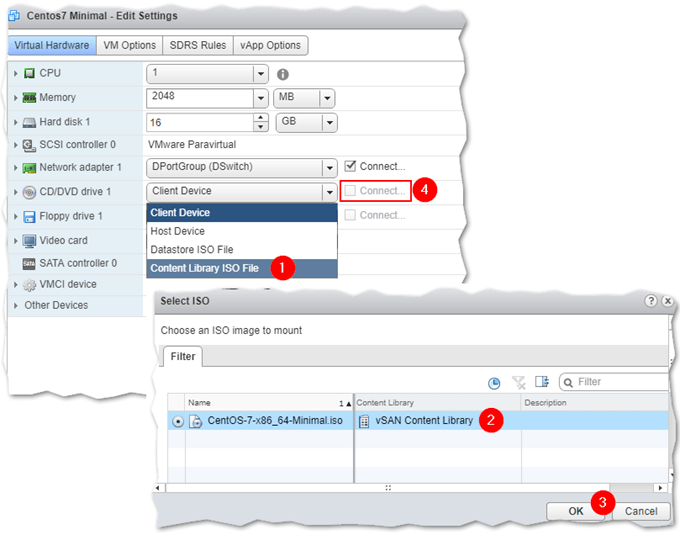
Configuring a VM to boot from an ISO stored in a content library
Step 3 – Once you finish setting up the VM, power it up and verify that it boots off the mounted library ISO image. As shown, the VM booted from the Centos ISO file just fine so that’s one test that gets a thumbs up!
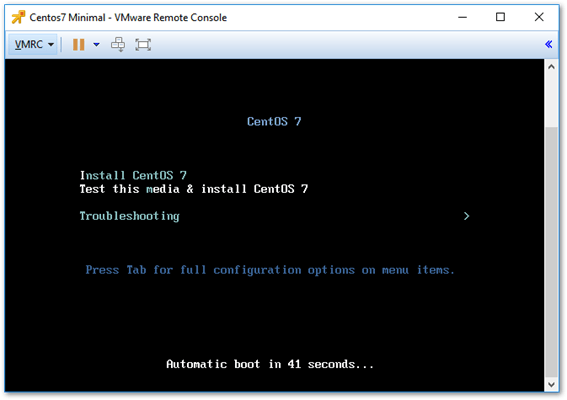
A VM successfully boot off a CentOS 7 bootable ISO image stored in a content library
Applying guest OS customization to a VM deployed from a library template
Prior to vSphere 6.5, it was not possible to apply guest OS customization to a VM deployed from a library template. This has changed with vSphere 6.5 as illustrated next.
Step 1 – Select the content library where the template you want to deploy from resides. Click on the Templates tab (1) and highlight the template you want to deploy from (2). Click on New VM from Library. This will launch the New Virtual Machine wizard.
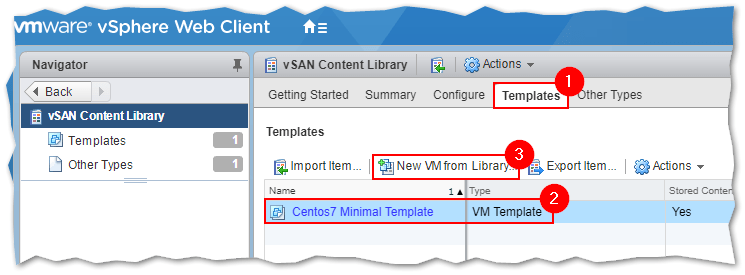
Provisioning a VM from a content library template
Step 2 – Tick on the Customize VM Options at the bottom of the first screen. Type in a name for the new VM and select a location for it. Press Next and move on the wizard.
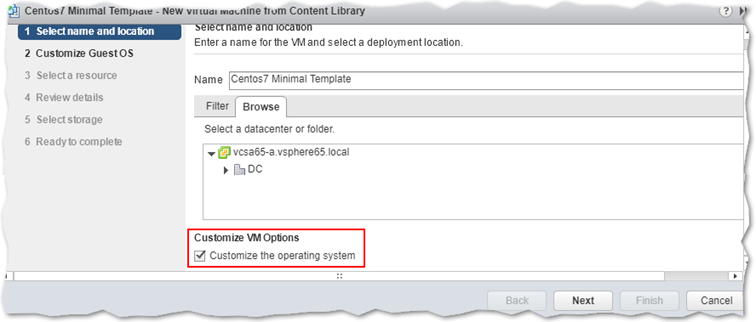
Enabling guest OS customization when deploying from a library template
Step 3 – Select the guest OS customization you want to be applied to the VM from the list and press Next. I’ve omitted the remaining screens since they are all self-explanatory; select an ESXi host, storage, and network. The VM will be deployed and configured automatically.
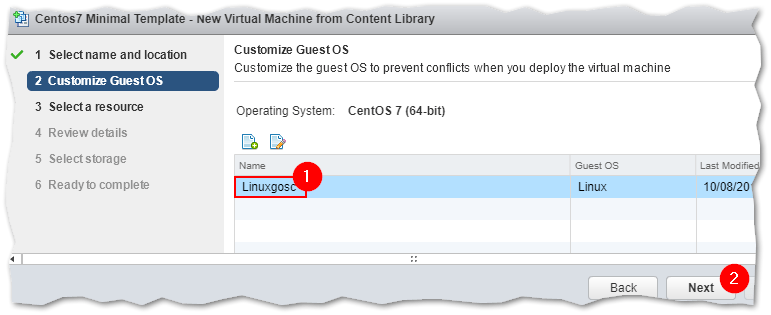
Selecting a guest OS customization specification when deploying a VM from a library template
Note: To learn more about templates and customization, have a look at my vSphere VM Templates – A Complete Guide 4-part series.
Updating a library template
I could not find any official documentation on how to update library templates, hence there might be better ways on how to do this.
For a starter, a library template is updated via an uploaded OVF file or template. Presumably, the first step is to patch and update the original VM or template that used to populate the library. Alternatively, you could export the template from the content library and take it from there.
Once you’re done updating and patching the VM, export the VM as an OVF template. For this example, I updated a Centos VM I had previously cloned as a template to my content library. I then exported it an OVF template by right-clicking on it and selecting Template -> Export OVF template.
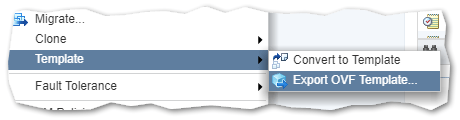
Exporting a VM as an OVF template
The library template update procedure is as follows:
Step 1 – Select the library and template you wish to update. Right-click on the template and select Update Item.
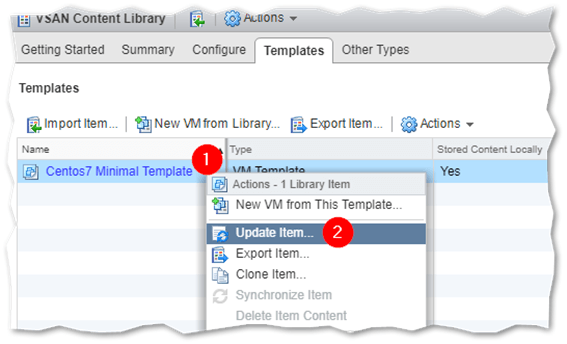
Updating a template stored in a content library
Step 2 – Navigate to the folder containing the OVF template using the Browse button. Select the OVF file and click on the Open button.
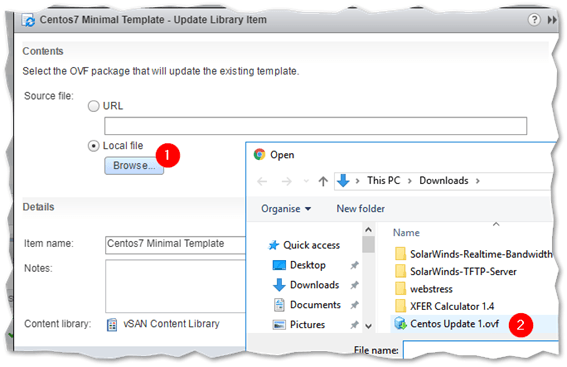
Selecting the OVF file used to update a library template
Step 3 – Use the Browse button to select the VMDK file associated with the OVF template. Select the file and press OK.
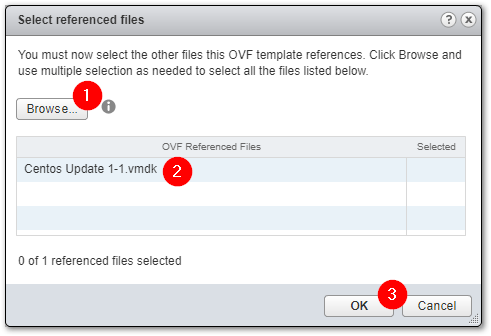
Selecting the OVF VMDK file used to update a library template
Step 4 – Press OK to start the update process.
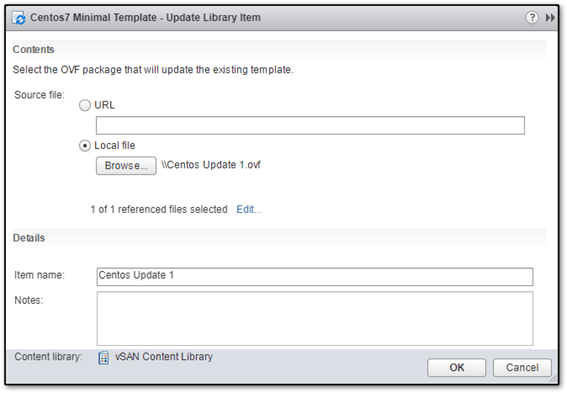
Completing the library template update process
Step 5 – Wait until the update upload completes. You can follow the progress in the Recent Tasks window.
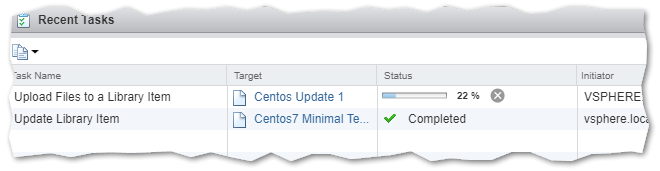
Following the progress of the template update process
TIP: You can view the current Content Version of the template by adding the version column to the list in vSphere client (works on both the Web and HTML5 clients) as shown next. Just right-click on the header row and add the Content Version column. You can also use PowerCLI to retrieve this and other versioning details as explained in this post.
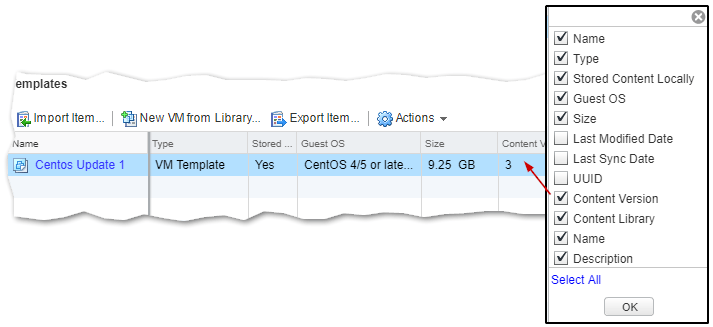
Template content versioning in vSphere 6.5
Conclusion
The new features added in vSphere 6.5 give content libraries a new lease of life. It is now possible to have a viable central repository of VM templates, ISOs, and other content. Better still, you can have VMs directly boot off ISO images stored in a library. Unlike earlier versions, you can now apply guest OS customization to VMs deployed from library templates. The only drawback I came across is the template update process. It is somewhat long-winded as it involves an OVF template export and a re-import.
There are still a few kinks that need to be ironed out as reported here but on the whole, vSphere 6.5 content libraries are a viable alternative to the hodgepodge of files scattered across different datastores and ESXi hosts.
[the_ad id=”4738″][the_ad id=”4796″]


Not a DOJO Member yet?
Join thousands of other IT pros and receive a weekly roundup email with the latest content & updates!
More in this category


About the Author
Jason Fenech


3 thoughts on "How vSphere Content Libraries Can Help Manage your VM Templates"
One limitation I’ve discovered with ISO images is that you can’t mount them across different clusters unless the datastore the ISO resides on is shared across all hosts in the clusters. One workaround is to create a Subscribed library in the other clusters and point to the main Local Content Library. You could share the datastore to the other hosts in the other cluster, however I don’t believe that’s best practice from a storage aspect.
Thanks for sharing this! Thank goodness the Content Library helps with this in vSphere 7 https://blogs.vmware.com/vsphere/2020/04/vsphere-7-content-library.html.