Save to My DOJO
Table of contents
Today’s post explores the concept of x86 hardware virtualization which is what allows multiple operating systems to run in parallel on a single x86 based processor. One of the main benefits of virtualization is that hardware resources such as servers can be exploited to their fullest. Rather than provision a physical server to host perhaps one or two applications which in most cases sees mediocre system utilization – there are exceptions of course such as high load SQL servers – , the same server could instead be used to run a number of operating systems in parallel each hosting its own application. All this is accomplished using virtual machines which are isolated instances of the hardware being virtualized. Incidentally, isolation is yet another bonus intrinsic to virtualization.
We take this for granted whenever we run multiple VMs on hypervisors such as ESXi, Hyper-V, XenServer and KVM.
x86 Virtualization
When virtualization started to take root, hardware virtualization was primarily done in software using complex emulation techniques. This approach, however good, had its limitations and ultimately suffered from performance issues.
An x86 processor implements what is known as a CPU privilege or protection ring scheme to regulate direct access to system resources. This keeps systems stable and secure. OS kernels generally run in ring 0, the highest privileged level. Drivers and similar software, in theory, should run in rings 1 & 2 while application software such as the browser you’re using just now, runs in ring 3.
Hypervisors such as ESXi run in ring 0. What this means then is that VM guest operating systems can only run in ring 1. When a software-based virtualization approach is taken, a hypervisor will have to trap and emulate processor instructions which simply cannot be executed at ring level 1, i.e. the level a VM’s guest OS is running in, hence the performance issue. The problem in reality is somewhat more complex but this is essentially why a better solution was called for.
VMware had actually worked around the problem using a process known as binary translation. This article makes for an interesting read if you wish to look at the bigger picture.
Enter Hardware-Assisted virtualization, an initiative undertaken by both Intel and AMD in 2005 as a direct response to the issue described above. New processors launched by both vendors saw the addition of virtualization-specific processor instructions resulting in a much needed boost in performance. In addition, a new ring level referred to as ring -1 was added to allow hypervisors to run in their own dedicated space leaving ring 0 fully accessible to guest operating systems. This eliminated the need for complex emulation hence the boost in performance. Truly, things are not this simple. In reality, VMs are made to “think” that they are running at ring 0 when in actual fact they are not.
ESXi CPU Requirements
Figure 1 depicts ESXi’s hardware requirements reproduced from the ESXi 6.5 documentation page. The requirements are essentially identical to those for previous versions.

Figure 1 – ESXi CPU Requirements
I’ll address each requirements in the order of how they are labelled:
- September 2006 is the official date at which processors started shipping with hardware-assisted virtualization. Avoid using processors prior to this date.
- NX/XD refers to a setting which when enabled prohibits code execution from specific areas in memory. This prevents VMs from conflicting with one another and the hypervisor itself. ESXi will fail to install if the setting is disabled or unavailable. If it is disabled after ESXi is installed you will be greeted by a purple screen (PSOD) on boot-up. Note: NX stands for No Execute while XD stands for eXecute Disable as implemented respectively by AMD and Intel.
- This is the part that actually refers to hardware-assisted virtualization. In the case of Intel processors, this is known as VT-x, short for Virtualization Technology extensions. VT-x also includes Extended Page Tables (EPT) which is another term you’ll see often listed. EPT is a method by which memory is mapped and translated which also allows for better memory management on a VM’s part. With AMD, hardware-assisted virtualization comes in the form of AMD-V which nowadays includes RVI (Rapid Virtualization Index), this being roughly synonymous to Intel’s EPT. Interestingly, ESXi will install and run regardless of whether the features are enabled or not. The downside to this is that 64-bit VMs will fail to start up as documented in this KB article hence why both VT-x and RVI are ESXi requirements. The assumption is made that many VMs deployed nowadays will be running a 64-bit OS of sorts.
Verifying that your processors meet the requirements
There are a number of things you could do to ascertain whether a processor is compatible with ESXi or other VMware products such as VMware Workstation.
- Use the VMware Compatibility Guide as explained in my How to use VMware compatibility tools post.
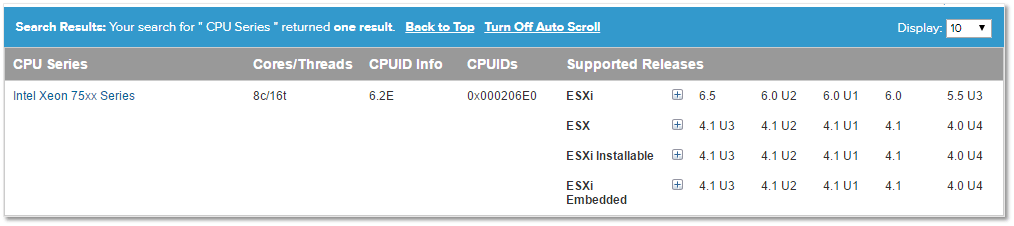
Figure 2 – Verifying CPU compatibility with ESXi
- From the BIOS settings, verify that virtualization is indeed supported and is enabled. To do so, you generally will need to reboot the machine and press a designated key or combination such as F10 or Delete on boot up to access the BIOS manager.
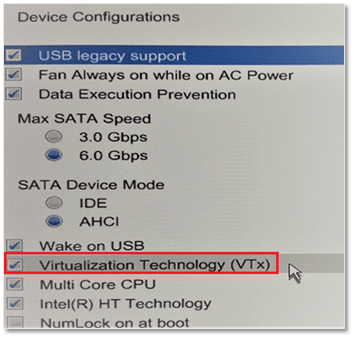
Figure 3 – VT-x setting on my laptop
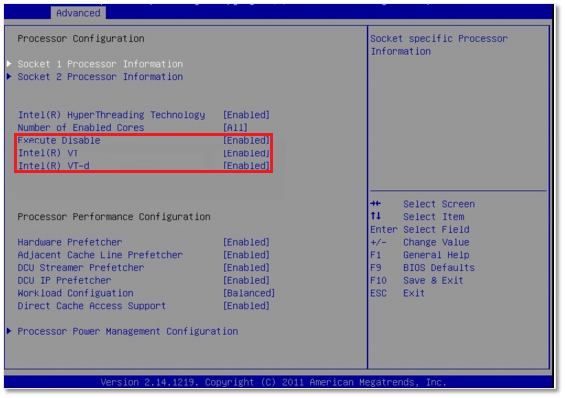
Figure 4 – Execute Disable (xD), VT-x and VT-d settings on a server
-
Run something like CPU-Z or Intel’s processor identification tool to learn more about a processors’ features (see Fig.5). In addition, visit the supplier’s web site for further information when in doubt. Here’s an example showing the specifics for the processor installed on my laptop.
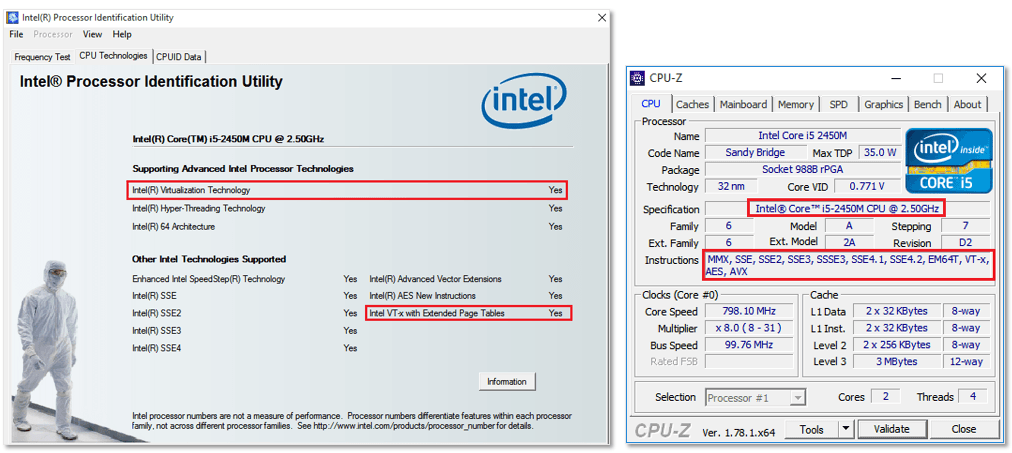
Figure 5 – Using hardware identification software to learn about CPU features
- Use the VMware CPU Identification Utility. This tool comes as an ISO image which you can either burn to a bootable CD/DVD or USB stick using say Rufus or mount as a DVD on a VM. Figure 6 shows the identification tool running on a VM in VMware Workstation Player installed on my laptop. As per the items marked in red, the CPU supports both NX/XD and VT-x (64-bit Longmode) so I know that I should be able to run 64-bit machines. You can carry out the same check on any server ear marked for ESXi.
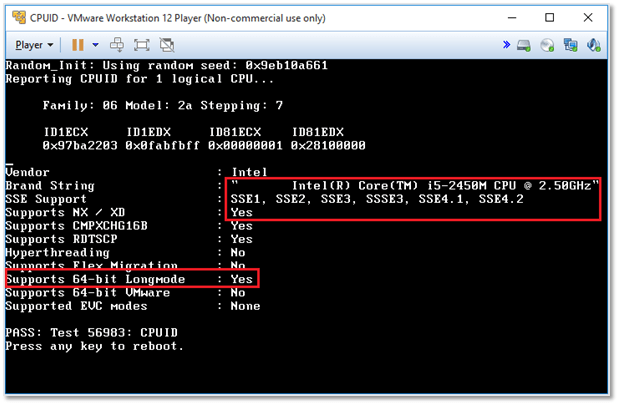
Figure 6 – Running the VMware CPU tool
To verify correct functionality, I rebooted my laptop and disabled the virtualization settings from BIOS. As per Figure 7 & 8 respectively, the tool correctly detects that VT-x is disabled and, as expected, a 64-bit VM will fail to start.
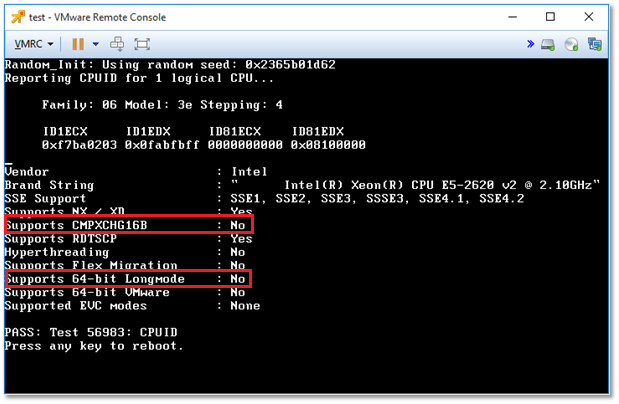
Figure 7 – The VMware CPU tool correctly detects that VT-x is disabled
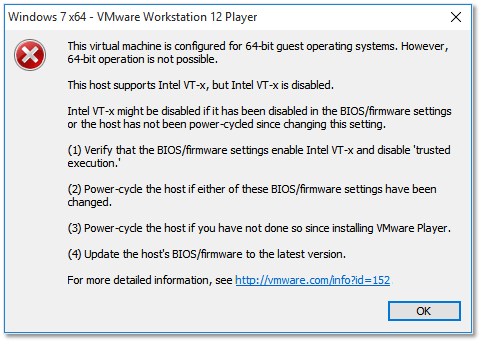
Figure 8 – A 64-bit VM will fail to start when VT-x (or AMD-V) is disabled
Incidentally, you will get the same type of error when running 64-bit machines on an ESXi host with VT-x disabled. Furthermore, you will experience the same when running VMs on a nested ESXi unless you enable the Expose hardware assisted virtualization … setting from the vSphere Web Client. You should also enable NX/XD as shown in Figure 9.
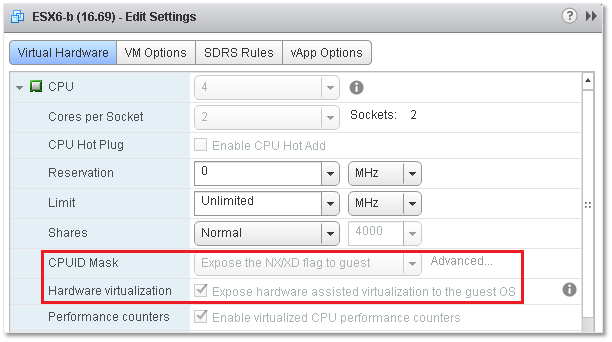
Figure 9 – Setting up a nested ESXi instance for running 64-bit VMs
- To check if a Windows box running VMware Workstation or similar supports 64-bit VMs, you can use either the VMware Compatibility Check tool or the Microsoft Hardware-Assisted Virtualization Detection Tool.
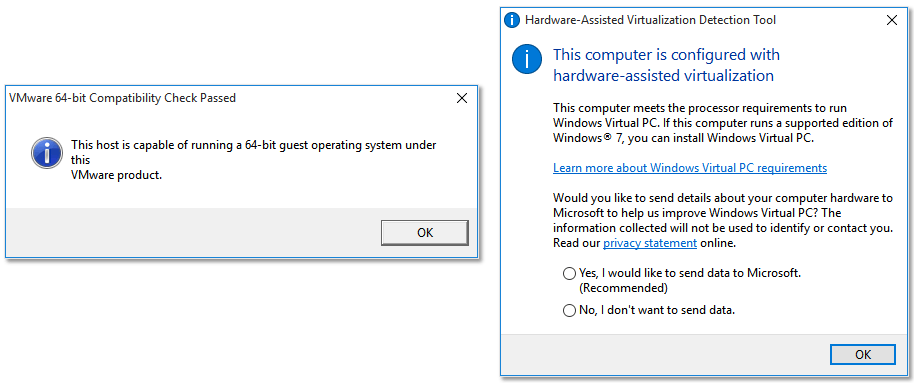
Figure 10 – Verifying 64-bit VM support on Windows using VMware and MS tools
One final trick you can use, for trouble-shooting purposes more than anything else, is to run the following command on ESXi (SSH).
esxcfg-info|grep "\----\HV Support"
Fig. 11 shows the command’s output when executed on one of my test servers. The value 3 tells me that 64-bit is supported and is enabled as per the following values list.
0 – VT/AMD-V indicates that support is not available for this hardware.
1 – VT/AMD-V indicates that VT or AMD-V might be available but it is not supported for this hardware.
2 – VT/AMD-V indicates that VT or AMD-V is available but is currently not enabled in the BIOS.
3 – VT/AMD-V indicates that VT or AMD-V is enabled in the BIOS and can be used.

Figure 11 – Using esxcfg-info to verify VT-x support
Conclusion
In today’s post we saw how hardware assisted virtualization makes it possible to seamlessly run multiple operating systems on a single processor thanks to the CPU’s embedded virtualization features. I’ve also covered ESXi’s processor requirements and how these enable 64-bit guest support. In addition, there are a number of methods you can use to check if a processor supports virtualization. Finally we’ve covered a number of tools and methods with which to assess 64-bit VM support within your environment.
As always, I hope you found this article useful and interesting.
[the_ad id=”4738″][the_ad id=”4796″]


Not a DOJO Member yet?
Join thousands of other IT pros and receive a weekly roundup email with the latest content & updates!
More in this category


About the Author
Jason Fenech

