Save to My DOJO
In Deploying vSphere ESXi 6.5, I discuss the various ESXi deployment methods and options. Installing ESXi on a USB device such as a flash drive or SD card, is a popular deployment method especially with disk-less servers. This may also apply when ESXi is deployed to servers with local storage since you might still wish to keep ESXi off any of the server’s disks.
Today’s post covers the process of installing ESXi on a USB pen/flash drive. Note that this is different from creating a bootable ESXi installer USB flash drive which is what I cover in How to Create a Bootable ESXi USB Flash Drive using Linux. We are actually booting a working instance of ESXi from a USB flash drive in this case.
So how do we do this?
The easy way is to use a physical server equipped with an optical drive. Insert a bootable ESXi CD/DVD disc, stick in an empty USB flash drive, power up the server and wait for the ESXi installer to kick in. Once you get to the part where it asks you to select the drive where you want ESXi installed, select the USB flash drive and the installer will happily install ESXi on it.
But since easy doesn’t cut it, we’re going to do this the hard way, well, maybe just a little bit more interesting. In this post, I’ll be using VMware Workstation Pro running on Windows to create a VM which I’ll use to install ESXi on a flash drive. To be honest, there’s nothing remotely difficult in all of this. It’s really a matter of convenience as I can use my laptop without having to get up from my desk and head to the server room!
So here it goes.
What you’ll need
- An ESXi ISO image
- VMware Workstation Pro or Player. You can also use ESXi if you wish.
- An 8GB or larger USB flash drive. Use reputable brands and verify support via the VMware Compatibility Guide.
An unbranded flash drive I used for this post. Avoid anything like this for production systems!
Note: For production environments, booting ESXi from a USB/SD device is subject to a number of conditions towards ensuring VMware support.
Creating the VM
We first need to create a VM that can run ESXi. The minimum specifications are 8GB of RAM, 2 processors and most importantly a USB controller and CD/DVD. There’s no need to create a virtual disk but you may if you wish so. Workstation’s VM creation wizard does not allow you to skip adding a hard drive to the VM, so feel free to remove it once you’re done creating the VM.
Note: Besides the obvious step of inserting the USB stick in a free USB port on the computer running Workstation, also make sure that the VMware USB Arbitration service is running correctly. You can easily check this by running services.msc.

Always check that the USB arbitration service is running when using USB devices on VMs hosted in Workstation
The following video shows you how to create the VM using VMware Workstation Pro.
In the video, you can see me enable EFI instead of standard BIOS under the Advanced options for the VM. Doing this, allows a VM to boot from a USB device, which is great as it allows you to test if the flash drive we go on to create is working or not.
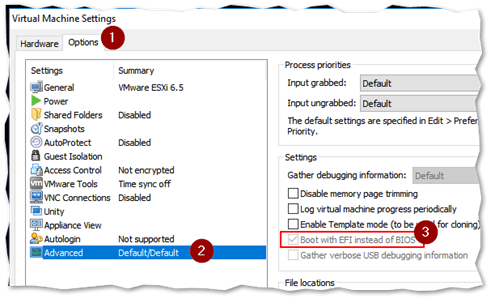
Enabling EFI instead of BIOS, enables a VM to boot off USB media
Installing ESXi on a USB flash drive
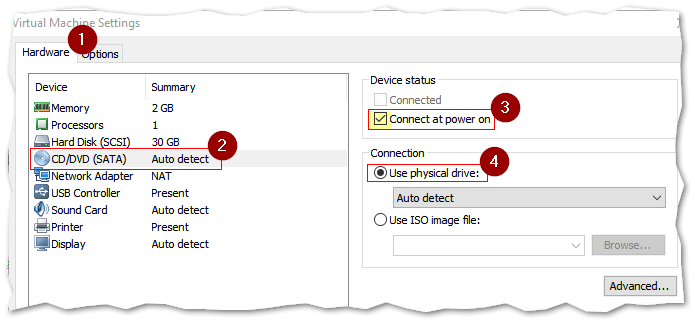
Now that the VM is up and running, it’s just a simple matter of making sure it boots from the attached ESXi ISO image. To double check that this is indeed the case, select the VM and click on the VM menu (1).
Click on Settings (2) and highlight the CD/DVD device (3). Make sure that Use ISO Image file points to the ESXi ISO image you want installed on the flash drive (5). Also, ensure that the Connect at power on option is enabled (4). All of this is highlighted in the next screenshot.
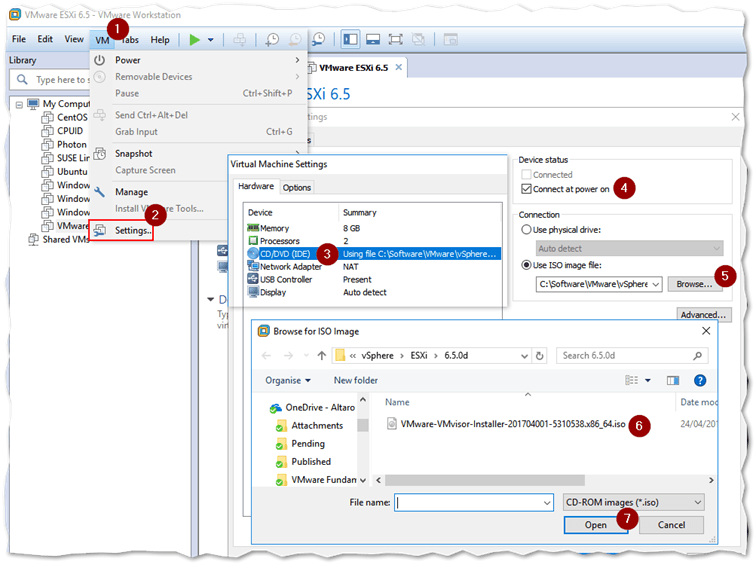
Mounting an ISO image on the VM
The VM should boot from the ESXi ISO image on its next power up, after which, wait for the ESXi installer to load and follow the steps as you would normally do. Once you get to the disk selection screen, make sure that the flash drive is listed. In the next screenshot, you can see that there’s only USB flash drive listed and nothing else. Remember that I had previously removed the virtual disk.
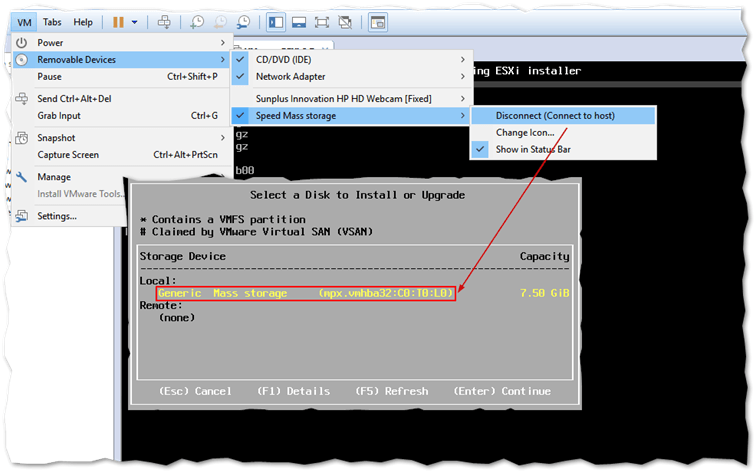
Double check that the USB device is visible to the VM. This ties in with ensuring that the USB arbitration service is running correctly.
Here’s a second video illustrating the installation process.
Testing it out
Testing out correct functionality is the easy part. We can use the same VM, which is why I previously enabled the EFI setting so I can boot ESXi off the flash drive once created.
To do this, disconnect the ESXi ISO image before powering on the VM so it does not boot from it. Right-click on the VM and select Settings. From the Hardware tab, select CD/DVD (SATA) and enable the Use physical drive option and/or disable the Connect at power on option. The steps are almost identical on both Workstation Player or ESXi.
Disconnecting a CD/DVD / ISO image from a VM
Here’s a third and final video showing ESXi booting from the flash drive. And, yes, that’s my hand there inserting the flash drive in my laptop; a rare glimpse into my daily work routine. Notice also how Windows gets all bonkers at 00:12 as it frantically opens all the different ESXi partitions on the flash drive each in its own Explorer window.
And just for the kicks of it, I’m going to see if my laptop can actually boot ESXi. To my surprise it does but fails to detect the Realtek PCI nic on my HP laptop which is understandable and is probably the case, there’s a fix for this as well. On my Dell server, the flash drive booted ESXi just fine.
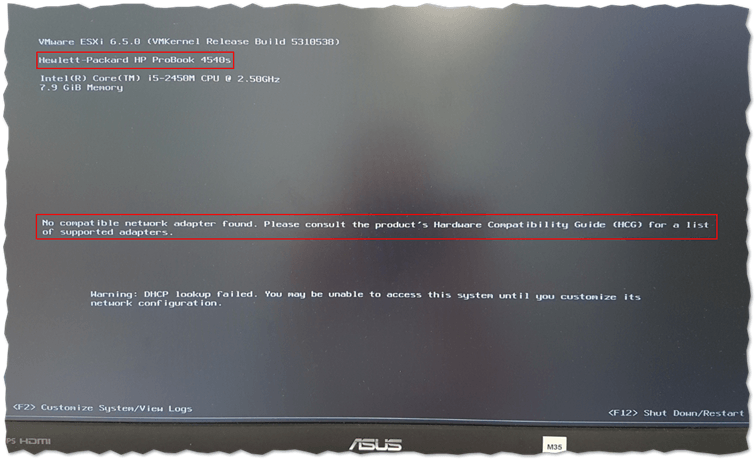
Booting to ESXi on my ancient HP ProBook 5404s Windows laptop
The Scratch Partition
One important item to keep in mind is the so-called scratch partition, which is a 4GB Fat16 partition automatically created when ESXi is installed. The partition is used to store logs, diagnostics, vSAN trace files and system swap. Although not a requirement, the scratch partition should be made persistent i.e. residing on a physical disk. This ensures that logs, for instance, are not lost after reboots.
I’m mentioning this fact since the scratch partition is NOT created when ESXi is installed on USB/SD media. Regardless of storage size, ESXi will skip creating this partition if it detects that the underlying media is USB/SD based. If this the case, the storage partition is created as a RAM disk i.e. it exists entirely in RAM which is why the content is lost after reboots.
This rather old blog post goes into some detail on the subject matter. I may, however, stand to be corrected given later releases of ESXi. In any case, refer to KB2004784 and KB10333696 for more details.
Conclusion
Installing ESXi on USB media comes in handy when you have diskless servers. The alternative is to boot via PXE (Auto Deploy) or directly from SAN. There is a bit of a disagreement when it comes to the pros and cons of booting ESXi using this method. Some people would rather install ESXi on RAID 1 or similar for redundancy. But then again, ESXi is run completely in RAM so it doesn’t really matter. It’s also very easy to clone a USB stick with ESXi running on it. Unsurprisingly, many admins simply tape a cloned stick to the physical server running ESXi. Some vendors, such as Dell, even provide RAID 1 USB/SD solutions meaning you have ESXi running off 2 USB sticks in RAID 1 mode.
Regardless of the benefits, or lack of, installing ESXi on USB media is one other deployment method that many will surely come to use.
Share your Experiences using ESXi on USB drives
I’ve used ESXi from USB many times and found it a very useful took particularly with diskless servers, however, some people have their reservations. What are your thoughts? Ever encountered any problems or if you’ve never tried it and you’re following the steps here, how did you get on? As always if you need any help or clarification about anything mentioned in this post, let me know in the comments below and I’ll get back to you with an answer!
[the_ad id=”4738″][the_ad id=”4796″]


Not a DOJO Member yet?
Join thousands of other IT pros and receive a weekly roundup email with the latest content & updates!
More in this category


About the Author
Jason Fenech


8 thoughts on "How to Boot ESXi from a USB Flash Drive Using VMware Workstation"
Thank You. It is very useful.
Thank you!
Thanks for the article. Will use soon to test VMware upgrade.