Save to My DOJO
Containerization is still a big thing and it’s very unlikely for this to change anytime soon. As I described in A first look at vSphere Integrated Containers, VMware has upped the game with vSphere Integrated Containers (VIC), a novel way of doing containers. The twist is that hosts and containers alike are deployed as virtual machines to leverage features such as vMotion, DRS, and HA for improved performance and reliability.
Since my original post, things have moved on quickly with VIC 1.2.1, the version currently available for download. VIC is now provisioned as an appliance. The management portal has also been greatly improved and there’s also a demo installer which admins can use to quickly pilot VIC.
Let’s have a look at this latest iteration.
A few requirements …
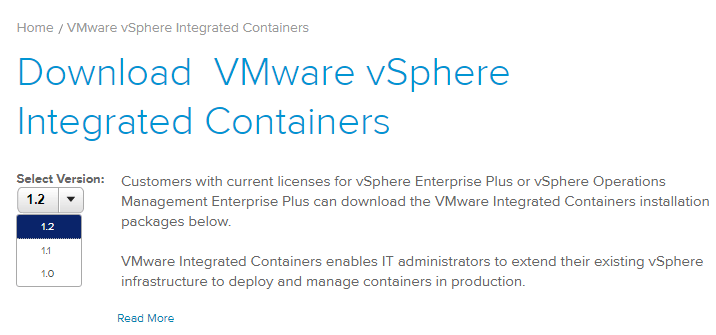
First off, you can download VIC 1.2.1 from here.
Deploying VIC 1.2.1 to a standalone ESXi host is no longer supported meaning you must have vCenter Server installed. The appliance comes as an OVF template and is deployed as such using the vSphere client. The appliance also includes the Harbor Registry and Admiral Management Portal.
You still need a vSphere Enterprise Plus License. Read this for a complete list of requirements and supported deployment environments.
Resource requirements are as follows:
- 2 vCPUs
- 8GB RAM
- 80GB free disk space on the datastore
- A distributed switch and 2 distributed port groups
Deploying the OVF
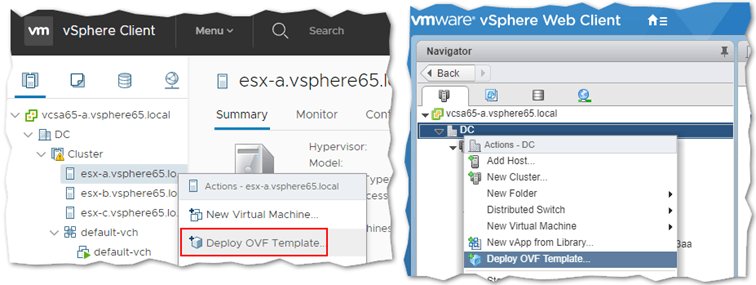
Installing VIC, is a standard OVF deployment task. Using the vSphere Web Client, right-click and select Deploy OVF template.
Note: The online documentation states to not use the HTML5 client, something I haven’t tried doing. I am assuming this is so because said functionality was not yet included in the HMTL5 client at the time when VIC 1.2.1 was released. Just in case, if anyone would like to have a go, let us know if it works.
I ran into a somewhat familiar missing descriptor error when deploying the OVF. The solution is simple. Extract the OVF contents to a folder using 7-Zip or similar. Redeploy, this time selecting all the extracted files which include the descriptor. This worked brilliantly for me.
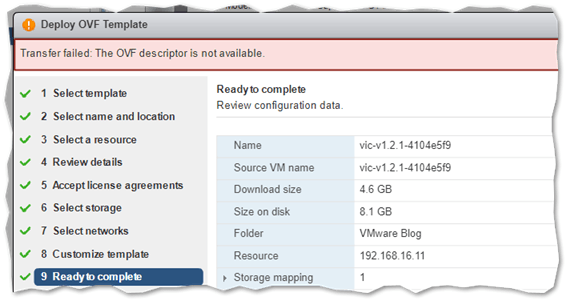
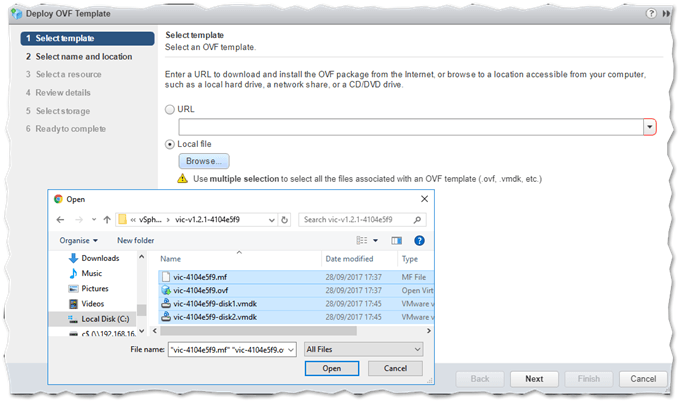
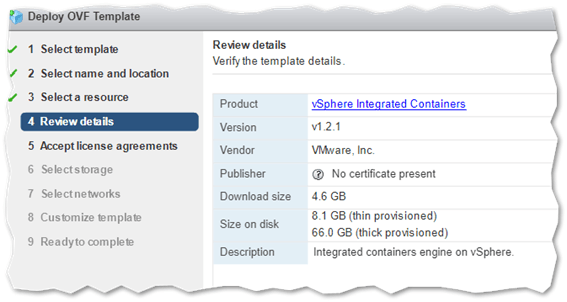
After you select the OVF template, click Next and follow the wizard. I’ve skipped a few screens since most of them are self-explanatory like setting a name and selecting where to deploy the appliance. After you review the details, accept the license agreement and select storage and network placement.
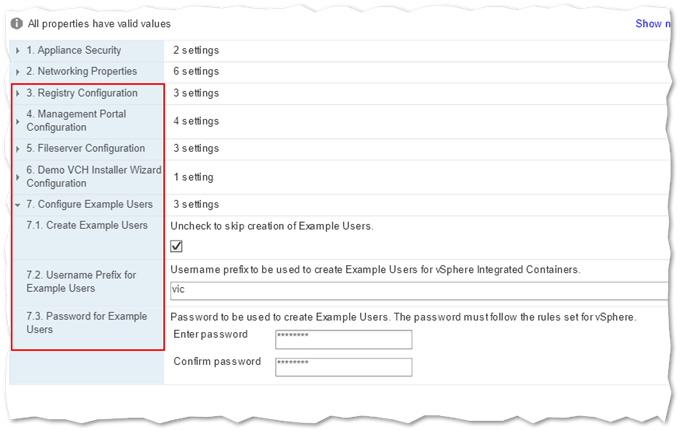
The Customize Template screen is where you’ll type in the important bits. Compulsory settings include;
- Appliance Security – Set a password for the root user and check the Permit Root Login if you want to allow users to log in as root via SSH.
- Networking Properties – If using static addressing, type in the IP address, subnet and gateway address for the VIC appliance. You should also specify a DNS server, search domain and FQDN for the appliance. I went ahead and created the vic12.vsphere65.local DNS entry in my case to ensure that things run smoothly.
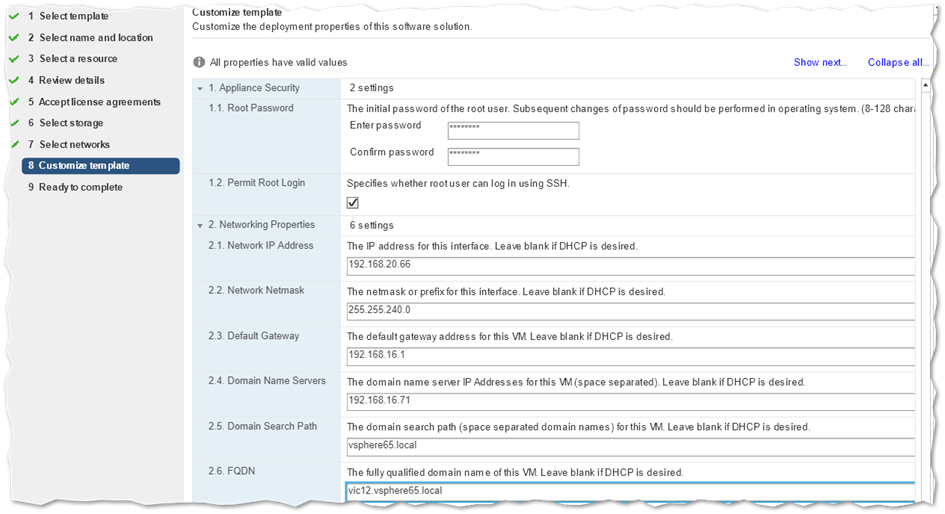
There are a few optional settings you might want to consider which mostly relate to certificates. Options 6 and 7 are for a Demo which you can kick off once the VIC appliance is fully deployed. I’ll get back to this Demo later on.
Pressing Finish on the last screen gives way to the deployment process. You can follow the progress in the vSphere client’s taskbar.

Powering up and configuring VIC
Soon after the Deploy OVF template task completes, go ahead and power up the VM just deployed. You should see the following screen.
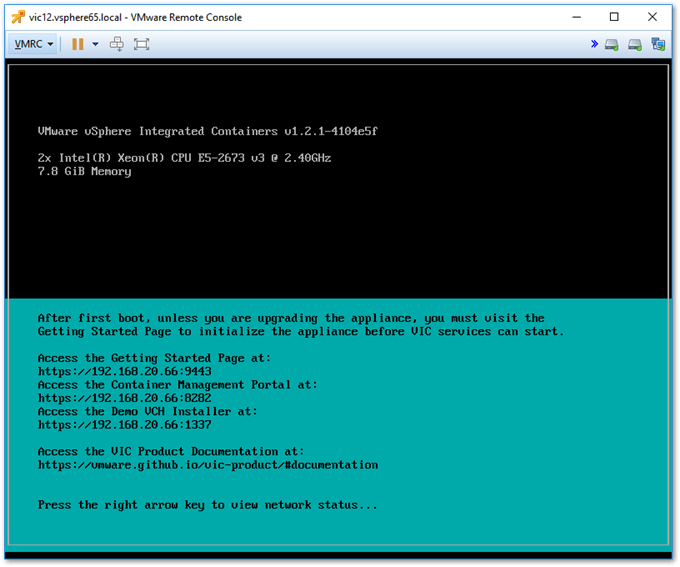
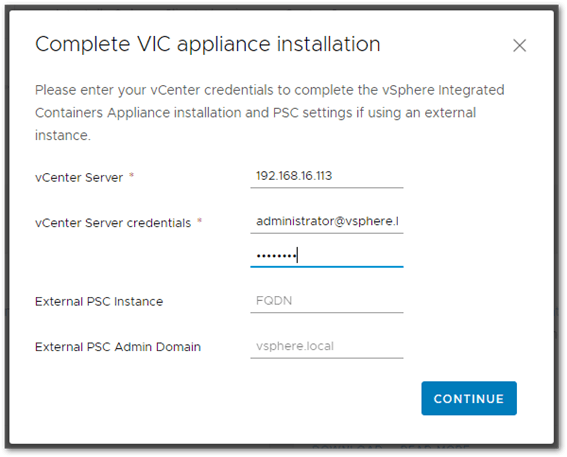
First off, launch a browser and head to the getting started page at http://<VIC FQDN or IP address>:9443 to finalize the appliance’s configuration.
Type in the vCenter Server’s IP or FQDN where VIC has been installed and a set of administrative credentials. If vCenter Server is using an external platform service controller (PSC), you must also type in the PSC’s FQDN and SSO domain. Press Continue to commit the configuration.
Note: I ran into another issue using the Chrome browser – Version 61.0.3163.100 (Official Build) (64-bit) – while carrying out this step. For some reason, I kept getting a failed to locate VIC appliance error which, according to most online posts on the matter, occurs when vCenter is connected to an external PSC. This, however, is not my case as I’m using an embedded PSC.
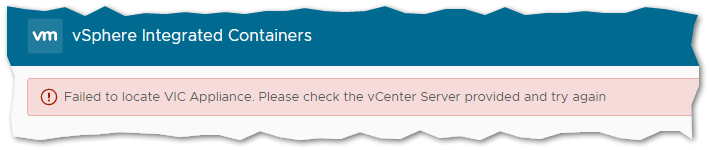
To cut a long story short, the triviality of using another browser, this time Firefox – 56.0 (32-bit), turned out to work just fine.
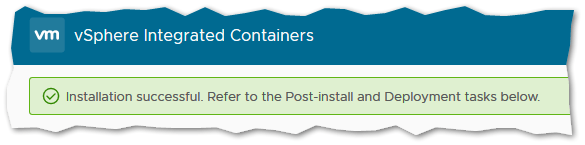
After you finish configuring VIC, the following screen is displayed.
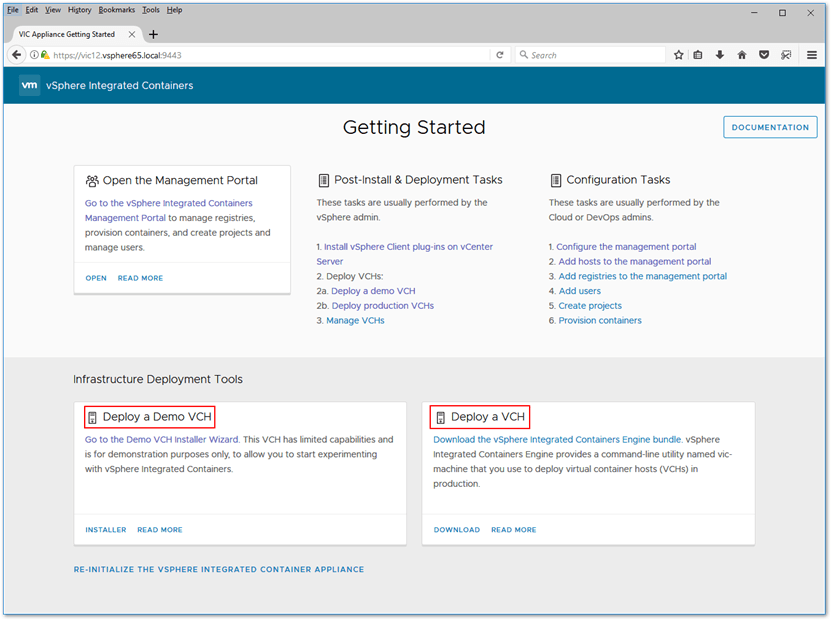
At this point, you can run the Deploy a Demo VCH installer which will automatically provision a virtual container host (VCH). Additionally, use the vic-machine-<OS> command-line utility to provision a VCH manually as I describe in my previous post. I’m not repeating myself since it’s still the same command and syntax.
Instead, I’ll be covering how to use the demo which, as implied, should only be used for demo purposes since it lacks the following:
- It does not implement any TLS authentication options, and as such is completely unsecured.
- It only supports DHCP. You cannot assign a static IP address to the VCH on any of its interfaces.
- It has no option create a volume store. Any containers that create volumes will fail to start if you run them in the demo VCH.
How to Deploy a Demo VCH
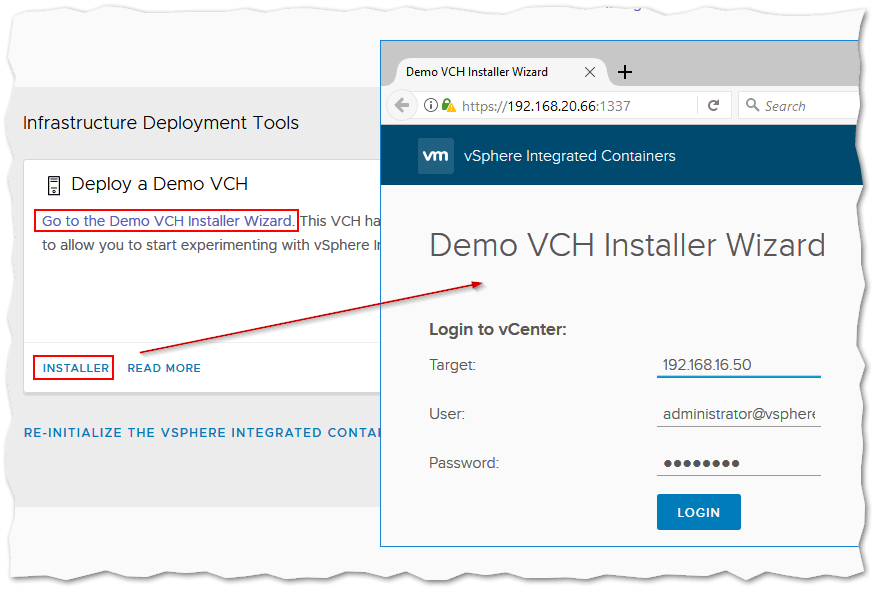
If you still on the Getting Started page, click on Go to the Demo VCH Installer Wizard or Installer link. If not, fire up a browser window and navigate to https://<VIC IP address or FQDN>:1337. On the Login dialog, type in the vCenter Server’s IP address (or FQDN) and credentials. Press Login to continue.
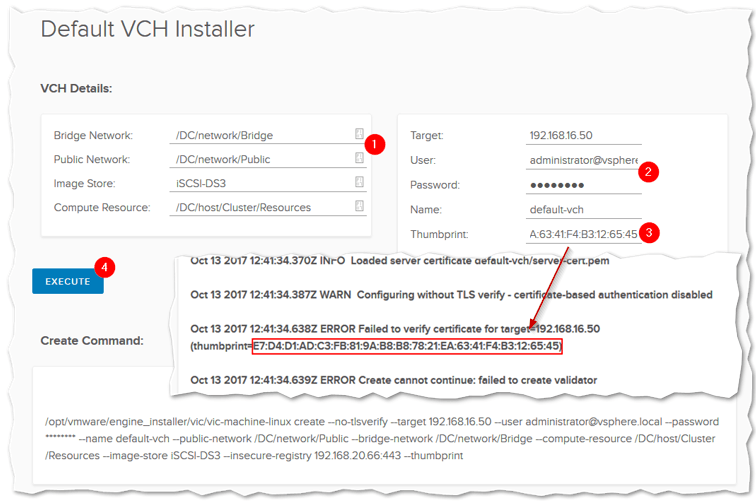
When prompted, supply the details to the installer. These include a minimum of 1 distributed portgroup, the location, and datastore where the VCH will be created, the target vCenter Server’s (or ESXi) IP or FQDN and credentials.
If you do not have the SSL thumbprint readily available, run the command regardless of pressing Execute. You’ll find that the thumbprint is included in the generated log which you can copy and then paste back. Looking at the next screenshot, notice how the installer is simply passing parameters to the vic-machine command-line tool exactly how you would when provisioning a VCH manually. With the thumbprint in hand, press Execute a second time to re-run the installer.
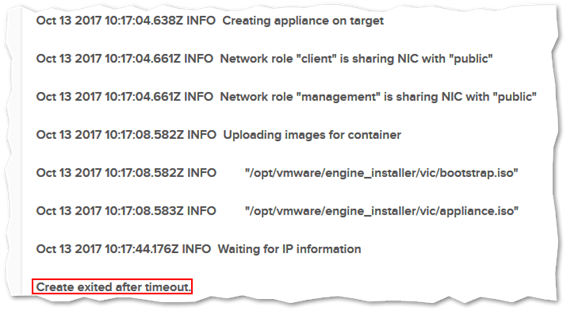
Also, make sure that your DHCP server is running and reachable. If the VCH being deployed fails to acquire an IP address, the deployment will also fail with a Create exited after timeout notification. You can see this in the next screenshot. Unfortunately, there is no way to assign a static IP address to a VCH, at least not while it is being provisioned.
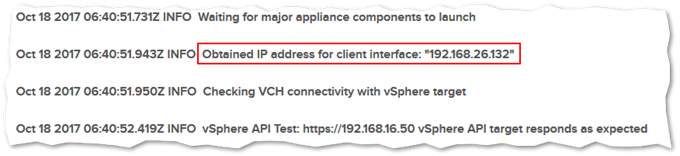
Here’s the log file when the VCH manages to acquire an IP address from a DHCP server.
If all goes well, you should see a new vApp created with the corresponding VCH under it in vSphere client like so.
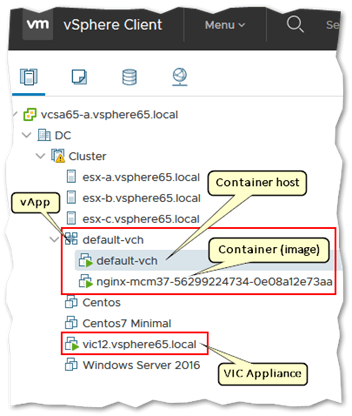
At this point, we have a functional Virtual Container Host (VCH). It’s time to deploy some containers.
How to deploy a container
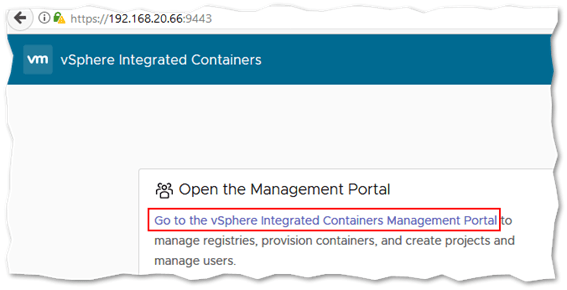
Once the VCH is online, you can deploy containers using VIC Management Portal which you can access directly at https://<VIC IP address or FQDN>:8282 or from the Getting Started page at https://<VIC IP address or FQDN>:9443/.
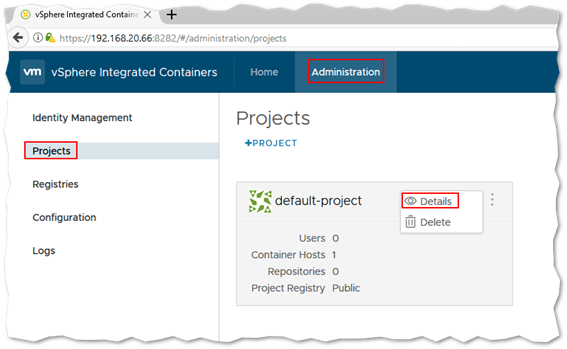
The demo installer creates what’s called a project for you, in this called default-project. A project is a group of repositories – the place you pull container images from – and also ties in a container host and defines who has access to what.
A project is either Public (accessible to everyone) or Private. The official documentation explains the concept in more detail. To view an existing project, click on the Administration tab, select the desired project and click on Details as shown next. To create a new project, click on the +Project link.
Let’s pull an image from an online repository. To do this, click on the Home tab and select Public repositories from the Library menu. For this example, I will deploy an nginx container. Type nginx in the search box and press Enter as shown next.
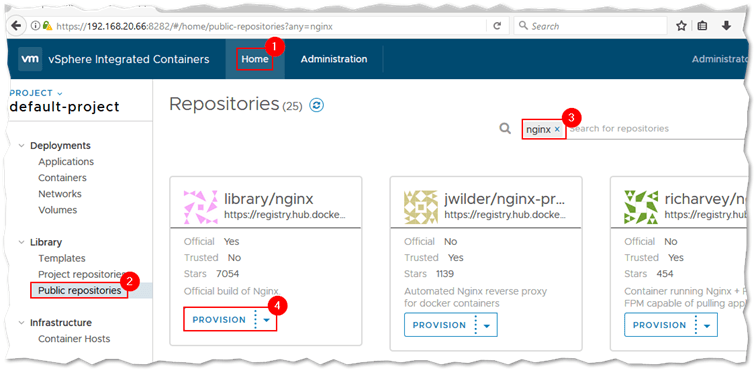
All the available containers (images) that can be pulled from the Docker Hub are displayed as individual boxes. Each has a Provision button you’ll use to deploy the respective container using the default settings.
If you wish to customize the deployment process, click on the down-arrow displayed on the Provision button. This allows you to tailor network and storage settings amongst other things. You can then save this configuration as a template in case you want to deploy containers with the same configuration in the future.
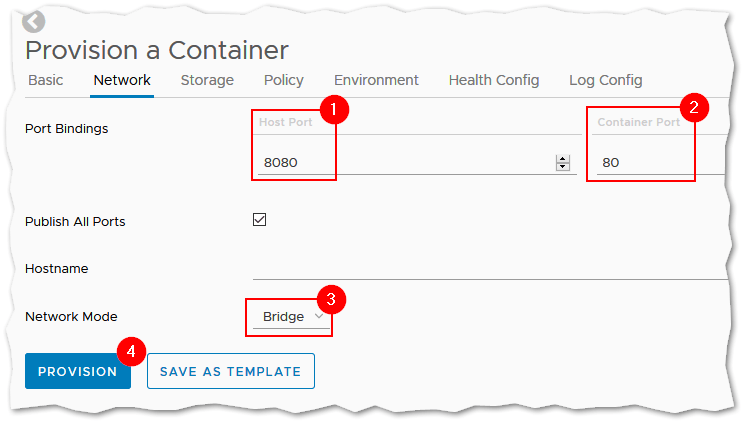
I also want to be able to access the nginx container using a custom port on the VCH. To do this, I simply select the Network tab and type in 8080 (or any other port number you like) for the host port and 80 for the container port, which is the default network port (http) nginx would be listening on. Set Network Mode to Bridge and you’re done. This is analogous to using the docker command to map network ports. Once provisioned, you’ll be able to access your nginx server on http://<VCH IP address or FQDN>:8080.
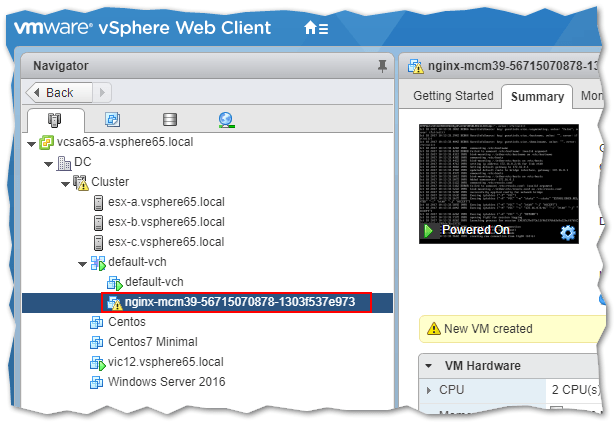
If all goes well, you’ll find the provisioned container under the vApp where the VCH is at.
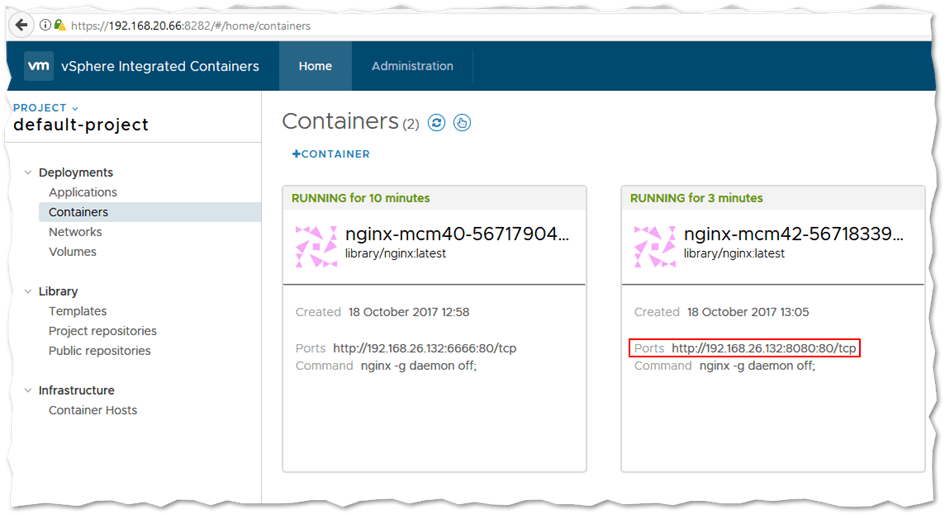
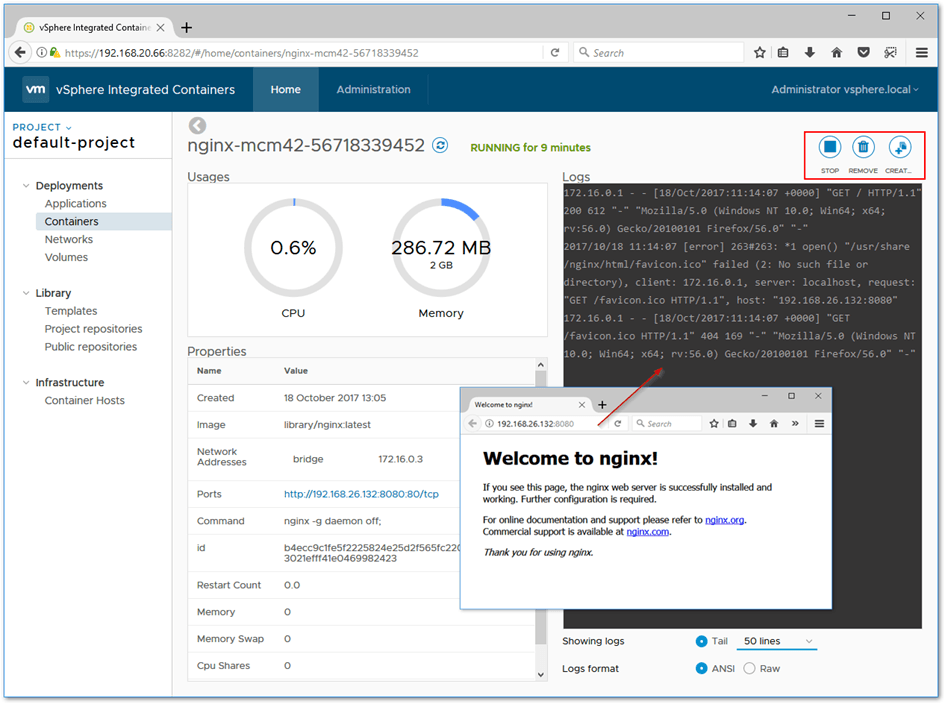
On the management portal, navigate to Containers under Deployment. There you will find your newly deployed nginx container. Clicking on it gives you a detailed view of the resources used, uptime, the container id and more. A log file for the container is also tailed in an adjoining console window as shown next.
Once you’re done using the container, you can stop and remove it using the icons placed above the console window.
That’s the beauty of containers. You can quickly provision a container or image in a matter of seconds and send the URL to a developer or otherwise for immediate use provided the container has been properly configured.
Conclusion
VIC 1.2.1 greatly improves on previous versions and the revamped management portal makes it a breeze to deploy containers. Containers are here to stay and, in my opinion, VMware is heading in the right direction by providing a very robust and viable alternative to existing container technology.
[the_ad id=”4738″][the_ad id=”4796″]


Not a DOJO Member yet?
Join thousands of other IT pros and receive a weekly roundup email with the latest content & updates!
More in this category


About the Author
Jason Fenech

