Save to My DOJO
As a PowerShell tool creator, planning for script errors is one of the biggest challenges that I’ve faced when creating a tool that multiple people will use. For example, maybe the tool I just created is supposed to move some files, and the user running that tool doesn’t have proper permissions to move said files; or maybe the tool requires password input, and the user “fat-fingered” their password, so the rest of the commands are failing.
For MSPs creating their own PowerShell scripts either for their team or clients, planning for these scenarios and incorporating Try and Catch statements into their tools makes for a far more stable experience for the tool users. Unfortunately for PowerShell newcomers, Try and Catch statements tend to be looked at as more of an advanced method of scripting and are usually overlooked. Let’s go through Try and Catch so you can get started using it with your custom tools!
What is a Try/Catch Block in PowerShell?
You should be using a Try block in any section of your script that requires monitoring for errors that can cause the script to terminate. If a terminating error is found inside a Try block, PowerShell will look for a Catch block to run. The code contained in the Catch block should be used to attempt to remediate the failing commands inside the Try block.
For a basic example of this use case, let’s say we want to run a command against multiple servers using a certain account that has local admin access to the servers in our list. Easy enough, we could just make a foreach loop that cycles through the servers in the list and executes the command remotely with Invoke-command. Something like this:
ForEach ($server in $serverlist){

    invoke-command -ComputerName $server -Credential $credential -ScriptBlock { $script}

}
Now we will throw in a hurdle to our scenario. Some servers exist in our list that the 1st set of credentials don’t have access to. So essentially, those servers will error out on their attempt to invoke a command due to improper credentials. However, if we incorporate a Try Catch statement, we can place our first attempt at invoking a command inside a Try block and then include our second set of credentials in a Catch block immediately after. This will direct PowerShell to try the first set of credentials and if the command fails, try the 2nd set of credentials that we know will be able to connect. The Syntax looks like the following:
ForEach ($server in $serverlist){

    Try{
        invoke-command -ComputerName $server -Credential $credential -ScriptBlock { $script}
    }Catch{

        invoke-command -ComputerName $server -Credential $credential2 -ScriptBlock { $script}
    }
}
This is a very basic example. However, we can use Catch blocks for more than just providing a “workaround” in certain situations. They can also be used for tracking errors. If we wanted just to keep a log of servers that couldn’t connect, we could just output the server name to a log file. Also, we could use the Catch block to notify the script user of the error by performing a write-verbose about the issue.
Using the Try Catch blocks, we went from having a basic script that would just error out on servers where invoke-command would fail, but now we have a much more efficient and stable script.
What is a Finally Block in PowerShell?
Now that we know how to use Try and Catch Blocks, we can’t forget about Finally blocks. Finally blocks are typically used for the “cleanup” of the Try block, usually to output info to a log, or clean up background jobs. After a Catch block is completed the Finally block is run.
Note: that you can also have a Try Finally block that doesn’t contain any Catch block at all.
What benefit do I get for using a Finally block? Why not just do a Try Catch block and then clean up at the end of the script? This is why a Finally block is so awesome, even if you terminate a script using CTRL + C the contents of the Finally block are still going to be run before the entire script is terminated.
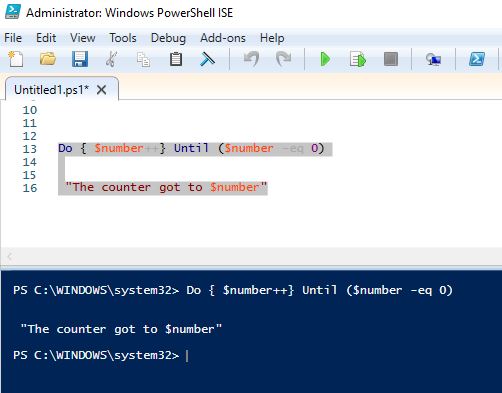
Check out this example, we create a simple counter loop with a Do Until statement. We let it run in ISE and then i terminate the script by clicking the Stop button:
Do { $number++} Until ($number -eq 0)

Write-host -m "The counter got to $number"
We can see in the picture below that once the script is terminated, the write-host line is never executed:
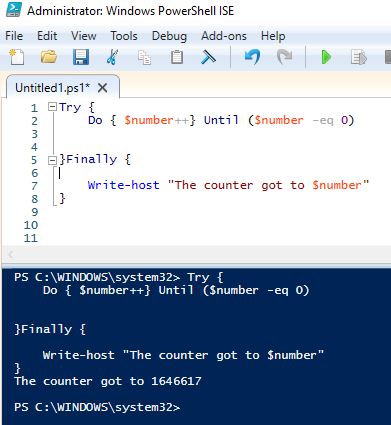
Now, let’s run through the same scenario with a Try Finally block. We’ll put the counter loop in the Try block and the Write-Host output in the Finally block. We let the counter run and then terminate the script in ISE:
Try {
    Do { $number++} Until ($number -eq 0)
}Finally {
    Write-host "The counter got to $number"
}
We can see in the example that immediately our contents in the Finally block are run after we terminate the script. We can see our write-host statement:
Finally, blocks are extremely useful for cleaning up complex scripts that are kicking off background jobs or performing some sort of detailed process that must be cleaned up or “reset” if not completed successfully. This is all the more reason why MSPs need to use Try/Catch/Finally blocks in their PowerShell scripts.
This creates a ton of options as you continue building your collection of PowerShell scripts!
Wrap-Up
As an MSP having PowerShell tools for the team to use is an extremely powerful benefit. But, in order to ensure that a script has a successful cleanup at the end upon either termination or completion, PowerShell tool users need to create their tools with error scenarios in mind and plan for what remediation and clean up steps need to be done. Once you’ve done this, you take your PowerShell game to an entirely new level and you and your customers will reap the benefits!
What about you? Have you tried using these types of blocks in your own scripts? Have they worked well for you?
Thanks for reading!


Not a DOJO Member yet?
Join thousands of other IT pros and receive a weekly roundup email with the latest content & updates!
More in this category


About the Author

Luke Orellana

