Save to My DOJO

Table of contents
- Prerequisites for a WSL/Windows Server Certification Pair
- Phase 1: Prepare the Subordinate CA on the Windows Server
- Enable Windows Subsystem for Linux and Choose Your Distribution
- Windows Subsystem for Linux Storage
- Creating a Root Certification Authority in Windows Subsystem for Linux
- Optional: Use OpenSSL to Generate the Subordinate CA’s Keys and Certificate Request
- Distributing the Root Certification Authority and Revocation List
- Complete Configuration of the Subordinate CA
- Root CA Maintenance and Activities
- Further Reading
- Why Use Windows Subsystem for Linux as a Root Certification Authority?
In a previous article, I talked about the concepts involved in PKI. In this article, I want to show you how to build your own PKI. I will mostly write this as a how-to, on the assumption that you read the previous article or already have equivalent knowledge. I will take a novel approach of implementing the root certification authority in Windows Subsystem for Linux. That allows you to enjoy the benefits of an offline root CA with almost none of the drawbacks.
Why Use Windows Subsystem for Linux as a Root Certification Authority?
Traditionally, building a Windows PKI with an offline CA involves Windows Server systems for all roles. Most Windows administrators find it easy — you only need to know the one operating system. Of course, you don’t necessarily need a Windows system at all. I have seen some that employ a standard Linux system as the offline CA.
I use Windows Subsystem for Linux to create an offline root CA and use a Windows system for an online intermediate (subordinate) CA for these reasons:
- Licensing: If you use a Windows Server system as the offline root, it consumes a license (physical installation) or a virtualization right (virtual installation). Since the offline root CA should be kept offline for nearly the entirety of its existence, that’s a waste.
- Built-in components: I won’t show you anything in this article that you can’t find natively in Windows/Windows Server. You could certainly go through all the effort to obtain and install a full Linux installation to use as the root CA. You could download and install OpenSSL for Windows to mimic what I’m doing with WSL.
- Setup ease: You can bring up the WSL instance with almost no effort. Compare to the alternatives.
- Active Directory integration :You can certainly create a full PKI without using Windows Server at all. You lose a lot, though. You can get a lot of mileage out of features such as auto-enrollment.
Using WSL for the offline root allows us to protect it easily. Using Windows Server as the intermediate allows us maximal benefits.
There a quite a few parts to this configuration so please use the table of contents below to keep track of your progress:
- Prerequisites for a WSL/Windows Server Certification Pair
- Phase 1: Prepare the Subordinate CA on the Windows Server
- Enable Windows Subsystem for Linux and Choose Your Distribution
- Windows Subsystem for Linux Storage
- Creating a Root Certification Authority in Windows Subsystem for Linux
- Optional: Use OpenSSL to Generate the Subordinate CA’s Keys and Certificate Request
- Distributing the Root Certification Authority and Revocation List
- Complete Configuration of the Subordinate CA
- Root CA Maintenance and Activities
- Further Reading
Prerequisites for a WSL/Windows Server Certification Pair
You’ll need a few things to make this work:
- Credentials for a domain account that belongs to the Enterprise Admins security group
- An installation of Windows Server (2016 used in this article; anything 2012 or later should suffice) to use as the online intermediate (subordinate) certificate server
- Domain-joined
- Machine name set and finalized (you cannot change it afterward)
- IP set and finalized
- A Windows system capable of running Windows Subsystem for Linux (Windows 10 used in this article; a current iteration of Windows Server, Semi-Annual Channel or Windows Server LTSC version 2019+ should suffice). This article is written with the expectation that you will use a physical Windows 10 system and store vital information on a removable USB device.
- Any full installation of a Linux distribution with OpenSSL, virtual or physical, would suffice as an alternative
- OpenSSL on a Windows installation would also suffice
- A folder on the Windows system where files can be transferred to and from the WSL environment. For your own sake, pick something easy to type (I used D:CA in this article)
- A DNS name where you will publish the root CA’s certificate and certificate revocation list (CRL). It must be reachable by the systems and devices that will treat your CA as authoritative. This DNS name becomes a permanent part of the issued certificates, so choose wisely.
If you want, you can use the same Windows Server system to host the online intermediate CA and the offline root. You only need to ensure that the Windows Server version can run WSL. Ordinarily, running both together would be a terrible action. In this case, the root CA will not “exist” long enough to cause concern.
Phase 1: Prepare the Subordinate CA on the Windows Server
Counter-intuitively, we will start with the subordinate certification authority. It will reduce the amount of file shuffling necessary. Because this setup is a simple procession of wizard screens, I did not include every screen.
Install the Subordinate CA Role
We begin in Server Manager. I have not done this in PowerShell although it is possible.
- Start the Add roles and features wizard from within Server Manager
- Select Active Directory Certificate Services:
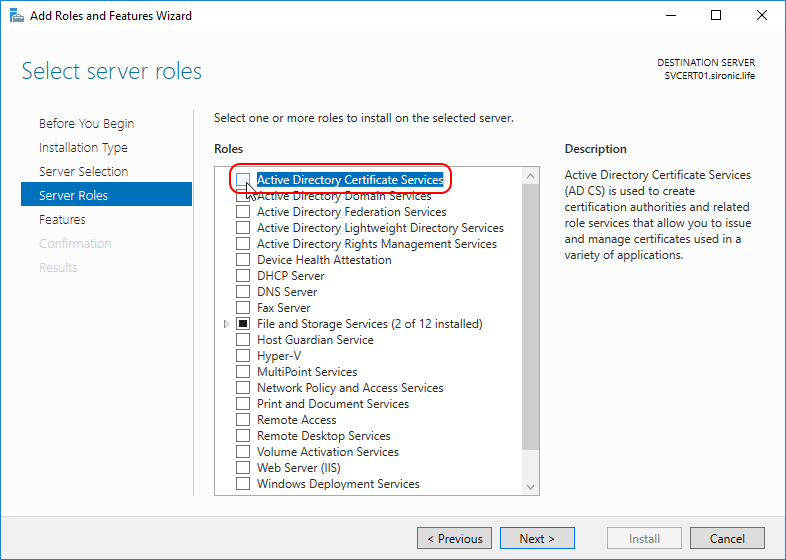
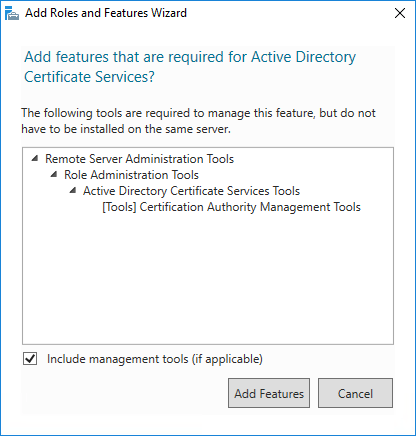
- You will be prompted to add the management features. You can skip this if you only want the Certificate Authority role to exist on the target server.
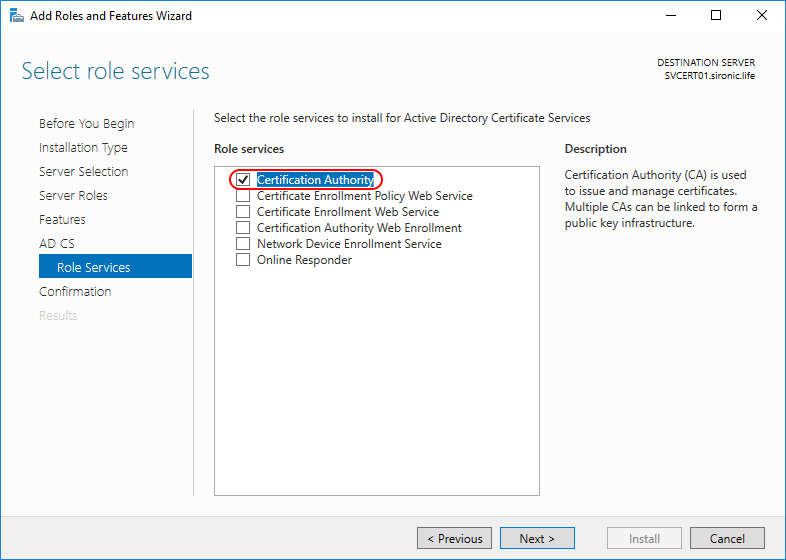
- By default, the wizard will only want to install the Certification Authority role. We will install and configure other roles later. You can select them now, but you will be unable to configure them. I recommend only taking the default at this time:
Complete the wizard and wait for the installation to finish.
Perform Initial CA Configuration
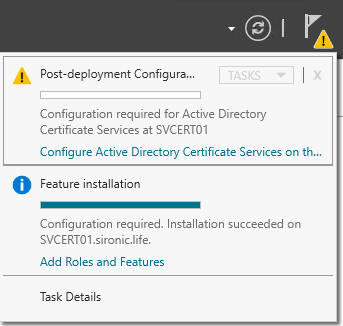
Once the wizard completes, you have the role installed but you cannot use it. Configure the subordinate CA role.
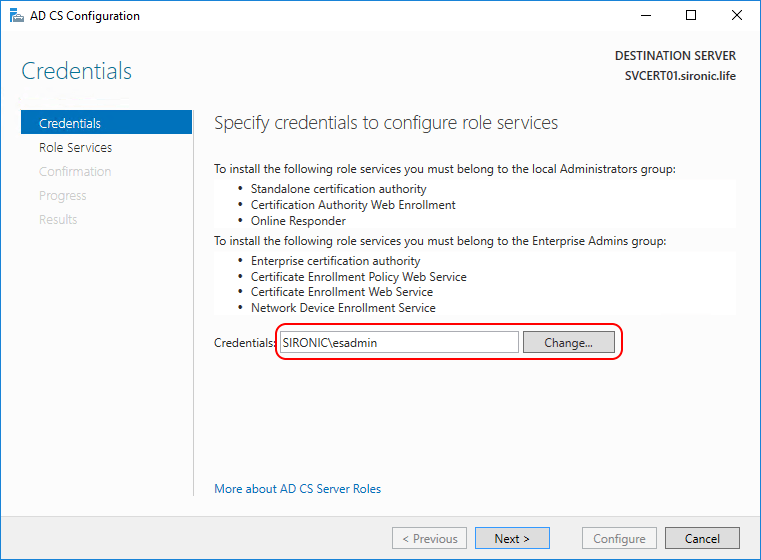
- In Server Manager, click the notification flag with the yellow triangle at the top right of the window, then click Configure Active Directory Certificate Services on the destination server:
- In the wizard, choose the enterprise admin account selected for this procedure:
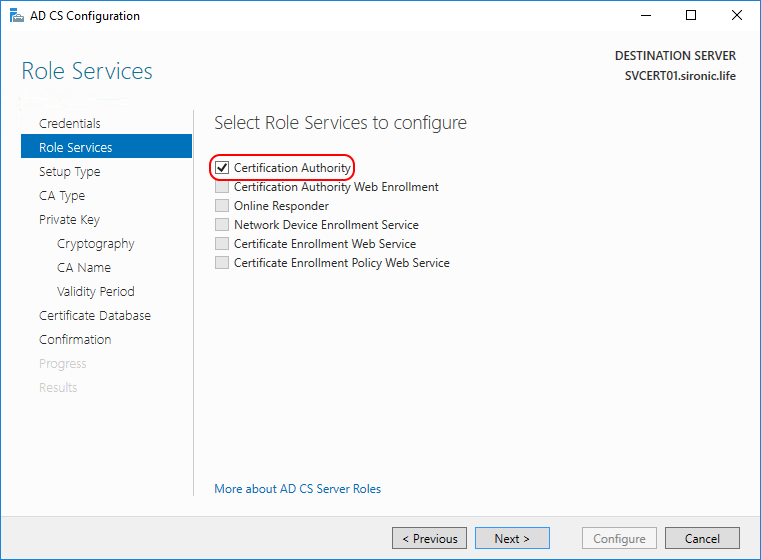
- Choose to configure the Certification Authority only. If you had selected to install other roles, do not attempt to configure them at this time.
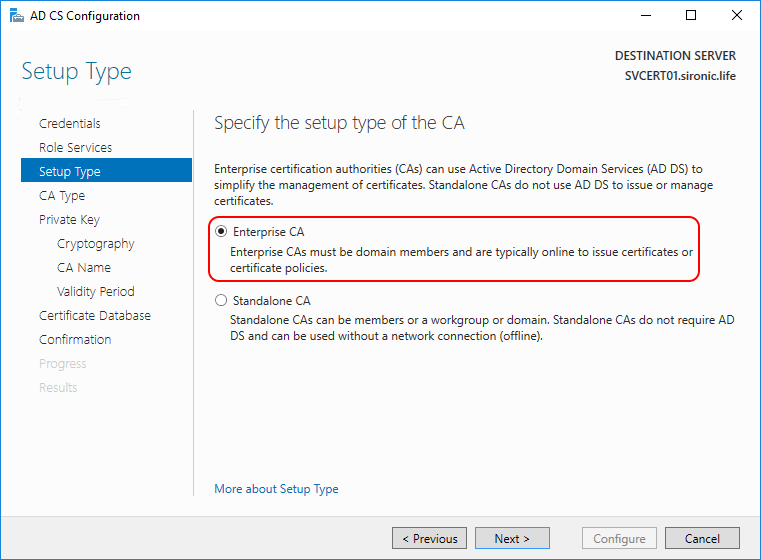
- Choose to configure the CA as an Enterprise CA (you can select Standalone CA if you prefer; you will miss out on most Active Directory features, however):
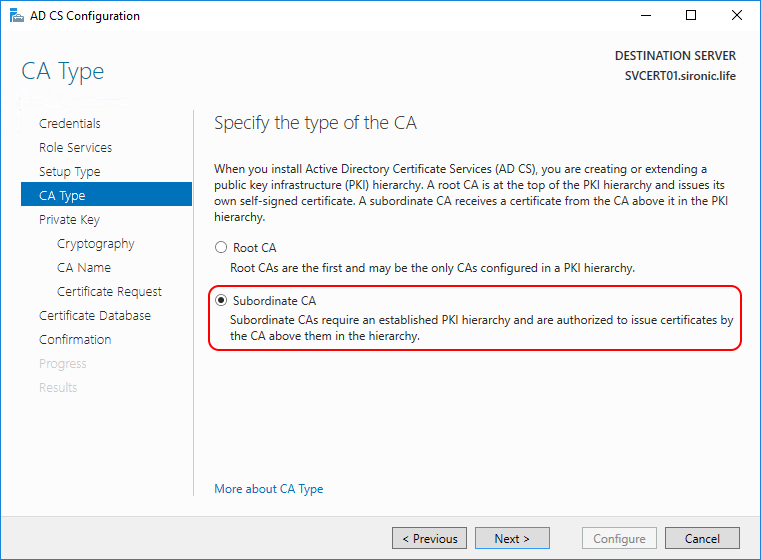
- Select the Subordinate CA type:
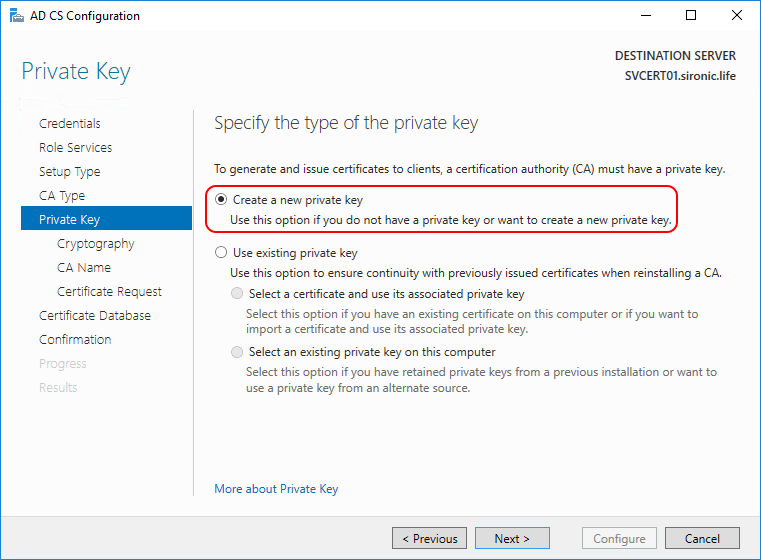
- Choose to Create a new private key.
Note 1: if you were re-installing a previously existing CA, you would work through the Use existing private key branch instead.
Note 2: If you’d like to use OpenSSL to create the key set instead, you’ll find instructions further down. You would do that if you wanted more information to appear on the CA’s certificate than the Microsoft wizard allows, such as organization and location information. However, you will need to pause here, perform the WSL steps, and then return to this point.
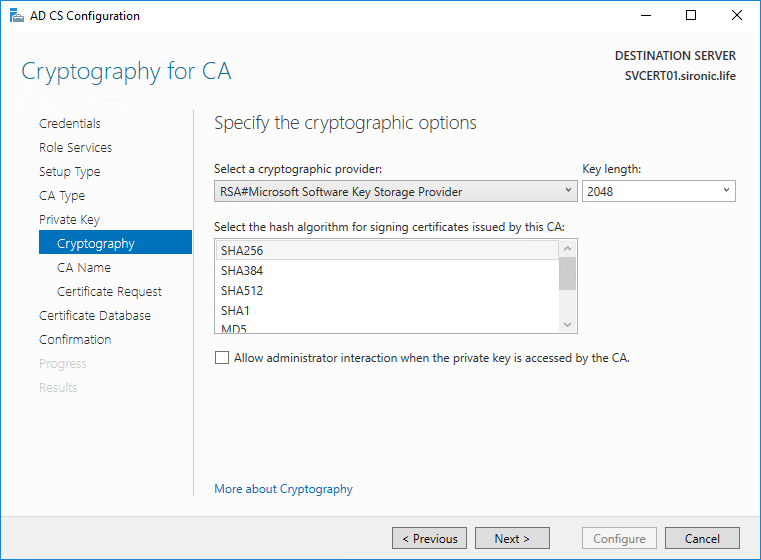
- The default Cryptography selections should suffice for most installations. Reducing any settings could cause compatibility problems; increasing them might cause compatibility and performance problems. Do not check Allow administrator interaction when the private key is accessed by the CA. That will cause credential prompts where you don’t want them.
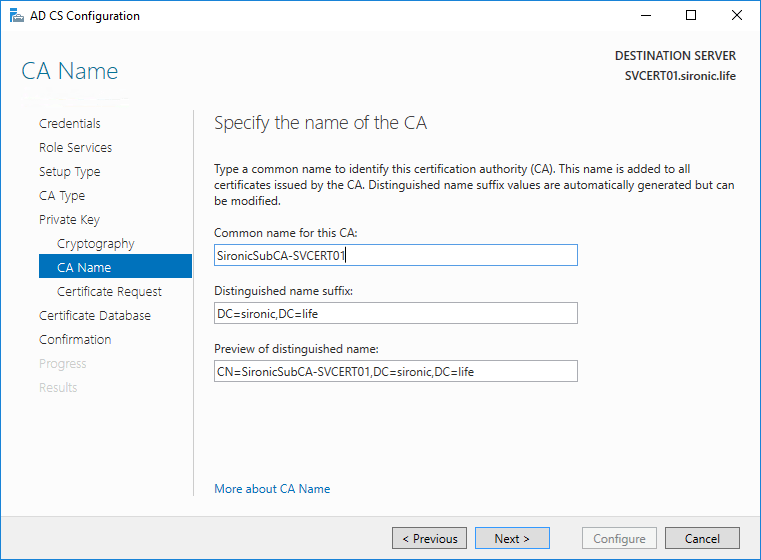
- Choose an appropriate name for the CA’s common name. The default should work well enough, although I tend to choose a friendlier name. I recommend that you avoid spaces; they can be used but will cause problems in some places. You can also change the suffix, if necessary for your usage.
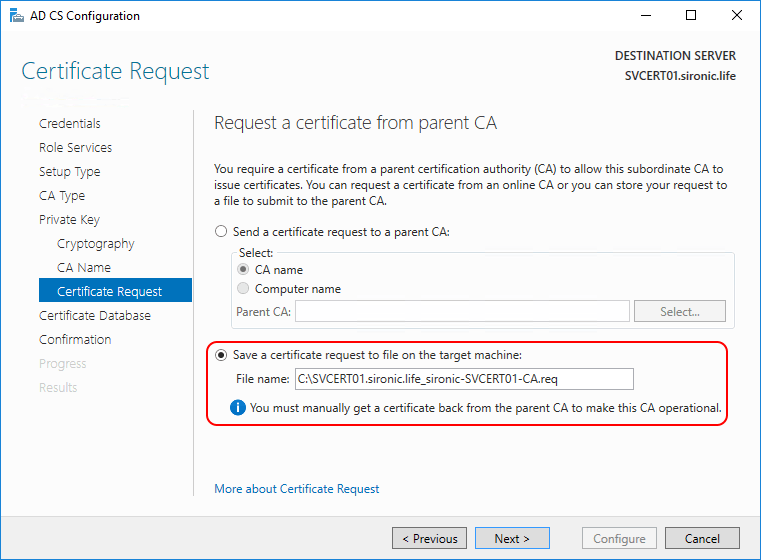
- Choose to Save a certificate request to file on the target machine. You can make the filename friendlier if you like. Make sure that you keep track of the name though because you’ll enter it in a future step.
- Proceed through the remainder of the wizard.
You have completed the initial configuration of the subordinate certificate authority. Now we turn to the WSL system to set up your offline root CA.
Enable Windows Subsystem for Linux and Choose Your Distribution
You can skip this entire section if you are bringing your own method for running OpenSSL.
Enabling Windows Subsystem for Linux is slightly different depending on whether you are using a desktop or server operating system.
Enable WSL on Windows 10
As of this writing, Windows 10 provides the simplest way to install WSL. If you prefer a server SKU, skip to the next sub-section.
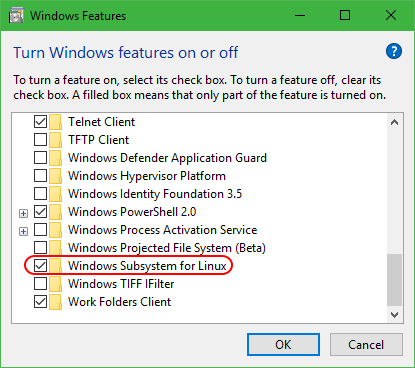
- Use Cortana to search for Turn Windows features on or off (or enough of a subset for the following to be found), then open the link
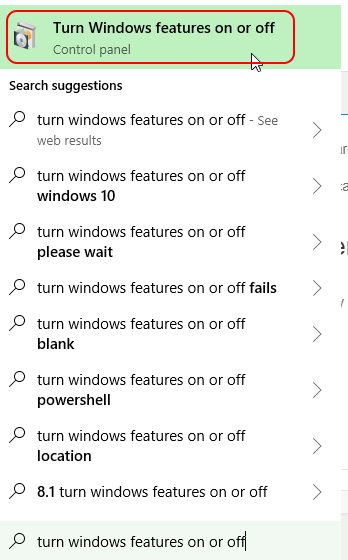
- Choose Windows Subsystem for Linux:
- Once that’s complete, use the Microsoft Store to find and install the Linux distribution of your choice. I prefer Kali, but any should do (you can find starting instructions for installing a non-Store distribution on Microsoft’s blog):

Start the Kali image and follow its prompts to set up your user and password.
Enable WSL on SAC or Windows Server LTSC 2019 or Later
Be aware that not all Linux distributions will work on non-GUI servers (in any way that I know of) because they do not include a .exe launcher. For example, Kali only comes as appx and I could not get it to work. Ubuntu comes as exe and should not pose problems.
- In PowerShell, run Install-WindowsFeature -Name Microsoft-Windows-Subsystem-Linux
- Restart the Windows Server computer.
- Access Microsoft’s list of Linux distributions. You have two purposes on this site: selecting your desired distribution and getting its URL. The page includes its own instructions which do not meaningfully deter from mine.
- Download the selected distribution: Invoke-WebRequest -Uri https://aka.ms/wsl-kali-linux -OutFile $env:USERPROFILEDownloadsKali.zip -UseBasicParsing
- Create a folder to run the distribution from: mkdir C:DistrosKali
- Extract the distribution: Expand-Archive -Path $env:USERPROFILEDownloadsKali.zip -DestinationPath C:DistrosKali
- Check the directory listing to check your options:
dir DistrosKali
- For .exe, just run it directly: DistrosUbuntuubunt1804.exe
- For .appx, use Install-AppxPackage first (desktop experience only, apparently), then run your distribution from the Start menu: Install-AppxPackage -Path C:DistrosKaliDistroLauncher-Appx_1.1.4.0_x64.appx
Follow the prompts to set up your user account and password.
Windows Subsystem for Linux Storage
This article is not about setting up WSL or explaining its technologies. If you want to know more than I’m showing you, then you’ll need to research it elsewhere. However, we’re dealing with a root certificate authority and security is extremely vital. So I want to make one thing clear: be aware that the files for your WSL installation will be held underneath your user profile (C:Usersyour-user-accountAppDataLocalPackagesthedistroname). If you follow my directions, you will not permanently leave sensitive information in this location. If you skip that part, then you must maintain significant security over that location.
As mentioned in the intro, I will have you use a USB device on your physical system running WSL. WSL can see your Windows file system at /mnt/DRIVELETTER. As an example, your C: drive is /mnt/c, your D: drive is /mnt/d, etc.
Before proceeding, pick a folder to use to transfer files back and forth from WSL and your Windows installation. I am using “D:CA” (/mnt/d/CA). Copy in the CSR (the .req file) created by the wizard at the end of the Windows section above.
Creating a Root Certification Authority in Windows Subsystem for Linux
I have used Kali in WSL on Windows 10 for all of these steps. Instructions should be the same, or at least similar, for other distributions. If you use a full installation of Linux rather than WSL, you must make modifications, primarily in transferring files between Windows and Linux. Your mileage may vary.
Configuring OpenSSL
Like most Linux programs, OpenSSL depends on a configuration file. I will include one, but OpenSSL provides a default file that you can modify. If you wish to copy that default file out to Windows for editing in something like Notepad++, I will provide the exact point at which you will perform that step. If you wish to use mine as your template, place it in the Windows-side folder that you’re using for transfer (D:CA on my system).
To keep the file short, I used only a few comments. Notes on the configuration points appear after the listing. Check each line before using this file yourself. I believe that you will only need to modify the four items at the top, but you may disagree. I have trimmed away all items that I considered non-essential for the task at hand. You will be unable to use this file for OpenSSL operations unrelated to certification authorities and x509 certificates.
# set the subject name for the root certification authority
rootcaname=SironicRootCA2018

# set the complete URL where the root CA's downloadable certificate will be published
rootcaissuerssite=http://rootca.sironic.life/SironicRootCA2018.crt

# set the complete URL where the root CA's downloadable CRL will be published
rootcrldistributionpoint=http://rootca.sironic.life/SironicRootCA2018.crl

# set the FQDN where the root CA's OCSP will be located (optional -- uncomment OCSP line in v3_root_aia)
rootocspsite=http://rootca.sironic.life/ocsp

[ ca ]
default_ca = CA_default

[ CA_default ]
dir = /ca
certs = $dir/certs
crl_dir = $dir/crl
database = $dir/index.txt
new_certs_dir = $dir/newcerts
certificate = $dir/private/$rootcaname.crt
serial = $dir/serial
crlnumber = $dir/crlnumber
crl = $dir/crl/$rootcaname.crl
crl_extensions = crl_ext
private_key = $dir/private/$rootcaname.key
RANDFILE = $dir/private/.rand
name_opt = ca_default
cert_opt = ca_default
default_days = 365
default_crl_days = 210
default_md = sha256
preserve = no
policy = policy_match

[ policy_match ]
commonName = supplied

[ req ]
default_bits = 4096
distinguished_name = req_distinguished_name
x509_extensions = v3_ca
string_mask = utf8only

[ req_distinguished_name ]
commonName = Common Name (e.g. server FQDN or YOUR name)
commonName_max = 64

[ v3_ca ]
subjectKeyIdentifier=hash
authorityKeyIdentifier=keyid:always,issuer
basicConstraints=critical,CA:true
keyUsage=critical,digitalSignature,cRLSign,keyCertSign

[ v3_subca ]
subjectKeyIdentifier=hash
authorityKeyIdentifier=keyid:always,issuer
basicConstraints=critical,CA:true,pathlen:0
keyUsage=critical,digitalSignature,cRLSign,keyCertSign
authorityInfoAccess = @v3_root_aia
crlDistributionPoints = URI:$rootcrldistributionpoint

[ v3_root_aia ]
caIssuers;URI=$rootcaissuerssite
#OCSP;URI=$rootocspsite

[ crl_ext ]
authorityKeyIdentifier=keyid:always
issuerAltName=issuer:copy
OpenSSL Configuration Notes
A few notes on the decisions that I made in this file:
- I included points where you can configure OCSP for the root CA if you wish, but I commented them out. Since your root CA will only sign one certificate, I see no justification for OCSP.
- You will want to change the names to match your own; the scripts that I’m about to show you expect the same names, so take care that they align.
- I set the CRL to expire after 210 days (about 7 months). You will need to regenerate and redeploy the CRL within that time or clients will cease trusting the subordinate CA, and therefore all certificates it has signed. CRL regeneration instructions provided later.
- It is possible to sign the subordinate CA without including CRL information. That will alleviate the need to periodically redeploy the CRL. However, it will also eliminate most of the benefit of using an offline CA. One major reason to keep the root offline is because if it is ever compromised, no authority can revoke it. If you do not configure your subordinate CA so that it can be revoked, then it will also remain valid even if compromised.
- Some other tutorials include generating a CRL for the root (here, in the v3_ca section). That is a wasted effort. No one is above the root, so it cannot be revoked. A CA cannot revoke its own certificate. This point trips some people up, because it seems to conflict with the preceding. The CA’s own certificate is self-signed; it is impossible to revoke a self-signed certificate. If you fill in CRL information on a self-signed certificate, it has no value. Every certificate issued by any CA is not self-signed, so it should have valid CRL information.
- I restricted the subordinate CA with “pathlen:0”. That way, if it is ever compromised, thieves cannot use it to create further CAs. You can change or remove this restriction if you need a more complex CA structure.
You are certainly welcome to make any changes that suit your situation. Just remember that the upcoming processes have item names that must completely match what’s in your openssl.cnf.
The Process for Creating a Root Certification Authority Using openssl
On my system, I placed all of these into a single file. I copied out the blocks separately and pasted them into the WSL interface. At the end of each block, the system will prompt for input of some kind. It would be possible to pre-supply many (maybe all) of these items. I do not classify the creation of a root certification authority as a viable purpose for full automation.
Overall instructions: paste the text from these blocks directly into WSL.
Part 1: Establish Variables
In this section, replace my named items with your own. Do not modify anything in the “composite variables” section. If you restart the WSL interface for any reason, you will need to resubmit these settings.
URGENT NOTE: The WordPress code plugin will not show the entire contents of the file correctly. Specifically, the file_crl variable in the “## composite variables” section. That should have TWO dollar signs ($). It does not correctly display the dollar sign before {rootcaname}. You might try $rootcaname instead, although I have much better luck with composite variables when using curly braces. For some reason, it does display correctly on the following line (file_rootcakey), so you can use that as a template to correct the file_crl line.
## setup environment; change as necessary

# the subject name of the root certificate authority
rootcaname=SironicRootCA2018

# the subject name of the subordinate certificate authority
subcaname=SironicSubCA2018-SVCERT01

# file name generated by the wizard during sub CA creation
file_subcacsr=SVCERT01.sironic.life_sironic-SVCERT01-CA.req

# root name of certificate chain files
chainname=SironicChain

# duration of root CA validity, in days
rootca_validity_length=10950

# duration of sub CA validity, in days
subca_validity_length=3650

# folder in WSL where these CA activities will occur
dir_root=/ca

# folders and files used by openssl
dir_certs=$dir_root/certs
dir_crl=$dir_root/crl
dir_newcerts=$dir_root/newcerts
dir_private=$dir_root/private
dir_out=$dir_root/out
file_conf=$dir_root/openssl.cnf
file_rand=$dir_private/.rand

# path to Windows folder
dir_host_transfer=/mnt/d/CA

# random seeds
seed_root=5791
seed_sub=7020

## end environment setup

## composite variables
file_crl="${dir_crl}/${rootcaname}.crl"
file_rootcakey="${dir_private}/${rootcaname}.key"
rootcacert=${rootcaname}.crt
file_rootcacert="${dir_private}/${rootcacert}"
file_subcakey="${dir_private}/${subcaname}.key"
file_subcacert="${dir_newcerts}/01.pem"
file_pemchain="${dir_out}/${chainname}.crt"
file_p7bchain="${dir_out}/${chainname}.p7b"
file_p7bchainwithcrl="${dir_out}/${chainname}WithCRL.p7b"
Note that I set the duration of the root CA’s validity to about 30 years and the subordinate CA’s validity to about 10 years. A CA cannot issue a certificate with a lifespan beyond its own. If both certificates expire at the same time, you will need to replace your entire PKI simultaneously.
Interim Optional Step: Copy the Default OpenSSL into Windows for Editing
If you wish to copy out the default openssl.cnf into Windows for easy editing rather than using mine, this will help (some distributions use a different directory structure):
cp /etc/ssl/openssl.cnf $dir_host_transfer
Part 2: Create the Environment
Note: before starting, and for the duration of this procedure, I recommend setting sudo -s. Most everything requires sudo to run properly anyway.
This section will build up the folder structure that openssl expects without disrupting the built-in openssl setting.
# setup CA folder structure
mkdir $dir_root
mkdir $dir_certs
mkdir $dir_crl
mkdir $dir_newcerts
mkdir $dir_private
mkdir $dir_out
touch $dir_root/index.txt
echo 01 > $dir_root/serial
echo 01 > $dir_root/crlnumber
Part 3: Place Your Edited openssl.cnf File
I edited my openssl.cnf file in Windows and have written all my instructions accordingly. If you took a different approach, such as editing it within WSL in vim, then your goal in this section is to move into the $dir_root directory (/ca in my design):
cp $dir_host_transfer/openssl.cnf $dir_root
chmod -x $file_conf
Note: under WSL, openssl doesn’t care about Windows vs. UNIX line-endings in its cnf file. In any other configuration, make sure you have line endings set appropriately for your environment.
Part 4: Create the Root Certification Authority’s Keys
Use the following to generate new keys to use for your root certification authority:
openssl rand -out $file_rand $seed_root
openssl genrsa -aes256 -out $file_rootcakey -rand $file_rand 4096
You will be prompted to provide a password (“pass phrase”) to protect the key. Do not lose the password or the key will be irretrievable. You will also need it several times in the remaining steps of this article.
Warning: the key set you just created is the most important file in the entire procedure. If any unauthorized individual gains access to it, you should consider your root CA compromised. They will need the password to unlock it, of course, but the key cannot be considered secured.
Part 5: Self-sign the Root Certification Authority Certificate
The following will create a new certificate from the private/public key pair that you created in part 4.
openssl req -x509 -new -key $file_rootcakey -sha256 -days $rootca_validity_length -utf8 -extensions v3_ca -config $file_conf -out $file_rootcacert
You will first be prompted for the password to the private key. You will also be prompted for the common name of the root certification authority. I stored that in $rootcaname, but in this particular prompt I always typed it in manually.
Part 6: Sign the Subordinate CA Certificate
In this section, you’ll copy in the certificate request file that you created for the subordinate CA back in the Windows setup steps. Then, you’ll have your new root CA sign it.
Note: if you want to use openssl to create the subordinate CA’s certificate instead of using one provided by the Windows wizard, those instructions appear after this section. Perform those steps and then continue with Part 7.
cp "${dir_host_transfer}/${file_subcacsr}" $dir_root
chmod -x "${dir_root}/${file_subcacsr}"
openssl ca -batch -in "${dir_root}/${file_subcacsr}" -extensions v3_subca -days $subca_validity_length -config $file_conf -notext
You will be prompted for the password to the root CA’s private key (from step 4). You might also see an error about “index.txt.attr”. You can ignore that message. It will automatically create the necessary file with defaults.
I included -batch to suppress as much input as possible, but you will still see the certificate’s details and its base64-encoded text on-screen.
Part 7: Create the Certificate Revocation List
This step creates the certificate revocation list from the root CA. The list will be empty, but the file is absolutely necessary.
openssl ca -gencrl -config $file_conf -out $file_crl
You will be prompted for the password to the root CA’s private key (from step 4).
Part 8: Separate out the Files to be Used in Windows
Certificate chains are often required. openssl can generate them easily, and you have both certificates on hand right now. You won’t find a much better time. Furthermore, several of the files that you’ll want to use in your Windows environment are scattered throughout the CA file structure. We’ll place all of these files into the same output directory (/ca/out in my design, held in $dir_out). I also rename the sub CA’s certificate name from 01.pem to a .crt file that contains its common name:
# create PEM certificate chain directly in the output location
cat $file_subcacert $file_rootcacert > $file_pemchain

# create P7B certificate chain
openssl crl2pkcs7 -certfile $file_rootcacert -certfile $file_subcacert -out $file_p7bchain -nocrl

# create P7B certificate chain with CRL
openssl crl2pkcs7 -in $file_crl -certfile $file_rootcacert -certfile $file_subcacert -out $file_p7bchain

# collect all files to be used in the Windows environment into a single folder
cp $file_rootcacert $dir_out
cp $file_subcacert "${dir_out}/${subcaname}.crt"
cp $file_crl $dir_out
Part 9: Transfer all Files to Windows
Now we’ll copy out the entire CA file structure into Windows wholesale:
cp -r $dir_root/* $dir_host_transfer
You’ll find all of the files needed for your Windows infrastructure in the out subfolder of your targeted Windows folder. Those are all safe to use and share anywhere. The rest of the folder structure should be treated as a singular unit and secured immediately. The private key for the root CA resides in private. It is imperative that you protect the .key file.
Part 10: Cleanup
You have now completed all the necessary steps in WSL. Cleanup with these steps:
- Start by verifying each file in the out folder; Windows should be able to open all of them directly. If a file is damaged, it will not open. Be aware that the subordinate CA will not yet be able to validate the entire chain because the root does not yet appear in the local trusted root store.
- Place the contents of the out folder somewhere that you can access them in upcoming sections. Remember that all of these are public files; they do not need any particular security measures.
- Once you have verified that all output files are valid, transfer all files in your target Windows folder to a secured, offline location, such as an external USB device that can be placed into a safe. You do not need to include the out folder.
- In WSL, run: rm -r $dir_root Note: this completely removes all of the CA data from WSL!
Remember that the CA environment that you created in WSL was intended to be temporary. You can’t really “save” it anywhere, and I’ve had multiple WSL environments fail completely for no reason that I could discern. Do not expect to keep it.
If space on your secured device is at a premium, you can delete the newcerts�1.pem file. That is your sub-CA’s signed certificate, which you kept as part of the out file listing. If space is even more precious than that, the only file that you absolutely must keep is the .key file in private. With that, you can sign new certificates, revoke compromised certificates, and regenerate the CRL. You should also have the various serial files and certificate database (index.txt, serial, crlnumber, etc.), but you could reasonably approximate those if absolutely necessary. You will not be able to perfectly reproduce the root CA’s public certificate, but hopefully, you’ll have some copies of it spread around. openssl.cnf would also be difficult to reproduce, but not impossible. To avoid problems, the best thing is to retain the entire directory structure.
[thrive_leads id=’17165′]
Optional: Use OpenSSL to Generate the Subordinate CA’s Keys and Certificate Request
You might wish to use OpenSSL to generate your subordinate CA’s keys and its CSR. The primary reason that I can think of would be control over the informational fields that the Windows-generated CSR does not generate, such as location and organization data.
This is a text dump of the commands involved. It expects the same environmental setup that I used in Part 1 above and the folder structure from Part 2. I did not break out the separate sections this time, to ensure that you do not blindly copy/paste the entire thing. I documented where OpenSSL will interrupt you.
## create subordinate CA locally
# set up environment
subcacsr="${dir_root}/${subcaname}.csr"
file_subcapkcs12="${dir_out}/${subcapkcs12}.pfx"

# create sub keys
openssl rand -out $file_rand $seed_sub
openssl genrsa -aes256 -out $file_subcakey -rand $file_rand 4096

### there will be a password prompt here

# create CSR for sub CA
openssl req -new -key $file_subcakey -sha256 -utf8 -extensions v3_subca -config $file_conf -out $subcacsr

### there will be a password prompt and a request for the CA's name here

# sign the CA's certificate
openssl ca -in $subcacsr -extensions v3_subca -days 3650 -config $file_conf -notext

# convert the sub CA to pkcs12 format
openssl pkcs12 -export -out $file_subcapkcs12 -inkey $file_subcakey -in $file_subcacert
The pkcs12 output portion is optional, but it allows you to move your entire subordinate CA’s keys and certificate in a single package. Just remember to take special care of it, as it contains the CA’s private key.
Distributing the Root Certification Authority and Revocation List
It may seem counter-intuitive, but we’re not going to finish configuration of the subordinate CA yet. You could do it, but it will complain about not being able to verify the root. Things go more smoothly if it can validate against the root.
Place the Root Certificate into the Domain
I recommend distributing your root CA certificate by using group policy. If you place it into the domain policy, it will appear on all domain members at their next policy refresh. If you delete it from that policy, domain members will (usually) remove it at their next policy refresh.
I feel that the Group Policy Management Console falls under the category of “common knowledge”, so I will not give you a detailed walk-through on installing or using it. You will find it as an installable feature on Windows Server. You can read Microsoft’s official documentation.
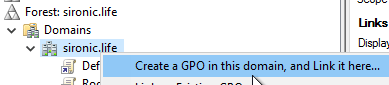
In GPMC, follow these steps:
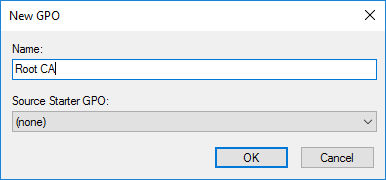
- Create a new GPO and link it to the root of the domain:
- Give the GPO a meaningful name:
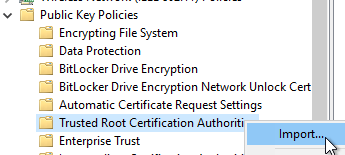
- Edit the new policy. Drill down to Computer ConfigurationWindows SettingsSecurity SettingsPublic Key Policies. Right-click Trusted Root Certification Authorities and click Import.
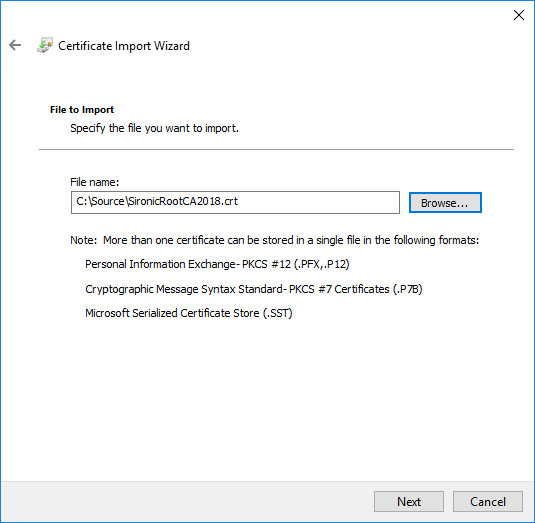
- Click Next to go to the import page where you can browse for the root CA’s certificate file:
- Proceed through the remainder of the wizard without changing anything.
You do not need to modify the user settings; you can disable that branch if you wish.
Configuring DNS for Root Certificate and CRL Distribution
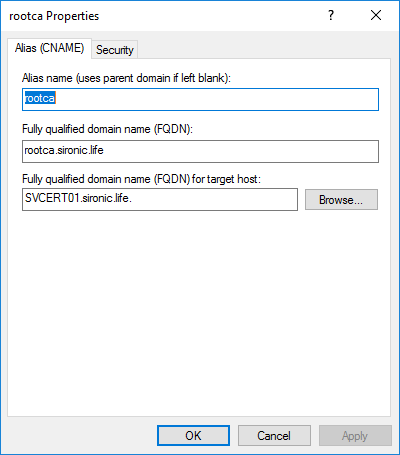
I am going to use the same system that hosts the subordinate CA to distribute the root CA’s certificate and CRL. Remember that these files are public by nature. There is no security risk. However, you do want to have the ability to separate them later if you ever need to decommission or revoke the subordinate CA. To facilitate this, I established a fully-qualified domain name just for the root CA. I’ll have DNS point that name to the subordinate certificate server where an IIS virtual directory will respond. If the situation changes in the future, it’s just a matter of retargeting DNS to the replacement web server.
We start in DNS with a simple CNAME record:
Configuring IIS for Root Certificate and CRL Distribution
My process only covers one possible option. You could simply install a standalone instance of IIS. You could use a different web server. You could use a Linux system. You could probably even get a container involved. You could employ a network load balancer. Whatever solution you employ, you only have one goal: ensure that the root certificate and CRL can be reached by any system that needs to validate the subordinate CA or a certificate that it signed.
In this article, I will piggyback off of the IIS installation enabled by the subordinate CA’s Certification Authority Web Enrollment role. It fits this purpose perfectly. In its current incarnation, this role has little more value than automatically publishing the CRT and CRL for the subordinate CA. It aligns with our goal of publishing the root CA’s CRT and CRL.
Install the Certification Authority Web Enrollment Feature
The role has not been installed by these instructions so far, so I’ll start with that.
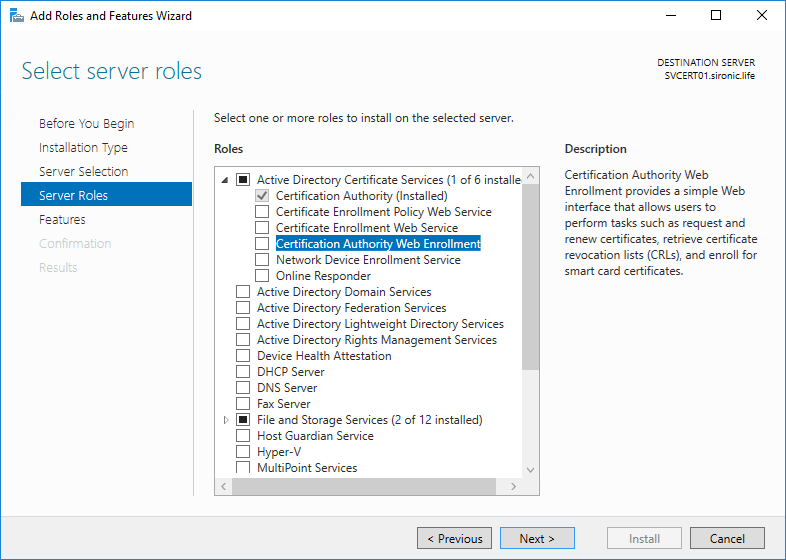
- On the certificate server (or a management workstation connected to it), start the Add roles and features wizard in Server Manager. Step forward to the Roles page.
- Expand Active Directory Certificate Services and check Certification Authority Web Enrollment:
- The wizard will prompt you to install several components of IIS. Agree by clicking Add Features.

- Proceed through the remainder of the wizard, keeping all defaults.
Create an IIS Site to Publish the Root CA Certificate and CRL
We will configure the newly-installed role later. Right now, we want to set up the root CA’s information.
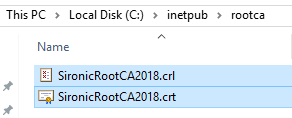
- In C:inetpub, create a folder named “rootca”. Place the root certification authority’s CRT and CRL file.
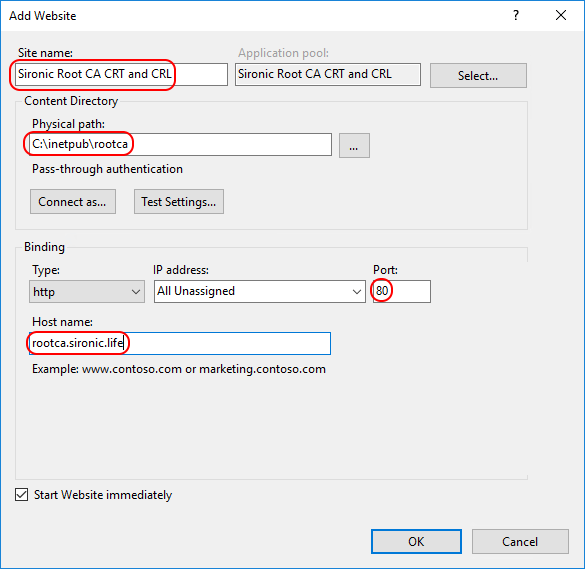
- In Internet Information Services Manager, create a new site:

- Configure the new site. Pay attention to the indicated areas. The Site Name is up to you. Use port 80; all of the items are digitally-signed and public. Publishing them with https is counter-productive, at best. Make sure that you use the same FQDN for the Host name that you indicated in the CRL information in your openssl.cnf file.
- Test access to the CRL and CRT by accessing the complete URL that appears in the subordinate CA’s CRL information:
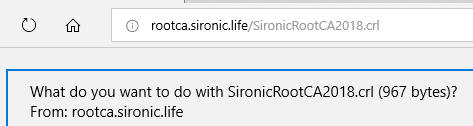
- Don’t forget to test the .CRT as well.
Complete Configuration of the Subordinate CA
Everything is in place for the subordinate CA. Follow these simple steps to finish up:
- Run gpupdate /force to ensure that group policy publishes the root certificate to the subordinate server.
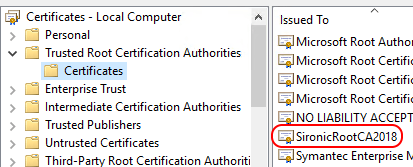
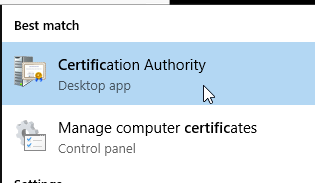
- Assuming Server 2016, use Cortana to Manage computer certificates. On older servers, you’ll need to manually run MMC.EXE and add the Certificates snap-in.

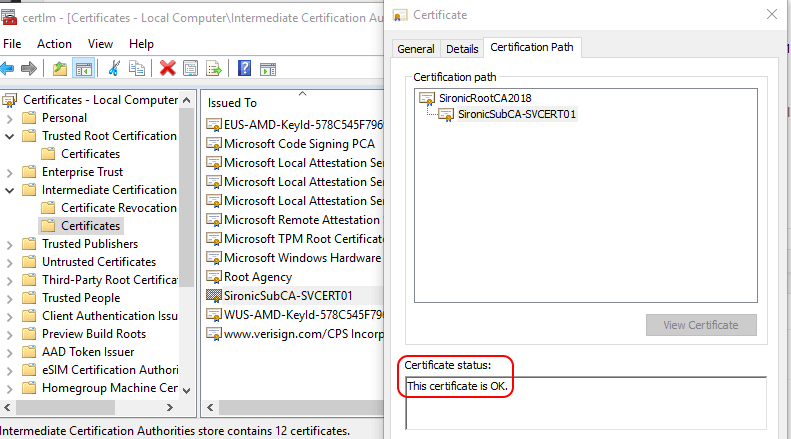
- Make certain that the certificate appears in Trusted Root Certification Authorities:
- Start the Certification Authority tool. You can find it under Windows Administrative Tools.
- Right-click your authority, go to All Tasks, and select Install CA Certificate.
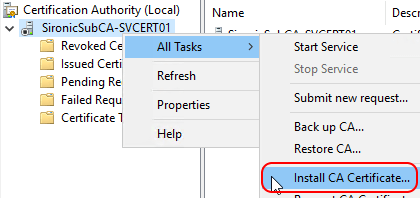
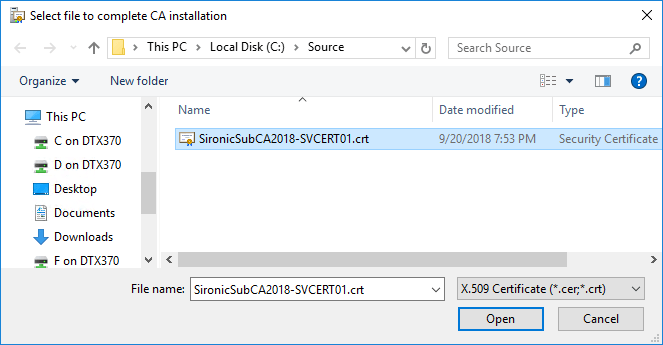
- Browse for any one of the subordinate CA’s certificate files that you generated into the out folder:
- Provided that everything is OK, it will run a short progress bar and then return you to the management console.
- Right-click on your certification authority, go to All Tasks, and click Start Service.

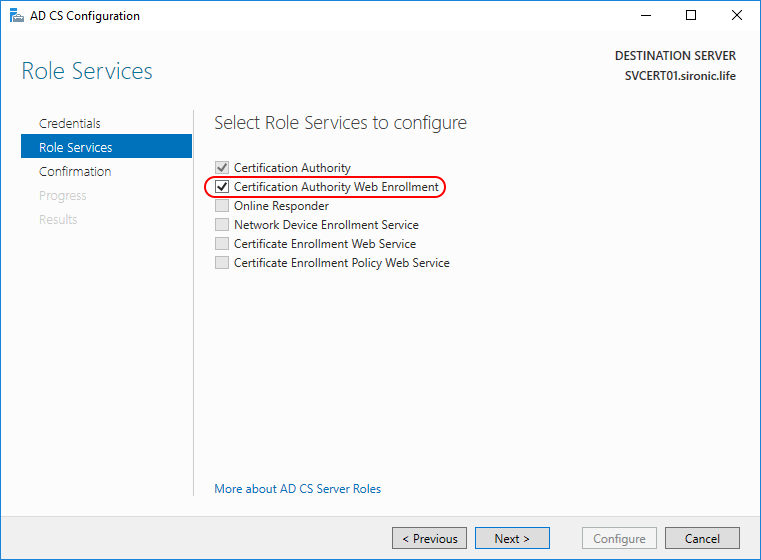
- Open Server Manager and click the notification flag with the yellow triangle at the top right of the window, then click Configure Active Directory Certificate Services on the destination server. If it is not present for some reason, then one of the recent tasks should show a link back to the Add roles and features wizard. It will start on the last page, which includes a link to the certification role configuration wizard.
- Proceed to the role configuration page. Check Certification Authority Web Enrollment.
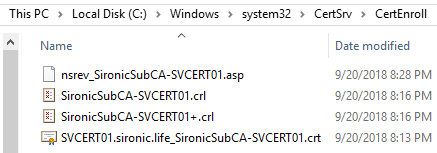
- IIS should now have a “CertEnroll” virtual directory underneath the Default Web Site that redirects to C:Windowssystem32CertSrvCertEnroll. It should contain the CRT and CRL for your subordinate CA:
Congratulations! You have set up a functional public key infrastructure, complete with an offline root CA and an operational enterprise subordinate CA! If you check the certificate list on a domain member with a current policy update, you should see the sub-CA with an OK status:
You can request certificates using the Certificates MMC snap-in on a domain-joined computer. You can also instruct group policy to automatically issue certificates. Explaining such usage (and all of the other possibilities) exceeds what I want to accomplish in this article.
Root CA Maintenance and Activities
You don’t need to do much with your root CA, but ignoring it will cause problems.
I highly recommend placing all of the above activities into a single text file and storing it with your CA’s files. You can then easily reuse the portions that you need. You’ll also have them available if you have an emergency and need to rebuild a new PKI from scratch in a hurry. Append the functions in this section to the file with relevant comments.
When you need to reuse your files, spin up a WSL environment, enter sudo -s, and then run the portion that generates the environment variables (Part 1: Establish Variables). Then, run cp -rf $dir_host_transfer/* $dir_root.
Updating the Root CA’s CRL
You will need to issue an updated CRL prior to the expiration of the existing one or problems will ensue. Specifically, anything checking the validity of any certificate in the chain may opt to treat the entire chain as invalid if it cannot retrieve a current CRL.
Assuming that you have performed the preceding bit about regenerating the CA structure within WSL, you can create an updated CRL very simply:
openssl ca -gencrl -config $file_conf -out $file_crl
To output the necessary CRL files back to the Windows environment:
cp -r /ca/crl* $dir_host_transfer
cp $file_crl $dir_out
Remember to rm -r /ca to remove the CA from WSL after you’ve done this. Copy the updated CRL file out to the web location and place the CA files back into secured storage.
Revoking the Subordinate CA’s CRL
If your subordinate CA becomes compromised, you’ll need to revoke it. That’s easily done. These instructions assume you followed the previous portion about rebuilding the CA structure and setting up the environment variables.
openssl ca -config $file_config -revoke $file_subcacert
Copy the index.txt file back to Windows; it contains the CA’s database and will now have a record of the revoked subordinate CA certificate.
cp $dir_root/index.txt $dir_host_transfer
You will need to provide the root CA’s private key password to complete the revocation.
Perform all the steps in the “Updating the Root CA’s CRL” section above — most importantly, you need to publish the CRL and leave it available. Remove the authority from Active Directory.
Renewing the Subordinate CA’s CRL
“Renewing” a certificate is just a phrase we use. In truth, you just set up another subordinate CA, usually with the same name. If you want, you can issue another CSR from the same private/public key pair and have your CA sign it. I would not recommend using the same private key, though. CA’s traditionally have long validation periods and any key can be cracked given enough time. Generating a new private key resets the clock.
In the Certification Authority tool, right-click your authority, go to All Tasks and select Renew CA Certificate.
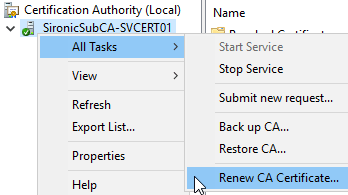
Follow the wizard to generate a new CSR. In the WSL portion above, locate the portion in Part 1 where you copy in the CSR file. Then, proceed from part 6 through to the end. Wrap up by starting at step 4 of the “Complete Configuration of the Subordinate CA” section above.
Further Reading
Microsoft’s base documentation for Certificate Services: https://docs.microsoft.com/en-us/previous-versions/windows/it-pro/windows-server-2012-R2-and-2012/hh831740(v%3dws.11)
Information on the newer web services: https://social.technet.microsoft.com/wiki/contents/articles/7734.certificate-enrollment-web-services-in-active-directory-certificate-services.aspx
Public Key Infrastructure Explained | Everything you need to know
Want to ask a question that relates directly to your situation? Head on over to the Altaro Dojo Forums and start a discussion. I’m actively part of that community and answering questions on a daily basis.


Not a DOJO Member yet?
Join thousands of other IT pros and receive a weekly roundup email with the latest content & updates!
More in this category


About the Author

Eric Siron


21 thoughts on "How to Make an Offline Root Certificate Authority for Windows PKI in WSL"
Comment only.
An excellent summary of this complex process, with just enough comments which are clearly made. Thanks for this Eric, worked fine for me. Tony
Hi,
very good explained.
You write about wasted effort regarding creation of CRL for the root ca and write later it is important to publish the root CRT and CRL files.
How could I create an CRL file? The follow command asks about root passwort, but dont create the CRL file.
openssl ca -gencrl -config $file_conf -out $file_crl
cheers
Loe
You have two separate concepts crossed.
Concept 1: No one has the authority to revoke a root CA’s certificate. Configuring CRL data on that one certificate is a waste of time. This is very important knowledge because the inability to revoke a root CA is one of the primary reasons that we have to work extra hard to keep it safe.
Concept 2: Any CA, roots and subordinates, can revoke a certificate that they issued. It is very important to configure CRL data on those issued certificates, and it is very important to maintain the matching CRLs.
Shorter version: the CRL data that appears on a certificate refers to the CRL that might revoke it. Root CAs can’t have any useful data there because no one can revoke them, but every other certificate can. Put yet another way, any non-self-signed certificate can and should have CRL data, but no self-signed certificate should.
Make sense?
As for your command, read the “Urgent Note” right above the listing in Part 1, about halfway down the page. The $file_crl variable is not created properly because of the way that WordPress mangles my code. You have to manually adjust that part of the listing. Just follow the instructions, it’s easy.
Did you miss out creating the $dir_out directory? At step 8
cat $file_subcacert $file_rootcacert > $file_pemchain
This errors out with no such file or directory.
I created the directory myself and seems to work fine, just surprised no one seems to have caught this.
Great post, saved me a lot of stress!
Hmm. IIRC, it was already there when I started. When I get some time, I’ll run through the directions from a cold start to see what happens. I’ll add a note in there now to ensure that it exists.