Save to My DOJO

As an infrastructure hypervisor, Hyper-V hits all the high notes. However, it misses on some of the management aspects, though. You can find many control features in System Center Virtual Machine Manager, but I don’t feel that product was well-designed and the pricing places it out of reach of many small businesses anyway. Often, we don’t even need a heavy management layer; sometimes just one or two desires go unmet by the free tools. Of those, admins commonly request the ability to create and deploy templates. The free tools don’t directly include that functionality, but you can approximate it with only a bit of work.
The Concept of the Gold Image
You will be building “gold” or “master” (or even “gold master”) images as the core of this solution. This means that you’ll spend at least a little time configuring an environment (or several environments) to your liking. Instead of sending those directly to production, you’ll let them sit cold. When you want to deploy a new system, you use one of those as a base rather than building the instance up from scratch.
As you might have guessed, we do need to take some special steps with these images. They are not merely regular systems that have been turned off. We “generalize” them first, using a designated tool called “sysprep”. That process strips away all known unique identifiers for a Windows instance. The next time anyone boots that image, they’ll be presented with the same screens that you would see after freshly installing Windows. However, most non-identifying customization, such as software installations, will remain.
Do I Need Gold Images?
The simpler your environment, the less the concept of the gold image seems to fit. I wouldn’t write it off entirely, though. Even with rare usage, you can use a gold image to jump ahead of a lot of the drudgery of setting a new system. If you deploy from the same image only twice, it will be worth your time.
For any environment larger than a few servers, the need for gold images becomes apparent quickly. Otherwise, you wind up spending significant amounts of time designing and deploying new systems. Since major parts of new server deployments share steps (and the equivalent involved time), you get the best usage by leveraging gold images.
Usually, the resistance to such images revolves around the work involved. People often don’t wish to invest much time in something whose final product will mostly just sit idle. I think that there’s also something to that “all-new” feeling of a freshly built image that you lose with gold images. The demands of modern business don’t really allow for these archaic notions. Do the work once, maybe some maintenance effort later, and ultimately save yourself and your colleagues many hours.
Should I Image Workstation or Server Environments?
The majority of my virtualization experience involves server instances. To that end, I’ve been using some sort of template strategy ever since I started using Hyper-V. I only build all-new images when new operating systems debut or significant updates release. Even if I wasn’t sure that I’d ever deploy a server OS more than once, I would absolutely build an image for it.
Workstation OSes have a different calculus. If you’ll be building a Microsoft virtual-machine RDS deployment, then you cannot avoid gold images. If you’re using only hardware deployments, then you might still image, but probably not the way that I’m talking about in this article. I will not illustrate workstation OSes, as the particulars of the process do not deviate meaningfully from server instances.
What About OS and Software Keys?
For operating systems, you have two basic types:
- Keyed during install: This key will be retained after the sysprep, so you’ll need to use a key with enough remaining activations. KMS keys work best for this. With others, you’ll need to be prepared to change the key after deployment if the situation calls for it. If you have Windows Server Datacenter Edition as your hypervisor, then you can use the AVMA keys. If you don’t have DC edition, then you could technically still use the keys but you’ll have to immediately change it after deployment. I have no idea how this plays legally, so consider that a last-ditch risky move.
- Keyed after install: This usually happens with volume licensing images. These are the best because you really don’t have to plan anything. Key it afterward. Of course, you also need to qualify for volume licensing in order to use this option at all, so…
- OEM keys: I’m not even going to wade into that. Ask your reseller.
If you use the ADK (revisited a bit in an upcoming section), you have ways to address key problems.
As for software, you’ll have all sorts of issues with that. Most retain their keys. Lots of them have activation routines, too, so there’s that. And all of the things that come with it. You will need to think through and test. It will be worth the effort far more often than not.
What About Linux Gold Images?
Yes, you most certainly can create gold masters of Linux. In a way, it can be easier. Linux doesn’t use a lot of fancy computer identification techniques or have system-specific GUIDs embedded anywhere. Usually, you can just duplicate a Linux system at will and just rename it and assign a new IP.
Unfortunately, that’s not always the case. Because exceptions are so rare, there’s also no singular built-in tool to handle the items that need generalization. The only problem that I’ve encountered so far is with SSH keys. I found one set of instructions to regenerate them: https://serverfault.com/questions/471327/how-to-change-a-ssh-host-key.
Creating Gold Images for Hyper-V Templating
The overall process:
- Create a virtual machine
- Install the operating system
- Customize
- Generalize
- Store
- Deploy
If that sounds familiar, you probably do something like that for physical systems as well.
Let’s go over the steps in more detail.
Creating the Virtual Machine and Installing the Operating System
You start by simply doing what you might have done any number of times before: create a new virtual machine. One thing really matters: the virtual machine generation. Whatever generation you choose for the gold image will be the generation of all virtual machines that you build on it. Sure, there are some conversion techniques… but why use them? If you will need Generation 1 and Generation 2 VMs, then build two templates.
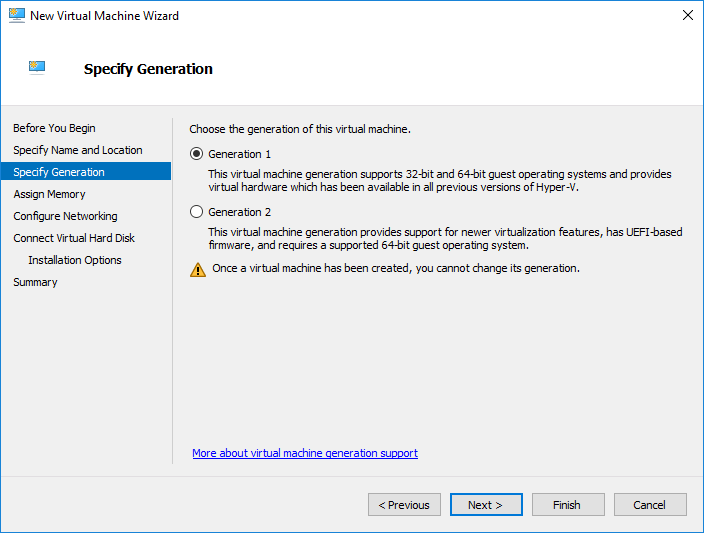
The rest of the settings of the virtual machine that you use for creating a gold image do not matter (unless the dictates of some particular software package override). You have more than one option for image storage, but in all cases, you will deploy to unique virtual machines whose options can be changed.
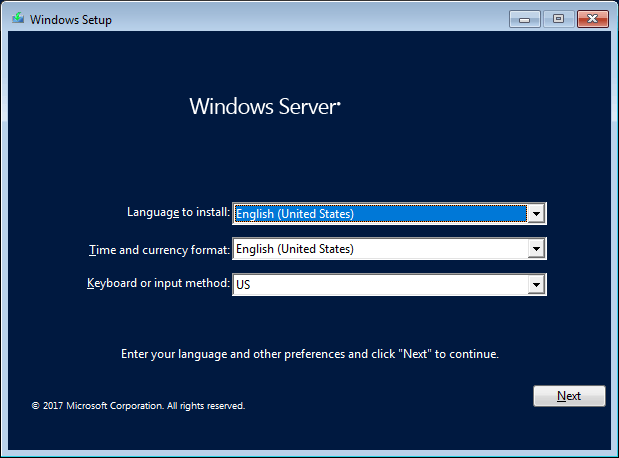
Once you’ve got your virtual machine created, install Windows Server (or whatever) as normal (note, especially for desktop deployments: many guides mention booting in Audit mode, which I have never done; this appears to be most important when Windows Store applications are in use):
Customizing the Gold Image
If you’re working on your first image, I would not go very far with this. You want a generic image to start with. For initial images, I tend to insert things like BGInfo that I want on every system. You can then use this base image to create more specialized images.
I have plans for future articles that will expand on your options for customization. You can perform simple things, like installing software. You can do more complicated things, such as using the Automated Deployment Kit. One of the several useful aspects of ADK is the ability to control keying.
Tip: If you have software that requires .Net 3.5, you can save a great deal of time by having a branch of images that include that feature pre-installed:
![]()
Just remember that you want to create generic images. Do not try to create a carbon-copy of an intended live system. If that’s your goal (say, for quick rollback to a known-good build), then create the image that you want as a live system and store a permanent backup copy. You could use an export if you like.
Very important: Patch the image fully, but only after you have all of the roles, features, and applications installed.
Generalize the Gold Image
Once you have your image built the way that you like it, you need to seal it. That process will make the image generic, freezing it into a state from which it can be repeatedly deployed. Windows (and Windows Server) includes that tool natively: sysprep.
The best way to invoke sysprep is by a simple command-line process. Use these switches:
C:WindowsSystem32Sysprepsysprep.exe /oobe /generalize /shutdown /mode:vm
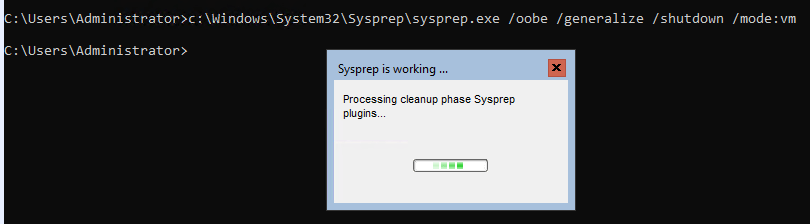
The first three parameters are standard. We can use the last one because we’re creating Hyper-V images. It will ensure that the image doesn’t spend a lot of time worrying about hardware.
Tip: If you want to use the aforementioned Audit Mode so that you can work with software packages, use /audit instead of /oobe.
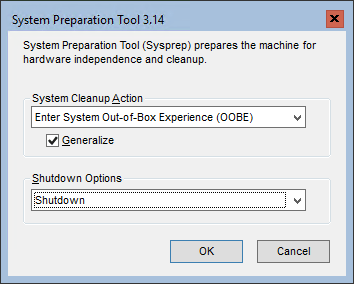
Tip: You can also just run sysprep.exe to get the user interface where you can pick all of these options except the mode. Your image(s) will work just fine if you don’t use /mode:vm.
Once the sysprep operation completes, it will stop the virtual machine. At that point, consider it to be in a “cold” state. Starting it up will launch the continuation of a setup process. So, you don’t want to do that. Instead, store the image so that it can be used later.
Storing a Gold Image
Decide early how you want to deploy virtual machines from this image. You have the option of creating all-new virtual machines at each go and re-using a copy of the VHDX. Alternatively, you can import a virtual machine as a copy. I use both techniques, so I recommend export. That way, you’ll have the base virtual machine and the VHDX so you can use either as suits you.
Image storage tip: Use deduplicated storage. In my test lab, keep mine on a volume using Windows Server deduplication in Hyper-V mode. That mode only targets VHDX files and was intended for running VDI deployments. It seems to work well for cold image storage, as well. I have not tried with the normal file mode.
VHDX Copy Storage
If you only want to store the VHDX, then copy it to a safe location. Give the VHDX a very clear name as to its usage. Don’t forget that Windows allows you to use very, very long filenames. Delete the root virtual machine afterward and clean up after it.
The benefit of copy storage is that you can easily lay out all of your gold image VHDXs side-by-side in the same folder and not need to keep track of all of those virtual machine definition files and folders.
Exported Image Storage
By exporting the virtual machine, you can leverage import functionality to easily deploy virtual machines without much effort on your part. There are some downsides, but they’re not awful:
- The export process takes a tiny bit of work. It’s not much, but…
- When importing, the name of the VHDX cannot be changed. So, you wind up with a newly-deployed virtual machine that uses the same VHDX name as your gold image. That problem can be fixed, of course, but it’s extra work.
I discovered that we’ve never written an article on exporting virtual machines. I’ll rectify that in a future article and we’ll link this one to it. Fortunately, the process is not difficult. Start by right-clicking your virtual machine and clicking the Export option. Follow the wizard from there:
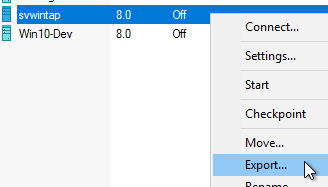
Tip: Disconnect any ISO images prior to exporting. Otherwise, the export will make a copy of that ISO to go with the VM image and it will remain permanently attached and deployed with each import.
Deploying Hyper-V Virtual Machines from Gold Images
From these images that you created, you can build a new virtual machine and attach a copy of the VHDX or you can import a copy.
Deploying from a VHDX Copy
VHDX copy deployment has two pieces:
- Creation of a virtual machine
- Attaching to a copy of the gold image VHDX
We have an article on using Hyper-V Manager to create a virtual machine. Make sure to use the same generation as the gold image. On the disk page, skip attaching anything:
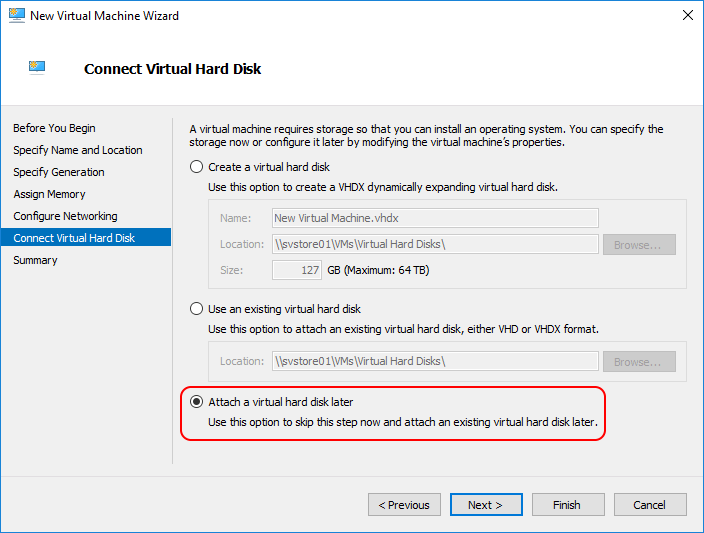
Remember that Hyper-V Manager doesn’t have much for configuration options during VM creation. Set the memory and CPU and network up before proceeding.
To finish up, copy the gold image’s VHDX into whatever target location you like. You can use a general “Virtual Hard Disks” folder like the Hyper-V default settings do, or you can drop it in a folder named after the VM. It really doesn’t matter, as long as the Hyper-V host can reach the location. If it were me, I would also rename the VHDX copy to something that suits the VM.
Once you have the VHDX placed, use Hyper-V Manager to attach it to the virtual machine:
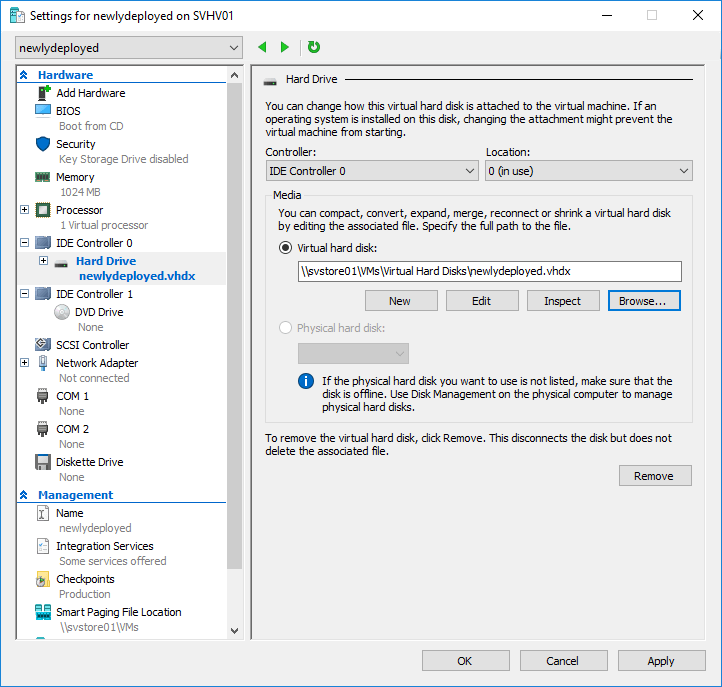
Once you hit OK, you can boot up the VM. It will start off like a newly-installed Windows machine, but all your customizations will be in place.
Deploying with Import
Importing saves you a bit of work in exchange for a bit of different but optional work.
We already have an article on importing (scroll down to the bottom 2/3 or so). I will only recap the most relevant portions.
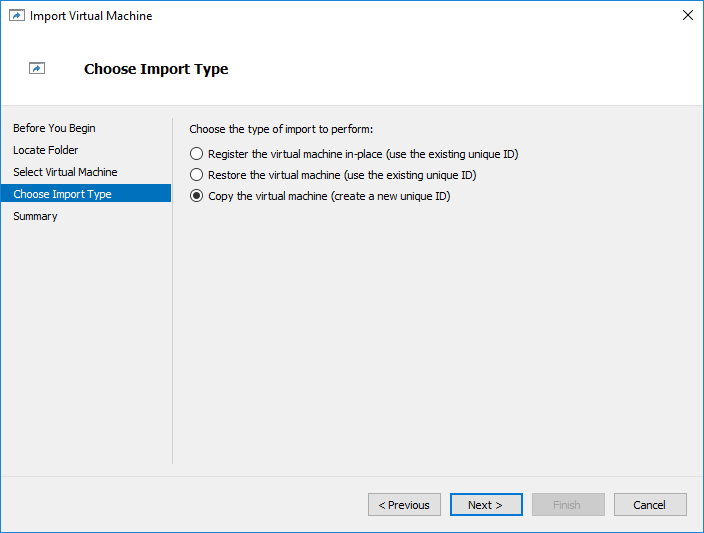
First, choose the relevant source gold image:
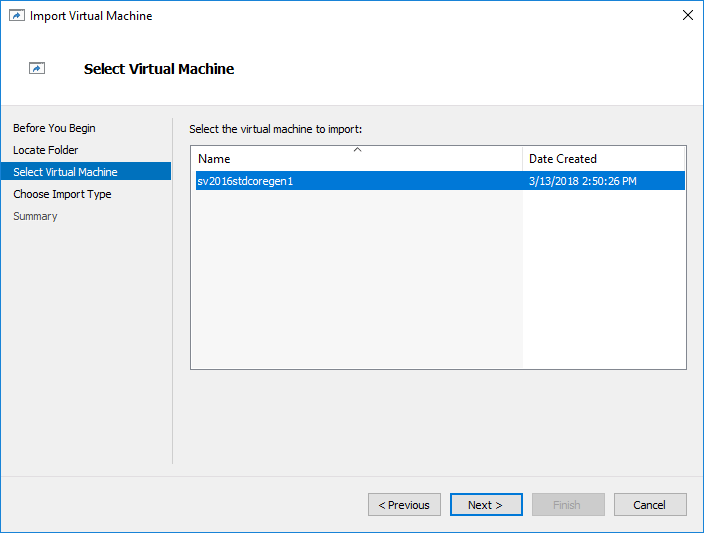
Especially ensure that you choose to Copy. Either of the other choices will cause problems for the gold image.
Now, the fun parts. It will import with the name of the exported VM. That’s probably not what you want. You’ll need to:
- Rename the virtual machine
- Rename the VHDX(s)
- Detach the VHDX(s)
- Rename it/them
- Reattach it/them
- You may need to rename the folder(s), depending on how you deployed. That hasn’t been a problem for me, so far.
Post-Deployment Work
At this point, you are mostly finished. The one thing to keep in mind: the guest operating system will have a generic name unrelated to the virtual machine’s name. Don’t forget to fix that. Also, IP addresses will not be retained, etc.
Further Work and Consideration
What I’ve shown you only takes you through some simplistic builds. You can really turn this into a powerhouse deployment system. Things to think about:
- After you have a basic build, import it, customize it further and sysprep it again. Repeat as necessary.
- Microsoft places limits on how many times an image can be sysprepped. Therefore, always try to work from the first image rather than from a deep child.
- You can use the Mount-WindowsImage cmdlet family and DISM tools. Those allow you to patch and apply items to an image without decrementing the sysprep counter. For an example, I have a script that makes a VHDX into a client for a WSUS system.
- You can mount a VHDX in Windows Explorer to move things into it.
Watch out for more articles that talk more about customizing your images. If you’re having trouble following any of the steps above, ping me a message in the comments below and I’ll help you out.


Not a DOJO Member yet?
Join thousands of other IT pros and receive a weekly roundup email with the latest content & updates!
More in this category


About the Author

Eric Siron


50 thoughts on "How to Create Virtual Machine Templates with Hyper-V Manager"
This is not what I would consider a Gold Image. This is just copying a syspred image. A Golden Image refers to using a master, read only VHD and having each iteration use a differencing disk.
OK. But the industry referred to ready-to-go sysprepped images as “gold” for quite some time before what you’re talking about was even possible. The term wasn’t new even then. Whatever works for you, though.
Don’t worry, I understood you. The “gold” image isn’t even vernacular globally used by all systems equally; So, contextually reading your article, it is obvious what you were conveying.
Thanks for the read. Was building quite a few Linux Mint 20 VMs in Hyper-V, and this is going to help me not have to go through the initial setup timezones updates vnc setup etc etc.
Hi, I am just using Hyper-V at the moment and “learning” about these images, before I go on to use SCVMM.
I have created a base setup and done the sysprep. Then exported the VM.
When I copy the VHDX and then rename it, to the destination, and then create my new VM and attach it, it is not booting up in to the OOBE. And so, everything appears to work ok (it boots in to the OS fine but without the initial config screens) until I try to join a domain and then it tells me that the SID exists and that I should use sysprep. If I run the sysprep again at this point, everything generalizes and I get the OOBE and all is then OK, but I was kind of expecting the initial turn on of the new VM with the attached copy to do that OOBE?
Am I mis-understading this process? Or am I missing something?
So, I:
1) Built new VM and got it all patched etc
2) Turned off the VM and took a snapshot
3) Powered it back on and ran sysprep with Shutdown
4) Exported the VM
5) Created a new VM with attach later selected
6) Copied the VHDX file to a new folder and renamed it
7) Settings – attached new disk as IDE0 and browsed and selected the copied VM / changed the BIOS order
8) Start VM
Have I missed something?
Thanks