Save to My DOJO
Table of contents
- What’s in this Article
- General Philosophy
- Prerequisites
- Step 1. Acquire and Enable openssl
- Step 2. Set Up a Certificate Authority
- Step 3. Set Your Managing Computer to Trust the CA
- Step 4. Secure the Nagios Web Site
- Step 5: Configure Nagios for Active Directory Authentication
- Step 6: Configure check_nrpe and NSClient++ for SSL
I’ve provided some articles on monitoring Hyper-V using Nagios. In all of them, I’ve specifically avoided the topic of securing the communications chain. On the one hand, I figure that we’re only working with monitoring data; we’re not passing credit card numbers or medical history.
On the other hand, several of my sensors use parameterized scripts. If I didn’t design my scripts well, then perhaps someone could use them as an attack vector. Rather than pretend that I can ever be certain that I’ll never make a mistake like that, I can bundle the communications into an encrypted channel. Even if you’re not worried about the scripts, you can still enjoy some positive side effects.
What’s in this Article
The end effects of following this article through to completion:
- You will access your Nagios web interface at an https:// address.
- You can access your Nagios web interface using your Active Directory domain credentials. You can also allow others to use their credentials. You can control what any given account can access.
- Nagios will perform NRPE checks against your Hyper-V and Windows Server systems using a secured channel
As you get started, be advised that this is a very long article. I did test every single line, usually multiple times. You will almost always need to use sudo. I tried to add it everywhere it was appropriate, but each time I proofread this article, I find another that I missed. You might want to just sudo -s right in the beginning and be done with it.
General Philosophy
When I started working on this article, I fully intended to utilize a Microsoft-based certificate authority. Conceptually, PKI (public key infrastructure) is extremely simple. But, from that simplicity, implementers run off and make things as complicated as possible. I have not encountered any worse offender than Microsoft. After several days struggling against it, I ran up against problems that I simply couldn’t sort out. After trying to decipher one too many of Microsoft’s cryptic and non-actionable errors (“Error 0x450a05a1: masking tape will not eat pearl soufflé from the file that cannot be named”), I finally gave up. So, while it should be possible to use a Microsoft CA for everything that you see here, I cannot demonstrate it. Be aware that Microsoft’s tools tend to output DER (binary) certificates. Choose the Base64 option when you can. You can convert DER to Base64 (PEM).
Rather than giving up entirely, I re-centered myself and adopted the following positions:
- Most of my readers probably don’t want to go to the hassle of configuring a Microsoft CA anyway; many of you don’t have the extra Windows Server licenses for that sort of thing, either
- We’re securing monitoring traffic, not state secrets. We can shift the bulk of the security responsibility to the endpoints
- To make all of this more secure, one simply needs to use a more secure CA. The remainder of the directions stay the same
Some things could be done differently. In a few places, I’m fairly certain that I worked harder than necessary (i.e., could have used fewer arguments to openssl). Functionality and outcome were most important.
In general, certificates are used to guarantee the identity of hosts. Anything else — host names, IP addresses, MAC addresses, etc., can be easily spoofed. In this case, we’re locking down a monitoring system. If someone manages to fool Nagios… uh… OK then. I am more concerned that, if you use the scripts that I provide, we are transmitting PowerShell commands to a service running with administrative privileges, and the transmission is sent in clear text. There are many safeguards to prevent that from being a security risk, but I want to add layers on top of that. So, while host authentication is always a good thing, my primary goal in this case is to encrypt the traffic. It’s on you to take precautions to lock down your endpoints. Maintain a good root password on your Linux boxes, maintain solid password protection policies, etc.
I borrowed heavily from many sources, but probably none quite so strongly as Nagios’ own documentation: https://support.nagios.com/kb/article.php?id=519.
Prerequisites
You need a Linux machine running Nagios. I wrote one guide for doing that on Ubuntu. I wrote another guide for doing that on CentOS. I have a third article forthcoming for doing the same with OpenSUSE. It’s totally acceptable for you to bring your own. The distributions aren’t so radically different that you won’t be able to figure out any differences that survive this article.
Also, for any of this to make sense, you need at least one Windows Server/Hyper-V Server system to monitor.
Have Patience! I can go on and on all day about how Microsoft makes a point of avoiding actionable error messages. In this case, they are far from alone. I lost many hours trying to decipher useless messages from openssl and NRPE. Solutions are usually simple, but the problems are almost always frustrating because the authors of these tools couldn’t be bothered to employ useful error handling. NSClient++ treated me much better, but even that let me down a few times. Take your time and remember that, even though there are an absurd number of configuration points, certificate exchange is fundamentally simple. Whatever problem you encounter is probably a small one.
Step 1. Acquire and Enable openssl
Every distribution that I used already had openssl installed. Just to be sure, use your distribution’s package manager. Examples:
sudo apt install openssl
yum install openssl
zypper install openssl
You’ll probably get a message that you already have the package. Good!
Next, we need a basic configuration. You should automatically get one along with the default installation of openssl. Look for a file named “openssl.cnf”. It will probably be in in /etc/ssl or /usr/lib/ssl. Linux can help you:
find / -name "openssl.cnf"
If you haven’t got one, then maybe removing and reinstalling openssl will create it… I never tried that. You could try this site: https://www.phildev.net/ssl/opensslconf.html. I’ll also provide the one that I used. Different sections of the file are used for different purposes. I’ll show each portion in context.
Set Up Your Directories and Environment
You will need to place your certificate files in a common place. First, look around the location where you found the openssl.cnf file. Specifically, check for “private” and “certs” directories. If they don’t exist, you can make some.
sudo mkdir /var/certs
To keep things simple, I just dump everything there on systems that need a directory created. I will write the remainder of this document using that directory. If your system already has the split directories, use “private” to hold key files and “certs” to hold certificate files. Note that if you find these files underneath a “ca” path, that is for the certificate authority, not the client certificates that I’m talking about. I’ll specifically cover the certificate authority in the next section.
Step 2. Set Up a Certificate Authority
In this implementation, the Linux system that runs Nagios will also host a certificate authority. We’ll use that to CA to generate certificates that Nagios and NRPE can use. Some people erroneously refer to those as “self-signed” because they aren’t issued by an “official” CA. However, that’s not the definition of “self-signed”. A self-signed certificate doesn’t have an authority chain. In our case, that term will apply only to the CA’s own certificate, which will then be used to sign other certificates. All of those will be authentic, not-self-signed certificates. As I describe it, you’ll use the same system as for both your CA and Nagios system, but you could just as easily spin up another Linux system to be the CA. You would only need to copy CSR, certificate, and key files across the separate systems as necessary to implement that.
Set Up Your Directories and Environment
You need places to put your CA’s files and certificates. openssl will require its own particular files. If you found some CA folders near your openssl.cnf, use those. Otherwise, you can create your own.
sudo mkdir /var/ca
sudo mkdir /var/ca/newcerts
sudo echo 01 > /var/ca/serial
sudo touch /var/ca/index.txt
Configure your default openssl.cnf (sometimes openssl.conf). Note the file locations that I mentioned in the previous section. Mine looks like this:
HOME			= .
RANDFILE		= $ENV::HOME/.rnd

# Extra OBJECT IDENTIFIER info:
#oid_file		= $ENV::HOME/.oid
oid_section		= new_oids

# To use this configuration file with the "-extfile" option of the
# "openssl x509" utility, name here the section containing the
# X.509v3 extensions to use:
# extensions		=
# (Alternatively, use a configuration file that has only
# X.509v3 extensions in its main [= default] section.)

[ new_oids ]

# We can add new OIDs in here for use by 'ca', 'req' and 'ts'.
# Add a simple OID like this:
# testoid1=1.2.3.4
# Or use config file substitution like this:
# testoid2=${testoid1}.5.6

# Policies used by the TSA examples.
tsa_policy1 = 1.2.3.4.1
tsa_policy2 = 1.2.3.4.5.6
tsa_policy3 = 1.2.3.4.5.7

####################################################################
[ ca ]
default_ca	= CA_default		# The default ca section

####################################################################
[ CA_default ]

dir			= /var/ca			# Where everything is kept
certs		= $dir/certs		# Where the issued certs are kept
crl_dir		= $dir/crl			# Where the issued crl are kept
database	= $dir/index.txt	# database index file.
unique_subject	= no			# Set to 'no' to allow creation of several ctificates with same subject.
new_certs_dir	= $dir/newcerts		# default place for new certs.

certificate	= $dir/cacert.pem 	# The CA certificate
serial		= $dir/serial 		# The current serial number
crlnumber	= $dir/crlnumber	# the current crl number
					# must be commented out to leave a V1 CRL
crl		= $dir/crl.pem 		# The current CRL
private_key	= $dir/private/cakey.pem# The private key
RANDFILE	= $dir/private/.rand	# private random number file

x509_extensions	= usr_cert		# The extentions to add to the cert

# Comment out the following two lines for the "traditional"
# (and highly broken) format.
name_opt 	= ca_default		# Subject Name options
cert_opt 	= ca_default		# Certificate field options

# Extension copying option: use with caution.
# copy_extensions = copy

# Extensions to add to a CRL. Note: Netscape communicator chokes on V2 CRLs
# so this is commented out by default to leave a V1 CRL.
# crlnumber must also be commented out to leave a V1 CRL.
# crl_extensions	= crl_ext

default_days	= 365			# how long to certify for
default_crl_days= 30			# how long before next CRL
default_md	= default		# use public key default MD
preserve	= no			# keep passed DN ordering

# A few difference way of specifying how similar the request should look
# For type CA, the listed attributes must be the same, and the optional
# and supplied fields are just that :-)
policy		= policy_match

# For the CA policy
[ policy_match ]
countryName		= match
stateOrProvinceName	= match
organizationName	= match
organizationalUnitName	= optional
commonName		= supplied
emailAddress		= optional

# For the 'anything' policy
# At this point in time, you must list all acceptable 'object'
# types.
[ policy_anything ]
countryName		= optional
stateOrProvinceName	= optional
localityName		= optional
organizationName	= optional
organizationalUnitName	= optional
commonName		= supplied
emailAddress		= optional

####################################################################
[ req ]
default_bits		= 2048
default_keyfile 	= privkey.pem
distinguished_name	= req_distinguished_name
attributes		= req_attributes
x509_extensions	= v3_ca	# The extentions to add to the self signed cert
prompt			= no

# Passwords for private keys if not present they will be prompted for
# input_password = secret
# output_password = secret

# This sets a mask for permitted string types. There are several options.
# default: PrintableString, T61String, BMPString.
# pkix	 : PrintableString, BMPString (PKIX recommendation before 2004)
# utf8only: only UTF8Strings (PKIX recommendation after 2004).
# nombstr : PrintableString, T61String (no BMPStrings or UTF8Strings).
# MASK:XXXX a literal mask value.
# WARNING: ancient versions of Netscape crash on BMPStrings or UTF8Strings.
string_mask = utf8only

req_extensions = v3_req # The extensions to add to a certificate request

[ req_distinguished_name ]
countryName			= Country Name (2 letter code)
countryName_default		= US
countryName_min			= 2
countryName_max			= 2

stateOrProvinceName		= Iowa
localityName			= Iowa City
0.organizationName		= SironIC
commonName				= svlmon1.siron.int
commonName_max			= 64
emailAddress			=
emailAddress_max		= 64

# SET-ex3			= SET extension number 3

[ req_attributes ]
challengePassword		= A challenge password
challengePassword_min		= 4
challengePassword_max		= 20

unstructuredName		= An optional company name

[ usr_cert ]

# These extensions are added when 'ca' signs a request.

# This goes against PKIX guidelines but some CAs do it and some software
# requires this to avoid interpreting an end user certificate as a CA.

basicConstraints=CA:FALSE

# Here are some examples of the usage of nsCertType. If it is omitted
# the certificate can be used for anything *except* object signing.

# This is OK for an SSL server.
# nsCertType			= server

# For an object signing certificate this would be used.
# nsCertType = objsign

# For normal client use this is typical
# nsCertType = client, email

# and for everything including object signing:
# nsCertType = client, email, objsign

# This is typical in keyUsage for a client certificate.
# keyUsage = nonRepudiation, digitalSignature, keyEncipherment

# This will be displayed in Netscape's comment listbox.
nsComment			= "OpenSSL Generated Certificate"

# PKIX recommendations harmless if included in all certificates.
subjectKeyIdentifier=hash
authorityKeyIdentifier=keyid,issuer

# This stuff is for subjectAltName and issuerAltname.
# Import the email address.
# subjectAltName=email:copy
# An alternative to produce certificates that aren't
# deprecated according to PKIX.
# subjectAltName=email:move

# Copy subject details
# issuerAltName=issuer:copy

#nsCaRevocationUrl		= http://www.domain.dom/ca-crl.pem
#nsBaseUrl
#nsRevocationUrl
#nsRenewalUrl
#nsCaPolicyUrl
#nsSslServerName

# This is required for TSA certificates.
# extendedKeyUsage = critical,timeStamping

[ v3_req ]

# Extensions to add to a certificate request

basicConstraints = CA:FALSE
keyUsage = nonRepudiation, digitalSignature, keyEncipherment

[ v3_ca ]


# Extensions for a typical CA


# PKIX recommendation.

subjectKeyIdentifier=hash

authorityKeyIdentifier=keyid:always,issuer

# This is what PKIX recommends but some broken software chokes on critical
# extensions.
#basicConstraints = critical,CA:true
# So we do this instead.
basicConstraints = CA:true

# Key usage: this is typical for a CA certificate. However since it will
# prevent it being used as an test self-signed certificate it is best
# left out by default.
# keyUsage = cRLSign, keyCertSign

# Some might want this also
# nsCertType = sslCA, emailCA

# Include email address in subject alt name: another PKIX recommendation
# subjectAltName=email:copy
# Copy issuer details
# issuerAltName=issuer:copy

# DER hex encoding of an extension: beware experts only!
# obj=DER:02:03
# Where 'obj' is a standard or added object
# You can even override a supported extension:
# basicConstraints= critical, DER:30:03:01:01:FF

[ crl_ext ]

# CRL extensions.
# Only issuerAltName and authorityKeyIdentifier make any sense in a CRL.

# issuerAltName=issuer:copy
authorityKeyIdentifier=keyid:always

[ proxy_cert_ext ]
# These extensions should be added when creating a proxy certificate

# This goes against PKIX guidelines but some CAs do it and some software
# requires this to avoid interpreting an end user certificate as a CA.

basicConstraints=CA:FALSE

# Here are some examples of the usage of nsCertType. If it is omitted
# the certificate can be used for anything *except* object signing.

# This is OK for an SSL server.
# nsCertType			= server

# For an object signing certificate this would be used.
# nsCertType = objsign

# For normal client use this is typical
# nsCertType = client, email

# and for everything including object signing:
# nsCertType = client, email, objsign

# This is typical in keyUsage for a client certificate.
# keyUsage = nonRepudiation, digitalSignature, keyEncipherment

# This will be displayed in Netscape's comment listbox.
nsComment			= "OpenSSL Generated Certificate"

# PKIX recommendations harmless if included in all certificates.
subjectKeyIdentifier=hash
authorityKeyIdentifier=keyid,issuer

# This stuff is for subjectAltName and issuerAltname.
# Import the email address.
# subjectAltName=email:copy
# An alternative to produce certificates that aren't
# deprecated according to PKIX.
# subjectAltName=email:move

# Copy subject details
# issuerAltName=issuer:copy

#nsCaRevocationUrl		= http://www.domain.dom/ca-crl.pem
#nsBaseUrl
#nsRevocationUrl
#nsRenewalUrl
#nsCaPolicyUrl
#nsSslServerName

# This really needs to be in place for it to be a proxy certificate.
proxyCertInfo=critical,language:id-ppl-anyLanguage,pathlen:3,policy:foo

####################################################################
[ tsa ]

default_tsa = tsa_config1	# the default TSA section

[ tsa_config1 ]

# These are used by the TSA reply generation only.
dir		= ./demoCA		# TSA root directory
serial		= $dir/tsaserial	# The current serial number (mandatory)
crypto_device	= builtin		# OpenSSL engine to use for signing
signer_cert	= $dir/tsacert.pem 	# The TSA signing certificate
					# (optional)
certs		= $dir/cacert.pem	# Certificate chain to include in reply
					# (optional)
signer_key	= $dir/private/tsakey.pem # The TSA private key (optional)

default_policy	= tsa_policy1		# Policy if request did not specify it
					# (optional)
other_policies	= tsa_policy2, tsa_policy3	# acceptable policies (optional)
digests		= md5, sha1		# Acceptable message digests (mandatory)
accuracy	= secs:1, millisecs:500, microsecs:100	# (optional)
clock_precision_digits  = 0	# number of digits after dot. (optional)
ordering		= yes	# Is ordering defined for timestamps?
				# (optional, default: no)
tsa_name		= yes	# Must the TSA name be included in the reply?
				# (optional, default: no)
ess_cert_id_chain	= no	# Must the ESS cert id chain be included?
				# (optional, default: no)
Make certain that you walk through it and enter your localized settings in place of mine. Also note that I’ve removed the comment mark in front of “req_extensions = v3_req”.
Create the CA certificate:
cd /var/ca
sudo openssl req -x509 -newkey rsa:4096 -keyout ca_key.pem -out ca_cert.pem -utf8 -days 3650
You will first be asked to answer a series of questions. If you filled out the fields correctly, then you can just press [Enter] all the way through them. You will then be asked to provide a password for the private key. Even though we aren’t securing anything of earth-shattering importance, take this seriously.
Your CA’s private key is the most vital file out of all that you’ll be creating. We’re going to lock it down so that it can only be accessed by root:
sudo chmod 600 ca_key.pem
The public key is included in the public cert file (ca_cert.pem). That can safely be read by anyone, anywhere, any time.
For bonus points, research setting up access to your new CA’s certificate revocation list (CRL). I did not set that up for mine.
Step 3. Set Your Managing Computer to Trust the CA
Your management computer will access the Nagios site that will be secured by your new CA. Therefore, your management computer needs to trust the certificates issued by that CA, or you’ll get warnings in every major browser.
For a Linux machine (client, not the Nagios server), check to see if /etc/ssl/certs contains several files. If it does (Ubuntu, openSUSE), just copy the CA cert there. You can rename the file so that it stands out better, if you like. Not every app on Linux will read that folder; you’ll need to find directions for those apps specifically.
If your Linux distribution doesn’t have that folder (CentOS), then look for /etc/pki/ca-trust/source/anchors. If that exists (CentOS), copy the certificate file there. Then, run:
sudo update_ca_trust enable
For a Windows machine:
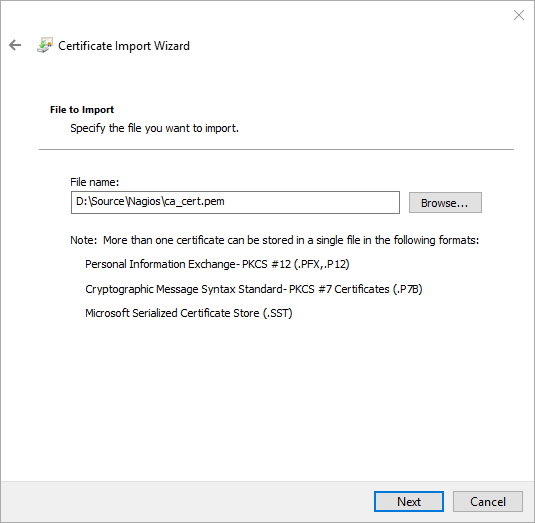
- Use WinSCP to transfer the ca_cert.pem file to your Windows system (not the key; the key never needs to leave the CA).
- Run MMC.EXE as administrator.
- Click File->Add/Remove Snap-in.
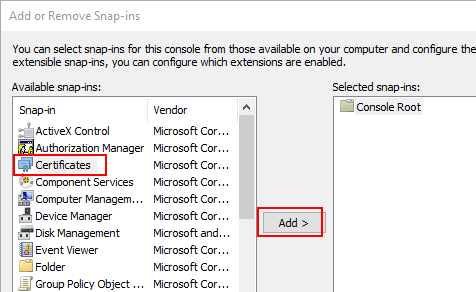
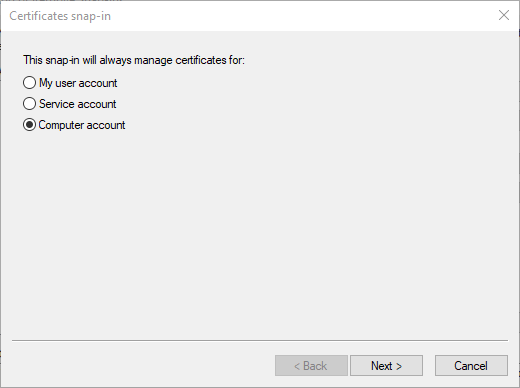
- Choose Computer Account and click Next.
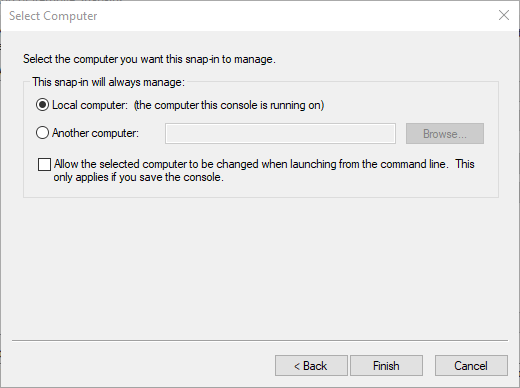
- Leave Local Computer selected and click Finish.
- Click OK back on the Add/Remove Snap-ins dialog.
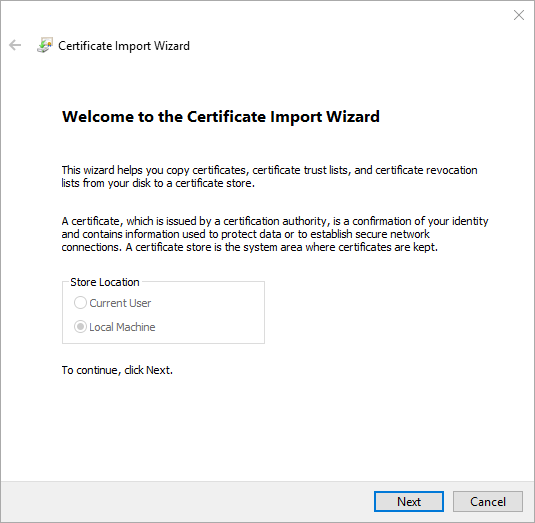
- Back in the main screen, right-click Trusted Root Certification Authorities. Hover over All Tasks, then click Import.
- On the Welcome screen, you should not be allowed to change the selection from Local Machine.
- Browse to the file that you copied over using WinSCP. You’ll either need to change the selection to allow all files or you’ll need to have renamed the certificate to have a .cer extension.
- Choose Trusted Root Certification Authorities.
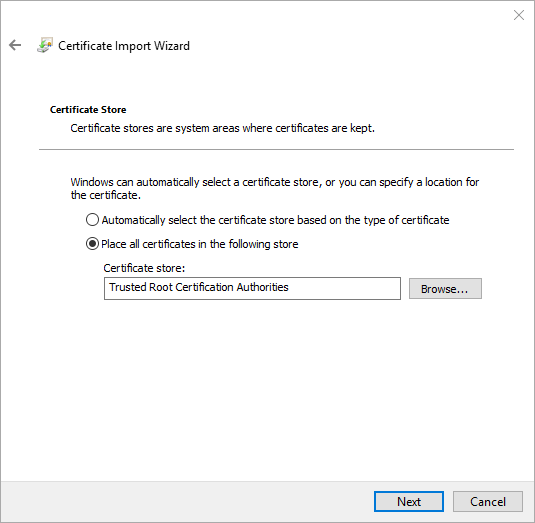
- Click Finish on the final screen.
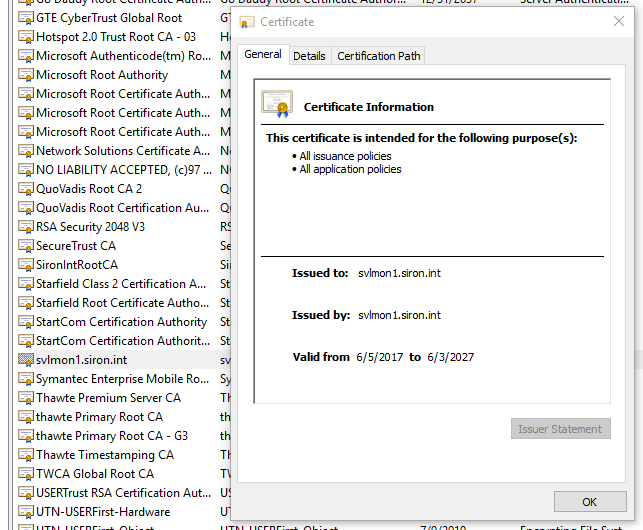
- Find your new CA in the list and double-click it to verify.
The above steps can be duplicated for other computers that need to access the Nagios site. For something a bit more widespread, you can deploy the certificate using Group Policy Management Console. In the GPO’s properties, drill down to Computer ConfigurationWindows SettingsSecurity SettingsPublic Key PoliciesTrusted Root Certification Authorities. You can right-click on that node and click Import to start the same wizard that you used above.
Note: Internet Explorer, Edge, and Chrome will use trusted root certificates from the Windows store. The authors of Firefox have decided that reinventing the wheel and maintaining a completely separate certificate store makes sense somehow. You’ll have to configure its trusted root certificate store within the program.
Step 4. Secure the Nagios Web Site
If you followed any of my earlier guides, you’re accessing your Nagios site over port 80 with Basic authentication. That means that any moderately enterprising soul can snag your Nagios site’s clear-text password(s) right out of the Ethernet. You have several options to fix that. I chose to use an SSL site while retaining Basic authentication. Your password still travels, but it travels encrypted. As long as you protect the site’s private key, an attacker should find cracking your password prohibitively difficult.
You could also use Kerberos authentication to have the Nagios site check your credentials against Active Directory. When that works, it appears that your password is protected, even using unencrypted HTTP. However, I could not find an elegant way to combine that with the existing file-based authentication. So, if you’re one of my readers at a smaller site with only one or two domain controllers and you lose your domain for some reason, you’d also lose your ability to log in to your monitoring environment. Also, managing Kerberos users in Nagios is kind of ugly. I didn’t find that a palatable option.
So, we’re going to keep the file-based authentication model and add LDAP authentication on top of it. You’ll be able to use your Active Directory account to log in to the Nagios site, but you’ll also be able to fall back to the existing “nagiosadmin” account when necessary.
One thing that I don’t demonstrate is updating the firewall to allow for port 443. Whatever directions you used to open up port 80, follow those for 443.
Create the Certificate for Apache
If you only use the one site address, then you can continue using the same openssl.cnf file from earlier steps. So, if I were using “https://svlmon1.siron.int/nagios” to access my site, then I would just proceed with what I have. However, I access my site with “https://nagios.siron.int”. I also have a handful of other sites on the same system. I (and you) could certainly create multiple certificates to handle them all. I chose to use Subject Alternate[sic] Names instead. That means that I create a single certificate with all of the names that I want. It means less overhead and micromanagement for me. Again, we’re not hosting a stock exchange, so we don’t need to complicate things.
You have two choices:
- Edit your existing openssl.cnf file with the differences for the new certificate(s).
- Copy your existing openssl.cnf file, make the changes to the copy, and override the openssl command to use the copied file.
I suppose a third option would be to hack at the openssl command line to manually insert what you want. That requires more gumption than I can muster, and I don’t see any benefits. I’m going with option 2.
sudo cp /etc/ssl/openssl.cnf /etc/ssl/apache-req.cnf
sudo nano /etc/ssl/apache-req.cnf
Of course, it’s not a requirement to use nano. Use the editor you prefer.
The following shows sample additions to the file. They are not sufficient on their own!
[ req ]
req_extensions = v3_req		# this line is commented out in the sample; remove that comment mark
[ v3_req ]
subjectAltName = @alt_names
[ alt_names ]
DNS.1 = svlmon1.siron.int
DNS.2 = svlmon1
DNS.3 = nagios
DNS.4 = nagios.siron.int
DNS.5 = mrtg
DNS.6 = mrtg.siron.int
DNS.7 = cacti
DNS.8 = cacti.siron.int
IP.1 = 192.168.25.128
The req_extensions line already exists in the default sample config, but has a hash mark in front of it to comment it out. Remove that (or type a new line, whatever suits you). The [ v3_req ] section probably exists; whatever it’s got, leave it. Just add the subjectAltName line. The [ alt_names ] segment won’t exist (probably). Add it, along with the DNS and IP entries that you want.
Note: The certificates we create now are not part of the CA. I sudo mkdir /var/certs to hold non-CA cert files. That’s a convenience, not a requirement. Follow the guidance from earlier.
If you’re copy/pasting, note that I used a .cnf file from /etc/ssl. Your structure may be different.
cd /var/certs
sudo openssl req -new -newkey rsa:2048 -keyout apache.key -out apache.csr -nodes -config /etc/ssl/apache-req.cnf
You will be asked to answer a series of questions like you did for the CA, with an additional query regarding a password and a company name. I would just [Enter] through both of those.
Verify that your CSR has the necessary Subject Alternate Names:
openssl req -text -noout -verify -in apache.csr
Secure the private key:
sudo chmod 600 apache.key
Submit the request to your new CA:
openssl ca -days 1825 -notext -md sha256 -keyfile /var/ca/ca_key.pem -cert /var/ca/ca_cert.pem -in apache.csr -out apache.pem -extensions v3_req -extfile /etc/ssl/apache-req.cnf
First, openssl will ask you to supply the password for the CA’s private key. Next, you’ll be shown a preview of the certificate and asked twice to confirm its creation.
The generated file will appear in your CA’s configured output directory (the one used in these directions is /var/ca/newcerts). It will use the next serial from your /var/ca/serial file as the name. So, if you’re following straight through, that will be /var/ca/newcerts/01.pem. You can ls /var/ca/newcerts to see them all. The highest number is the one that was just generated. Verify that it’s yours:
openssl x509 -in /var/ca/newcerts/01.pem -text -noout
Transfer the certificate to whatever location that you’ll have Apache call it from, and, for convenience, rename it:
cp /var/ca/newcerts/01.pem /var/certs/apache.pem
Tell Apache to Use SSL with the Certificate
Apache allows so much latitude in configuration that it appears to be complicated. Every distribution that installs Apache from repositories follows its own conventions, making things even more challenging. I’ll help guide you where possible. If you feel lost, just remember these things:
- The last time that Apache finds a configuration setting overrides all previous configurations of that setting
- Apache reads files in alphabetical order
- Apache doesn’t care about file names, only extensions
So, any time that a configuration doesn’t work, that means that a later setting overrides. It might be further down in the same file or it might be in another file, but it’s out there somewhere. It might be in a file with a seemingly related name, but it might not be.
Start by locating the master Apache configuration file.
- Ubuntu and OpenSUSE: /etc/apache2/apache2.conf
- CentOS: /etc/httpd/conf/httpd.conf
This file will help you to figure out what extensions qualify a configuration file and which directories Apache searches for those configuration files.
We will take these basic steps:
- Enable SSL
- Instruct Apache to listen on ports 80 and 443
- Instruct Apache to redirect all port 80 traffic to port 443
- Secure all 443 traffic with the certificate that we created in the preceding section
Enable SSL in Apache
Your distribution probably enabled SSL already. Verify on Ubuntu with apache2 -M | grep ssl. Verify on CentOS/OpenSUSE with httpd -M | grep ssl. If you are rewarded with a return of ssl_module, then you don’t need to do anything else.
To enable Apache SSL on Ubuntu/OpenSUSE: sudo a2enmod ssl.
To enable Apache SSL on CentOS: sudo yum install mod_ssl.
Configure SSL in Apache
We could do all of steps 2-4 in a single file or across multiple files. I tend to do step 2 in a place that makes sense for the distribution, then steps 3 and 4 in the primary site configuration file. We could also spread out certificates across multiple virtual hosts. I’m not hosting tenants, so I tend to use one virtual host per site, but each uses the same certificate.
Remember, it doesn’t really matter where any of these things are set. The only thing that matters is that they are processed by Apache after any conflicting settings. Do your best to simply eliminate any conflicts. For instance, CentOS puts a lot of SSL settings in /etc/httpd/conf.d/ssl.conf. For that distribution, I left all of the settings it creates for defaults but commented out the entire VirtualHost host item. I strongly encourage you to create backup copies of any file before you modify them. Ex: cp /etc/httpd/conf.d/ssl.conf /etc/httpd/conf.ssl.conf.original
Somewhere, you need a Listen 443 directive. Most distributions will automatically set it when you enable SSL (look in ports.conf or a conf file with “ssl” in the name). However, I’ve had a few times when that only worked for IPv6. If you can’t get 443 to work on IPv4, try Listen 0.0.0.0:443. This resolves step 2.
Next, we need a port 80 to 443 redirect. Apache has an “easy” Redirect command, but it’s too restrictive unless you’re only hosting a single site. In my primary site file, I create an empty port 80 site that redirects all inbound requests to an otherwise identical location using https:
<VirtualHost *:80>
        RewriteEngine On
        #RewriteCond %{SERVER_PORT} 80
        RewriteRule ^(.*)$ https://%{HTTP_HOST}%{REQUEST_URI} [L,R=301]
</VirtualHost>
This sequence sends a 301 code back to the browser along with the “corrected” URL. As long as the browser understands what to do with 301s (every modern browser does), then the URL will be rewritten right in the address bar. If you’re stuck for where to place this, I recommend:
- On Ubuntu: /etc/apache2/sites-available/000-default.conf (symlinked from /etc/apache2/sites-enabled/)
- On CentOS: /etc/httpd/conf.d/sites.conf
- On OpenSUSE: /etc/apache2/default-server.conf
Wherever you put it, you need to verify that there are no other virtual hosts set to port 80. If there are, comment them out. You could also replace the 80 with 443, provided that you also add in the certificate settings that I’m about to show you.
After setting up the 80->443 redirect, you next need to configure a secured virtual host. It must do two things: listen on port 443 and use a certificate to encrypt traffic. Mine looks like this:
<VirtualHost _default_:443>
        ServerName      svlmon1
        ServerName      svlmon1.siron.int
        ServerAlias svlmon1.siron.int
        ServerAlias nagios.siron.int
        ServerAlias nagios
        DocumentRoot /usr/local/nagios/share

        SSLEngine On
        SSLCertificateFile /var/certs/apache.pem
        SSLCertificateKeyFile   /var/certs/apache.key
</VirtualHost>
If you have other sites on the same host, create essentially the same thing but use the ServerName/ServerAlias fields to differentiate. For instance, my MRTG site is on the same server:
<VirtualHost _default_:443>
        ServerAlias mrtg.siron.int
        ServerAlias mrtg
        DocumentRoot /var/www/mrtg

        SSLEngine On
        SSLCertificateFile /var/certs/apache.pem
        SSLCertificateKeyFile   /var/certs/apache.key
</VirtualHost>
If you want, you can certainly use the instructions from the preceding section to create as many additional certificates as necessary for your other sites.
You’ve finished the hard work! Now just restart Apache. service apache2 restart on systems that name the service “apache2” (Ubuntu, OpenSUSE) or service httpd restart (CentOS). Test by accessing the site using an https prefix, then again with an http prefix to ensure that redirection works.
Step 5: Configure Nagios for Active Directory Authentication
Now that we’re securing the Nagios web site with SSL, we can feel a little bit better about entering Active Directory domain credentials into its challenge dialog. We have five phases for that process.
- Create (or designate) an account to use for directory reads.
- Select an OU to scan for valid accounts.
- Enable Apache to use LDAP authentication.
- Configure Apache directory security.
- Set Nagios to recognize Active Directory accounts.
Create an Account for Directory Access
Use PowerShell or Active Directory Users and Computers to create a user account. It does not matter what you call it. It does not matter where you put it. It does not need to have any group membership other than the default Domain Users group. It only requires enough powers to read the directory, which all Domain Users have by default. I recommend that you set its password to never expire or be prepared to periodically update your Nagios configuration files.
Once you’ve created it, you need its distinguished name. You can find that on the Attribute Editor tab in ADUC. You can also find it with Get-ADUser:
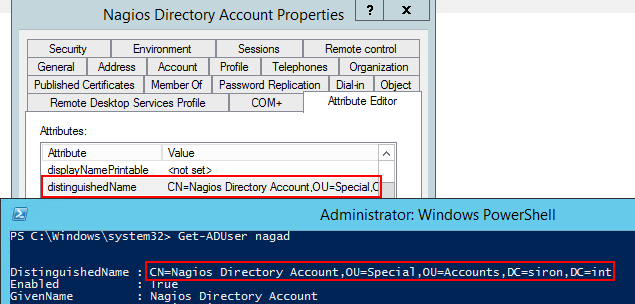
Keep the DN and the password on hand. You’ll need them in a bit.
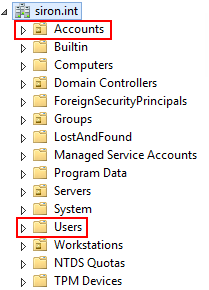
Selecting OUs for Apache LDAP
When an account logs in to the web site, Apache’s mod_authnz_ldap will search for it within locations that you specify. You need to know the distingished name of at least one organizational unit. Apache’s mod_ldap queries cannot run against the entire directory. I found many, many, many articles claiming that it’s possible, including Apache’s official document, but they are all lies (thanks for wasting hours of my time on searches and tests, though, guys, I always appreciate that).
It will, however, search multiple locations, and it can search downward into the child OUs of whatever OU you specify. Luckily for me, I have a special Accounts OU that I’ve created to organize user accounts. Hopefully, you have something similar. If not, you can use the default Users folder. You can do both.
I’ll show you how to connect to an OU and the default Users folder.
It is not necessary for the directory read account that you created in the first part of this section to exist in the selected location(s). The target location(s), or a sub-OU, only needs to contain the accounts that will log in to Nagios.
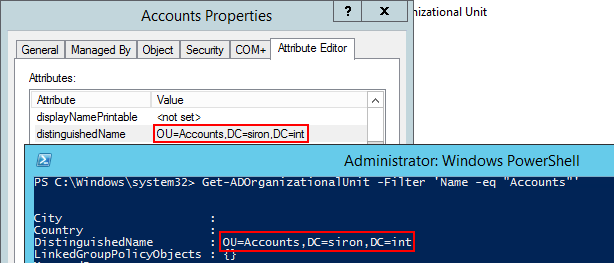
Once you’ve made your selection(s), you need to know the distinguished name(s). You can use the Attribute Editor tab like you did for the user, or Get-ADOrganizationalUnit:
Enabling LDAP Authentication in Apache
Apache requires two modules for LDAP authentication: authnz_ldap_module and ldap_module. You will probably need to enable them, but you can check in advance. On Ubuntu, use apache2 -M | grep ldap. On CentOS/OpenSUSE, use httpd -M | grep ldap. If you see both of these modules, then you don’t need to do anything else.
To enable Apache LDAP authentication on Ubuntu/OpenSUSE: sudo a2enmod authnz_ldap. You might also need to: sudo a2enmod ldap.
To enable Apache LDAP authentication on CentOS: yum install mod_ldap.
Make certain to perform the apachectl -M verification afterward to ensure that both modules are available.
Configuring Apache Directories to Use LDAP Authentication
Collect your OU DN(s), your user DN, and the password that user. Now, we’re going to configure LDAP authorization sections in Apache. Again, you can put these in any conf file that pleases you. I usually find the distribution’s LDAP configuration file:
- Ubuntu: /etc/apache2/mods-available/ldap.conf
- CentOS: /etc/httpd/conf.modules.d/01-ldap.conf
- OpenSUSE: no default file is created for the ldap module on OpenSUSE; you can create your own or add it to another, like /etc/apache2/global.conf
Warning: On Ubuntu, the files always exist in mods-available; when you run a2enmod, it symlinks them from mods-enabled. I highly recommend that you avoid the mods-enabled directory. Eventually, something bad will happen if you touch anything there manually (yes, that’s experience talking). Edit the files in mods-available.
My ldap.conf, for comparison:
LDAPSharedCacheSize 500000
LDAPCacheEntries 1024
LDAPCacheTTL 600
LDAPOpCacheEntries 1024
LDAPOpCacheTTL 600

<AuthnProviderAlias ldap ldap-users>
	AuthLDAPBindDN "CN=Nagios Directory Account,OU=Special,OU=Accounts,DC=siron,DC=int"
	AuthLDAPBindPassword 8HBtigJO9ErPNzdUtexb
	AuthLDAPURL ldap://siron.int/CN=Users,DC=siron,DC=int?sAMAccountName?sub?(objectClass=user)
</AuthnProviderAlias>

<AuthnProviderAlias ldap ldap-accounts>
	AuthLDAPBindDN "CN=Nagios Directory Account,OU=Special,OU=Accounts,DC=siron,DC=int"
	AuthLDAPBindPassword 8HBtigJO9ErPNzdUtexb
	AuthLDAPURL ldap://siron.int/OU=Accounts,DC=siron,DC=int?sAMAccountName?sub?(objectClass=user)
</AuthnProviderAlias>

<Location /ldap-status>
        SetHandler ldap-status
        Require valid-user
</Location>

# vim: syntax=apache ts=4 sw=4 sts=4 sr noet
The initial lines are not required, but can make the overall experience a bit smoother. I am just using defaults; I didn’t tune any of those lines. The only thing to be aware of is that Apache will be oblivious to changes that occur during cache timeouts — including lockouts and disables.
A breakdown of the AuthnProviderAlias sections:
- In the opening brackets, AuthnProviderAlias and ldap must be the first two parts. We are triggering the authn provider framework and telling it that we’re specifically working with the ldap provider. Where I used ldap-accounts and ldap-users, you can use anything you like. I named them after the specific OUs that I selected. Whatever you enter here will be used as reference tags in directories.
- For AuthLDAPBindDN, use the distinguished name of the read-only Active Directory user that you created at the beginning of this section. You can omit the quotes if you have no spaces in the DN, but I would recommend keeping them just in case.
- For AuthLDAPBindPassword, use the password of the read-only Active Directory account. Do not use quotes unless there are quotes in the password. If your password contains a quote, I recommend changing it.
- For AuthLDAPURL, use the distinguished name of the OU to search. Use one? instead of sub? if you don’t want it to search sub-OUs.
Note that the Users folder uses CN, not OU.
TLS/SSL/LDAPS Configuration for Apache and LDAP
You should be able to authenticate with TLS or LDAPS if configured in your domain. I couldn’t get that to work because of the state of my domain. I have made it work elsewhere, so I can confirm that it does work. If you want to try on your own, I will tell you that right off, find the “LogLevel” line in your Apache configs and bump it up to “Debug” until you have it working, or you’ll have no idea why things don’t work. The logs are output to somewhere in /var/logs/httpd or /var/logs/apache2, depending on your configuration/distribution (the file is usually ssl_error_log, but it can be overridden, so you might need to dig a tiny bit). You can go through Apache’s documentation on this mod for some hints. You need at least:
- LDAPTrustedGlobalCert CA_BASE64 /path/to/your/domain/CA.pem in some Apache file. I use the built-in ldap.conf or 01-ldap.conf for Apache. If you download the certificate chain from your domain CA’s web enrollment server, you can extract the subordinate’s certificate and convert it from P7B to PEM.
- LDAPTrustedMode SSL in some Apache file if you will be using LDAPS on port 636. I normally keep it near the previous entry. Note: you can also just append SSL to any of the AuthLDAPURL entries for local configuration instead of global. In your AuthLDAPURL lines, you must change ldap: to ldaps: and append :636 to the hostname portion. Ex: AuthLDAPURL ldaps://siron.int:636/OU=Accounts,DC=siron,DC=int?sAMAccountName?sub?(objectClass=user)
- LDAPTrustedMode TLS in some Apache file if you will be using TLS on port 389. I normally keep it near the previous entry. Note: you can also just append TLS any of the AuthLDAPURL entries for local configuration instead of global.
- In the <Directory> fields that attach to AD, you need: LDAPTrustedClientCert CERT_BASE64 /var/certs/your-local-system.pem. It might also work in the AuthnProviderAlias blocks; I haven’t yet been able to try.
- You might need to add LDAPVerifyServerCert off to an Apache configuration. I don’t like that, because it eliminates the domain controller authentication benefit of using TLS or LDAPS. Essentially, if you can get openssl -s_client -connect your.domain.address:636 -CAfile ca-cert-file-from-first-bullet.pem to work, then you will be fine.
The hardest part is usually keeping LDAPVerifyServerCert On. First, use openssl s_client -connect your.domain.controller:636 -CAfile your.addomain.cafile.pem. It will display a certificate. Paste that into a file and save it. Then, use openssl verify -CAfile your.addomain.cafile the.file.you.pasted. If that says OK, then you should be able to get SSL/TLS to work.
Because security is our goal here and I couldn’t get TLS or LDAP to work, I did run a Wireshark trace on the communication between the Nagios system and my domain controller. It does pass the user name in clear-text, but it does not transmit the password in clear text. I don’t love it that the user names are clear, but I also know that there are much easier ways to determine domain user accounts than by sniffing Apache LDAP authentication packets. There are also easier ways to crack your domain than by spoofing a domain controller to your Nagios system. If you can’t get TLS or LDAP to work, it won’t be the weakest link in your authentication system.
Note 1: Be very, very, very careful about typing. You’re handling your directory in read-only mode, so I wouldn’t worry about breaking the directory. What you need to worry about is the very poor error reporting in this module. I lost an enormous amount of time over a hyphen where an equal sign should have been. It was right on the side-scroll break of nano so I didn’t see it for a very long time. The only error that I got was AH01618: user esadmin not found: /., or whatever account I was trying to authenticate. If things don’t work, slow down, check for typos, check for overrides from other conf files.
Note 2: I will happily welcome verifiable assistance on improving this section. If you just throw URLs at me, they’d better contain something that I didn’t find on any of the 20+ pages that made big promises without delivering, and the directions had better work. For example, using port 3268 to authenticate against the global catalog vs. 389 LDAP or 636 LDAPS does not do anything special for trying to authenticate the entire directory.
Configure Apache Directory Security for LDAP Authentication
From here, the Apache portion is relatively simple. Assuming that you already have a Nagios directory configured, just compare with mine:
ScriptAlias	/nagios/cgi-bin	"/usr/local/nagios/sbin"
<Directory "/usr/local/nagios/sbin">
	Options ExecCGI
	AllowOverride None
	<RequireAll>
		Require all granted
		AuthName "Nagios Access"
		AuthType Basic
		AuthUserFile /usr/local/nagios/etc/htpasswd.users
		AuthBasicProvider file ldap-users ldap-accounts
		Require valid-user
	</RequireAll>
</Directory>

Alias /nagios /usr/local/nagios/share
<Directory "/usr/local/nagios/share">
	Options None
	AllowOverride None
        <RequireAll>
                Require all granted
                AuthName "Nagios Access"
                AuthType Basic
                AuthUserFile /usr/local/nagios/etc/htpasswd.users
                AuthBasicProvider file ldap-users ldap-accounts
                Require valid-user
        </RequireAll>
</Directory>
The default Nagios site created by the Nagios installer contains a lot of fluff, which I’ve removed. For instance, I don’t check the Apache version because I know what version it is. There’s only one major change, though: look at the AuthBasicProvider line. Yours, if you’re using the default, just says file. Mine also says ldap-users ldap-accounts. Those are the tags that I applied to the providers in the previous sub-section. By leaving file in there, I can still use the original “nagiosadmin” account, as well as any others that I might have created. If you create additional providers for other OUs, just keep tacking them onto the AuthBasicProvider lines.
On the AuthBasicProvider line, order is important. I placed file first because I want accounts to be verified there first. The majority of my accounts will be found in Active Directory, but the file is only a couple of lines and can be searched in a few milliseconds. If I need to reach out to the directory for an uncached account, that will cause a noticeable delay. For the same reason, order your LDAP locations wisely.
Test
We’re not quite done; Nagios still doesn’t know what to do with these accounts. However, stop right now and go make sure that AD authentication is working.
sudo service apache2 restart or sudo service httpd restart, depending on your distribution. If Apache doesn’t restart successfully, use sudo journalctl -xe to find out why. Fix that, and move on. Once Apache successfully restarts, access your site at https:/yournagiosite.yourdomain.yourtld. Log in using an Active Directory account inside a selected OU. You do not need to prefix it with the domain name.
If all is well, you should be greeted with the Nagios home page. Click any of the navigation links on the left. The pages should load, but you should not be able to see anything — no hosts, no services, nothing. If so, that means that Apache has figured out who you are, but Nagios hasn’t. You can double-check that at the top left of most any of the pages. For instance, on the Tactical Overview:
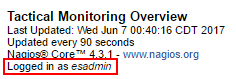
Do not move past this point until AD authentication works.
Configure Nagios to Recognize Active Directory Accounts
Truthfully, Nagios doesn’t know an AD account from a file account. All it knows is that Apache is delivering an account to it. It will then look through its registered contacts for a match. So, in /usr/local/nagios/etc/objects/contacts.cfg, I have:
define contact{
        contact_name                    esadmin
        use                             generic-contact
        alias                           Eric
        service_notification_period     workhours

        email                           [email protected]
        }
From there, add that account to groups, services, hosts, etc. as necessary. So, if your CFO wants a dashboard to show him that the accounting server is working, add his AD account accordingly. An account will only be shown its assigned items.
Remember, after any change to Nagios files, you must:
sudo service nagios checkconfig
sudo service nagios restart
Note on cgi access: by default, only the “nagiosadmin” account can access the CGIs (most of the headings underneath the System menu item at the bottom left). That access is controlled by several “authorized_” lines in /usr/local/nagios/etc/cgi.cfg. As you become accustomed to using multiple accounts in Nagios, you’ll begin plopping them into groups for easier file maintenance. In this particular .cfg file, groups don’t mean anything. I found some Nagios documentation that insists that you can use groups in cgi.cfg, but I couldn’t make that work. You’ll have to enter each account name that you want to access any CGI.
Step 6: Configure check_nrpe and NSClient++ for SSL
After all that you’ve been through in this article, I hope that this serves as comfort: the rest is easy.
We’re going to take three major actions. First, we’ll create a “client” certificate for the check_nrpe utility, and then we’ll create a “server” certificate to be used with all of your NSClient++ systems. After that, we deploy the certificate to monitored systems and configure NSClient++ to use it.
Configure a Certificate for check_nrpe
This part is almost identical to the creation of the SSL certificate for the Apache site. You need to set up a config file to feed into openssl (or modify the default, but I don’t recommend that).
You have two choices:
- Edit your existing openssl.cnf file with the differences for the new certificate(s).
- Copy your existing openssl.cnf file, make the changes to the copy, and override the openssl command to use the copied file.
I suppose a third option would, again, be to hack at the openssl command line to manually insert what you want. I’m going with option 2 this time, as well.
sudo cp /etc/ssl/openssl.cnf /etc/ssl/check_nrpe.cnf
sudo nano /etc/ssl/check_nrpe.cnf
Of course, it’s not a requirement to use nano. Use the editor you prefer.
The following shows sample replacements and additions to the file. They are not sufficient on their own!
[ req ]
req_extensions = v3_req		# this line is commented out in the sample; remove that comment mark
[ req_distinguished_name ]
commonName_default = nagios.siron.int
[ v3_req ]
subjectAltName = @alt_names
[ alt_names ]
DNS.1 = svlmon1.siron.int
DNS.2 = svlmon1
DNS.3 = nagios
DNS.4 = nagios.siron.int
IP.1 = 192.168.25.128
The req_extensions line already exists in the default sample config, but has a hash mark in front of it to comment it out. Remove that (or type a new line, whatever suits you). The [ v3_req ] section probably exists; whatever it’s got, leave it. Just add the subjectAltName line. The [ alt_names ] segment won’t exist (probably). Add it, along with the DNS and IP entries that you want. I don’t know precisely how the check_nrpe tool presents itself to remote systems, or even if the monitored systems care beyond receiving a valid certificate, so set the DNS and IP entries to cover all of your bases.
Now, create the certificate request:
cd /var/certs
sudo openssl req -new -newkey rsa:2048 -keyout check_nrpe.key -out check_nrpe.csr -nodes -config /etc/ssl/check_nrpe.cnf
[Enter] through the questions (unless you need to change a default). Do not use a password when asked.
Lock the private key down:
sudo chown root:nagios check_nrpe.key
sudo chmod 640 check_nrpe.key
Submit the CSR to your CA. I’m going to use the CA that I created on my Nagios system:
sudo openssl ca -days 1825 -notext -md sha256 -keyfile /var/ca/ca_key.pem -cert /var/ca/ca_cert.pem -in check_nrpe.csr -out check_nrpe.pem -extensions v3_req -extfile /etc/ssl/check_nrpe.cnf
First, openssl will ask you to supply the password for the CA’s private key. Next, you’ll be shown a preview of the certificate and asked twice to confirm its creation.
The generated file will appear in your CA’s configured output directory (the one used in these directions is /var/ca/newcerts). It will use the next serial from your /var/ca/serial file as the name. So, if you’re following straight through, that will be /var/ca/newcerts/02.pem. You can ls /var/ca/newcerts to see them all. The highest number is the one that was just generated. Verify that it’s yours:
sudo openssl x509 -in /var/ca/newcerts/02.pem -text -noout
Transfer the certificate to the location that you’ll have check_nrpe load it from, and, for convenience, rename it:
sudo cp /var/ca/newcerts/02.pem /var/certs/check_nrpe.pem
Now “all” you need to do is go around and change every instance of check_nrpe in your object files to use the new certificate and never forget to use it on all new check_nrpe commands and change all those instances if you ever change something about the certificate. Who wants to do that? Oh, right, no one wants to do that.
So, let’s do this instead:
cd /usr/local/nagios/libexec
sudo touch ./check_nrpe_secure
sudo chmod +x ./check_nrpe_secure
sudo chown root:nagios ./check_nrpe_secure
sudo nano ./check_nrpe_secure
In the nano screen, paste this:
#!/bin/bash
/usr/local/nagios/libexec/check_nrpe -A /var/ca/ca_cert.pem -C /var/certs/check_nrpe.pem -K /var/certs/check_nrpe.key -L 'ALL:!ADH:!LOW:!EXP:!MD5:@STRENGTH' $*
Test:
sudo ./check_nrpe_secure -H 192.168.25.10
Note: In the original run of this document, I did not include the -L ‘ALL:!ADH:!LOW:!EXP:!MD5:@STRENGTH’ portion, and both encrypted and unencrypted NSClient++ installations worked just fine. Two weeks later, all checks began failing over cipher mismatches. There was no indication as to why they worked up until that moment. So, you may need to test your unencrypted systems WITHOUT the -L bit, then add it back in later. The $* after the -L is required.
Assuming that you used a valid IP for a system running NSClient++ on the default port, you should receive something similar to:
I (0.4.4.19 2015-12-08) seem to be doing fine...
It doesn’t matter if the NSClient++ system is still configured to use insecure mode (mind the note above). If it says that you used incorrect parameters, that means that you didn’t compile check_nrpe with SSL support. Go back and do that (I gave instructions in all of my Nagios articles; if you update to the most recent version of check_nrpe then SSL is implicitly configured). For any other problems, you may need additional parameters, ex: to override the port. Use whatever is working in your existing commands.
Once you have this working, you can go into all of your command files and swap out all instances of “check_nrpe” for “check_nrpe_secure” with a simple Find/Replace operation. That’s all that you’ll need to remember to do going forward. If you need to change anything about the certificate(s), then you only need to modify check_nrpe_secure itself.
Configure a Certificate for NSClient++
You’ve seen this game a couple of times now. The primary difference between this and previous certificate generation is that I will not be using any subject alternate names for the NSClient++ certificate. Working from the assumption that you don’t want to sit around generating CSRs and delivering certificates to every single monitored system, I’m going to have you create one certificate to use on all of your monitored hosts. I suppose that’s a slight security risk, because anyone with the certificate set could pretend to be one of your monitored hosts. I think if they can spoof your system that well, being able to fool Nagios will be the least of your concerns. This exercise satisfies our primary goal of encrypting the Nagios<->monitored system traffic with a nice touch of allowing the monitored systems to authenticate the Nagios system. Anything more is mostly extra effort.
Generate the CSR first. You can do this from pretty much anywhere, but I’ll continue to use the pattern that we’ve established in this article:
sudo cp /etc/ssl/openssl.cnf /etc/ssl/nsclient.cnf
sudo nano /etc/ssl/nsclient.cnf
Of course, it’s not a requirement to use nano. Use the editor you prefer.
The following shows sample replacements to the file. They are not sufficient on their own!
[ req ]
req_extensions = v3_req		# this line is commented out in the sample; remove that comment mark
[ req_distinguished_name ]
commonName_default = nsclient.siron.int
All of the changes that we made for the other certificates are unnecessary here. In fact, you could probably feed in the default openssl.cnf and just change the commonName when prompted. To each their own.
Create the certificate request:
cd /var/certs
sudo openssl req -new -newkey rsa:2048 -keyout nsclient.key -out nsclient.csr -nodes -config /etc/ssl/nsclient.cnf
[Enter] through the questions (unless you need to change a default). Do not use a password when asked.
Locking down this particular private key file won’t do much because you’re going to be copying it to all of your monitored hosts anyway.
Submit the CSR to your CA. Again, I’m using my Nagios system’s CA:
sudo openssl ca -days 1825 -notext -md sha256 -keyfile /var/ca/ca_key.pem -cert /var/ca/ca_cert.pem -in nsclient.csr -out nsclient.pem -extensions v3_req -extfile /etc/ssl/nsclient.cnf
First, openssl will ask you to supply the password for the CA’s private key. Next, you’ll be shown a preview of the certificate and asked twice to confirm its creation.
The generated file will appear in your CA’s configured output directory (the one used in these directions is /var/ca/newcerts). It will use the next serial from your /var/ca/serial file as the name. So, if you’re following straight through, that will be /var/ca/newcerts/03.pem. You can ls /var/ca/newcerts to see them all. The highest number is the one that was just generated. Verify that it’s yours:
openssl x509 -in /var/ca/newcerts/03.pem -text -noout
Transfer the certificate and private key to some distribution point. While I’m not overly concerned about securing the key this time, do perform some basic due diligence. No need to just open the door and invite attackers in. I do generally copy it over to /var/certs just for consistency (avoids the “now, where did I put that” problem).
sudo cp /var/ca/newcerts/03.pem /var/certs/nsclient.pem
Configure NSClient++ for Certificate Security
Start by making sure that all checks that target this host use the new check_nrpe_secure. If they use the original check_nrpe without certificate information, all checks to the host will fail once you complete these steps.
You need three things to proceed: the certificate that you created for NSClient, the private key that you created for NSClient, and the certificate for the CA that signed the NSClient certificate. You do not need the CA’s private key. Just leave that where it is.
Copy the three files to C:Program FilesNSClient++security.
Edit your nsclient.ini file. Here’s mine:
[/settings/default]
password = nagios
allowed hosts = 192.168.25.128

[/settings/NRPE/server]
allow arguments = true
verify mode = peer-cert
certificate = C:Program FilesNSClient++securitynsclient.pem
certificate key = C:Program FilesNSClient++securitynsclient.key
ca = C:Program FilesNSClient++securityca_cert.pem
dh =
insecure = 0
use ssl = 1

[/modules]
CheckExternalScripts = enabled
CheckHelpers = 1
CheckEventLog = 1
CheckNSCP = 1
CheckDisk = 1
CheckSystem = 1
NRPEServer = 1
NSClientServer = 1

[/settings/external scripts]
allow arguments = true

[/settings/external scripts/wrappings]
ps1=cmd /c echo scripts%SCRIPT% %ARGS%; exit($lastexitcode) | powershell.exe -noprofile -nologo -command -

[/settings/external scripts/wrapped scripts]
check_checkpointage=check_hvcheckpointage.ps1 $ARG1$ $ARG2$
check_vmdyndisksize=check_hvvmdyndisksize.ps1 $ARG1$ $ARG2$ $ARG3$ $ARG4$ $ARG5$ $ARG6$
check_csvspace=check_csvspace.ps1 $ARG1$ $ARG2$ $ARG3$
check_clusterquorumwitness = check_clusterquorumwitness.ps1
check_csvstatus=check_csvstatus.ps1 $ARG1$ $ARG2$
check_clustermemoryovercommit=check_clustermemoryovercommit.ps1 $ARG1$ $ARG2$ $ARG3$
Restart the service (Restart-Service nscp or net stop nscp && net start nscp).
From here, you just need to come up with a deployment technique that transfers the certificates, key, and ini file to all other systems, then restarts the ncsp service.


Not a DOJO Member yet?
Join thousands of other IT pros and receive a weekly roundup email with the latest content & updates!
More in this category


About the Author

Eric Siron


6 thoughts on "How to Securely Monitor Hyper-V with Nagios and NSClient"
Just wanted to say THANK YOU! I’ve been searching up and down Google trying to find the best method to secure connectivity between nrpe server and hosts and your method is the cleanest and easiest one to follow. Well done and thank you for sharing!