Save to My DOJO
Table of contents
- What are Shielded Virtual Machines?
- What are the Requirements for Shielded Virtual Machines?
- How Does the Shielded Virtual Machine Mechanism Work on a Standalone System?
- Can I Use Shielded VMs from an “Untrusted Guardian” on Another Hyper-V Host?
- What Happens When the Certificate Expires?
- How Do I Know if a VM is Shielded?
- Are Shielded VMs a Good Idea on an Untrusted Host?
One of the hot new technologies in Hyper-V 2016 is Shielded Virtual Machines. This feature plugs a few long-standing security holes in the hypervisor space that were exacerbated by the rise of hosting providers. It’s ridiculously easy to start using Shielded Virtual Machines, but its simplicity can mask some very serious consequences if the environment and guests are not properly managed. To make matters worse, the current documentation on this feature is sparse and reads more like marketing brochures than technical material.
The material that does exist implies that Shielded Virtual Machines require a complicated Host Guardian Service configuration and a cluster or two. This is not true. You can use Shielded Virtual Machines on standalone hosts without ever even finding any setup for Host Guardian Service (HGS). Using a properly configured HGS is better, but it is not required. Standalone mode is possible. “Standalone” can apply to non-domain-joined hosts and domain-joined hosts that are not members of a cluster. I did verify that I could enable VM shielding on a non-domain-joined host, but I did not, and will not, investigate it any further. This article will discuss using Shielded Virtual Machines on a domain-joined Hyper-V host that is not a member of a cluster and is not governed by a Host Guardian Service.
What are Shielded Virtual Machines?
A Shielded Virtual Machine is protected against tampering. There are several facets to this protection.
Unauthorized Hosts Cannot Start Shielded Virtual Machines
Only systems specifically authorized to operate a Shielded Virtual Machine will be able to start it. Others will receive an error message that isn’t perfectly obvious, but should be decipherable with a bit of thought. The primary error is “The key protector could not be unwrapped. Details are included in the HostGuardianService-Client event log.” The details of the error will be different depending on your overall configuration.
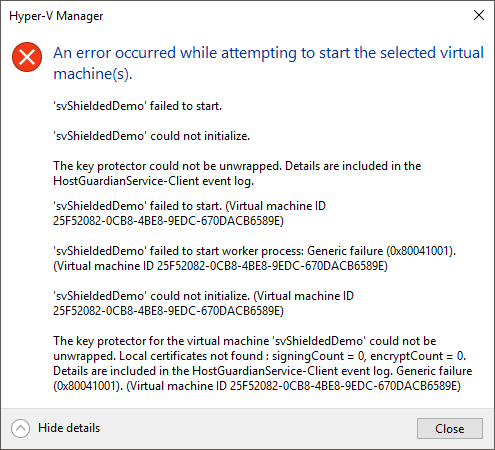
No Starting Shielded VMs on Unauthorized Hosts
This feature is most useful when combined with the next.
Unauthorized Hosts Cannot Mount Virtual Hard Disks from Shielded Virtual Machines
The virtual hard disks for a Shielded Virtual Machine cannot be opened or mounted on unauthorized systems. Take care as the error message on an unauthorized host is not nearly as clear as the message that you receive when trying to start a Shielded Virtual Machine on an unauthorized host, and it could be mistaken for a corrupted VHD: “Couldn’t Mount File. The disk image isn’t initialized, or contains partitions that aren’t recognizable, or contains volumes that haven’t been assigned drive letters. Please use the Disk Management snap-in to make sure that the disk, partitions, and volumes are in a usable state.”.
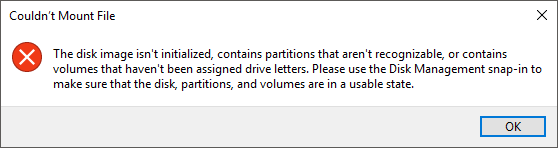
Error When Opening a Shielded VHD on an Unauthorized Host
For small businesses, this is the primary benefit of using Shielded Virtual Machines. If your VM’s files are ever stolen, the thieves will need more than that.
VMConnect.exe Cannot be Used on a Shielded Virtual Machine
Even administrators can’t use VMConnect.exe to connect to a Shielded Virtual Machine. In case you didn’t already know, “VMConnect.exe” is a separate executable that Hyper-V Manager and Failover Cluster Manager both call upon when you instruct them to connect to the console of a virtual machine. This connection refusal provides a small level of protection against snooping by a service provider’s employees, but does more against other tenants that might inadvertently have been granted a few too many privileges on the host. Attempting to connect results in a message that “You cannot connect to a shielded virtual machine using a Virtual Machine Connection. Use a Remote Desktop Connection instead.”
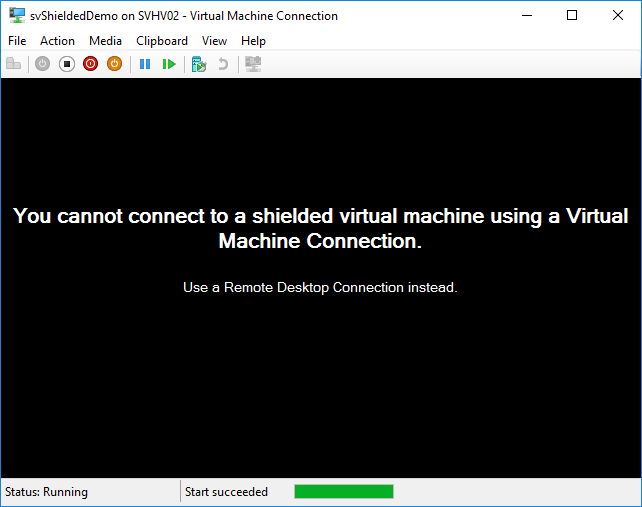
No VMConnect for Shielded VMs
The upshot of the VMConnect restriction is that if you create VMs from scratch and immediately set them to be shielded, you’d better have some method in mind of installing an OS without using the console at all (as in, completely unattended WDS).
What are the Requirements for Shielded Virtual Machines?
The requirements for using Shielded Virtual Machines are:
- Generation 2 virtual machines
That’s it. You’ll read a lot about the need for clusters and services and conditional branches where a physical Trusted Platform Module (TPM) can be used or when administrator sign-off will do and all other sorts of things, but all of those are in regards to Guarded Fabric and involve the Host Guardian Service. Again, HGS is a very good thing to have, and would certainly give you a more resilient and easily managed Shielded Virtual Machine environment, but none of that is required. The only thing that you must absolutely have is a Generation 2 virtual machine. Generation 1 VMs cannot be shielded.
Generation 1 virtual machines can be encrypted by Hyper-V. That’s a topic for another article.
How Does the Shielded Virtual Machine Mechanism Work on a Standalone System?
Do not skip this section just because it might have some dry technical details! Ignorance on this topic could easily leave you with virtual machines whose data you cannot access! Imagine a situation in which you have a single, non-clustered host with a guest on a Scale Out File Server cluster and you enable the Shielded VM feature. Since all of the virtual machine’s data is on an automatically backed-up storage location, you don’t bother doing anything special for backup. One day, your Hyper-V host spontaneously combusts. You buy a new host and import the VM directly from the SOFS cluster, only to learn that you can’t turn it on. What can you do!? You could try crying or drinking or cursing or sacrificing a rubber chicken or anything else that makes you feel better, but nothing that you do short of cracking the virtual machine’s encryption will get any of that data back. If you don’t want that to be you, pay attention to this section.
Shielded Virtual Machines are Locked with Digital Keys
Access to and control of a Shielded Virtual Machine is governed by asymmetric public/private encryption keys. In a single host environment without a configured Host Guardian Service, these keys are created automatically immediately after you set the first virtual machine to be shielded. You can see these certificates in two ways.
Viewing Shielded Virtual Machine Certificates Using CERTUTIL.EXE
The CERTUTIL.EXE program is available on any system, including those without a GUI. At an elevated command prompt, type:
certutil -viewstore "Shielded VM Local Certificates"
You’ll be presented with a dialog that shows the Shielded VM Encryption Certificate. Click More Choices and it will expand to show that certificate and the Shielded VM Signing Certificate:
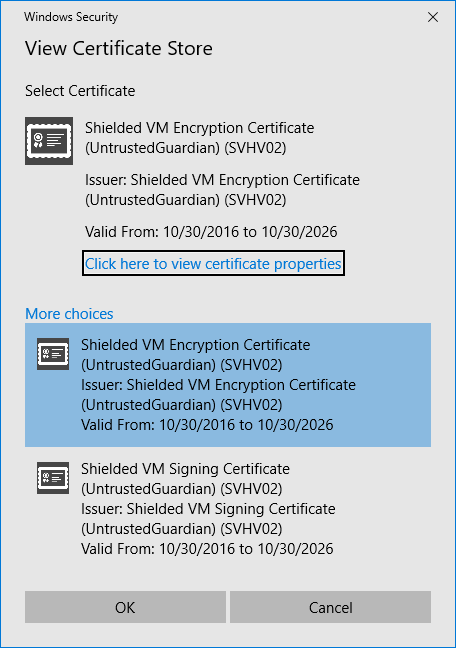
VM Shielding Certificates
You can click either of the certificates in the bottom half of the dialog and it will update the information in the top half of the dialog. Click the Click here to view certificate properties link, and you’ll be rewarded with the Certificate Details dialog:
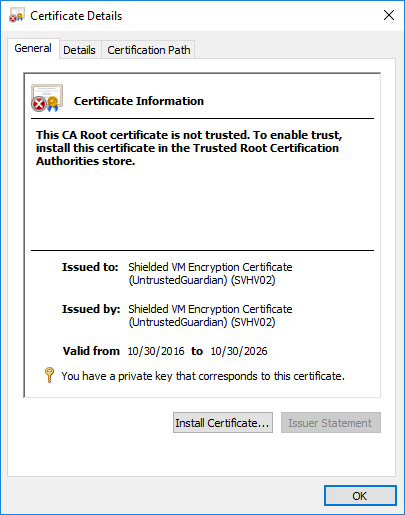
Certificate Details
This dialog should look fairly familiar if you’ve ever looked at a certificate in Internet Explorer or in the Certificates MMC snap-in. We’ll turn to that snap-in next.
Viewing Shielded Virtual Machine Certificates Using the Certificates MMC Snap-In
The Microsoft Management Console (MMC.EXE) has a dependency on the Explorer rendering engine, so it is only available on GUI systems. You can use it to connect to systems without a GUI, though, as long as they are in the same or a trusting domain.
- At an elevated prompt, run MMC.EXE. You can also enter MMC.EXE into Cortana’s search, then right-click it and choose Run as administrator.
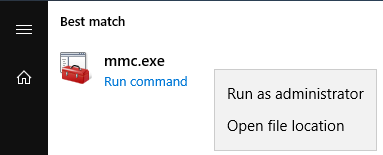
Starting MMC
- In Microsoft Management Console, click File -> Add/Remove Snap-in…
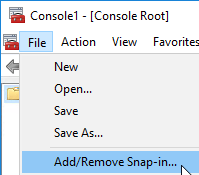
Accessing the Snap-in Menu
- In the Add or Remove Snap-ins dialog, highlight Certificates and then click the Add > button.
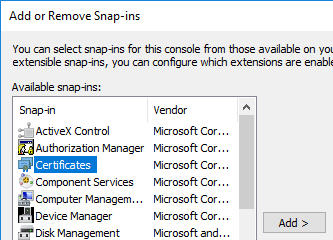
Choose Certificates Snap-in
- A prompt will appear for the target of the Certificates snap-in. We want to target the Computer account:
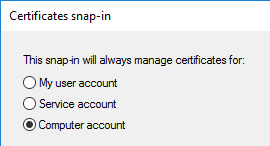
Computer Account Choice
- After that, you’ll need to indicate which computer to control. In my example, I want the local computer so I’ll leave that selection. You can connect to any computer in the same or a trusting domain, provided that the user account that you started MMC.EXE with has administrative privileges on that computer:
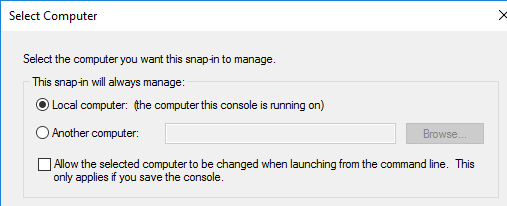
Choose Local or Remote Computer
- After you OK out of all of the above dialogs, MMC.EXE will populate with the certificate tree of the targeted computer account. Expand Shielded VM Local Certificates, then click the Certificates node. If you have shielded a virtual machine, you’ll see two certificates:
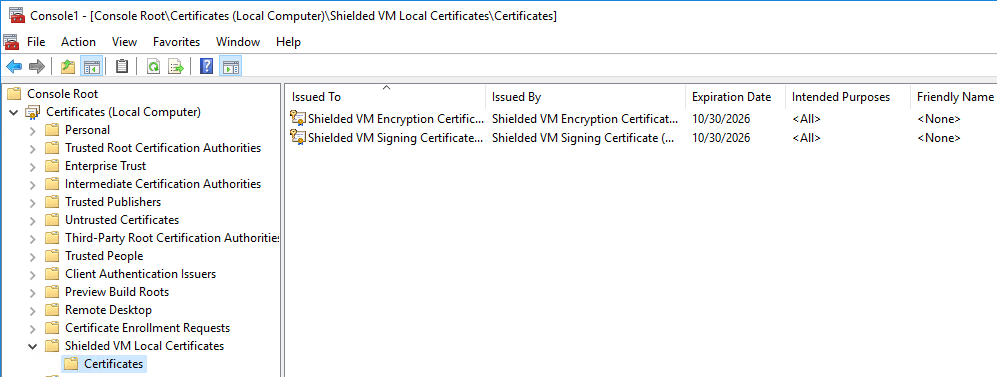
VM Shielding Certificates in MMC
You can open these certificates to view them.
The Significance of Certificates and Shielded Virtual Machines
Not to put too fine a point on it, but these two certificates are absolutely vital. If they are lost, any virtual machine that they were used to shield is also permanently lost… unless you have the ability to crack 2048-bit SHA256 encryption. There is no backdoor. There is no plan “B”.
If you are backing up your host’s operating system using traditional backup applications, a standard System State backup will include the certificate store.
If you are not backing up the management operating system, then you need a copy of these keys. I’ll give you directions, but the one thing that you must absolutely not miss is the bit about exporting the private keys. The shielding certificates are completely useless without their private keys!
Exporting and Importing VM Shielding Keys with CERTUTIL.EXE
Using CERTUTIL.EXE is the fastest and safest way to export certificates.
- Open an elevated command prompt.
- Type the following: certutil -store “Shielded VM Local Certificates”
- In the output, locate the Serial Number for each of the certificates.
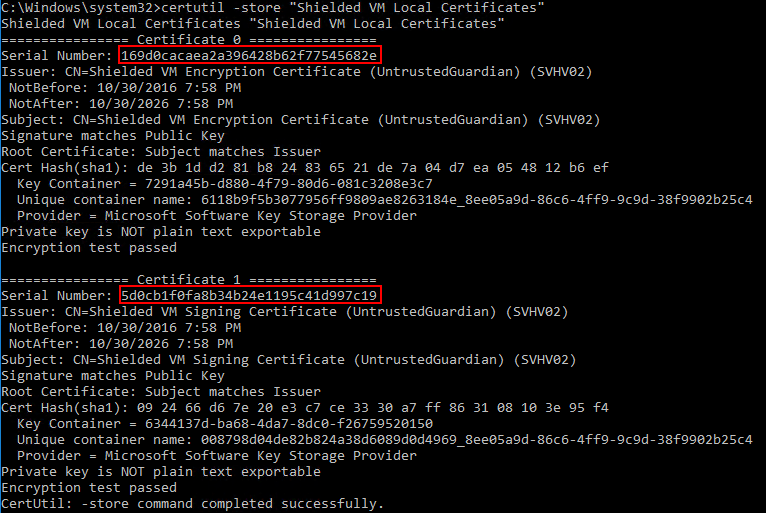
VM Shielded Certificates with Serial Numbers
- Use the mouse to highlight the first serial number, which should be for the encryption certificate, then press [Enter] to copy it to the clipboard.
- To export the VM shielding encryption certificate, type the following, replacing my information with yours. Use right-click to paste the serial number when you come to that point: certutil -exportPFX -p “2Easy2Guess!” “Shielded VM Local Certificates” 169d0cacaea2a396428b62f77545682e c:tempSVHV02-VMEncryption.pfx
- Use the mouse to highlight the second serial number, which should be for the signing certificate, then press [Enter] to copy it to the clipboard.
- To export the VM shielding signing certificate, type the following, replacing my information with yours. Use right-click to paste the serial number when you come to that point: certutil -exportPFX -p “2Easy2Guess!” “Shielded VM Local Certificates” 5d0cb1f0fa8b34b24e1195c41d997c19 c:tempSVHV02-VMSigning.pfx
- Ensure that the PFX files that you created are moved to a SAFE place and that the password is SECURED!
If you ever need to recover the certificates, use this template:
certutil -importPFX "Shielded VM Local Certificates" c:tempSVHV02-VMEncryption.pfx
certutil -importPFX "Shielded VM Local Certificates" c:tempSVHV02-VMSigning.pfx
You’ll be prompted for the password on each one.
Exporting and Importing VM Shielding Keys with MMC
The MMC snap-in all but encourages you to do some very silly things, so I would recommend that you use the certutil instructions above instead. If you must use the UI:
- Open MMC and the Certificates snap-in using instructions from the “Viewing Shielded Virtual Machine Certificates Using the Certificates MMC Snap-In” section above.
- Highlight both certificates. Right-click them, hover over All Tasks, and click Export…
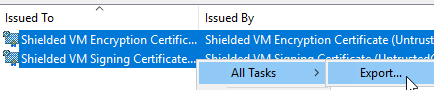
Export Start
- Click Next on the informational screen.
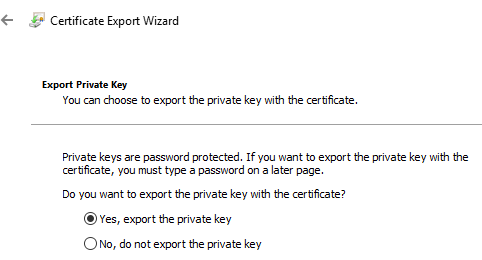
- Change the dot to Yes, export the private key. The certificates might as well not exist at all without their private keys.
Export Private Key
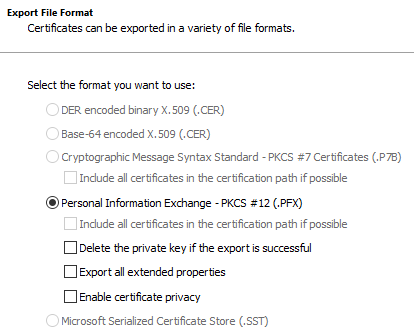
- Leave the defaults on the Export File Format page. If you know what you’re doing, you can select Enable certificate privacy. Do not select the option to Delete the private key!! The host will no longer be able to open its own shielded VMs if you do that!
Certificate File Format
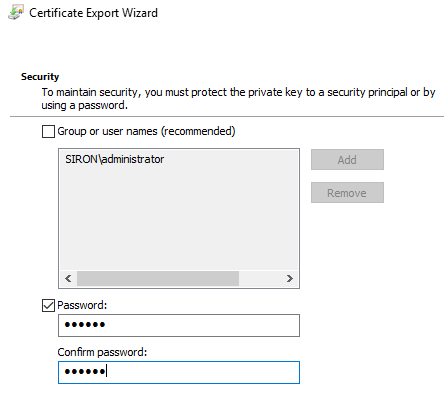
- On the Security tab, you must choose to lock the exported certificate to a security principal or a password. It’s tempting to lock it down by security principal, and it might even work for you. I almost always use passwords because they’ll survive where security principals won’t. If you do choose this option, only use domain principals, use groups not names, use more than one, and make double-, triple-, and quadruple- certain that your Active Directory backups are in good shape. If you’re one of those types that likes to leave your Hyper-V hosts outside of the domain for whatever reason, the Groups or user names option is a good way to lose your shielded VMs forever.
Exported Certificate Security
- On the File to Export page, use a file name that indicates that you’re backing up both certificates. That’s one nice thing about the GUI.
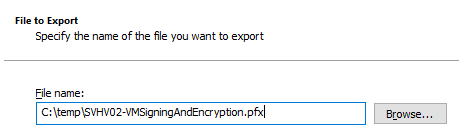
Choose a File
- The final screen is just a summary. Click Finish to complete the export.
- Ensure that the PFX files that you created are moved to a SAFE place and that the password is SECURED (or if you used one or more security principals, hope that nothing ever happens to them)!
If you ever need to recover these certificates, I would again recommend using certutil.exe instead. The GUI still makes some dangerous suggestions and it takes much longer. If you insist on the GUI:
- Open MMC and the Certificates snap-in using instructions from the “Viewing Shielded Virtual Machine Certificates Using the Certificates MMC Snap-In” section above.
- Right-click in the center pane and hover over All Tasks, and click Import…
- Click Next on the introductory screen.
- On the File to Import screen, navigate to where your certificate backups are. Note that you’ll need to change the filter from *.cer, *.crt to *.pfx, *.p12 to see them.
- The Password part of the Private key protection screen is fairly easy to figure out (and won’t be necessary at all if you protected by security principal). Do make sure to check the Mark this key as exportable box. If you don’t, then you won’t be able to export the private key. It’s not strictly necessary, since you do have the file that you’re importing from. At least, you have it right now. Something could happen to it, and then you’d have no way to generate a new one.
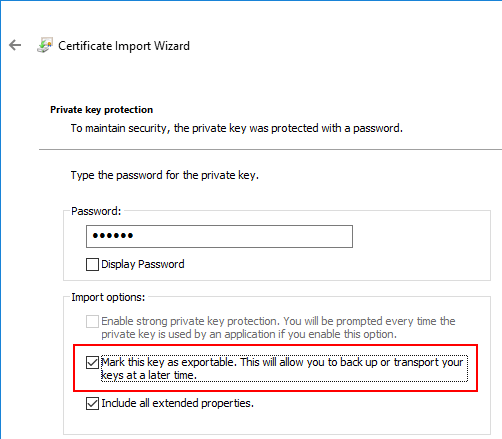
Import as Exportable
- Make certain that the certificate store is Shielded VM Local Certificates.
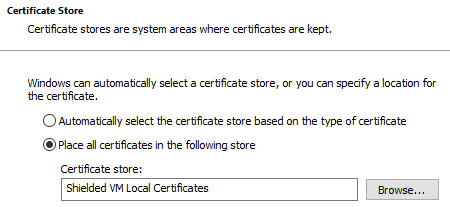
Certificate Store Choice
- The final screen is just a summary. Click Finish to import the certificates.
Do take good care of these certificates. They are literally the keys to your Shielded Virtual Machines.
Why Does the Certificate Say “Untrusted Guardian”?
The consequence of not using a full Host Guardian Service is that there’s no independent control over these certificates. With HGS, there’s independent “attestation” that a host is allowed to run a particular virtual machine because the signature on the VM and the signing certificate will match up and, most importantly, the signing certificate was issued by someone else. In this case, the certificate is “self-signed”. You’ll see the term “self-signed” used often, and usually incorrectly. Most of the time, I see it used to refer to certificates that were signed by someone’s internal certificate authority, like their private domain’s Enterprise CA. That is not self-signed! A true self-signed certificate is signed and issued by a host that is not a valid certificate authority and is only used by that host. The most literal meaning of a self-signed certificate is: “I certify that this content was signed/encrypted by me because I say so.” There is no independent verification of any kind for a true self-signed certificate.
Can I Use Shielded VMs from an “Untrusted Guardian” on Another Hyper-V Host?
Yes. These virtual machines are not permanently matched to their source host. That’s a good thing, because otherwise you’d never be able to restore them after a host failure. All that you need to do is import the keys that were used to sign and encrypt those virtual machines on the new target host into its “Shielded VM Local Certificates” store, and it will then be able to immediately open those VMs. There will not be any conflict with any certificates that are already there. This should work for Live Migrations as well, although I only tested export/import.
If you like, you can unshield the VMs and then reshield them. That will shield the VMs under the keyset of the new target host.
What Happens When the Certificate Expires?
I didn’t test, so I don’t know. You could try it out by forcing your clock 10 years into the future.
Realistically, nothing bad will happen when the certificate expires. An expired certificate still matches perfectly to whatever it signed and/or encrypted, so I see no reason why the VMs wouldn’t still work. You can’t renew these certificates, though, so the host will no longer be able to use them to sign or encrypt new VMs. If this is still something that you’re concerned about 9 years and 11 months after shielding your first VM, be happy that your host made it that long and then unshield all of the VMs, delete the certificates, and reshield the VMs. New 10 year certificates will be automatically created and give you another decade to worry about the problem.
How Do I Know if a VM is Shielded?
The “easiest” way is the checkbox on the GUI tab. There’s also PowerShell:
Get-VMSecurity svshieldeddemo01
Virtual hard drives are a bit tougher. Get-VHD, even on Server 2016, does not show anything about encryption. You can test it in a hex editor or something else that can poke at the actual bits, of course, but other than that I don’t know of a way to tell.
Are Shielded VMs a Good Idea on an Untrusted Host?
I’m not sure if there is a universal answer to this question. Without the Host Guardian Service being fully configured, there is a limit to the usefulness of Shielded VMs. I would say that if you have the ability to configure HGS, do that.
That said, shielding a VM on an untrusted host still protects its data if the files for the VM are ever copied to a system outside of your control. Just remember that anyone with administrative access to the host has access to the certificate. What you can do, if you’ve got an extremely solid protection plan, is export, delete, and re-import the certificate without marking the private key as exportable. That’s risky, because you’re then counting on never forgetting or losing that exported certificate. However, even a local admin won’t be able to steal virtual machines without having access to the exported key as well.


Not a DOJO Member yet?
Join thousands of other IT pros and receive a weekly roundup email with the latest content & updates!
More in this category


About the Author

Eric Siron


28 thoughts on "Hyper-V 2016 Shielded Virtual Machines on Stand-Alone Hosts"
Hi Eric, Thanks for this article. You said in introduction “Hyper-V host that is not a member of a cluster”. Given that I export the certificates and private key and import it on the other Hyper-V cluster member, would it work in a cluster? (live-migration etc…)
Thanks,
Thomas.
I have not seen it work with my own two eyes, therefore my default answer is NO.
However, according to the general way that certificates work, the most likely answer is probably.
However, you may run into issues with Live Migration and other cluster-based features.
Marking private key not exportable does buy much more security.
Mimikatz can be used to bypass the non-exportable restriction:
https://gist.github.com/derrickorama/7b08298b657048660293
True-ish, but out of context here. We are deliberately not trying to secure the private key because it needs to be moved to another system in order to perform the full encryption/decryption cycle necessary for shielded VMs.
Since you brought it up, I should also point out that Mimikatz is not doing anything particularly special. The private key must exist in the local key store and at least the local system account needs to have full read access to it. Otherwise, it couldn’t use it to encrypt/decrypt things. In other words, the private key cannot be both inaccessible and usable. Mimikatz depends on local administrator access to the keystore in order to perform the extraction. So, it’s not really bypassing much of anything except a convenience checkbox.
Basically, the only way you can ever keep the private key safe is by never exporting it and by preventing unauthorized access to administrative accounts. So, really, basic due diligence.
Hi Eric,
I am struggling to setup the LAB for testing the Shielded VMs. This article gives me an Idea what to test in the LABs. But, could you please guide me step by step to configure the Lab without VMM and Azure. I dont have the Azure and VMM in my environment. But I would like to use this security feature, please guide me to proceed further.
Well if you’re just doing a local untrusted host like this article talks about, you enable the physical TPM and check the “Shielded” box for your virtual machines. If you’re wanting to know how to do a full HGS setup and configuration, that’s a very big ask and I cannot fulfill it in a comment. Start here: https://docs.microsoft.com/en-us/windows-server/virtualization/guarded-fabric-shielded-vm/guarded-fabric-and-shielded-vms-top-node
Hi Eric
Thanks for detail info.
My hyper v vm is fully replicated to other host ( both hosts are non clustered and domain joined). When i try to run planned failover, am getting key wrapped protector error, hence unable to start vm on other host. I will export certificate and import it on other host however my concern and question is my source machine will be infact? After exporting certificate from it.
Thanks
That would work. We will have some better articles on this subject in the future.
Just like to say a big thanks for the article.
Reinstalled our Hyper-V host and was unaware of this issue. Fortunately we had a backup that I could restore to a temporary server to retrieve the certificates (which are now safely backed up!)
After getting our bitlockered VM back up and running thanks to your blog, I re-read the article and checked the status of the VM in question.
Both the GUI and powershell show that shielding isn’t enabled but I still needed the certificates to start the VM (originally got the “The key protector could not be unwrapped” error).
Right, there is a block in place to prevent an attacker from restoring a stolen shielded VM to an alternative server and just unchecking the box. Unfortunately, it trips up legitimate restores equally.
Sorry I probably didn’t make myself clear. As far as we were concerned this wasn’t a ‘shielded’ VM. We never chose it to be shielded and both powershell and the GUI show it isn’t shielded but it seems that Microsoft are still using certificates to protect it.
We had assumed that as long as we had the Bitlocker keys we could always restore it even if the TPM wasn’t available but we were wrong. Fortunately we have backups of the host that we could get the certificates from but I can see this tripping up a lot of people who don’t fully test their disaster recovery.
I don’t know if this behaviour has always been the case but this was on Server 2016.
I’ll have to play with that when I start doing my more indepth testing. I would not expect that behavior either.
You couldn’t open the VHDX at all, or you could open it but not read anything? As in, you couldn’t even boot the VM, or you could start it but it couldn’t read its disk?
Couldn’t boot the VM. Just got ““The key protector could not be unwrapped”
It’s a bit lockered VM with two additional bitlockered virtual drives. Unfortunately I wasn’t in the mood to play at the time as I was in the middle of reinstalling the VM host and this particular VM has all our data on it (hence the bitlocker). I was just grateful for your blog and relieved I could get the certificates back from a backup.
It would have been interesting to see if I could have mounted the additional drives on to another VM but I presume the result would have been the same until I installed the certificates.
I will roll through a few permutations to see where all of this falls out. I would expect that any VM other than the original could not read a Bitlocker-ed VHDX.
I did some tinkering with this today. Basically, it exhibits this behavior as a protection mechanism for the virtual TPM. Without it, you would have no way to trust the integrity of the vTPM. That, of course, would then cascade through anything that relied on the vTPM.
Thanks for the guide. It was very helpful and a detailed guide that covered everything!
Nice article.
I’m trying to import the keys to another Hyper-V host but the certificate store “Shielded VM Local Certificates” doesn’t exist. What can I do to create the store?
Enable shielding on any VM.
Hello,
I am running a single Windows 10 host (not on a domain, just a personal workstation) with a TPM 2 chip and Hyper-V enabled, and a shielded VM that is stored on a NAS and accessed via an iSCSI connection.
My host experienced a failure and I had to reinstall Windows 10 from scratch. Once it was back up, I opened up Hyper-V and imported the VM in place (meaning that the VHD, etc. were not copied from the NAS).
If I enable the TPM in the VM settings, I get the “key protector could not be unwrapped” error. If I disable the TPM in the VM settings, then the VM boots normally… except that I cannot access my work VPN or use any of the SSO functions to access work resources. In other words, the VHD is not encrypted; I just use the TPM to store work credentials.
In this scenario, can I recover and reuse the existing keys?
If not, I can go through the process of getting certs to access my work environment… but then I need to be able to flush the existing TPM settings and reenable them.
Failing that, I would guess I need to build a new VM from scratch and then redo the work to get it to access my work environment. This I know how to do, but I’d rather not if at all possible.
Many thanks in advance!
I don’t believe that there is any way to get that original vTPM key back once the source keypair is lost. I believe that you’ll have to flush the TPM settings. Sorry 🙁