Save to My DOJO

In a previous article, I showed you how to build a fully-functional two-tier PKI environment. If you followed it all the way to the end and stopped, you had the most basic possible two-tier Windows Public Key Infrastructure (PKI) system. Now, I want to move you forward by showing you how to create and manage certificate templates. Certificate templates add a great deal of flexibility to your PKI environment and help to greatly reduce management overhead.
I used “SSL” in the title because most people associate that label with certificates. For the rest of the article, I will use the more apt “PKI” label.
Why Do I Need PKI Certificate Templates?
I feel that certificate templates make more sense when you have a glimpse of life without them. Pay a quick visit to the IETF’s documentation on RFC 5280. Scroll down to section 4. Skim section 4, taking notice of the rules around the various object identifiers (OIDs). At least a subset of these rules applies to every x509-compliant certificate (or, more correctly, a base rule set applies to all and the rest are optional). All the seemingly small things that we concern ourselves with, such as ensuring that a web site encrypts client traffic, come from an . If you want, you could hand-design a perfect combination of identifiers. It would apply to one usage. You would then need to modify it or rebuild it for every other use.
The OpenSSL tool solves this problem with sections in its cnf files. With research and practice, you can use them to manage certificate issuance effectively. You can follow the link in the introductory paragraph to see the way that I used them.
Microsoft built out a graphical system as their solution. I feel that it does mask away some functionality and perhaps makes some things more difficult than necessary. However, it substantially eases the overall process. Most uses do not require in-depth knowledge of the tool or certificates, and it has pre-defined templates that you can use immediately or copy. With experience and research, you can design certificates for advanced uses. Once you have the templates, requesting and issuing certificates based on them is trivial.
The Basics of Windows PKI Certificate Templates
You follow three basic steps to make a Windows PKI Certificate Template ready to use:
- Select or create a template to deploy.
- Configure settings and security on the template to control its usage and enrollment scope.
- Make the certificate template available for assignment on your certificate server(s)
If you want to configure the certificate, do that after step 1. We’ll walk through each of these steps in more detail. Once you have an understanding of the process, you only need to remember these three steps.
Notes: These directions were written using a system built from the instructions in the article linked in the introductory paragraph. You do not necessarily need the same design, but you may need to adjust your procedure. I doubt much of this will work if your certification authority is not Active Directory-integrated (Enterprise CA vs. Stand-alone CA).
Selecting or Creating a PKI Certificate
Your initial goal is to select or create a template with the necessary configuration to issue the kind of certificate that you want. For this walkthrough, we will create a certificate template that you can use with regular computers via autoenroll.
Start on a system with the Certification Authority Management Tools installed. If you run a GUI installation of Windows as your certificate server, you likely installed those tools along with the Certification Authority role. Otherwise, you will find it as an installable role in the standard Remote Server Administration Tools package.
- As a domain or enterprise administrator, open the Certification Authority tool under Windows Administrative Tools.
- If not running locally on the certification authority, right-click on Certification Authority and click Retarget Certification Authority. Connect to the target certificate authority.
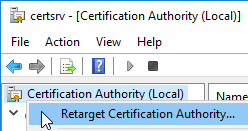
- Expand the tree in the left pane. Right-click Certificate Templates. Click Manage. That will open the Certificate Templates Console. (you can add this console directly to MMC; since you rarely work with templates separately from the authority, it makes sense to start there).
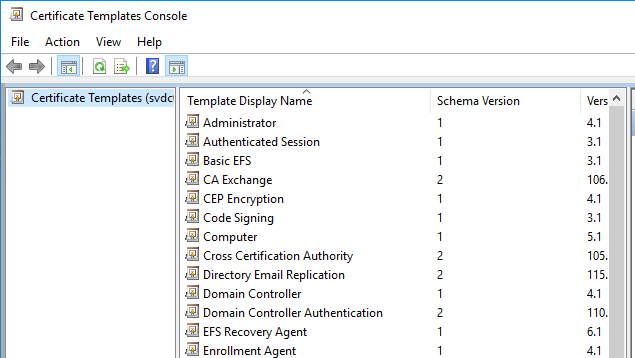
If you have not seen this screen before, I recommend that you take some time to familiarize yourself. Take care that you do not make changes to any of the default templates at this time. Some things to note:
- If you look at the full text of the root object (the only item in the left pane), you’ll see that it connected to a domain controller. Domain controllers hold the templates, not CAs.
- Each of these certificate templates serves a purpose that Microsoft defined, but they often use regular OIDs.
- You can right click on the root node and click View Object Identifiers to see the Microsoft-specific OIDs. Copying one to the clipboard allows you to use that OID in non-Microsoft contexts.
- Double-click on any template to view its properties. Compare templates to each other, especially those that use different schema versions.
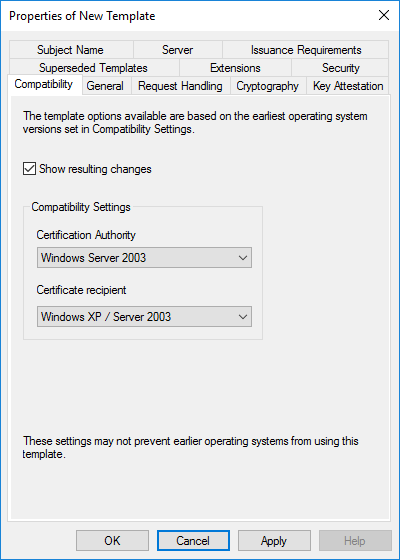
- The “Compatibility” tab shows different Windows versions. Version compatibility primarily controls which features will be made available to certificates based on this template. If you open one of the oldest certificate templates (schema 1), you will see that it has fewer tabs than newer templates. In other cases, you can access the tabs but not modify one or more settings due to a compatibility block. If you leave Show resulting changes checked on the Compatibility tab, then switch through the different choices, it will show you the differences.
- You cannot create an all-new template. You can only duplicate existing ones.
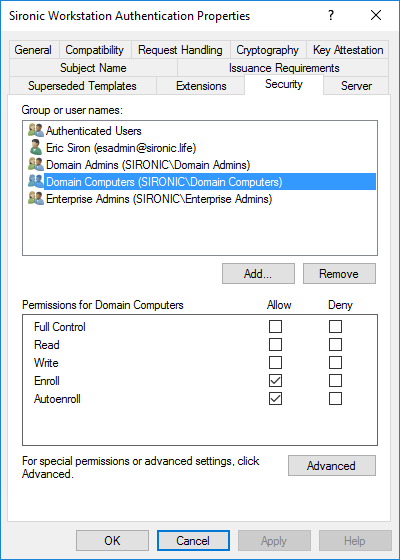
Security Settings for Certificate Templates
Certificate templates have a great many settings. I think that you can figure out most of them easily enough. You can find details on most of the rest through some Internet searches. I do want to spend some time going over the security settings, though. Let’s take a look at the security tab:
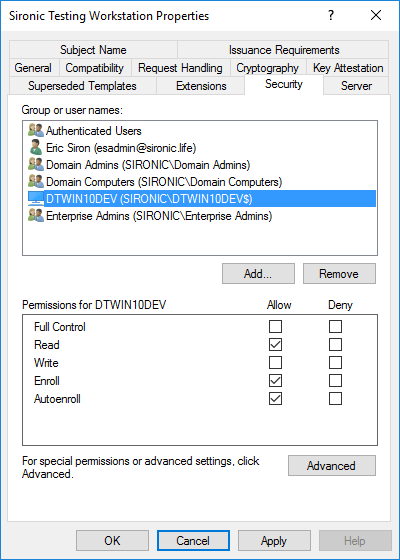
I want to draw your attention to two permissions in particular: Enroll and Autoenroll.
- Enroll: Accounts with the enroll permission can use any available method to request certificates from CAs that host this template. The exact methods vary, sometimes by options set on the certificate template, but include MMC, certreq.exe, and the request web site.
- Autoenroll: Accounts will request all available certificates during group policy refresh. If they have autoenroll permissions on a certificate and it falls within policy scope, the CA will issue the certificate.
I will explain the request and enroll procedures in a forthcoming article. If you want to skip ahead to autoenroll, just remember that it requires a combination of permissions on the template and an applied group policy that enables autoenroll.
Impact of Certificate Template Subject Name Choices
On any certificate template that uses a schema version other than 1, switch to the Subject Name tab:
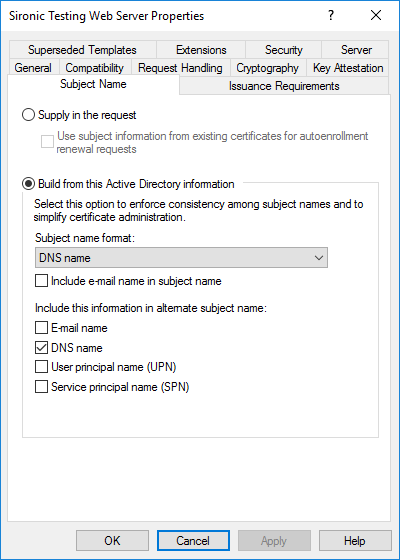
You have two basic choices, Supply in the request or Build from this Active Directory information.
- Supply in the request: If you choose this, you will be able to manually specify the subject name when requesting certificates. This is the only way you can request a certificate using the old web enrollment method. This presents a web page where users can enter in certificate request information by hand or upload a certificate signing request. If you select it, you should also set the CA certificate manager approval option on the Issuance Requirements tab. That requires you to manually approve all requests for this template. Otherwise, you have no control on who can request the certificate. You will not be able to use autoenroll to issue new certificates with any template with this option. Furthermore, the web enrollment page has been deprecated; it still works, albeit with multiple problems. Development was halted some time ago. I recommend that you avoid using that feature. However, the “supply” option still has uses. We’ll review them later.
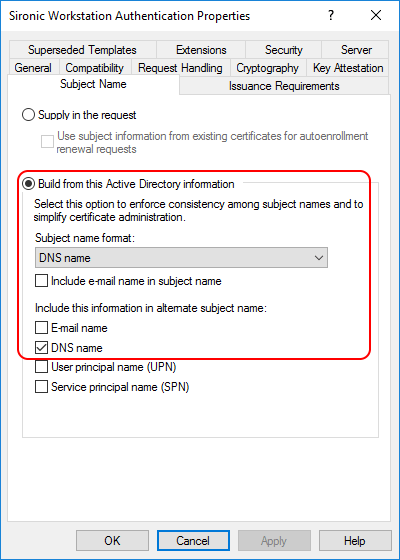
- Build from this Active Directory information: This option allows for all types of enrollment except the aforementioned web enrollment. The above screenshot shows the default and recommended settings for a certificate issued to a computer. I recommend that you prefer this option.
Creating PKI Certificate Templates
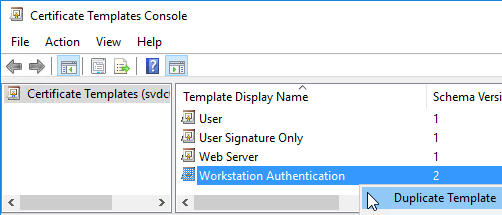
Let’s get back to our walkthrough. We want to create a certificate template to use on regular domain computers. If you saw the template list, then you might have noticed that it already contains a Workstation Authentication template. If you open its property sheets, you’ll discover that you can modify it. I recommend that you avoid any changes to any default template. The Certification Authorities employ many of them. Editing one permanently impacts any future use, including renewals. You cannot undo those changes.
Therefore, I recommend that you always duplicate an existing template and fashion it into a template that specifically suits your needs. I’ll show a general introduction to that process:
- In the Certificate Templates Console, right-click the Workstation Authentication template and click Duplicate Template.
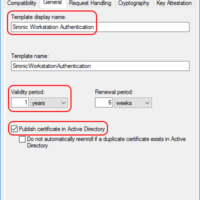
- That action will immediately open a set of property sheets to configure the newly-copied template. Start by switching to the General tab. Your Template display name will say Copy of Workstation Authentication. Change it to something that suits you. If desired, you may also change the validity period of the certificate from its default of 1 year. I do not change Renewal period. It establishes a window prior to expiration in which autoenroll will renew. Since we’re using an Active Directory-integrated certification authority, select Publish certificate in Active Directory so you can make it available for enrollment.
- Switch to the Compatibility tab. The Show resulting changes checkbox will pop-up a dialog every time you change either of the compatibility settings. The Certification Authority setting governs which Windows Server versions running the Certification Authority role will be able to use all CA-related settings on the certificate template. The Certificate recipient setting does the same for systems that request a certificate from the CA. Note that the compatibility settings have no impact on the systems that will communicate with certified machines nor will they necessarily prevent a down-level system from having a certificate issued.
- Switch to the Subject Name tab. Because we’re making a certificate for autoenroll and will not ever try to use a custom subject name, I chose Build from this Active Directory information.
- Switch to the Security tab. I want to make this available to any computer in my domain, so I added that object to the ACL and granted it Enroll and Autoenroll. If I wanted to let regular users enroll their computers, I could add matching security group(s) and grant them Enroll.
For typical usage, that’s enough. Look through the other tabs, though. Most importantly:
- Extensions: Use this tab if you need to control what the certification authority will authorize. Application Policies control the certificate’s authorized uses. If you’re going through the walkthrough, then this will have Server Authentication and Client Authentication. Typical web server certificates use only Server Authentication. Check the other items on this property sheet.
- Request handling: Use this to control a few aspects of issued certificates. I sometimes use the Allow private key to be exported option, for instance.
- Issuance Requirements: Because of our subject name option in step 4, we don’t need to do anything here. Had we chosen the supplied option, anyone with sufficient permissions could request a certificate and use any subject names they like. Personally, I use the Security tab to limit who has access even in those cases. You can use the options on the Issuance Requirements tab to enact tighter control.
Once you have made settings to your liking, click OK. Your new certificate template will now appear in the list.
How to Make a Certificate Template Available on Certification Authorities
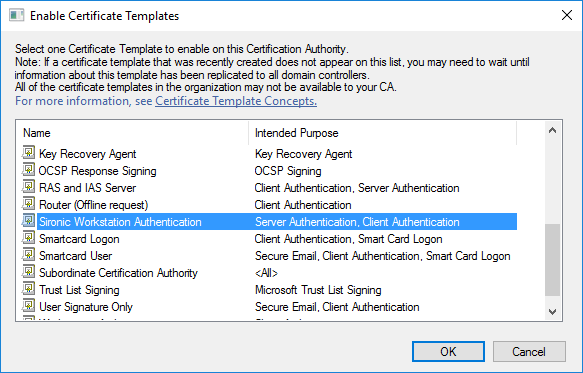
Once you have a template created, return to the Certification Authority MMC. Right-click the Certificate Templates node, hover over New, and click Certificate Template to Issue.
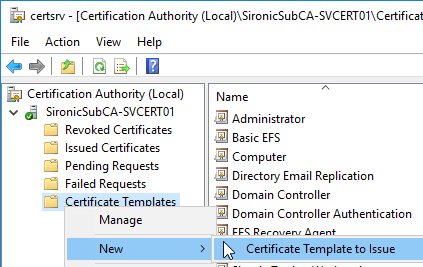
Now you only need to select your newly created template.
Your certificate template will now appear in the CA’s template list. If you have other CAs that should distribute certificates from this template, repeat this action on them.
Differences for Manually-Named PKI Certificates
When using a certificate created using the above walk-through, it will always have a subject name that uses the requesting account’s Active Directory information. In some cases, you will want to override the subject name. Two of those reasons:
- Web servers: You may want to control the information that a web server exposes in its certificate, especially when it lives in a farm or when it presents the certificate to clients outside of your domain.
- Proxy requesting: You might use a tool on a domain-joined system to request a certificate for a non-domain-joined system. Or, you might use a single MMC session to request multiple certificates for different systems. You definitely don’t want invalid information in your certificate.
I mentioned the solution in a couple of places above, but I want to call it out directly for skimmers. You must use the Supply in the request option on the Subject Name tab. Initial issuance of these certificates cannot occur via autoenroll. However, once a system has a certificate with this setting, it can use autoenroll for renewals if you also enable the Use subject information from existing certificates autoenrollment renewal requests. If you use a lower compatibility setting, you may not have that option available.
Using the Supply in the request option does present one potential problem: anyone that can request a certificate based on this template can put anything they like into the subject name field. You can use settings on the Issuance Requirements tab to keep that from getting out of hand. The easiest control is to check CA certificate manager approval. That will cause the CA to hold certificate requests from this template in Pending Requests. You will need to manually approve or decline them.
Maintaining Certificate Templates
Once you have made a template available, even after you have issued certificates from it, you can still modify the template. CAs that have already made the template available will automatically use the modifications on new certificates. You have a bit of work to do if you want to replace previously-issued certificate.
For auto-enrolled certificates: In Certificate Templates Console, right-click the newly modified template and click Reenroll All Certificate Holders. This action will update the major version number of the certificate template. Systems that hold this certificate and meet the criteria for autoenroll will replace their existing certificate with the new version at the next policy refresh.

For manually-enrolled certificates, you will need to repeat the enrollment process.
How to Verify a Certificate’s Version
If you want to check that a system has a new certificate, access its local certificate list.:

The Expiration Date probably gives away the change. But, you can also check the version more conclusively. Double-click the certificate, or right-click it and click Open. Switch to the Details tab and click the Certificate Template Information line item:
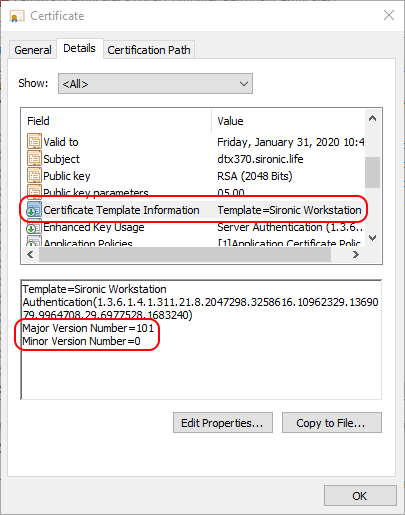
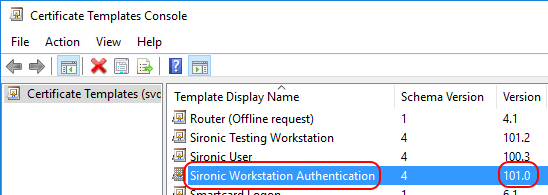
The template name and version numbers should match what you see in the Certificate Templates Console:
Next Steps
This concludes my instructions on creating, deploying, and managing PKI certificate templates in a Windows environment. Spend some time learning your way around these tools. Set up some templates and acquaint yourself with the settings. Let me know if I did not make anything clear enough.
I still have not shown you how to request and issue certificates in this system. I will write that article next.


Not a DOJO Member yet?
Join thousands of other IT pros and receive a weekly roundup email with the latest content & updates!
More in this category


About the Author

Eric Siron


52 thoughts on "How to Create and Manage Windows SSL Certificate Templates"
Hi Eric
Very useful and simple to understand. I must say all your articles related to PKI are very good for anyone who want to master PKI domain.
Thanks for keeping such infromation available for free.