Save to My DOJO

You’ve got a straightforward problem. You have a file on your Windows machine. You need to get that file into your Linux machine. Your Windows machine runs Hyper-V, and Hyper-V runs your Linux machine as a guest. You have many options.
Method 1) Use PowerShell and Integration Services
This article highlights the PowerShell technique as it’s the newest method, and therefore the least familiar. You’ll want to use this method when the Windows system that you’re working from hosts the target Linux machine. I’ll provide a longer list of the benefits of this method after the how-to.
Prerequisite for Copying a File into a Linux Guest: Linux Integration Services
The PowerShell method that I’m going to show you makes use of the Linux Integration Services (LIS). It doesn’t work on all distributions/versions. Check for your distribution on TechNet. Specifically, look for “File copy from host to guest”.
By default, Hyper-V disables the particular service that allows you to transfer files directly into a guest.
Enabling File Copy Guest Service in PowerShell
The cmdlet to use is Enable-VMIntegrationService. You can just type it out:
Enable-VMIntegrationService -VMName svlmon01 -Name 'Guest Service Interface'
The Name parameter doesn’t work with tab completion, however, so you need to know exactly what to type in order to use that syntax.
You can use Get-VMIntegrationService for spelling assistance:
Get-VMIntegrationService -VMName 'svlmon01'
Enable-VMIntegrationService includes a VMIntegrationService parameter that accepts an object, which can be stored in a variable or piped from Get-VMIntegrationService:
Get-VMIntegrationService -VMName 'svlmon01' | where Name -match 'guest' | Enable-VMIntegrationService
You could leave out the entire where portion and pipe directly in order to enable all services for the virtual machine in one shot.
Use whatever method suits you best. You do not need to power cycle the virtual machine or make any other changes.
Enabling File Copy Guest Service in Hyper-V Manager or Failover Cluster Manager
If you’d prefer to use a GUI, either Hyper-V Manager or Failover Cluster Manager can help. To file copy for a guest in Hyper-V Manager or Failover Cluster Manager, open the Settings dialog for the virtual machine. It does not matter which tool you use. The virtual machine can be On or Off, but it cannot be Saved or Paused.
In the dialog, switch to the Integration Services tab. Check the box for Guest services and click OK.
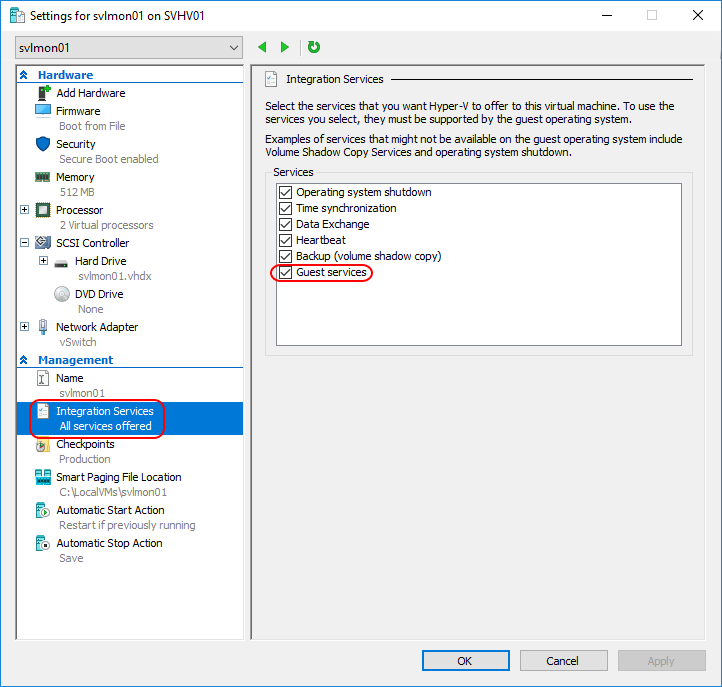
You do not need to power cycle the virtual machine or make any other changes.
Verifying the Linux Guest’s File Copy Service
You can quickly check that the service in the guest is prepared to accept a file from the host:
ps -u root | grep hyper
Look in the output for hypervfcopyd:

Of course, you can supply more of the name to grep than just “hyper” to narrow it down, but this is easier to remember.
Using Copy-VMFile to Transfer a File into a Linux Guest
All right, now the prerequisites are out of the way. Use Copy-VMFile:
Copy-VMFile -Name svlmon01 -SourcePath 'C:Sourcenagios-4.3.2.tar.gz' -DestinationPath '/home/eric/Downloads' -FileSource Host
You can run Copy-VMFile remotely:
Copy-VMFile -ComputerName svhv01 -Name svlmon01 -SourcePath 'C:Sourcenagios-4.3.2.tar.gz' -DestinationPath '/home/eric/Downloads' -FileSource Host
Notice that SourcePath must be from the perspective of ComputerName. Tab completion won’t work remotely, so you’ll need to know the precise path of the source file. It might be easier to use Enter-PSSession first so that tab completion will work.
You can create a directory on the Linux machine when you copy the file:
Copy-VMFile -Name svlmon01 -SourcePath 'C:Sourcenagios-4.3.2.tar.gz' -DestinationPath '/downloads/' -CreateFullPath -FileSource Host
CreateFullPath can only create one folder. If you ask it to create a directory tree (ex: -CreateFullPath ‘/downloads/new’ ), you’ll get an error that includes the text “failed to initiate copying files to the guest: Unspecified error (0x80004005)“.
Benefits and Notes on Using Copy-VMFile for Linux Guests
Some reasons to choose Copy-VMFile over alternatives:
- I showed you how to use it with the VMName parameter, but Copy-VMFile also accepts VM objects. If you’ve saved the output into a variable from Get-VM or some other cmdlet that produces VM objects, you can use that variable with Copy-VMFile’s VM parameter instead of VMName.
- The VMName and VM parameters accept arrays, so you can copy a file into multiple virtual machines simultaneously.
- You do not need a functioning network connection within the Linux guest or between the host and the guest.
- You do not need to open firewalls or configure any daemons inside the Linux guest.
- The transfer occurs over the VMBus, so only your hardware capabilities can limit its speed.
- The transfer operates under the root account, so you can place a file just about anywhere on the target system.
Notes:
- As mentioned in the list item in the preceding list, this process runs as root. Be careful what you copy and where you place it.
- Copied files are marked as executable for some reason.

- Copy-VMFile only works from host to guest. The existence of the FileSource parameter implies that you copy files the other direction, but that parameter accepts no value other than Host.
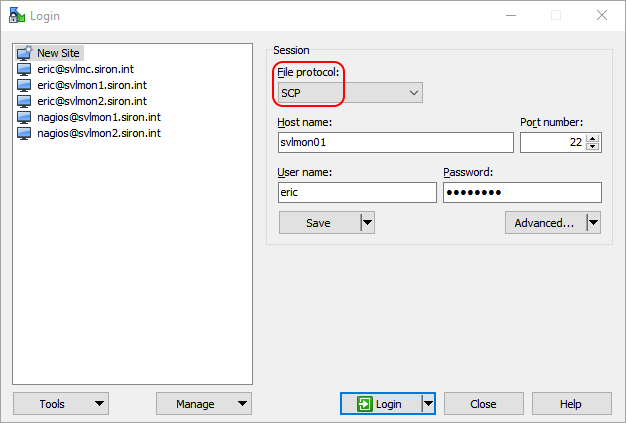
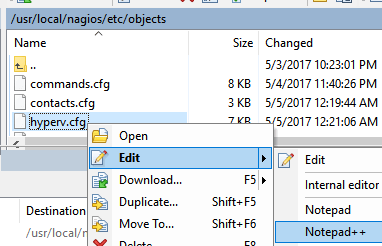
Method 2) Using WinSCP
I normally choose WinSCP for moving files to/from any Linux machine, Hyper-V guest or otherwise.
If you choose the SCP protocol when connecting to a Linux system, it will work immediately. You won’t need to install any packages first:
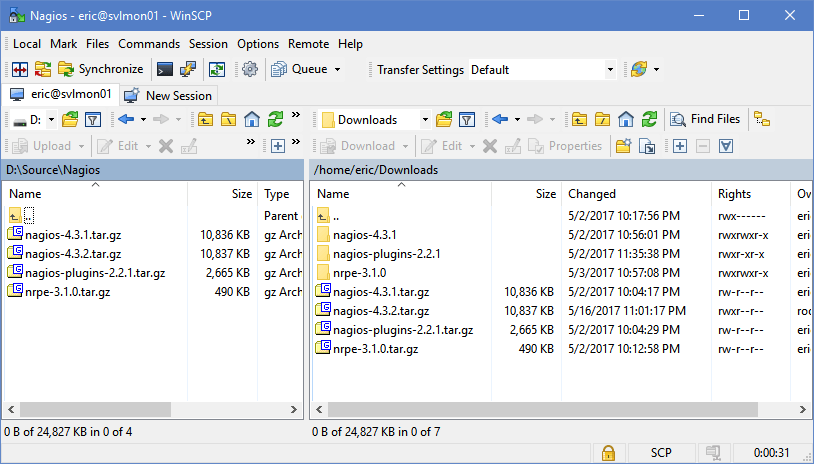
Once connected, you have a simple folder display for your local and target machines with simple drag and drop transfer functionality:
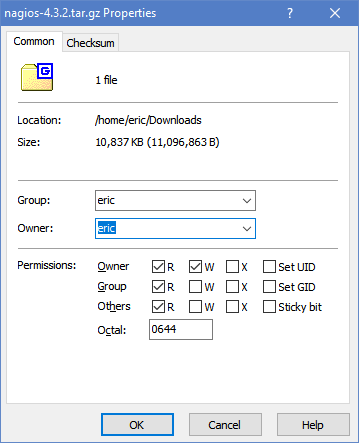
You can easily modify the permissions and execute bit on a file (as long as you have permission):
You can use the built-in editor on a file or attach it to external editors. It will automatically save the output from those editors back to the Linux machine:
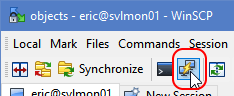
You can even launch a PuTTY session right from WinSCP (if PuTTY is installed):
I still haven’t found all of the features of WinSCP.
Method 3) Move Files to/from Linux with the Windows FTP Client
Windows includes a command-line ftp client. It has many features, but still only qualifies as barely more than rudimentary. You can invoke it with something like:
ftp svlmon01
The above will attempt to connect to the named host and will then start an interactive session. If you’d like to start work from within an interactive session, that would look something like this:
ftp
open svlmon01
Use ftp /? at the command prompt for command-line assistance and help at the interactive ftp > prompt for interactive assistance.
You’ll have a few problems using this or any other standard FTP client: most Linux distributions do not ship with any FTP daemon running. Most distributions allow you to easily acquire vsftpd. I don’t normally do that because SCP is already enabled and it’s secure.
Method 4) Move Files Between Linux Guests with a Transfer VHDX
If you have a distribution that doesn’t work with Copy-VMFile, or you just don’t want to use it, you can use a portable VHDX file instead.
- First, create a disk. Use PowerShell so that the sparse files don’t cause the VHDX file to grow larger than necessary:
New-VHD -Path .linux_transfer.vhdx -SizeBytes 20gb -Dynamic -BlockSizeBytes 1mb
- Attach the VHDX to the Linux guest. If you attach to the virtual SCSI chain, you don’t need to power down the VM.
- Inside the Linux guest, create an empty mount location.
sudo mkdir /transfer
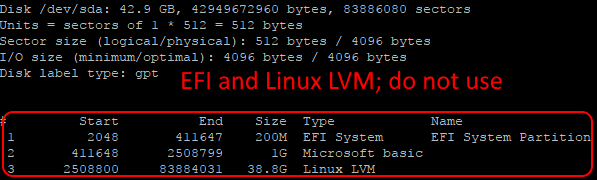
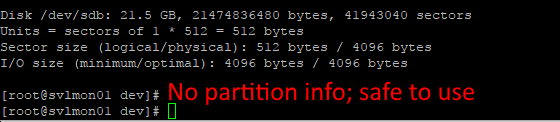
- Determine which of the attached disks can be used for transfer with sudo fdisk -l . You are looking for a /dev/sd* item that has FAT32 partition information.
Do not use:
Use:
- Enter the following as shown. Outputs will show you what you’re doing; I’m only telling you what to type:
sudo fdisk /dev/sdb
n
[Enter]
[Enter]
[Enter]
[Enter]
t
b
w
- Run sudo fdisk -l to verify that your new disk now has a W95 FAT32 partition. You need FAT32 as it’s the only file system that both Linux and Windows can use without extra effort that’s not worth it for a transfer disk.
- Format your new partition:
sudo mkfs.vfat -n transfer /dev/sdb1
You have successfully created your transfer disk.
Use a Transfer Disk in Linux
To use a transfer disk on the Linux side, you need to attach it to the Linux machine. Then you need to mount it:
- Use sudo fdisk -l to verify which device Linux has assigned the disk to. Use the preceding section for hints.
- Once you know which device it is, mount it to your transfer mount point: mount /dev/sdb1 /transfer. Move/copy files into/out of the /transfer folder.
- Once you’re finished, unmount the disk from the folder:
umount /transfer
or
umount /dev/sdb1
- Detach the VHDX from the virtual machine.
Use a Linux Transfer Disk in Windows
You mount a VHDX in Windows via Mount-VHD (must be running Hyper-V), Mount-DiskImage, or Disk Management. Once mounted, work with it as you normally would. Mount-VHD and Disk Management will attach it to a unique drive letter; Mount-DiskImage will mount to the empty path that you specify. Once you’re finished working with it, you can use Dismount-VHD, Dismount-DiskImage (don’t forget -Save!), or Disk Management.
Be aware that even though Windows should have no trouble reading a FAT32 partition/volume created in Linux, the opposite is not true! Do not use Windows formatting tools for a Linux transfer disk! Your mileage may vary, but formatting in Linux always works, so stick to that method.


Not a DOJO Member yet?
Join thousands of other IT pros and receive a weekly roundup email with the latest content & updates!
More in this category


About the Author

Eric Siron


113 thoughts on "4 Ways to Transfer Files to a Linux Hyper-V Guest"
or…. install samba?? Takes less than 5 minutes to setup and is more convenient and potentially faster than some of these methods.
If that’s what works best for you, sure.
Hey; when checking to see if the Hyper-V process is running on my Ubuntu, nothing comes up. I followed instructions here (https://www.serverwatch.com/server-tutorials/installing-and-activating-hyper-v-linux-integration-services.html) to enable it, since apparently it comes in-box with Ubuntu (using 18.04) but not sure if it’e enabled out the box. Still no dice. Any thoughts?
Re. Verifying the Linux Guest’s File Copy Service
At least on Opensuse, the process does not have “hyper” in the name so the suggested grep command won’t work.
‘ps -u root -f | grep hyper’ catches it and shows the name:
root 967 1 0 01:52 ? 00:00:00 /usr/lib/hyper-v/bin/hv_fcopy_daemon –no-daemon
which can be used elsewhere:
# systemctl status hv_fcopy_daemon
Other Hyper-V processes:
# ps -u root | grep [h]v
230 ? 00:00:00 hv_vmbus_con
231 ? 00:00:00 hv_pri_chan
232 ? 00:00:00 hv_sub_chan
567 ? 00:00:00 hv_balloon
967 ? 00:00:00 hv_fcopy_daemon
980 ? 00:00:00 hv_vss_daemon
1387 ? 00:00:00 hv_kvp_daemon
#
Euh, I’m pretty sure Samba (cifs-utils, etc.) will work for everyone, no? These solutions all seem super complicated and instructions are missing (how do the integration services get installed?)