Save to My DOJO
In the previous part of this series, I showed you how to prevent virtual machines from being migrated to specific hosts. In part 2, we’ll look at how to make the restriction less harsh by setting preferred nodes and anti-affinity.
Preferred Nodes via GUI
You can indicate to a virtual machine that it should prefer certain nodes. If a failover event occurs, it will try to find a preferred node to start on. If none in the preferred list are available, only then will it start on any other node. This setting is very simple to make. The process is almost identical for both 2008 R2 and 2012 so I’m only going to include the screenshot for 2012:
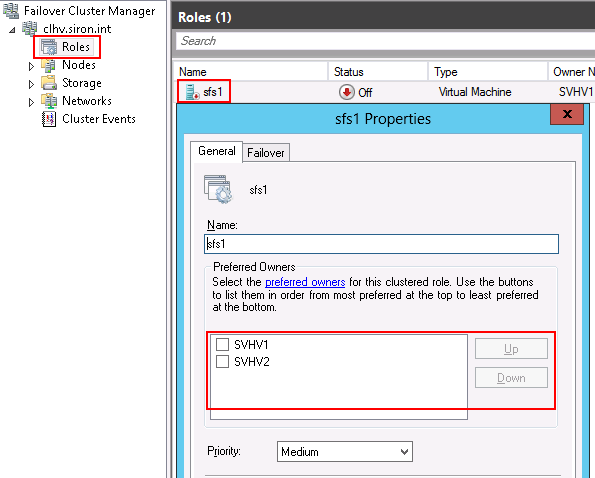
Preferred Owner for VM
- Open Failover Cluster Manager. Expand your cluster.
- In 2008 R2, click on or expand “Services and applications” in the left pane. In 2012, click on “Roles” in the left pane.
- In the center-pane, right-click on the virtual machine to modify and click “Properties”. In 2008 R2, you can also right-click on the machine in the left pane.
- In the properties dialog, check the box(es) for hosts that you want this machine to prefer. You can use the Up and Down buttons on the right to sort your preferred hosts.
If you just want to establish the order that machines should try to run on and not exclude any, it’s perfectly to check off all of the hosts and then arrange them in the desired order. If you don’t select any at all (the default), then the clustering service will try to determine the best host to place the machine on.
Preferred Nodes via PowerShell
To start off, you need to have the Failover Clustering PowerShell modules ready. To save you from flipping back to the last post, here are the instructions again:
On 2008 R2, you have to import the module:
Import-Module FailoverClusters
For 2012, you just have to run the command on a system that has the Failover Clusters PowerShell module already installed. If you haven’t, run this:
DISM /ONLINE /ENABLE-FEATURE /FEATURENAME:FailoverCluster-PowerShell
The command for preference looks much like the command for the command for possible, but this time the noun is Group instead of Resource. If you’re not sure what the resource name is, first get a list of all of them:
# List preferred owners for all cluster group objects
Get-ClusterGroup
In most cases, it will be the simple name of the virtual machine, but notice that there will be other objects there as well:
Get-ClusterGroup

Name                       OwnerNode                  State
----                       ---------                  -----
Available Storage          SVHV1                      Offline
Cluster Group              SVHV1                      Online
sfs1                       SVHV1                      Offline
You can check the current preferred owners with:
# List the preferred hosts for all cluster groups
Get-ClusterGroup | Get-ClusterOwnerNode
Of course, you can add the name(s) of a virtual machine to narrow your results (2012 allows the use of wildcards as well):
# List the preferred owners for sfs1 and svdc1
Get-ClusterGroup sfs1,svdc1 | Get-ClusterOwnerNode
Now that you know the name(s) of the virtual machines you want to modify, all you have to do is pipe them back in to Set-ClusterOwnerNode:
# Set preferred owners for sfs1 to svhv2 first, svhv1 second, and leave svhv2 as unpreferred
Get-ClusterGroup sfs1 | Set-ClusterOwnerNode svhv2, svhv1
The order that you specify the hosts in indicates the preference order. Any hosts not included will not be preferred (their checkboxes will be cleared).
If you need to reset to defaults, just pass in an empty string:
# Clear preferred owners for sfs1
Get-ClusterGroup sfs1 | Set-ClusterOwnerNode ""
The pair of double-quotes is required. If you just use “Set-ClusterOwnerNode”, it will prompt you for a value. If you don’t supply one, the cmdlet will throw an error.
Anti-Affinity
Anti-affinity is a feature of the clustering service that works to keep certain resources from sharing a cluster node. It’s sort of like setting VMs to act the same pole of a set of magnets. They’ll repel each other when possible, but can be put together if necessary. The “magnetizing” process is done by setting the value of a text field on the properties of a cluster group. Every cluster group with the exact same text string in that field will try to stay away from every other cluster group with the same value.
This setting can be manipulated either with cluster.exe or with PowerShell, but not from within the GUI.
Anti-Affinity With Cluster.EXE
The original way is to user “cluster.exe”. You won’t run into any troubles getting that to run on any 2008 R2 computer with Failover Clustering or the Failover Cluster Manager tool installed, but it was deprecated in 2008 R2 so it’s no longer there by default in 2012 (and will probably be completely gone in the next iteration). You’ll need to make a special-case installation. In the GUI, just go through the “Add roles or features” wizard and on the features wizard, add the Failover Cluster Command Interface:
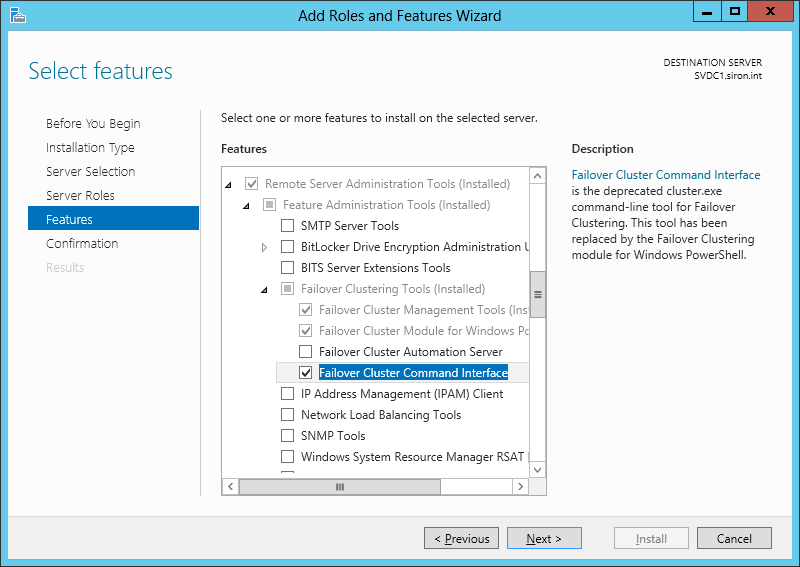
Adding Deprected Cluster Commands in 2012
On Hyper-V 2012 or Server Core 2012, enter the following (only the feature name itself is case-sensitive):
DISM /ONLINE /ENABLE-FEATURE /FEATURENAME:FailoverCluster-CmdInterface
To set the anti-affinity property on a virtual machine (group) named sfs1 to “File Servers”:
cluster group sfs1 /prop AntiAffinityClassNames = "File Servers"
A virtual machine can be in more than one anti-affinity class at a time. To put the above virtual machine into “File Servers” and “Critical Servers”, do the following:
cluster group sfs1 /prop AntiAffinityClassNames = "File Servers", "Critical Servers"
Be aware that this is a set command only. If the virtual machine is in any anti-affinity classes, they are removed when you set this. Also, if the virtual machine’s group name has spaces, you’ll need to enclose it in double-quotes:
cluster group "SCVMM svmon1 Resources" /prop AntiAffinityClassNames = "Monitoring Servers"
To reset to defaults:
cluster group sfs1 /prop AntiAffinityClassNames = ""
Anti-Affinity With PowerShell
I found this on another blog. Proper attribution will follow the instructions.
You can see which classes a virtual machine is in:
(Get-ClusterGroup sfs1).AntiAffinityClassNames
By default, this will just return you to the PowerShell prompt because there’s nothing there.
On 2012, you can just start adding classes:
(Get-ClusterGroup sfs1).AntiAffinityClassNames = "Critical Servers"
Still on 2012, you can easily add more with the += operator:
(Get-ClusterGroup sfs1).AntiAffinityClassNames += "File Servers"
To do it at all on 2008 R2 or to add several at once on 2012, you have to build a multi-string variable and pass that attach it:
# Create a multi-string variable called "antiaffinityclassnames"
$antiaffinityclassnames = New-Object System.Collections.Specialized.StringCollection
# The first class is "File Servers"
$antiaffinityclassnames.Add("File Servers")
# The second class is "Critical Systems"
$antiaffinityclassnames.Add("Critical Systems")
# The variable is ready, attach it to the virtual machine's AntiAffinityClassNames property
(Get-ClusterGroup sfs1).AntiAffinityClassNames = $antiaffinityclassnames
The source blog post for most of this latter PowerShell portion is on PowerShell.no. That post is definitely worth a read if you’ll be doing this often because the author has encapsulated this into an easier-to-use cmdlet.


Not a DOJO Member yet?
Join thousands of other IT pros and receive a weekly roundup email with the latest content & updates!
More in this category


About the Author

Eric Siron

