Save to My DOJO
It can be very frustrating to deal with VMs that are experiencing some sort of checkpoint issue. Whether the checkpoint chain is broken, the config files are corrupt, or the checkpoints are orphaned, it’s never fun to get error messages like “failed to apply checkpoint” when trying to revert to a checkpoint state. It’s even worse when a VM won’t start up due to checkpoint issues. Luckily, Hyper-V gives us the ability to manually merge the AVHDX files with the parenting disk so that we can potentially resolve the checkpoint headache. In the guide below you will find out how to manually Merge Hyper-V Checkpoints.
A Manual Merge Should not Be the First Step
Please note that if you’re running into issues with a VM checkpoint, don’t immediately attempt to manually merge the AVHDX files. A manual merge should be the last option when trying to fix checkpoints. The safest and easiest way to merge your checkpoints is to create a new checkpoint (if you can) and then delete it. This will allow Hyper-V to clean up and take care of your checkpoints automatically.
Depending on the issue that you’re experiencing with your VM checkpoints, another option that can be considered before performing a manual merge is to export your VM from a checkpoint and then import it. To do this, first shut down the VM, take a checkpoint, then export the VM from the new checkpoint and import it back into Hyper-V Manager. This creates a new VM from the current state without any of the checkpoint files associated with it. Keep in mind that the imported VM will need to have a different unique identifier if you want to have it registered in the same Hyper-V environment as the original VM. It will also take on the name of the checkpoint, so it will have to be renamed.
Also, more importantly: always take a backup of your files before making any merges or changes. I even recommend copying your VM files manually and making the merge changes on the copies to verify that it will work. Sometimes performing a merge can break things further, so having a copy to revert to will be a necessity. It will also allow you to give Microsoft Support a chance to try their hand at fixing your checkpoint issue before things become completely unrecoverable.
How to Find Out What Checkpoints to Merge
Before merging any checkpoints, you will need to determine the parent of each checkpoint to sort out the checkpoint structure of the chain. To do this find the location of where your VHDX and AVHDX files are stored:
Then, in Hyper-V manager, on the right hand side, select Inspect Disk:
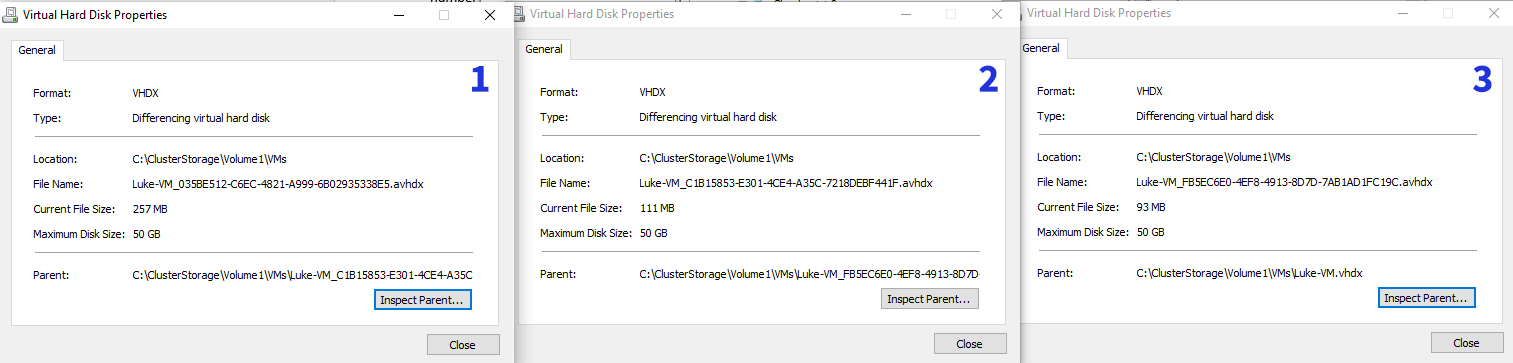
Browse to your AVHDX files select one and click OK. We can see which disk is the parent of the checkpoint and can even click on the Inspect Parent button to inspect the parent disk as well. This will allow us to find out which checkpoint is the newest and what goes where:
In the example below, I inspected each AVHDX file in the VM’s checkpoint tree and looked at each parent disk. From there I numbered the checkpoints from newest to oldest, so if we were going to merge all our AVHDX files back into their parent we would go in the order of: one, two, then three:
You might be tempted to use the files’ time stamps to determine the oldest and newest checkpoints, but if you’ve been switching back and forth between different checkpoint states, this information can be misleading since the modified date changes each time new data is written to the AVHDX file.
It’s important to determine which checkpoint goes where because, when merging checkpoints within a tree, you will want to go from newest to oldest. Why newest to oldest? Well, lets say we had a checkpoint tree that looks like the following:
If we wanted to remove checkpoint 2 and keep the data from checkpoint 1 and 3, we wouldn’t want to merge checkpoint 1 and checkpoint 2 because the data in checkpoint 1 would be overwritten with checkpoint 2’s changes. Instead, we would want to merge checkpoints 3’s changes with checkpoint 2 so that we retain the data from checkpoint 1 and 3. Luckily, Hyper-V automatically chooses the right checkpoints to merge so that when we right click on checkpoint 2 and delete it, checkpoint 3’s changes become merged into checkpoint 2. Checkpoint 3 would contain the newly merged AVHDX and the tree would look like the following:
How to Merge the Checkpoints
Now that we know the order we need to merge our checkpoints in, we can start merging them one by one. To do this click on Edit Disk in the right hand side of Hyper-V Manager:
Select the disk that you want. In our example, we will choose Luke-VM_035BE512-C6EC-4821-A999-6B02935338E5.avhdx. Then, select Merge:
Click Next and select To the parent virtual hard disk and click Finish.

The disk will then be merged to the parent disk. Now we will do the same for the remaining disk AVHDX files until all the changes are completely merged into the original VHDX.


Not a DOJO Member yet?
Join thousands of other IT pros and receive a weekly roundup email with the latest content & updates!
More in this category


About the Author

Luke Orellana


16 thoughts on "How to Merge Hyper-V Checkpoints"
– The vm settings for HardDrive will still point to an [avhdx] checkpoint file.
– Once all the merges are complete
– Go into vm settings for harddrive
– Delete the current harddrive thatpoints to the [avhdx] that no longer exists
– Add a new drive and point it to the good disk [vhdx]
Great article.
Really helped me a lot when i had to manually merge 4 Checkpoints at on VM.