Save to My DOJO
Table of contents
I obtained a copy of the preview versions of Windows Server 2012 R2 and Hyper-V Server 2012 R2 and wanted to upgrade my cluster. Here’s how I did it. Do remember that this is not intended as a step-through guide, but a sort of narrative of the things that happened to me and how I dealt with them. Make sure you read through the whole thing before attempting it yourself just so you aren’t caught by any surprises.
In case you need a refresher, I’ve covered Hyper-V Clusters in this series of posts. Since I’m running a two-node cluster, my plan was to vacate node 1, install Windows Server on it, move all the virtual machines to node 1, install Hyper-V Server on node 2, and rebuild the cluster. Remember that I get away with a lot of stunts because this is a test cluster. Do not run preview operating systems in production and do not mix management operating systems in your cluster. Once R2 is released, these steps will be usable.
Everything pretty much worked out as planned — at first. Then things got bad. When I disjoined node 1 from my Active Directory domain, it just disabled the computer account (this is normal behavior). After installing R2, I gave it the same name as the original node and rejoined it to the domain, so it immediately picked up all the previous security settings — at first. So, since I have already configured it for constrained delegation, I didn’t need to do it again. What this means is that I was able to use Shared Nothing Live Migration (SNLM) right away to move the virtual machines from node 2 (running Hyper-V Server 2012) to node 1 (running Windows Server 2012 R2 with Hyper-V as a role). I should indicate that, just as advertised, the Failover Cluster Manager and Hyper-V Server Manager tools in Windows Server 2012 R2 had no trouble managing the virtual machines and cluster operations on my Hyper-V Server 2012 box. Remotely targeted PowerShell cmdlets (using the -ComputerName parameter, not a remote session) also worked as expected.
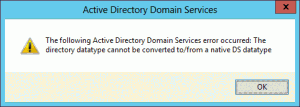
Then, I went to sleep. I got up the next morning and could no longer perform SNLMs. I checked in Active Directory, and the constrained delegation from node 1 to node 2 was still there, but not vice versa. No problem, I’ll just re-add them. No dice:
After some research, I determined that this error basically means: the object is broken. So, I started loading up ADSI Edit to begin some really hard work. Then I realized that I’m lazy and I don’t really like to do hard work, so I went back into Active Directory Users and Computers to the Delegation tab of the original host. I set it back to Do not trust this computer for delegation and clicked Apply. Then I put all the delegations back the way I had them. After rebooting the source host, SNLM worked fine again. Note that I tried restarting Netlogon to get it to refresh its security settings first, but that wasn’t enough. Perhaps if I’d restarted VMMS, that might have done it.
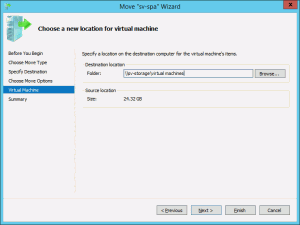
SNLM then went exactly as expected for my non-highly available virtual machines. The highly available ones needed a bit more work. The first thing I had to do was make them non-highly available. The easiest way to do this is to just right-click on them in Failover Cluster Manager and click Remove. Nothing is actually deleted except the cluster service’s knowledge of and control over the VM. Now, you can just initiate SNLM. Up until I performed the reset on the delegation, I had mixed results with this method, so I’d say to go ahead and rebuild your delegations before proceeding. If, like me, you’ve only got two nodes and the reboot would introduce unwanted guest downtime, the delegation changes might pick up if you wait a while. The files for my highly available VMs were on a CSV, and the CSV, naturally, can only be connected to one cluster at a time. The new node had no visibility. So, I wanted to use SNLM to move the VM so that it ran on node 1 but was stored on an SMB 3.0 share. Using Hyper-V Manager’s Move operation, I told it to Move the Virtual Machine and Move the Virtual Machine’s data to a single location on the corresponding screens. I configured the destination like so:
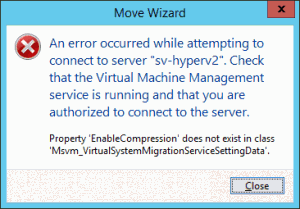
If you don’t reconfigure delegations first, this may or may not work. What I ran into before making the change was that it would throw errors about the CSV location. What I wound up doing was setting the option to move each of the virtual machine’s files to distinct locations, then I just set the same destination for all of them. I hadn’t been paying close enough attention during other people’s discussions on cross-version Shared Nothing Live Migration and didn’t know that it was one-way. You can only go from 2012 to 2012 R2, not the other way. Since I doubt I’m the only person who wasn’t paying attention, I’ve listed the errors that you’ll encounter if you try. If you try to use Hyper-V Manager in 2012 R2 to SNLM a VM from 2012 R2 to 2012, this is what you’ll get:
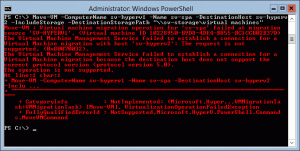
If you use PowerShell to start the migration from the R1 host, this is what you’ll get:
When attempting the SNLM from R2 to R1 from Hyper-V Manager in Windows 8 or Windows Server 2012, you’ll get the same basic message as you see in the above PowerShell output.
In all this talk, don’t lose sight of the fact that I performed all my migrations by using SNLM and an SMB 3.0 share. You will not be able to move virtual machines while keeping them on a CSV. If you haven’t got good storage for SMB 3.0, you’ve got some other options. One is just to create new LUNs and attach them to your R2 host by Fibre Channel or iSCSI. Once you recreate the cluster, they can be added as cluster disks and then converted to CSVs, although that will break the VHD pointer on all the virtual machines. If your setup permits, you could even temporarily move them to internal storage on the R2 node. If you’re really in bad shape, you could perform an export of the source VMs and place them on external storage, then rebuild the cluster and import. The other thing to remember is that I moved everything out of the original CSVs. This was good because, when I reconnected to storage, one of my nodes absolutely would not communicate with one of the original iSCSI disks. It saw it as “RAW” and nothing would change its mind. The second node was able to work with it well enough, but I actually had to delete and recreate the LUN to get the first node to work with it at all. Neither node had any troubles with the other CSVs, though. What this means is, you can’t count on being able to just re-attach your LUNs like nothing ever happened. Perhaps, if I had taken the time to remove them from CSV and cluster storage prior to destroying the original cluster, this wouldn’t have been an issue.
After the storage drama, everything was pretty simple. I disjoined the second node, but I did not remove it from the cluster or destroy the cluster. I rebuilt it (with Hyper-V Server 2012 R2 Preview). I configured it and re-added it to the domain. I reconfigured constrained delegation. Next, I disabled the original cluster’s Cluster Name Object (the computer account that represented it in Active Directory). Then, I rebuilt the cluster just as it was before, using the original CNO, following the same steps I used for R2. In my case, I used the validation wizard in Failover Cluster Manager even though I know it’s going to error on having mismatched OSs. Since it’s a test cluster and I don’t care about support, I could have just as easily created it outright without validation. Once the cluster was rebuilt, I used SNLM to move VMs that I wanted permanently on node 2. I always place my domain controllers and Nagios monitoring systems on internal storage on these units. I used Failover Cluster Manager to re-establish the VMs on SMB 3.0 storage as highly available. All you have to do is right-click Roles in the left pane and click on Configure Role… Pick Virtual Machine, and you’ll be presented with a list of all the virtual machines it can see on any node. Check the ones on highly available storage and they’ll all convert. Don’t forget to upgrade Integration Services in your guests!


Not a DOJO Member yet?
Join thousands of other IT pros and receive a weekly roundup email with the latest content & updates!


2 thoughts on "How to Migrate a Cluster from Hyper-V 2012 to Hyper-V R2"
Wouldn’t it be easy if you just export all your VMs, build both the nodes from scratch and import all your VMs?
This process isn’t bad as long as you know what’s coming. The real purpose to a migration vs. an import/export is leaving the VMs online. The only downtime necessary is a reboot for the Integration Services upgrade. That can wait until scheduled downtime. So, with a bit of effort, you can migrate from 2012 to 2012 R2 and not kick the users off.