Save to My DOJO
I am really enjoying working with Hyper-V. Even though I primarily run it on Windows 8 many to the typical or daily administration tasks are the same as if I were managing Hyper-V on a Windows Server 2012 system. And if you are managing a server installation, you hopefully have procedures to avoid the scenario I’m going to describe.
My Windows 8 system was having problems so I decided to use the refresh operating system feature. I had a document backup and the refresh leaves those file untouched anyway. What I neglected to realize what that the refresh process removed the Hyper-V feature. In itself, that wasn’t too bad since it was easy to re-add it. However, all of my virtual machines were gone. After a brief moment of sheer panic I discovered that all of the VHD and VHDX files remained in place. So other than reconfiguring things like virtual switches all I was missing were the virtual machines which are really nothing more than a set of configuration settings. As long as I had the VHD files the “heart” of the virtual machine was intact.
Fortunately, I had backups of all my virtual machines, although not as up to date as I would have liked. In a totally new system I would have no choice but to import the virtual machines from the backup, and that’s pretty easy. But in this case I didn’t want to overwrite the disk files. What I had to work with was the XML configuration file. This file is created from snapshots or exporting virtual machines. All I needed to do was read information from the existing XML configuration file and recreate the virtual machine. Naturally I wasn’t going to do this manually so enter PowerShell.
Processing XML
If you’ve exported the virtual machine the configuration file will be found under the Virtual Machines folder. The file name will be a GUID so the file will look like 8EED2157-E131-49ED-A6A6-2214443629F1.XML. You can use whatever tool you’d like to pull information from the XML file. I’ll go ahead and use PowerShell since that is what I’ll be using to re-create and configure the virtual machine.
PowerShell can take the contents of the XML file and turn it into an XML document.
PS C:> [xml]$vmconfig = Get-Content 'D:backupDemo RigVirtual Machines8EED2157-E131-49ED-A6A6-2214443629F1.XML'
PS C:> $vmconfig

xml                                       configuration
---                                       -------------
version="1.0" encoding="UTF-16" standa... configuration
I can “walk” the document as an object.
Hyper-V configuration as a PowerShell XML document
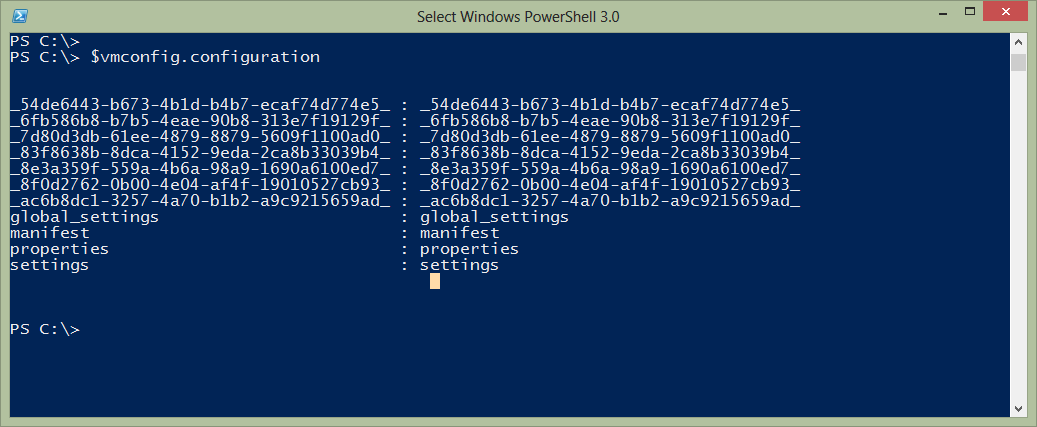
The challenge is finding the relevant information within the document. Most everything I need is found under the Configuration node.
PS C:> $vmconfig.configuration.properties.name.'#text'
Demo Rig
Because many document properties will include the # character which is the comment character in PowerShell, you need to quote that portion. I can get the number of processors:
PS C:> $vmconfig.configuration.settings.processors.count.'#text'
1
Some values are buried under nodes with GUID names so the best way to search is to use an XPath query with Select-XML. For example, to discover the virtual switch name I can run a command like this:
PS C:> (select-xml -xml $vmconfig -XPath "//AltSwitchName").node."#text"
Work Network
Another critical setting to recover is memory configuration.
PS C:> $memory = (select-xml -xml $vmconfig -XPath "//memory").node.Bank
PS C:> $memory

dynamic_memory_enabled : dynamic_memory_enabled
limit                  : limit
priority               : priority
reservation            : reservation
size                   : size
target_memory_buffer   : target_memory_buffer
Here I can see that dynamic memory is enabled. Other memory settings can be retrieved from the properties as well. You’ll notice that I’m converting them to numeric byte values so that I can use them later to configure the virtual machine with the PowerShell cmdlets.
PS C:> $MemoryMaximumBytes = ($memory.limit."#text" -as [int]) * 1MB
PS C:> $MemoryStartupBytes = ($memory.size."#text" -as [int]) * 1MB
PS C:> $MemoryMinimumBytes = ($memory.reservation."#text" -as [int]) * 1MB
PS C:> get-variable mem*bytes

Name                           Value
----                           -----
MemoryMaximumBytes             1073741824
MemoryMinimumBytes             536870912
MemoryStartupBytes             805306368
The last piece of the puzzle, and the most complicated, is retrieving the disk information. The virtual machine may have multiple controllers and drives and I need to make sure everything is wired back together the same way.
First, I’ll retrieve the controllers.
PS C:> $controllers = Select-Xml -xml $vmconfig -xpath "//*[starts-with(name(.),'controller')]"
PS C:> $controllers

Node                         Path                  Pattern
----                         ----                  -------
controller0                  InputStream           //*[starts-with(name(.),'cont...
controller0                  InputStream           //*[starts-with(name(.),'cont...
controller1                  InputStream           //*[starts-with(name(.),'cont...
controller0                  InputStream           //*[starts-with(name(.),'cont...
Each controller node will have a collection of hard drives that have to be enumerated.
PS C:> $controllers[0].node.drive0

pathname                          pool_id                          type
--------                          -------                          ----
pathname                          pool_id                          type

PS C:> $controllers[0].node.drive0.type

type                                              #text
----                                              -----
string                                            VHD

PS C:> $controllers[0].node.drive0.pathname

type                                              #text
----                                              -----
string                                            G:VHDsdemo-rig-disk4.vhdx
By the way, I can also check to see if this is a SCSI controller by checking the parent node. It appears that if the parent node has a ChannelInstanceGUID property, it is a SCSI controller.
PS C:> $controllers[0].node.ParentNode

ChannelInstanceGuid                               controller0
-------------------                               -----------
ChannelInstanceGuid                               controller0
Creating the Virtual Machine
Now that I have all the information (there are a few minor items I didn’t point out) I can create the virtual machine using New-VM. I find it easiest to splat a hash table of parameter values.
$newVMParams = @{
Name = $name
NoVHD = $True
MemoryStartupBytes = $MemoryStartupBytes
SwitchName = $switchname
BootDevice = $bootdevice
ErrorAction = "Stop"
}

$vm = New-VM @newVMParams
You may have noticed that I created the virtual machine without and VHD drives. That was intentional.
Setting Virtual Machine Values
Once the virtual machine is created, I can go back and configure properties such as processors and memory using Set-VM. Again, I’ll create a hash table of parameter values based on information I pulled from the XML configuration file.
$SetVMParams = @{
ProcessorCount = $processors
MemoryStartupBytes = $MemoryStartupBytes
}

If ($dynamicmemory) {
   $SetVMParams.Add("DynamicMemory",$True)
   $SetVMParams.Add("MemoryMinimumBytes",$MemoryMinimumBytes)
   $SetVMParams.Add("MemoryMaximumBytes", $MemoryMaximumBytes)
}

else {
   $setVMParams.Add("StaticMemory",$True)
}

$vm | Set-VM @SetVMParams –Passthru
Finally, I need to go through and add the drives using Add-VMHardDiskDrive and possibly SetVMDvdDrive if there is a mounted DVD drive.
foreach ($controller in $controllers) {
  $node = $controller.Node
  #Check for SCSI
  if ($node.ParentNode.ChannelInstanceGuid) {
     $ControllerType = "SCSI"
  }
  else {
    $ControllerType = "IDE"
  }

  $drives = $node.ChildNodes | where {$_.pathname."#text"}

  foreach ($drive in $drives) {
     #if drive type is ISO then set DVD Drive accordingly
    $driveType=$drive.type."#text"
    $VHDPath = $drive.pathname."#text"
    $addDriveParam = @{
       ControllerNumber = $rx.Match($controller.node.name).value
       Path = $VHDPath
    }
    if ($drive.pool_id."#text") {
       $ResourcePoolName = $drive.pool_id."#text"
       $addDriveParam.Add("ResourcePoolname",$ResourcePoolName)
    }
     if ($drivetype -eq 'ISO') {
        Set-VMDvdDrive -vmname $vm.name @addDriveParam
    }
    else {
        $addDriveParam.add("ControllerType",$ControllerType)
        $vm | Add-VMHardDiskDrive @AddDriveparam
    }
 } #foreach drive
} #foreach controller
And, believe it or not, that’s it!
A PowerShell Scripted Solution
You probably figured out by now that while you could do all of this interactively in PowerShell, using a script is much more efficient. So I am happy to share my script, Import-VMConfig.ps1, with you. You can download Import-VMConfig. Save it to any folder you wish with a .ps1 extension. This is not a PowerShell function but a script. However, the script includes help.
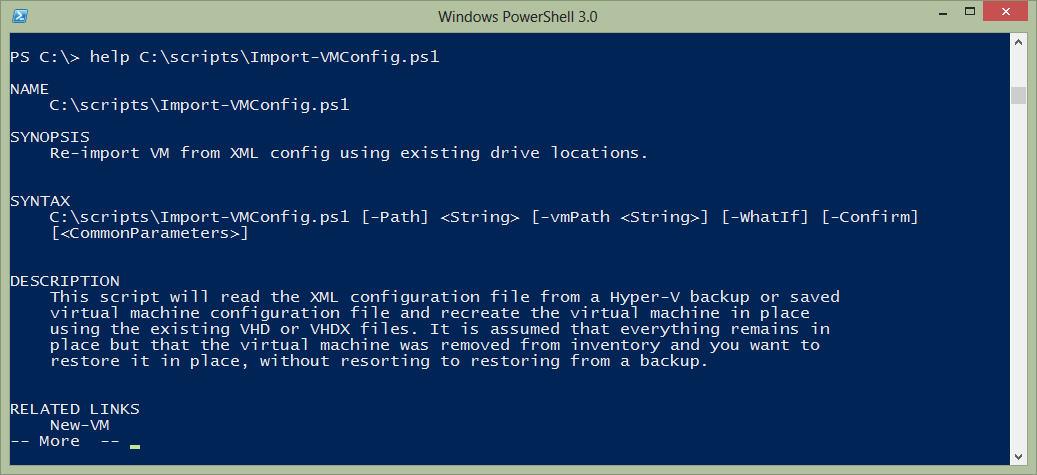
Getting help from Import-VMConfig
It is very important that you test this in a non-production Hyper-V setting so that you fully understand what it can and cannot do. You may have a virtual machine configuration that I didn’t anticipate.
The script is written to support –Whatif. I developed it so that I could go through a directory of XML configuration files and rebuild the virtual machines.
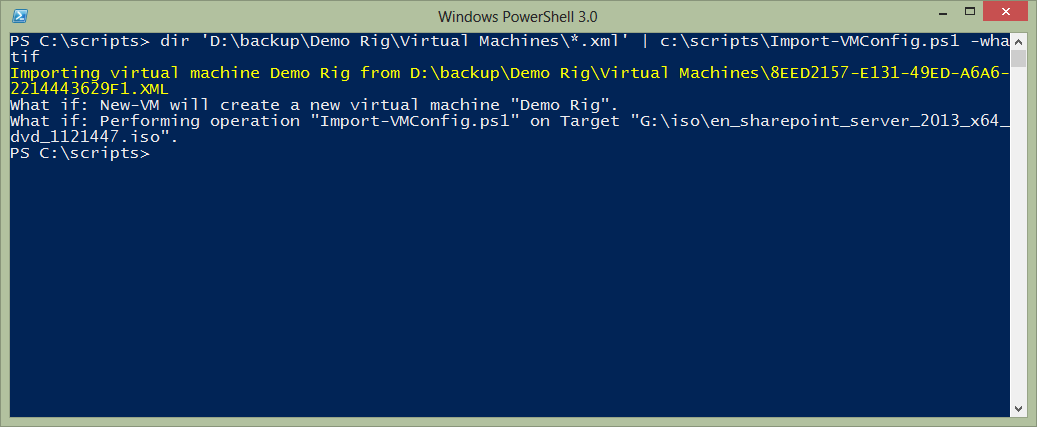
importing from a configuration file with PowerShell -Whatif
When I’m ready I can do it for real.
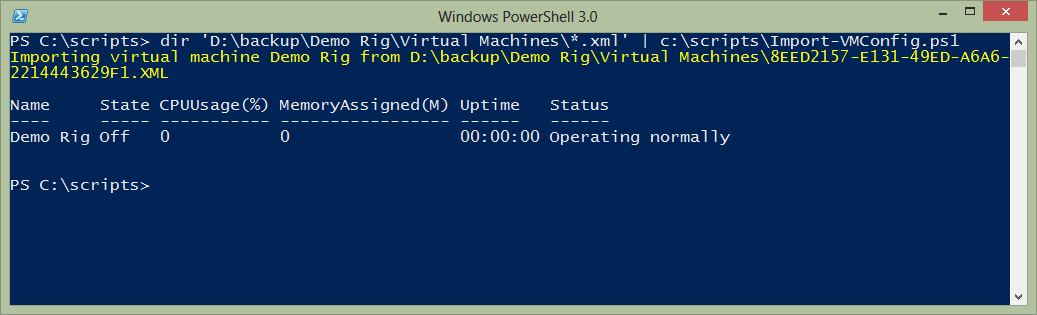
Recreating a Hyper-V virtual machine from an XML configuration file
I can see that the hard drives are back.
PS C:scripts> get-vm "demo rig" | select -expand harddrives | select path
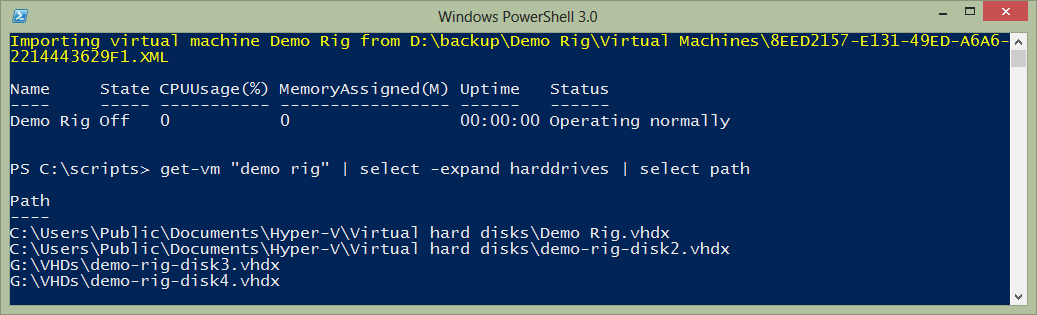
Validating VHD paths
As well as verifying the memory configuration with Get-VMMemory
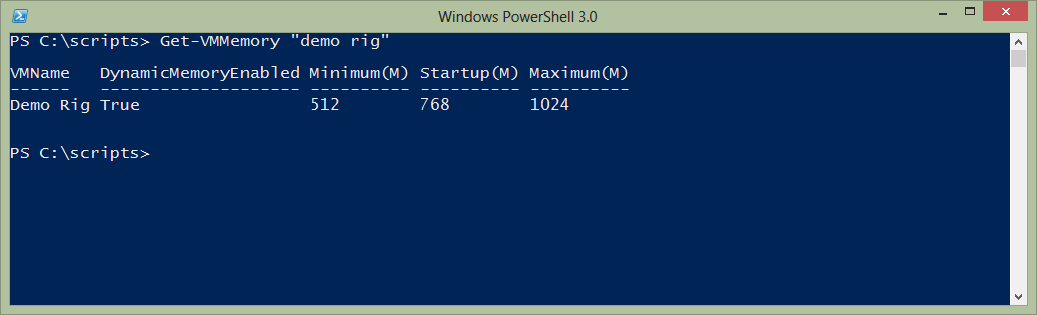
Validating virtual machine memory configuration
Limitations
Even as handy as this is, there are still some limitations. These items are not found in the xml file and may have to be manually configured:
- SmartPagingFilePath
- AutomaticStartAction
- AutomaticStopAction
- AutomaticStartDelay
- SnapshotFileLocation
- AllowUnverifiedPaths
You also need to make sure that any virtual switches referenced in the XML files exist. In my case, I had to recreate the virtual switch with the same name. I have not tested this with any machines using a complicated network setup, but I expect that if you have something that sophisticated you most likely have tools in place to handle recovery. My solution should be fine for test-lab setups or small to mid-size configurations. But please, test and re-test any PowerShell scripts and commands with non-production systems and virtual machines.
Summary
I hope that you don’t run into the situation I encountered. Although I suppose it isn’t too difficult to accidently delete a virtual machine. The key to making this work is having regular backups because the easiest solution is to restore. But for those special circumstances, PowerShell is your friend.


Not a DOJO Member yet?
Join thousands of other IT pros and receive a weekly roundup email with the latest content & updates!
More in this category


About the Author

Jeffery Hicks


3 thoughts on "How to Import a Hyper-V VM from XML Configuration"
Very informative article on manually creating Hyper V virtual machines. I ended up recreating all the virtual machines after refreshing windows 8. These instruction are good for disaster recovery of Hyper v virtual machines.
I found the above user useful and was wondering if anyone can help me importing VMs in place (i.e. -register)
i wanted to import-Vm from a different(backup) path but i keeps saying failed because no VHD found, the import only works in two scenarios,
a . if all my VDHs for that VM are stored in “Virtual Hard Disks” folder with VM
b. when I edit vhd path in the .xml file
for a few vms we could do either of those but i wanted to import say 100s then its not feasible to do individuals.
any help would be appreciated.
Thanks
TA
First off, I’m assuming that the VM you want to import your exported either from the Hyper-V GUI or using Export-VM. Without seeing your actual command it is hard to say what is happening. I’m assuming that in the folder structure where you exported the VM there is a folder called ‘Virtual Hard Disks’ which includes VHD or VHDX files. When you import a VM, you are using the XML configuration file found under virtual machines. This config file points to the exported VHD files. You can’t import and register in place AND point to a different location for the VHD files. Unless maybe you edit the exported XML config file. But without seeing your folder structure or the command syntax you are using, I can’t really offer much else.