Save to My DOJO
Table of contents
One of the things I commonly lament over is the poor state of the management tools available for Hyper-V (from Microsoft; I’m pointedly not talking about third party solutions). One issue I see a lot of is that there isn’t a quick way, when looking at the Hyper-V-specific tools, to know how much free memory a host has. People then have to resort to other tools like Task Manager to determine this. These methods are usually effective, but imperfect. Sometimes, you are unable to match up what those tools display against what happens in Hyper-V.
I could write out a long and complicated script that would display some fairly detailed information on memory usage in your systems, and someday I might do that. However, as this article is part of the ongoing Hyper-V and PowerShell series, the primary focus of this article will be to help you get to the information that you need as quickly as possible with steps that you have a chance of remembering. The secondary lessons in this article are to introduce you to custom objects and basic error handling in PowerShell.
The first stop on the PowerShell memory-exploration train will be WMI. Many people get a quick look at WMI and run away screaming. I can’t blame them. WMI is one of those things that can actually get scarier as you learn more about it. However, there’s no denying the raw power that you can harness with it. In this case, you can breathe easy; it’s fairly trivial to get sufficient information about memory from WMI. Even better, there isn’t a language out there that can interact with WMI as easily as PowerShell. To find out how much memory you’ve got left in your system, you only need to ask the Win32_OperatingSystem class:
Get-WmiObject -Namespace 'rootcimv2' -Class 'Win32_OperatingSystem' | Select-Object -Property FreePhysicalMemory
Wow! Looks like a whole lot of typing and things to remember, doesn’t it? Well, it only looks that way because I have a policy of showing you the entirety of my PowerShell cmdlets because it makes things a lot easier to decode, comprehend, tear apart, and tinker with later. You don’t really need all of that. This will do just as well:
gwmi Win32_OperatingSystem | select FreePhysicalMemory
You don’t even have to capitalize Win32_OperatingSystem, if you don’t want to.
You can run it for multiple hosts simultaneously using implicit remoting:
gwmi Win32_OperatingSystem -ComputerName svhv1, svhv2 | select PSComputerName, FreePhysicalMemory
How accurate is it? Well, that’s a two-part answer. I’ll tackle the easy one first. These two screenshots were taken from the same system at about the same time:

Task Manager Memory Check
GWMI Memory Check
As you can see, they’re quite close. Memory may fluctuate a bit from moment to moment and the precision of Task Manager isn’t the same as the precision of WMI so you shouldn’t expect a perfect match-up, but they’re close enough.
Unfortunately, this isn’t the entire story. The host has used up what it needs, the other guests have used up what they need, so you should be able to start up a guest with something around 2.6 GB of Startup RAM assigned, correct? The answer: maybe. There have been more than a few times when people have been unable to start a guest that was definitely below the Available line. So, what gives?
The answer to that is also the second part of the accuracy question around the WMI call. In the Task Manager screenshot, do you see the small, thin line in the Memory Composition graph? Hold your mouse over it, and you get this:
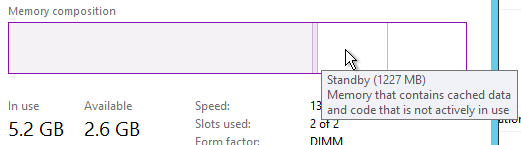
Standby Memory
The segment after the used (shaded area) and before the completely unused (clear area at the far right) represents Standby memory. Just as the tooltip says, it “contains cached data and code that is not actively in use”. Basically, this is stuff that the system could page out to disk but, since there’s currently no pressing need to release it, is holding in RAM. Technically, this memory is available. When I was testing for this article, I was able to start a virtual machine with 2GB of fixed RAM without trouble. However, I’ve fielded questions from people in similar situations that could not start VMs that were within the “Available” range. My only guess is that the host couldn’t page enough of it for some reason. Without personally being there to investigate and never having that happen to me, I can’t definitively say what was going on. But, that’s not the point of this article.
What would really be nice to know is how much RAM is unquestionably available. I didn’t screen shot it, but in Task Manager, if you continue sliding the mouse to the right into the last segment of the Memory composition graph, it will show in the tool tip how much memory is completely open. But what about PowerShell? There’s probably some WMI way to do it, but I don’t know what that is — one of the worst things about WMI is discoverability. Most things in WMI are either painfully obvious or painfully obscure without a lot of middle ground. You could go digging around in WMI Explorer to see if there’s a field to query. Fortunately, there’s a really easy way just for us Hyper-V users:
Get-VMHostNumaNode
That’s all you need. Sort of. One my test systems, this is what I get:
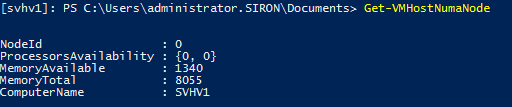
Simple Get-VMHostNumaNode
The MemoryAvailable field is quite accurate and shows an almost identical number to what is displayed as Free in Task Manager. As I went back and forth, they seem to stay within a couple dozen megabytes of each other, which is likely accounted for by the brief overhead of running the PowerShell cmdlet. I know that if I want to start a virtual machine that has 1340 megabytes or less of Startup memory that it will work.
But (there’s always a “but”), there is a problem. In the displayed system, this is a useful readout because I only have a single NUMA node in my test lab systems. If you’ve got a dual or quad socket host, then you have multiple NUMA nodes. Each node is going to get its own separate statistics set. If you’re not using NUMA spanning, then that’s OK; the largest MemoryAvailable reading represents the largest VM you’ll be guaranteed to be able to start. But, most of us are using NUMA spanning (there are precious few good reasons to turn it off). Unfortunately, there’s no quick and simple way to funnel all of that into a single reading. Sure, I could spend some time and craft a clever one-liner that would do the trick, but such things are very difficult to understand, almost impossible to remember, and day-to-day operations are not good places to use those clever one-liners. So, I worked up a script that is relatively simple but still shows you what you need to know:
function Get-VMHostAvailableMemory
{
    <#
    .SYNOPSIS
       Retrieves the upper and lower bounds of available Hyper-V host memory.
    .DESCRIPTION
       Retrieves the upper and lower bounds of available Hyper-V host memory. The upper value is the reported free space. The lower value is the truly free space.
    .EXAMPLE
       PS C:Scripts>Get-VMHostAvailableMemory
       ----------------------------------------
       Shows available memory on the local system.
    .EXAMPLE
       PS C:Scripts>Get-VMHostAvailableMemory -ComputerName svhv2
       ----------------------------------------
       Shows available memory on svhv2.
    .NOTES
       v1.1

       Author: Eric Siron
       Authored date: November 5, 2015
       Copyright 2015 Altaro Software

		 v1.1 January 28, 2016: Corrected for inconsistencies in the way Get-VMHostNumaNode works on multi-node hosts
    #>
    #requires -Modules Hyper-V
    param(
        [Parameter()][String[]]$ComputerName = @('.')
    )

    process {
        foreach ($Computer in $ComputerName)
        {
            $FreeMemoryBounds = New-Object -TypeName PSObject
            if($ComputerName.Count -gt 1)
            {
                Add-Member -InputObject $FreeMemoryBounds -MemberType NoteProperty -Name PSComputerName -Value $Computer
            }
            Add-Member -InputObject $FreeMemoryBounds -MemberType NoteProperty -Name LowerBoundMB -Value 0
            Add-Member -InputObject $FreeMemoryBounds -MemberType NoteProperty -Name UpperBoundMB -Value 0
            try
            {
                $FreeMemoryBounds.UpperBoundMB = [int]((Get-WmiObject -ComputerName $Computer -Namespace rootcimv2 -Class Win32_OperatingSystem -ErrorAction Stop).FreePhysicalMemory / 1KB)
                foreach ($NodeMemoryAvailable in (Get-VMHostNumaNode -ComputerName $Computer -ErrorAction Stop).MemoryAvailable)
                {
                    $FreeMemoryBounds.LowerBoundMB += $NodeMemoryAvailable
                }
                $FreeMemoryBounds
            }
            catch
            {
                Write-Error $_
            }
        }
    }
}
This is designed to be dot-sourced, so save it as a .PS1 (Get-VMHostAvailableMemory.ps1 would be good) and then dot-source it from a PowerShell prompt:
. .Get-VMHostAvailableMemory
You can also add it to your profile using steps you can find most anywhere, including earlier in our series. Another option would be to add a single line at the very end of the script with only “Get-VMHostAvailableMemory”; you can then run the script directly, but you can’t use Get-Help on it and you can’t feed it ComputerName qualifiers (well, you can, but they won’t do anything useful).
PowerShell Lessons from this Script
I tried to keep the complexity to a minimum but there are some new tricks in this script that I haven’t shown you before.
PowerShell Custom Objects
First is the usage of New-Object and Add-Member. I don’t want to use Write-Host or anything of the sort because it is inappropriate here, but I do need to ensure that I’m not just dumping raw numbers on you without context. The New-Object line creates a blank object, conveniently called “FreeMemoryBounds”. If you supplied more than one computer name, the first Add-Member line appends a property called PSComputerName and populates it with the name that you submitted; this is to simulate the action of a normal implicit remoting command since this script masks the underlying remoting capabilities of the cmdlets that it relies on. The next two lines add properties named “LowerBoundMB” and “UpperBoundMB”.
After all the processing is done, there is a single line that just contains the object all by itself (line 44). What that does is place the object into the pipeline. Once the script is done, you’re given a full PowerShell object named “FreeMemoryBounds” and it will have these properties attached to it. You can pass that object to other routines and access its properties using a dot just like you can any other PowerShell object. If you just run the script, then it outputs these fields to the screen in an easy-to-follow format. Also, because of the “foreach” loop, you’ll be given one object per valid ComputerName input.
PowerShell Error Handling with Try-Catch
The second thing is the usage of try-catch. I had two major reasons to use it here. The first is that, without it, it would be trivial to create a FreeMemoryBounds object that had invalid data. For just one host queried in an interactive session, that wouldn’t be a problem. If you were performing an automated run against 30 hosts, that would be a much bigger problem. The second reason is that, without the try block, an invalid computer name (or blocked firewall, or insufficient permissions, etc.) would result in both of the information retrieval cmdlets being run, even though an error condition on the first one is enough to let you know that the second isn’t worth the effort. Again, not a big deal for a single iteration, but problematic when there are many.
I chose to take a very simple route. I took the two cmdlets that are most likely to fail and put them into a single try block. Also, because I only want the new FreeMemoryBounds object to be placed in the pipeline if it has valid data, I included it in the same try block. That way, if either of the two cmdlets before it fails, that line is skipped and the object is silently destroyed. If an error does occur, I just emulate the same mechanism that PowerShell uses to place the error into the error stream (Write-Error). I do this because I don’t want to suppress the error but I also don’t care about the error itself. What I care about is not allowing an error to affect the product of my script.
There is one very, very important lesson to be learned. I even see some of the top-tier PowerShell experts make mistakes here. For every cmdlet exception that you wish to be caught in a try block, you must include the ErrorAction parameter and set it to “Stop”. PowerShell’s default error action is to display the error and keep going (“Continue”). Some people override that on their systems, but most people won’t. If the default action isn’t Stop and you don’t set ErrorAction to Stop, then the try block leads a pointless existence that just makes your script a little harder to read.
While this is important to remember, especially because it’s not intuitive, it also highlights a special feature(?) of PowerShell that you won’t find in traditional computer programming languages: if you have a cmdlet inside a try block that you don’t want to trigger the error handling system, then just set its ErrorAction to something other than “Stop”. Ordinarily, you would just keep cmdlets of that kind outside a try block in the first place, but this capability grants you quite a bit of flexibility to selectively ignore and capture error conditions as necessary.


Not a DOJO Member yet?
Join thousands of other IT pros and receive a weekly roundup email with the latest content & updates!
More in this category


About the Author

Eric Siron

