Save to My DOJO
Microsoft ships Windows Server Hyper-V 2012 in two versions; Windows Server 2012 with Hyper-V as a role and Hyper-V Server 2012 version. The Hyper-V Server 2012 is a free version and offers almost all the components and features that are available in Windows Server 2012 with Hyper-V as a role version. It contains only Hyper-V role installed and it has to be installed on local hard disk like any other Windows installation. What if you need to make Hyper-V Server 2012 available on a USB stick; booting Hyper-V Server 2012 from a USB Stick and make it available for your testing? This is where this article comes handy; explaining the process involved in creating a bootable USB Stick with Hyper-V Server 2012 installed onto it.
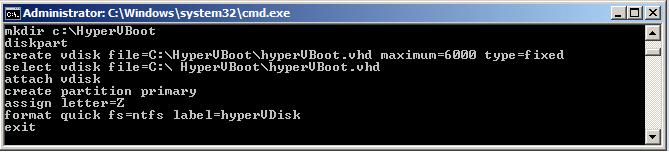
The complete process to create the bootable USB Stick is done via command-line tools (mkdir, diskpart, ImageX, BOOTSect, BCDBoot, and REG.EXE) as shown in an example screenshot below:
Throughout the process, you need to have the following items available:
Requirements
- 8 GB of space on flash drive.
- A computer supporting boot from a USB Stick
- Hyper-V Server prerequisites
- Install.WIM file from Hyper-V Server Source folder
- Windows 7 or newer Operating System
- Windows Automated Installation Kit (WAIK) for Windows 7 or newer
- Microsoft Hyper-V Server 2012 ISO from Microsoft web site
- Available drive letters on local computers; Z: and R:
As an overview to the process, you will be performing the following steps:
- Creating and mounting a VHD file as a Primary Partition on local computer
- Formatting as NTFS and assigning a disk label
- Applying Install.WIM to VHD file using ImageX tool
- Using DISKPART to prepare the USB flash drive
- Using BOOTSect and BCDBoot tool to add the boot configuration to USB flash drive.
- Removing paging file using the REG command
These are the steps you’ll need to take:
1. Creating, mounting, and formatting a VHD File
Create the following folders on your local computer:
- C:WIMFile – used to store the WIM file
- C:HyperVBoot – used to store VHD file
Open the Hyper-V Server 2012 ISO file, navigate to the Sources folder, and copy the Install.WIM file to C:WIMFile folder you created in the first step.
Next, open the command prompt under local administrator credentials and run the following command to create the VHD file which has a 6 GB capacity. The last three commands except “exit” will mount the VHD file as the drive letter Z:
mkdir c:HyperVBoot
diskpart
create vdisk file=C:HyperVBoothyperVBoot.vhd maximum=6000 type=fixed
select vdisk file=C:HyperVBoothyperVBoot.vhd
attach vdisk
create partition primary
assign letter=Z
format quick fs=ntfs label=hyperVDisk
exit
2. Applying Install.WIM image and detaching the VHD file
Once the VHD file is created in the previous step, your next step is to apply Install.WIM file. Please execute the following commands:
cd /d "C:program filesWindows AIKtoolsAMD64"
ImageX /apply C:WIMFileInstall.WIM 1 Z:
And using DISKPART tool you detach the virtual disk from your computer:
diskpart
select vdisk file=C:HyperVBoothyperVBoot.vhd
detach vdisk
exit
3. Preparing your USB Stick
The next step is to prepare the USB Stick you will be using to install the Hyper-V Windows Server 2012 version. As part of the USB Stick preparation process, you will be using DISKPART tool to format the USB drive and copying the VHD File you created in earlier steps to the USB drive. Execute the following commands to get the USB disk number
diskpart
list disk
Note: Note down the disk number for USB disk
And the following commands to create and format a new partition and assign the letter T: to the USB stick. Replace <USB Disk number> with the number identified in the previous step.
select disk (USB Disk number)
clean
create partition primary
select partition 1
active
format quick fs=ntfs
assign letter=T
exit
Copy the VHD file C:HyperVBoothyperVBoot.vhd to the USB drive letter assigned as T:
4. Using BOOTSECT tool to update the MBR code
BOOTSect tool allows you to update the MBR record on the disk (USB Stick in thiscase) so you can boot Hyper-V Windows Server 2012 from USB Stick.
Run the following BOOTSect command to update the MBR
cd /d "C:program filesWindows AIKtoolsPEToolsAMD64"
BOOTSect /nt60 T: /force /MBR
and the DISKPART command to attach the VHD file to the T drive.
diskpart
select vdisk file=T:HyperVBoot.vhd
attach vdisk
exit
5. Using BCDBOOT tool
Use the BCDBOOT tool to copy the necessary boot files so that you can boot your USB stick. Run the following command:
BCDBOOT Z:windows /s /ALL T:
6. Removing Paging file from USB flash drive
Since you are installing Hyper-V Windows Server 2012, you must remove the Pagefile requirement. Use the following command to load the registry from the VHD file and then remove the page file value and entry from the registry:
REG load HKLMHyperVRegistry Z:windowssystem32configsystem
REG add "HKLMHyperVRegistryControlSet001ControlSession ManagerMemory Management" /v PagingFiles /t REG_MULTI_SZ /d "" /f
REG delete "HKLMHyperVRegistryControlSet001ControlSession ManagerMemory Management" /v ExistingPageFiles /f
REG unload HKLMHyperVRegistry
Finally the following commands to detach the VHD file from the T drive:
Diskpart
select vdisk file=T:HyperVBoot.vhd
detach vdisk
exit
Remove the USB stick from this computer and attach it to a computer which supports all Hyper-V prerequisites to boot Hyper-V Windows Server 2012 from a USB Stick. Please make sure to change the boot order in computer BIOS in order to boot from the USB Stick.
Required software can be downloaded from below links:
Hyper-V 2012 Server Core Free edition:
http://aka.ms/dlhv2012
WAIK for Windows 7:
http://www.microsoft.com/en-in/download/details.aspx?id=5753


Not a DOJO Member yet?
Join thousands of other IT pros and receive a weekly roundup email with the latest content & updates!


70 thoughts on "Installing and running Hyper-V from a USB stick"
This site is awesome. So much useful information. I’m a VMware Consultant learning what I can about Hyper-V 3 and SCVMM 2012 SP1. Currently have Hyper-V and SCVMM running on vSphere 5.1 to learn the features of Hyper-V. Runs well but it would be great to run Hyper-V from a USB drive to get a truer experience how Hyper-V performs on native hardware. I’m going to try this article to accomplish that task. The only thing I’m wondering is where to get all the utilities you mention?
Thanks for sharing.
Tom
line 4 has a space “select vdisk file=C: HyperVBoothyperVBoot.vhd”
also command “select disk <USB Disk number>” did not work? I had to select disk manually
also the whole reg section has spaces that need to be dropped HKLM” ” no space
Thank you Tom! Appreciate your time for reading this article! Yes, I fixed those and mentioned the links for downloading Hyper-V – 2012 free edition and WAIK for Windows 7.
Thank you! Got me started. After creating two usb hyper-v 2012 sticks I rebooted my esx servers and they became hyper-v 2012 running from usb. This allows me to see native hyper-v performance verses them running as VM’s on ESX while saving my esx config. To run esx all I have to do is shutdown, remove the USB sticks, reboot, and now I’m running ESX again. Thanks for the tip.
More for your readers, I wasn’t sure what functionality I might loose running Hyper-V 2012 vs Server 2012 with role Hyper-V added. As far as I can tell very little, if any. I’m using the RSAT tools to manage Hyper-V 2012 with Hyper-V Manager, Failover Cluster Manager, and SCVMM.
Thanks again. Watching for continued great post from you.
Nirmal:
Item 6 line 1 I’m seeing the r:windowssystem32 et al … I have r: free on my computer but I don’t see where / if I’m supposed to have it mapped.
I’m also having to replace the AMD64 with x86 …
Thanks for your post…
Thanks Jay for the comments! Fixed drive letter in the article!
Hi!
Thanks for the article. I think there’s a small typo on step 6:
REG load HKLMHyperVRegistry T:windowssystem32configsystem
should probably be: REG load HKLMHyperVRegistry Z:windowssystem32configsystem
as the letter T: is assigned to the USB disk, not to the mounted vhd file.
Regards
Hi, thanks for the feedback – fixed it!
It won’t work for me. System says that it can’t find any bootable files on USB removable device. 🙁
I’m using Kingston DataTraveler Elite 3.0 Transcend drives. I follow the instructions, but it just won’t work.
Hi Srdjan, Thank you for reading the article!
Could you please tell me at which step it fails? It looks like you received the “Can’t find any bootable files” message when you are booting from the USB?
Thanks!
Nirmal
This is happening to me too with Kingston Datatraveler. I get “An operating system wasn’t found. Try disconnecting any drives that don’t contain an operating system.”
Thanks.
Hello,
Thanks for this great post!
I would like to comment that with Windows 8 and Server 2012, there is no need for WAIK any more. The following included commands are enough (on one line):
1) “dism /apply-image /imagefile:d:Sourcesinstall.wim /index:1 /applydir::”.
2) “:WindowsSystem32bcdboot :Windows /f ALL /s :”
For more boot options: http://technet.microsoft.com/en-us/library/hh825709.aspx
Thanks,
Nadav
On the above comment the commands are cutoff (drive letters are missing). Here are the fixed ones (D is for the install DVD/ISO, T is for the USB and S is for the VHD):
1) “dism /apply-image /imagefile:D:Sourcesinstall.wim /index:1 /applydir:S:”.
2) “S:WindowsSystem32bcdboot S:Windows /f ALL /s T:”
Sorry for that,
Nadav
Hi Nadav, Thank you for the commands!
Nirmal
How do you backup the USB disk? Can we just clone the disk and replace it when the original one die?
Hi Richard, Windows does not have native tool for cloning USB stick but yes there are third-party tools available you can use to clone USB Sticks!
Thanks!
Nirmal
Nirmal,
Commented above, so I’ve been using your instructions to run Hyper-v 2012 from USB, 2 host and built SCVMM as a VM. All good. Have an assignment to build Hyper-V for a customer so I rebuilt my USB drives to start over and get more practice. Problem is after building the USB drive and on first boot I get “can’t find “windowssystem32winload.exe”. Odd. Did not have that issue before. I had to use easybcd.exe to fix the bootloader? It’s working now but I did not have to use easybcd before. Any idea what I’m doing wrong?
Nirmal,
Nevermind. I went out and bought 2 Lexar USB drives and they work fine? The Western Digital not so much.
Thanks again for this great post.
Also just bought Windows Server 2012 Hyper-V Install and Config Guide. So far it’s well written and informative.
Hi Tom, Thanks!
Interesting…
Let me try with Western Digital…
Nirmal
I’ve successfully did this on 2 proliant servers, now I have a new proliant G8 and keep getting blue screen saying there was a problem and can’t go any further. Any help would be good.
Hi Paul, Not sure why you’re seeing a blue screen.
Does it say failure with any specific driver?
Thank You,
Nirmal
Hi Nirmal,
Thanks for the most excellent post – very clear and concise.
I just wanted to pass on my experience with implementing this technique as having found your post I went away and gave it a try on my lab PC.
The first time I tried it didn’t work – I just got the dreaded “Your PC has a problem…” error message when Windows attempted to boot and then my lab PC would just constantly restart.
In the end I formatted my USB stick (A Lexar 16GB by the way) and ran through your instructions again.
This time, success!!
It worked like a dream – Hyper-V 2012 server core running off the USB.
No idea what I did wrong the first time, but I just wanted to pass on to anyone that it doesn’t work for the first time, to not give up immediately..
Thanks,
Mark
Hi Mark, Thanks for sharing your feedback! Appreciate it!
Nirmal.
Nirmal – I assume this process will work for hyper-v 2012 R2 tech preview?
Also just a comment for Richard above about backing up USB sticks. Along the same lines, as soon as I create the USB following your process I use linux to save the USB as an iso file, then I dd the iso to another usb stick. It’s builds another USB drive identical to the first. Quick, fast way to build multiple hyper-v USB boot sticks.
dd if=/dev/sdX of=hyperv2012.iso creates clean ISO file
dd if=hyperv2012.iso of=/dev/sdX create a clean USB just like the original
Just saves a little time.
Thanks
Tom Miller
Hi Tom, I haven’t tested for 2012 R2 Preview but it should work, I believe!
Thanks!
Nirmal
Great Article. Couple of questions;
1) The 6GB specified for the VHD is not sufficient if you want to patch the OS. I’m using 32GB UFD, so I increased the VHD size from 6GB to 20GB. It worked and I was able to fully patch the OS, however it was DESPERATELY slow. Even via RDP the screen refresh was like looking at a slide show showing events that occurred several seconds ago. Any idea why increasing the VHD size might attribute to slowing things down to a snails pace?
2) Do you know of anyway to expand on the registry injection to include specifying IP details, enabling RDP and setting the Admin password? The method here is fine if you have physical access to all the servers, however I’ve got a requirement to get a Hyper-V server up an running I don’t have physical access to. If I can tell the DC techy to just plug in a USB flash disk and reboot, I think it would provide significant time savings.
Hi Dom,
Thanks for comments!
1. You’re right! 6 GB might not be enough if patching needs to be done! The article’s primary focus is to run Hyper-V from a USB stick for testing purpose.
2. For IP details injection, you can design a small script which includes NETSH commands to change IP details and then run it via registry RunOnce. For admin password, you can use “Net User” command in the script to change the admin password.
Thanks!
Nirmal
Great article, thank you for sharing. It get this response when attempting to update the MBR (step 4):
“This tool can only be run on systems booted using a PC/AT BIOS. This system was booted using EFI or some other firmware type.”
Apart from running this process from a Windows 7 computer with the PC/AT BIOS, does anyone know a way around this? Thanks in advance.
What does the 90 in step 3 mean i just get a error?
Hi Peter,
Please ignore that. Fixed that!
Thanks for pointing out!
Nirmal
Nirmal – for clarity you need to add “cd C:Program FilesWindows AIKToolsamd64” to step 5 BEFORE command bcdboot. As bcdboot is not found in the current directory your currently in.
Also for your readers this process works fine with hyper-v 2012 R2 as well.
Thanks for your work.
Tom
Hi Tom, Thank you very much for verifying on Hyper-V 2012 R2 and posting back!
Regards,
Nirmal.
Hi,
running hyper-v 2012 from usb for a while now with satisfactory, but can I upgrade the stick to R2 like a normal installation from another usbstick with the R2 ISO on it?
Anyone done that yet?
thx
@Nadav, you wrote:
1) “dism /apply-image /imagefile:D:Sourcesinstall.wim /index:1 /applydir:S:”
2) “S:WindowsSystem32bcdboot S:Windows /f ALL /s T:”
should 2) have /s S: as follows??
2) “S:WindowsSystem32bcdboot S:Windows /f ALL /s S:”
Nirmal,
I have ran though the process 3 times now. When attempting to boot our supermicro server I get “Windows Boot Manager: Windows failed to start. A recent hardware or software change might be the cause. 0xc000000e”
Have you ever encountered this issue?
Same issue.
windowssystem32winload.exe
gets the blame.
The application or operating system couldn’t be loaded because a required file is missing or contains errors.
The file winload.exe is present.
install.win from Server2012 R2 Standard VLSC download.
(IR2_SSS_X64FREV_EN-US_DV5)
Installing from that iso works perfect.
HP ML350p G8
Kingston DataTraveler Ultimate 128GB
Used Windows Assessment and Deployment Kit (ADK) for Windows® 8
http://www.microsoft.com/en-us/download/confirmation.aspx?id=30652
I was able to at least get to the windows loading screen, but getting a BSOD with an inaccessable boot device message. I have tried this on different machines with the same results.
Is there a way to correct this issue?
Hi Stephen,
BSOD for Inaccessible Boot Device message indicates issue with driver. Which USB make and model are you using?
Thank you for reading articles!
Nirmal
Hi, it works like charm on a HP Gen7 box , thank for the detail procedure Nimal.
Question: once the Hyper V is up , how can I mount the USB drive over network so I can upload program ( such as coreconfig ) to it ? it’s a homelab workgroup environment and I don’t have compatible client RSAT to config the hyper V .
Thank you,
Hi it’s Andy again , if server on USB is up and running , how to access other files on USB ( other than hyperV.vhd ) from server ? Mine is a workgroup environment however I can’t access shares over the network ( running command like net use gets error ).
Thanks. Realy helpfull.
Hello, would you be so kind as to mention this needs to be run on a PC with a BIOS and not (U)EFI as one of the requirements at the top of the page? I got halfway through and ran into the same problem as D Carlson did above:
“This tool can only be run on systems booted using a PC/AT BIOS. This system was booted using EFI or some other firmware type.”
A requirement which has rather put a stop to my experiment for now. Oh Microsoft and its ineffable ways…
Otherwise, another excellent article Altaro.
Followed this but upon installation in to my server and power on, the screen said “no operating system found”. I ensured USB boot, and it can boot from USB.
When I look at the USB drive the only file I see is hyperVBoot.vhd on the usb drive. Is there something missing? I followed the steps without issue.
I am following the steps on a Windows 7 system, and followed everything to the letter. There were no error messages during any of the steps.
I am also using a 16gb USB key. It does work, as I had ESXi on it previously, and I ensured that I formatted it and started fresh for this installation.
Thank you
Hi SG,
I suspect you’re having the same issue as several others in this comment thread – trying to boot a BIOS USB stick on a UEFI system. Adding the /ALL switch to BCDBOOT in step 5 (the article has been updated with this switch), will create a USB stick that can be booted on both a BIOS and a UEFI system.
Hope that helps.
Paul Schnackenburg, Altaro DOJO Technical Editor
I have used this procedure and it seems that some USB flash drives work while others do not.
Do you know any reason why some would work fine, while another would say “No operating system detected”?
Hi Robert,
I’m not sure – apart from the fact that some people are probably caught in “booting a BIOS USB stick on a UEFI system” (see other comments in the threat) it does seem that some people are having one brand of USB stick work fine and another not at all. I’m not sure I’d want my production Hyper-V server dependent on the quality of a USB stick but it’s a cool trick nevertheless.
Paul Schnackenburg, Altaro DOJO Technical Editor
Hi,
Thanks for a great article.
Is there any way to get that working on a computer with UEFI? I understand that this will only work on a PC with legacy BIOS. On my HP Z230 I’m getting error message when trying to boot “An operating system wasn’t found…”
Thanks
Konrad
Hi Konrad,
As mentioned in a few comments in this thread, adding the /ALL switch to BCDBOOT in step 5 (the article has been updated with this switch), will create a USB stick that can be booted on both a BIOS and a UEFI system. See here for more information.
Paul Schnackenburg, Altaro DOJO Technical Editor
Thank you, these steps worked perfectly. Do you know how they can be altered to support creating a UEFI bootable USB rather than using MBR/BIOS?
Hi Jeremy,
If you look at Darren Wigfield’s comment from the the 5th of February 2020 he suggested adding /ALL to the BCDBOOT step and I’ve updated the article accordingly. Please give that a try and see if it is sufficient to boot on a UEFI system.
Paul Schnackenburg, Altaro DOJO Technical Editor
Got error since I’m using laptop with UEFI:
C:Program FilesWindows AIKToolsPEToolsamd64>BOOTSect /nt60 T: /force /MBR
This tool can only be run on systems booted using a PC/AT BIOS. This system
was booted using EFI or some other firmware type.
Any ideas how to fix it?
Hi Boris,
As mentioned in a few comments in this thread, adding the /ALL switch to BCDBOOT in step 5 (the article has been updated with this switch), will create a USB stick that can be booted on both a BIOS and a UEFI system. See here for more information.
Paul Schnackenburg, Altaro DOJO Technical Editor
On Step 5. you use the drive Z: but there is no Z: I think you detach this on Step 2?
Hi MB@BIT,
What happens if you attach the Z to the vdisk again? In other words, run line 2,5 and 7 from Step 1 again? There are lots of comments on this popular post but no one else seems to have had this issue so maybe they worked around it that way?
Paul Schnackenburg, Altaro DOJO Technical Editor
Can you provide a screen shot of the file structure that should be created on the SD card. I keep getting “operating system not found” when trying to boot from it.
Hi Alberto,
Unfortunately we don’t have that screenshot to share.
Paul Schnackenburg, Altaro DOJO Technical Editor
I know this post is old, but there’s a problem I ran into with the directions and I think I also found a solution.
In your directions, you use BCDBOOT tool to copy boot files to the USB stick. However, the command given doesn’t provide files for both BIOS and UEFI systems. Add /ALL to the command so that the USB drive will boot for either kind of firmware.
Hi Darren,
Thanks for spotting that, much appreciated. I’ve updated the article.
Paul Schnackenburg, Altaro DOJO Technical Editor
Hello Nirmal,
Thank you for your help with this. I have created the USB. Now when I put it into the server I want to install hyper v, it says invalid partition table. Any ideas?
Kuber
Hi Kuber,
I suspect (as others have found in this comment thread) that your server is using UEFI, not BIOS to start. You’ll need to rerun the steps and the addition of the /ALL command (Step 5, BDCBOOT) should allow you to boot the stick on a UEFI system. It could also be the quality of the USB stick, several people in this comment thread had problems with one brand of USB stick and no issues with another.
Paul Schnackenburg, Altaro DOJO Technical Editor
After removing the paging files from the mounted VHD file on the Z: drive, do I have to copy it again to the T: drive?
Hi Steve,
No, that shouldn’t be necessary.
Paul Schnackenburg, Altaro DOJO Technical Editor
I receive a winload.exe error.
Can you help me?
Hi Yiyi,
I suspect this is because you’re trying to boot the USB stick on a UEFI system – check the other comments in this thread. As mentioned in a few comments in this thread, adding the /ALL switch to BCDBOOT in step 5 (the article has been updated with this switch), will create a USB stick that can be booted on both a BIOS and a UEFI system. See here for more information.
Paul Schnackenburg, Altaro DOJO Technical Editor