Save to My DOJO
I’ll say upfront that this article is more about Linux than Hyper-V. It’s relevant here for anyone that duplicates a source VHDX to use with new Linux guests. In our how-to article on using Ubuntu Server as a Hyper-V guest, I counseled you to do that in order to shortcut installation steps on new systems. That article shows you how to rename the system so that it doesn’t collide with others. However, it doesn’t do anything with the volumes.
During Ubuntu (and I assume other distributions), the Logical Volume Manager (lvm) gives its volume groups the same base name as the system. So, using a copy of that VHDX for a new system leaves you with a name mismatch. Before you do anything, keep in mind that this state does not hurt anything! I’m going to show you how to change the volume group names, but you’re modifying a part of the system involved with booting (and probably other things). My systems still work fine, but these system-level changes only address a cosmetic problem. If you’re still interested, check your backups, take a checkpoint, and let’s get started!
Linux Volume Group Names: What We’re Solving
In case you’re in the dark as to what I’m talking about, run lvs on your system. My mismatched system looks like this:
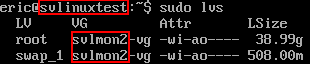
This system is currently named “svlinuxtest”. It was built from a base system that was named “svlmon2”. I want to reiterate that nothing is broken here. I see the volume group name pop up occasionally, such as during boot. That’s it. If I leave this alone, everything will be perfectly fine. On Windows, changing a volume name is trivial because the system only cares about drive letters and volume IDs. On Linux, volume names have importance. You take a risk when changing them, especially for volume groups that contain system data.
Renaming Volume Groups on Ubuntu Server
These instructions were written using Ubuntu Server. I assume that they will work for any system using lvm.
Read step 7 before you do anything! If that bothers you, leave this whole thing alone!
- Make sure that you have a fresh backup and/or a checkpoint. I haven’t had problems yet, but…
- If you don’t already know the current volume group, use sudo lvs as shown above to list them. Decide on a new name. Take special care to match the spelling exactly throughout these directions!
- Use lvm to change to a new name: sudo lvm vgrename oldname newname.

- Change the volume name in the /etc/fstab file to match the new name.
- METHOD 1: Use the nano visual editor: sudo nano /etc/fstab. Notice that the entries in fstab use TWO hyphens between the name and the “vg-volumename” suffix whereas outputs show only ONE. Leave the extra hyphen alone! Once you’ve made your changes, use [CTRL+X] to exit, pressing [Y] to save when prompted.

- METHOD 2: Use sed. This method is faster than nano and only gives you one shot at making a typo instead of two. You don’t get any visual feedback, though (although you could open it in nano or less or some other editor/reader, of course): sudo sed -i “s/oldname/newname/g” /etc/fstab .

- METHOD 1: Use the nano visual editor: sudo nano /etc/fstab. Notice that the entries in fstab use TWO hyphens between the name and the “vg-volumename” suffix whereas outputs show only ONE. Leave the extra hyphen alone! Once you’ve made your changes, use [CTRL+X] to exit, pressing [Y] to save when prompted.
- Change the volume name in /boot/grub/grub.cfg just as you did with /etc/fstab.
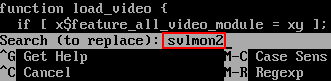
- METHOD 1: Use the nano visual editor: sudo nano /boot/grub/grub.cfg. This file is much larger than fstab and you will likely have many entries to change. As with fstab, there are TWO hyphens between the volume group name and the “vg-volumename” suffix. Leave them alone. If you’re going to use nano for this, I’d recommend that you employ its search and replace feature.
- Press [CTRL+].
- Type the original name in the Search (to replace) prompt and press [Enter]:
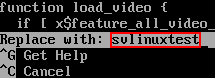
- Type the new name in the Replace with prompt and press [Enter]:
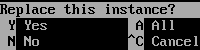
- Working with the assumption that you didn’t use an original name that might otherwise appear in this file (like, say, “Ubuntu”), you can press [A] at the Replace this instance? prompt. If you want to be certain that you’re not overwriting anything important, press [Y] and [N] where appropriate to step through the file.
- Use [CTRL+X] when finished and [Y] to save the file.
- METHOD 2: Use sed. As with /etc/fstab, this method is faster than nano. It allows you to change all of the entries at once without prompting (even if you type the name wrong). If you used sed to change fstab, then you can press the up arrow to retrieve it from the buffer and change only the filename: sudo sed -i “s/oldname/newname/g” /etc/fstab.

- METHOD 1: Use the nano visual editor: sudo nano /boot/grub/grub.cfg. This file is much larger than fstab and you will likely have many entries to change. As with fstab, there are TWO hyphens between the volume group name and the “vg-volumename” suffix. Leave them alone. If you’re going to use nano for this, I’d recommend that you employ its search and replace feature.
- Apply the previous file changes to initramfs: sudo update-initramfs -u. This operation can take a bit of time, so don’t panic if it doesn’t return right away. I also sometimes get I/O errors mentioning “fd0”. That’s the floppy disk. Since I don’t have a floppy disk in the system, I don’t worry about those errors.

- Shut down the system. While it’s probably not urgent, I recommend doing this immediately: sudo shutdown now. You could use -r if you want, but it won’t matter. The system will almost undoubtedly hang on shutdown! That’s because the volumes that it wants to dismount by name no longer have that name. Just wait for the shutdown process to hang, then use the Hyper-V console’s reset button. Or, if you’re not using Hyper-V, whatever reset method works for you.


- Test EVERYTHING. sudo lvs for certain. Make sure your services are functioning. Once everything looks good, test a restart: sudo shutdown -r now. It should not be hanging anymore.
- Remove any checkpoints.
Volume Group Rename Notes
I performed a fair bit of research to come up with these directions and found a lot of conflicting information. One place said that it wasn’t necessary to update initramfs. If you follow that advice, everything will most likely still function. However, you’ll get errors at boot up that volume groups cannot be found. Those messages will include the original volume names. They’ll also be repeated a few times, which appears to delay bootup a bit. I’m not sure if any other problems will arise if you don’t follow these directions as listed.
I’m also not entirely certain that these directions reach 100% of all places that the volume groups are named. As always, we encourage comments with any additional information!


Not a DOJO Member yet?
Join thousands of other IT pros and receive a weekly roundup email with the latest content & updates!
More in this category


About the Author

Eric Siron

