Save to My DOJO

One of the many benefits of virtualization is the ease of moving an entire operating environment from one place to another, such as the Hyper-V import virtual machine process. Hyper-V includes several mechanisms for such portability. As mentioned, one of these is the export/import system, which involves creating an offline copy of a virtual machine. In 2008 R2 and prior versions of Hyper-V, the import system was quite fragile. It was drastically improved in Server 2012. Some functionality was lost starting in 2012 R2, but the process is nearly bulletproof. The same process is still found in the current version of Hyper-V today, in Windows Server 2022.
Importing a Hyper-V Virtual Machine
In order to begin, you need a source Hyper-V virtual machine. Windows Server 2012 allows importing a virtual machine that has not first been exported. However, it is worth noting, following the latest guidance from Microsoft, Export and import virtual machines | Microsoft Docs, it is the recommendation to first export Hyper-V VM from the source Hyper-V environment using the export process before importing. This guidance is current for Windows Server 2022 and also covers earlier versions. The export Hyper-V VM process creates all the files needed such as the Hyper-V import VMCX file which is the virtual machine configuration information. Microsoft’s guidance mentions you don’t need to export if you are importing into the same Hyper-V host. For most situations, you will want to first perform the proper export. For a simple Hyper-V import virtual machine process, follow these steps for Hyper-V manager import virtual machine:
- In Hyper-V Manager, select (highlight) the host that will own the imported virtual machine in the left pane.
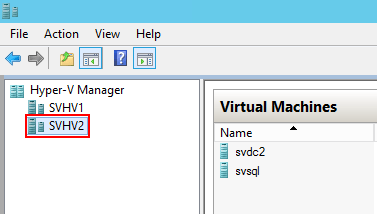
Select Host
- Right-click on the host and choose Import Virtual Machine. Alternatively, find the same entry under the Actions pane at the far right:
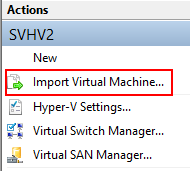
Import Menu Option
- The Import Virtual Machine wizard will appear. The first screen is merely informational. Click Next.
- You will be presented with the Locate Folder page where you’ll need to type or browse to the location of the files for the virtual machine. This screen can cause a great deal of confusion. To simplify it as much as possible, be aware that wizard is looking for an .XML file that describes a virtual machine. It will look in the specified folder. If the specified folder has a Virtual Machines sub-folder, it will look there too. Once you have a source selected, click Next.
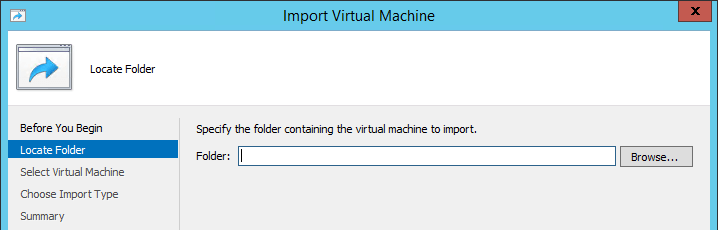
Import Source Folder
- What happens on the next screen depends on whether or not it detects an importable virtual machine in the target location.
- If a suitable virtual machine was found, its name will appear and be selectable. If you see the virtual machine that you want to import, highlight it and click Next.
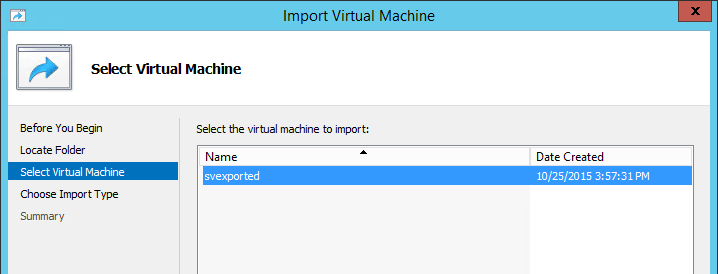
Virtual Machine to Import
- If a suitable virtual machine was not found, you will receive a somewhat misleading error that says, The folder <foldername>Virtual Machines could not be found. You might not have permission to access it. In this case, the folder that it mentions truly does not exist, but it’s also not the folder that I specified. I only told it to look at “C:Exports”. When it didn’t find an XML file there, it then tried to find a Virtual Machines sub-folder. When it didn’t find that either, it generated the error. What makes it more confusing is that even if the folder does exist, you’ll get the same message if the only problem is that it didn’t find a suitable XML.

No VM Source Folder Found
- If a suitable virtual machine was found, its name will appear and be selectable. If you see the virtual machine that you want to import, highlight it and click Next.
- If you found a suitable virtual machine in step 5, you’ll now be presented with the Choose Import Type screen. The “Import Types” discussion section after these steps details what the options mean. Make your selection and click Next.
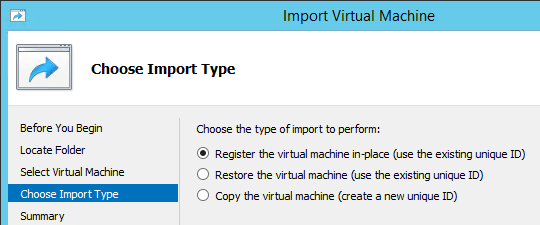
Import Type
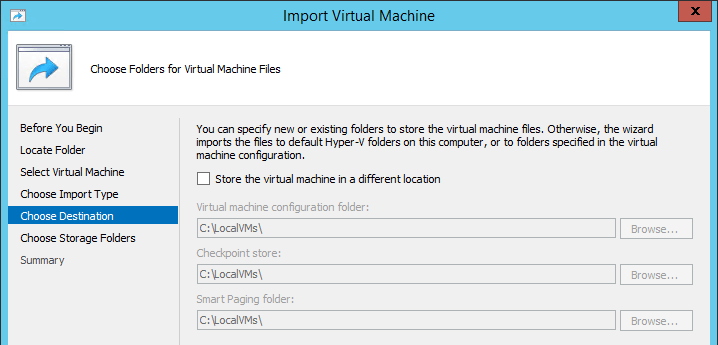
- If you chose either Restore or Copy in step 6, the next screen will ask where you want to place the individual components of the virtual machine. If you do nothing on this screen, the files are placed in the host’s default location. Make your choices and click Next.
Import Target Locations
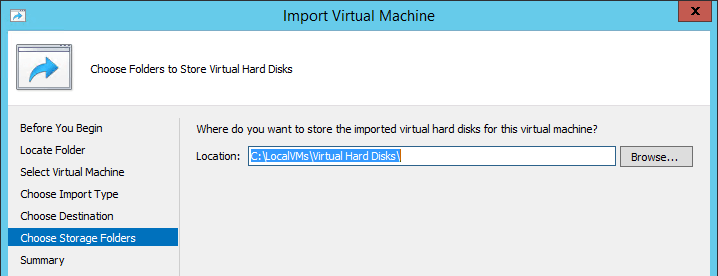
- Also for the Restore or Copy options in step 6, you’ll be asked where to place the virtual hard disks. They’ll all be placed in the folder that you choose here, but you can use Storage [Live] Migration to make adjustments later.
Import Target Virtual Disk Locations
- The final screen is a summary, which allows you to review your selections. Click Back to make adjustments or Finish to start the process. If you have chosen the Restore option, the import will happen almost instantly. Otherwise, you’ll need to wait while the files are copied to their destination. Once that completes, the virtual machine will appear in Hyper-V Manager on the host that you initially selected. Note, the Hyper-V Server import virtual machine process is the same as importing into Windows Server with the Hyper-V role installed.
Notes on Hyper-V Import
The import procedure is quite simple when all is well, but there are quite a few issues involved.
- The native import process in 2012 R2 only works with virtual machines that were created or run on 2012 or 2012 R2. The 2012 import process is the most versatile, as it will accept virtual machines as old as 2008 and as new as 2012 R2. It has not been explained why Microsoft chose to cripple the import procedure in newer versions. If you wish to import a pre-2012 virtual machine, you will need to use a 2012 host.
- Export and import can be used as a backup, but lacks a great deal of functionality in comparison to true backup applications. If used for backup, it is best applied to virtual machines that require only a single backup instance. An example would be a software firewall implementation that is more or less steady-state.
- In 2008 R2 and earlier, the import process required an EXP file that was only created by the export process. The EXP file is no longer used and the “export” procedure is mostly just a file copy.
- The contents of the virtual machine files are not altered except to reflect any location or VMID changes necessary. If not properly handled, this can lead to the same types of issues that occur with cloned operating systems.
- As indicated in the steps, all of the imported virtual machine’s virtual hard disks are placed in the same location. If you have issues with your storage space that might lead to problems, you have two options:
- Place all of the virtual hard disks in the largest available space. Once the import completes, use Storage [Live] Migration to relocate the files as necessary.
- If the export and import are on the same system, you can detach one or more of the disks before exporting the original. The import process will not be aware of them. Once the virtual machine is imported, reattach the disks.
- In 2012 R2 and prior, your credentials only control whether or not you can start the import. It is the Virtual Machine Management Service (VMMS.EXE) on the importing host that performs the operation. Any Access denied errors that you receive will be because the computer account on the host performing the import does not have the proper permissions.
Import Types
On step 6 of the steps, you are asked which type of import to perform. How you answer depends on the condition of the source files and what your goals are.
Register the Virtual Machine In-Place (Use the Existing Unique ID)
With this option, none of the source files are moved or changed in any way. A symbolic link is created in C:\ProgramData\Microsoft\Windows\Hyper-V\Virtual Machines that points to the virtual machine’s true XML file (this behavior changes in the Windows 10/2016 code base; I do not know how these virtual machines are registered).
In-place registration is the preferred choice when a virtual machine has become unregistered from the Hyper-V host in some way, such as the symbolic link being damaged or destroyed by an anti-virus application or a failed Live Migration procedure. This is also the preferred choice if you manually copy files from a backup to the final destination. If you do not want to run the new virtual machine from where the source files are, make another choice. Choose in-place restoration if:
- The source files do not need to be preserved as-is.
- The imported virtual machine will be the only live copy of this particular virtual machine.
- The source location is appropriate for running a virtual machine on the specified host.
Hyper-V and many applications that are aware of Hyper-V virtual machines (such as the Altaro Backup for Hyper-V product) track virtual machines by their ID. As stated in the option text, in-place registration does not modify this ID.
Restore the Virtual Machine (Use the Existing Unique ID)
The primary difference between this option and the Register the Virtual Machine In-Place option is that all of the files are copied from the specified source location into the specified destination location. Hyper-V will run the imported virtual machine from that target folder. In the abstract sense, VMMS needs permissions to copy to that location in order for the import to work, so that ability is a positive sign that it will probably be able to load a virtual machine from that location as well. In concrete terms, that’s not a guarantee. Be certain to verify permissions.
Restoration is the optimal choice if you are importing from a manual backup location that stores copies of virtual machines in their operating format (most backup software does not store virtual machine backups in this way). Choose restoration if:
- You want to preserve the source files unmodified.
- The imported virtual machine will be the only live copy of this particular virtual machine.
- The source location is inappropriate for running a virtual machine (ex: a NAS that only supports the SMB 2 protocol).
The note at the end of the in-place registration section regarding the virtual machine ID is the same for restoration.
Copy the Virtual Machine (Create a New Unique ID)
The third option makes the most changes. It copies the files from the source to the specified destination, but it also modifies the XML file and the virtual machine’s files and folders to use a new VMID. As for the new destination, much of what was said in the Restore section applies.
Copying the virtual machine is a good decision when you truly need to duplicate the virtual machine. The ID will change, so ID-aware applications like Altaro Backup for Hyper-V will see it as an all-new virtual machine. Use the Copy option if either of the following are true:
- You want to preserve the source files unmodified.
- You want the virtual machine to exist alongside the virtual machine it was copied from.
- You want any software outside or inside the virtual machine to treat the copy as a new operating system instance.
Applications inside the copy, including Windows Server, will be able to detect that a change occurred. It will be treated as a hardware change, much like restoring to a new computer. What does not happen is any change to any guest operating system identifiers. The Windows SID will not change and no computer names will be modified. IP addresses will be kept. SSL certificates will not be changed. While copying a virtual machine is certainly a powerful tool, consider using generalizing tools such as sysprep before exporting.
Wrapping Up
To perform a Hyper-V import virtual machine process, there are many options and various considerations to make. It is best practice with the Hyper-V import virtual machine process to first properly export the virtual machine from the source Hyper-V environment before importing the VM into the target Hyper-V environment.
There are three Hyper-V import virtual machine import types, including: register in place, restore the virtual machine, and copy the virtual machine. All three Hyper-V import virtual machine types have different characteristics as noted that need to be considered by IT admins with the Hyper-V import virtual machine process.
Importing other disk types, such as VMware VMDK files require the use of a third-party tool or using something like System Center Virtual Machine Manager (VMM) to perform the disk conversion process. Nonetheless, IT admins have several options for the Hyper-V import virtual machine process, allowing migration of VMs from one Hyper-V environment to another.


Not a DOJO Member yet?
Join thousands of other IT pros and receive a weekly roundup email with the latest content & updates!
Frequently Asked Questions
How do I import a VM into Hyper-V?
How do I import a virtual machine into Hyper-V VirtualBox?
How do I import a VMDK file into Hyper-V?
How do I import VHDX into Hyper-V?
What is virtual machine VM Import Export?
More in this category


About the Author

Eric Siron


7 thoughts on "How to Import a Hyper-V Virtual Machine"
Has anyone tried doing an import from an SMB share (Server 2016 file server) using Hyper-V Server 2016 via the Hyper-V Manager MMC on a 2016 domain? I ask because I have found that while I can get the Hyper-V server to export to the SMB share, it will not recognize what it exported as valid for import over the network. Presumably it isn’t seeing the .vmcx file. However, if I manually copy said files back from the SMB share to the Hyper-V local drive Hyper-V will recognize the local files as importable. I keep thinking there is some permissions issue, but since the Hyper-V server has no problems reading or writing to the SMB share I am at a loss. I wonder if there is an actual bug with the latest and greatest Hyper-V. I have only tried this via the Hyper-V Manager MMC, not the PowerShell cmdlets.
Related, Hyper-V 2016 SMB issue that has been resolved (thanks again): https://www.altaro.com/hyper-v/use-isos-hyper-v/#comment-256812
I am looking for a definitive answer on how to get an existing VM imported into VMM. Does it simply require a library refresh after the import to the Hyper-V host, or is there more to do ?