Save to My DOJO
Altaro Software, maker of Hyper-V virtual machine backup software, is releasing the following PowerShell script to the public at no charge – Freeware. Altaro realizes that even though all companies recognize the importance of backing up their virtual machines, some of them simply do not have the capability to acquire a proper backup solution. While not a true backup, Hyper-V’s export feature can be used as an interim measure to ensure some duplicate of your virtual machines exists somewhere.
Please note that Altaro Software is not responsible for what the script might directly or indirectly do (or not do). Feel free to check out the PowerShell code before running the script.
Script Overview
The attached code is a set of PowerShell scripts to automate the export of VMs. It is provided as-is without any warranty or support. You are strongly urged to read all documentation and test the scripts prior to using in a production environment.
Download VMExport-PowershellScript-1-0
Screenshots


Capabilities and Behavior
There are two separate scripts that comprise this offering. The configuration script allows you to assign defaults and define specialized export jobs, all of which are saved into an XML file. The export script then operates based on those defaults and defined jobs. With all options enabled, the script can LiveMigrate or move VMs to the local node and shut down or save running VMs prior to export; they will be restored to their prior node and running state once the export completes. Jobs can be defined that will allow you to override the default behaviors for particular VMs; for instance, you might want the default action to be to save VMs prior to export but to shut down your domain controllers. You might want a particular job to export all VMs except one or to only export three specific VMs. You might want a job to move some VMs if they are missing but to leave others where they are.
To begin, run the configuration script (instructions below). Set defaults under menu option #1 from the main menu (global options). Define jobs from main menu option #2.
Keep in mind:
- An “Exclude” job does not allow you to set special-case conditions on VMs. They will all follow the job defaults.
- The script will not migrate a non-high availability VM under any conditions.
- Running the export script without a job name will export all VMs using the default conditions. This means that if you have turned on the cluster features, it will not only export VMs on the current host, it will also, one by one, migrate all HA VMs from all other nodes in your cluster, export them, and return them to the source node.
- The export job has no screen output except to notify you that it has no screen output. It writes to the log file as specified in the configurator.
- The export script does not clean up the log file. Ever. The configurator tool has an option to clear it. You can also open the log file in a text editor, empty it, and save it.
- If the export script is told to export to a location that already contains an export of that VM, the existing export is simply deleted.
- These scripts do not perform imports. This is a task better left to a human being to manually initiate and monitor.
Installation and Environment Preparation
- Download the ZIP file. Use Windows Explorer to unblock it (right-click, properties, Unblock).
- Copy the contents to a permanent location on a Hyper-V host. It is advisable to not use Program Files because the configuration script will create/edit an XML file in its containing folder and it is a best practice to not save changeable configuration files under the Program Files tree. If desired, you can modify the .ps1 files to change the location of the configuration script if you wish.
- PowerShell and .Net must be installed on the server. Within a full GUI install of Windows Server, these are installed by accessing the Control Panel, opening “Programs and Features” and clicking “Turn Windows features on or off”. In a Server Core or native Hyper-V installation, run the following (feature names are case-sensitive):
- DISM /Online /Enable-Features /FeatureName:NetFx2-ServerCore /FeatureName:MicrosoftWindowsPowerShell
- The PowerShell script is not signed. If you wish to sign it, search the Internet for directions on creating self-signed certificates and applying them to PowerShell scripts. Otherwise, you’ll need to lower the restrictions on PowerShell. The lowest recommending setting is “RemoteSigned”, which allows unsigned scripts to run locally (which means someone with write access to the server would have had to place the script file initially) but will not allow execution of unsigned scripts started from remote computers. To set this, run the following at a command prompt on the Hyper-V host you’ll be running the scripts from:
- POWERSHELL
- Set-ExecutionPolicy RemoteSigned
- EXIT
- If you will be exporting to a network location (whether by UNC or mapped drive), you will need to change permissions on that share and, if applicable, NTFS so that the account that Hyper-V runs under has sufficient access. “Change” is sufficient on the share and “Modify” is enough for NTFS. By default, Hyper-V runs under the context of LocalSystem, so you’ll need to set the permissions for the computer accounts. Directions on doing so are available on the Microsoft KB: http://support.microsoft.com/kb/2008849. Those directions indicate using “Full Control” which is acceptable but unnecessarily high.
- Run the configuration tool to set defaults:
- On the server, use the command prompt and navigate to the folder where you placed the .ps1 files from step 2.
- Type “POWERSHELL .\Configure-VM-Export.ps1”
- At minimum, establish the defaults in menu option #1.
Usage
(Configuration)
 POWERSHELL .\Configure-VM-Export.ps1
(Export)
 POWERSHELL .\Export-VMs [[-JobName] <<job name>>] [[-Subfolder] <<name of a subfolder to be created>>
Examples
Export all VMs on this node to the default export location using configured default settings (only works if the default option for Include or Exclude is set to Exclude):
POWERSHELL .\Export-VMs
Run the defined export job called “Mail Servers”:
POWERSHELL .\Export-VMs "Mail Servers"
Run the defined export job called “Server VMs” to a subfolder called “Friday” underneath the job’s configured location:
POWERSHELL .\Export-VMs "Server VMs" "Friday"
Necessary Privileges
The user account that runs the script will need local administrative privileges on the Hyper-V host. If the script will export to a network location, see step 5 under Installation and Environment Preparation. If you enable the cluster features of the script, the user account will also need to have administrative privileges on the cluster.
Scheduled Task Design
It should be unnecessary to fully qualify the location of POWERSHELL.EXE, but it is necessary to provide the entire location of the script file to be run. The “Action” should be to “Start a program” with a value such as: POWERSHELL “C:\Export Scripts\Export-VMs.ps1” -JobName “Friday Job” -Subfolder “Friday”. The job must be set to run with highest privileges and an account that fits those listed under “Necessary Privileges”.
Importing an Exported VM
These scripts do not contain a mechanism for import, and that is intentional. Importing is potentially very dangerous and should be manually done.
- Manually copy the entire folder structure to the location that you want the VM to run from. If you are operating on a cluster, this would be somewhere in your CSV tree or on a shared LUN.
- In Hyper-V Manager, select the host you want to import to. On the right hand side of the screen, click “Import Virtual Machine…” If you are going to run the imported VM side-by-side with the original, choose the “Copy” option. If you are restoring a failed or damaged VM, choose the “Move or restore” option. In this setup, it doesn’t really matter whether or not you choose the “Duplicate” option because you are working from a copy of the files according to step 1.
- If you are not importing to a cluster or you don’t wish to make the imported VM highly available, stop here. The VM can now be worked with.
- Open Failover Cluster Manager. Right-click “Services and applications” and click “Configure a service or Application”.
- If it appears, click “Next” on the start screen. Highlight “Virtual Machine” and click “Next”.
- The next screen will search for available VMs to convert. Check the box for the VM you just imported and click “Next” twice. Check the report and click Finish.
Detailed Explanation of Configuration Menu Paths
All of these directions assume starting at the main menu. Zero exits to the next higher menu level. Migration settings have no effect on non-HA VMs.
Main Menu
1 Change global options: access the global options menu
2 Work with export job definitions: access menu to create and manipulate jobs
3 Clear the job log: Empties out the log file, leaves a timestamp and the user id of the person who ran the command
Global Options Menu
1-1 Change Default Export Path: opens a dialog to choose the export folder. You must also enter a filename, but this is ignored.
1-2 Change Log File Name: opens a dialog to choose the folder and file name for the log. Regardless of extension, this is always text-formatted.
1-3 Save or shut down VMs prior to export?: Choose one or the other for default handling of VMs. Can be overriden by job and VM definitions.
1-4 Use cluster?: Turn on or off cluster features.
1-5 Attempt to LiveMigrate missing VMs to this node?: If set to Yes and cluster features are enabled, when an export job tries to export a VM, it will search other nodes. If the VM is found on another node, it will be LiveMigrated (or moved, if offline) to the active node, the export will run as scheduled, and the VM will be returned to its originating node.
1-6 Include or exclude selected VMs by default?: New jobs will follow this setting at creation. It is not used at any other time.
Configure Job Definitions Menu
2-1 Add/modify export job definition: shows a menu for creating or modifying definitions
2-2 Presents a menu to delete definitions
Add/Modify Export Job Definitions menu
2-1-1 Add a new job: allows you create a new job by entering its name. Typing the name of an existing job goes to the modify screen for that job.
2-1-x: Opens the modify screen for the selected job, by name
Modify Job menu
2-1-x-1 Name: allows you to change the job’s name
2-1-x-2 Export Path: opens a dialog for you to select the export path. You must enter a filename but it will be ignored.
2-1-x-3 Save or shut down the VMs prior to export?: how the VMs will be handled for this job definition. For include jobs, can be overridden per-VM
2-1-x-4 Move missing VMs to this node?: Migrate VMs on other hosts to this node? For include jobs, can be overridden per VM.
2-1-x-5 Include or exclude selected VMs?: Select to include or exclude the VMs listed under option 6. Use “Exclude” with no VMs selected in 6 to export all using defaults.
2-1-x-6 Modify (included or excluded) VMs: Change the list of VMs to include or exclude, based on option 5.
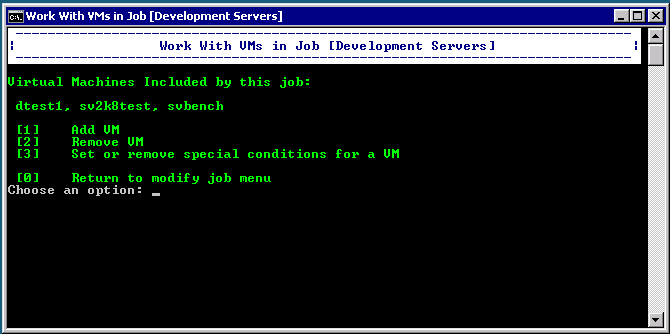
Work with VMs in Job menu
2-1-x-6-1 Add VM: Add a VM to the include/exclude list
2-1-x-6-2 Remove VM: only appears if VMs are defined, allows you to remove selected VMs
2-1-x-6-3 Set or remove special conditions for a VM: only appears for “include” jobs and if VMs are defined, opens a menu to set special options.
Select VMs to Add to Job menu
2-1-x-6-1-x Any number besides -1 and 0 must correspond to a listed VM. It will add that VM to the include/exclude list.
2-1-x-6-1-(-1) All listed VMs are added.
2-1-x-6-1-(free text) Any non-numeric data is added as a VM. VMs manually entered that don’t actually exist will show as “Skipped” when the job is run.
Remove VMS from Job menu
2-1-x-6-2-x Any number besides -1 and 0 must correspond to a listed VM. It will remove that VM from the include/exclude list.
2-1-x-6-2-(-1) Will remove all VM definitions. THERE IS NO CONFIRMATION.
Override Defaults for VMs in Job menu
2-1-x-6-3-1 Override save or shutdown behavior on individual VMs: Opens a menu to change specific VM shutdown behavior
2-1-x-6-3-2 Override migration behavior on individual VMs: Opens a menu to change specific VM migration behavior
Override Save/Shutdown Behavior in Job menu
2-1-x-6-3-1-x Choosing the number of a listed VM toggles it between “Save”, “Shutdown”, and “Default”. Default refers to the job default, not the global default.
Override Missing VM Behavior in Job menu
2-1-x-6-3-2-x Choosing the number of a listed VM toggles it between “Yes”, “No”, and “Default”. Default refers to the job default, not the global default.
Delete Export Definitions menu
2-2-x Choosing the number of a listed definition deletes it completely. THERE IS NO CONFIRMATION
Please note that Altaro Software is not responsible for what the script might directly or indirectly do (or not do). Feel free to check out the PowerShell code before running the script.


Not a DOJO Member yet?
Join thousands of other IT pros and receive a weekly roundup email with the latest content & updates!
More in this category


About the Author

Eric Siron


7 thoughts on "A Free Configurable PowerShell Script for Hyper-V Export"
[…] http://hub.altaro.com/hyper-v/a-free-configurable-powershell-script-for-hyper-v-export/ […]
Where is the Script? There is no link to download it.
Steve,
The file must have gotten lost in the conversion to the new site format. I’ve re-uploaded it.
I warn you that in PowerShell terms, this script is ancient. It was only tested on 2008 R2. I think it will work on 2012. It might work on 2012 R2, but it doesn’t know that it can export VMs while they’re online.
Hi
With Hyper-V 2012 R2 VMs can stay running during backing, but the process is then to take a snapshot, and export that (new feature in 2012R2)
Any plans to include that in perhas ver 2.0 if this script?
Thanks
Time permitting, I’d like to revisit this at some point. No concrete plans, though.