Save to My DOJO

Several technologies work together in Microsoft 365 that help you manage the lifecycle of your data and documents. In this article, we’ll start with an overview of these and when to use which one, followed by a deep dive into records management and some very powerful features on offer.
Knowing what you have is the first step
Discovering your data and whether there’s sensitive information you need to protect is the first step. If it isn’t enabled, enable Office 365 audit logging in your tenant. It can take several hours until audit data starts showing up, so do this ahead.
As part of what Microsoft calls “know your data,” you can explore what you have stored in Exchange Online, SharePoint Online, and OneDrive for Business before creating any policies or making any changes (apart from enabling auditing). In the Microsoft 365 compliance portal, click on Data classification, and the Overview tab will show you the number of sensitive documents stored in any of the online locations (on-premises data will be included here in a coming update if you deploy the AIP Scanner – see below).
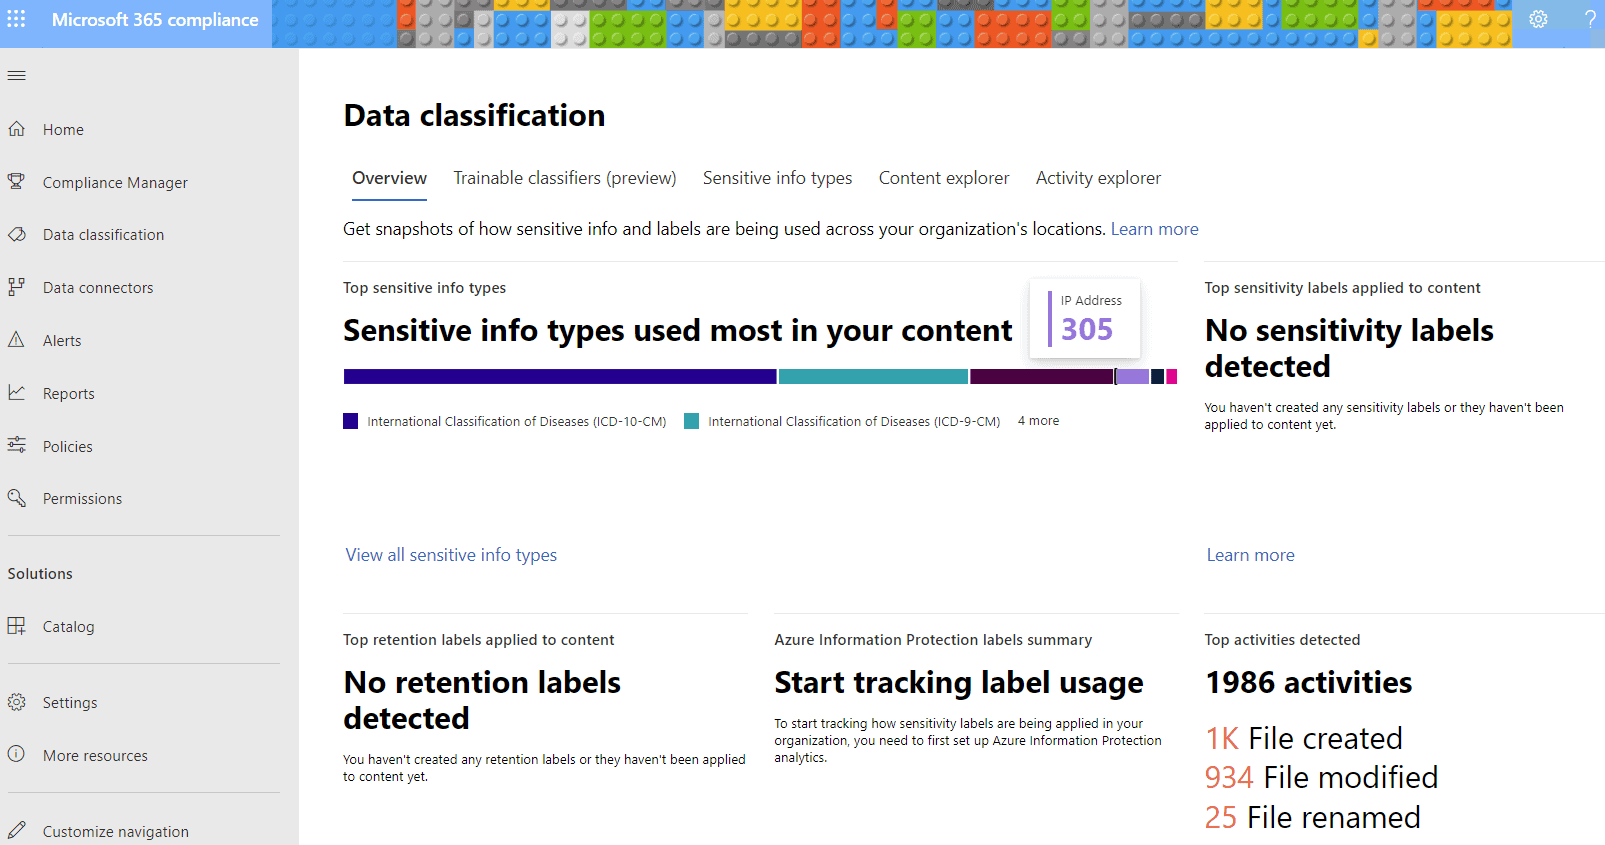
Overview in Data Classification
The Content Explorer tab, on the other hand, will give you more than just an overview of statistics; it’ll let you dig into this data. Note that you need permissions not part of the default Global Administrator role to see this data, as well as at least one license of Office 365 E5, M365 E5 or one of the Advanced Compliance E5 / Advanced Threat Intelligence E5 add-ons.
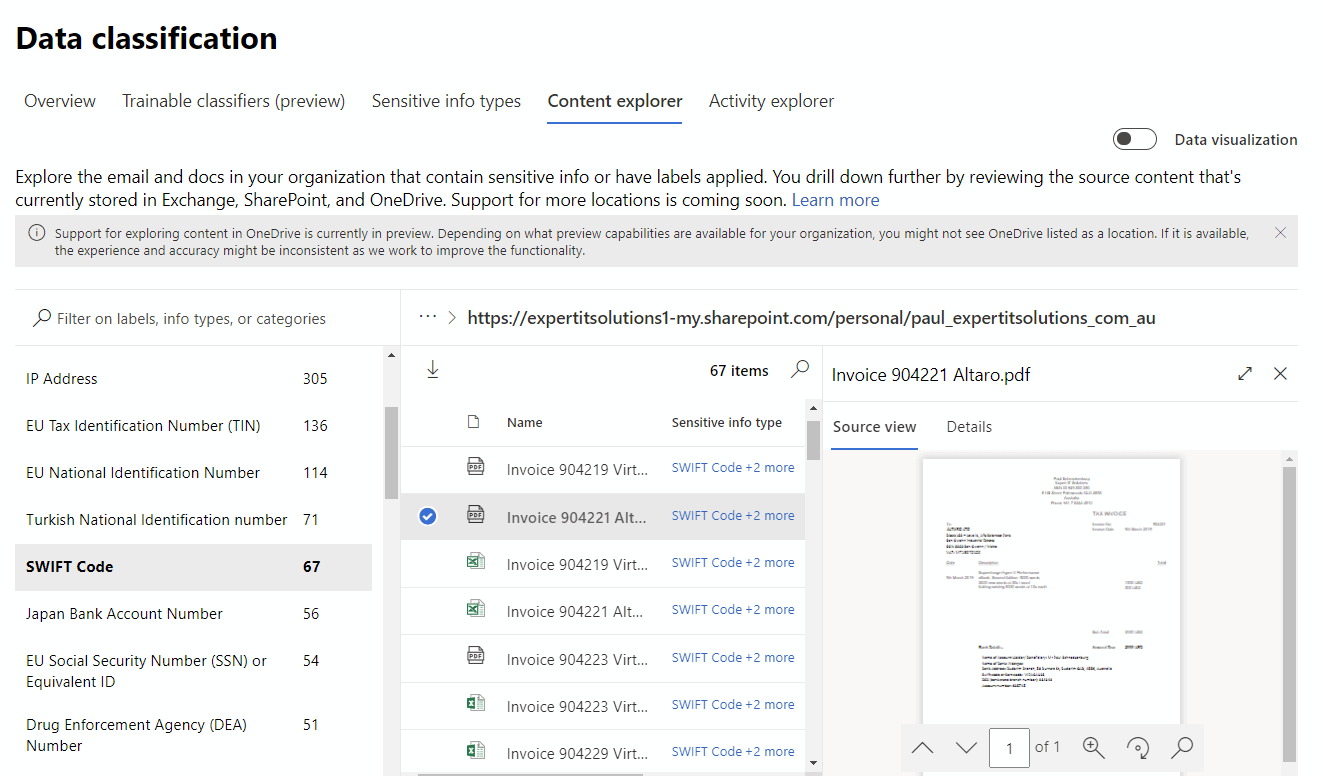
Content Explorer in Data Classification
Accounts with Content Explorer List viewer can see the number of sensitive documents in each repository and individual document names but NOT their content, whereas an account that also has Content Explorer Content viewer can see the content of each document. Be very careful with assigning these permissions, as these administrators are able to access sensitive data.
But the issue for many is using the Content Explorer. Luckily, that’s not a difficult task. Firstly, access the Content Explorer by navigating to the Microsoft 365 compliance center. From the dashboard, locate and click on the ‘Content Explorer’ tab. This will open up the main interface of the tool.
In the Content Explorer, you will find your organization’s data repositories listed. These could include locations such as Exchange Online, SharePoint Online, and OneDrive for Business. Each repository will display a summary, including the number of sensitive documents it contains.
As a user with ‘Content Explorer List viewer’ permissions, you can delve into each repository to view more detailed information. This includes the ability to see individual document names, which helps in identifying and managing sensitive documents effectively. However, it’s important to note that with this level of access, you won’t be able to view the actual content within these documents.
Information Protection
Once you have some idea of the sensitivity of the documents stored in your tenant, it’s time to apply protection to them. This is done through Sensitive Information Types (SIT) labeling and policies. Currently, Microsoft has 152 built-in SITs that you can build policies around, covering many types of PII from different countries in the world.
If you have in-house sensitive data types, you can build your own SIT (essentially a regex with supporting keywords and information). For more complex document types, you can use trainable classifiers (in preview), a machine learning model that you train to recognize a particular type of document (European Contracts, for example).
Using SITs, you then build policies that label the email, Office document, PDF, image, or another type of document that contains one or more examples of sensitive information. You can further add headers, footers, or watermarks to sensitive documents and control permissions for accessing the document, no matter how it’s shared, using built-in encryption.
To scan, label, and optionally protect on-premises documents and file shares in SharePoint (2013+), you can use the Azure Information Protection (AIP) scanner.
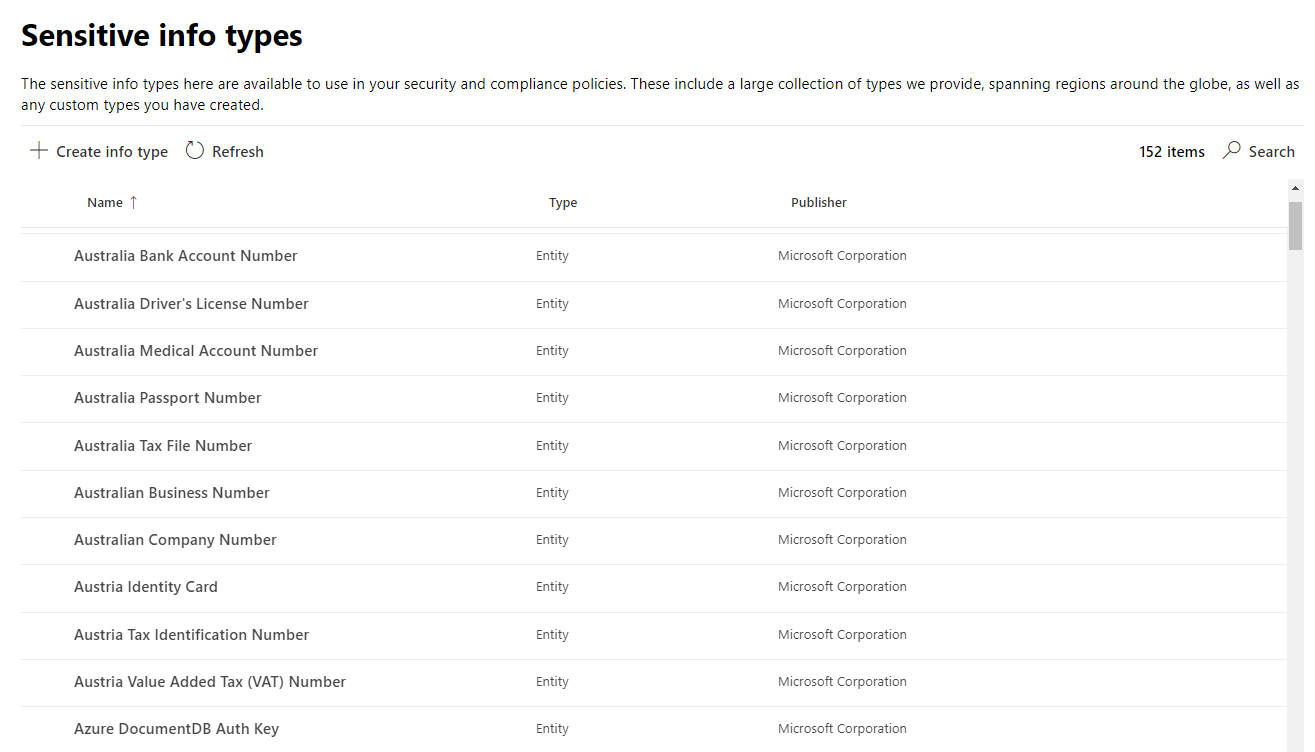
Sensitive Information Types in M365
Usage of SITs and policies requires M365 E3 or E5 licensing, and auto labeling requires M365 E5, as do trainable classifiers and the AIP scanner.
Data Loss Prevention
In addition to protecting sensitive data, you probably also want to make sure it’s not accidentally shared with the wrong people. This is the job of Data Loss Prevention (DLP), which relies on the same SITs to give users warning when they’re about to share credit card numbers with an external user via email, for instance. Recently, DLP protection was extended to Windows 10 endpoints, providing a powerful option for controlling data sharing everywhere (particularly useful now that many of us are working from home).
One big “philosophical” difference between Microsoft’s Information Governance solutions and third-party solutions is that Microsoft manages data “in place,” while other solutions create copies of the data in separate repositories, adding extra cost and complexity.
Need to retain data for seven years and ensure it doesn’t get deleted? Create a retention policy, and even if users try to delete emails or documents, they will be available for seven years. Need to ensure that only these three people can access this sensitive Word contract, even if they try to share it with someone else?
Use Information Protection to apply permissions to the document and encrypt it – ensuring that only the right people can access it. Need to ensure that these finalized legal contracts are retained for ten years and not tampered with – use Records Management and keep them where they’re stored, secure in the knowledge that they can’t be altered.
Retention
Sometimes, you have data that isn’t sensitive and thus doesn’t fall into what you’d use Information Protection or DLP for, but you have a business or regulatory need to retain the data for a certain number of years. Both SharePoint and Exchange have built-in tech for this (a leftover from when they were on-premises server solutions), but the newer, unified approach in Office 365 lets you retain data, no matter where it’s stored.
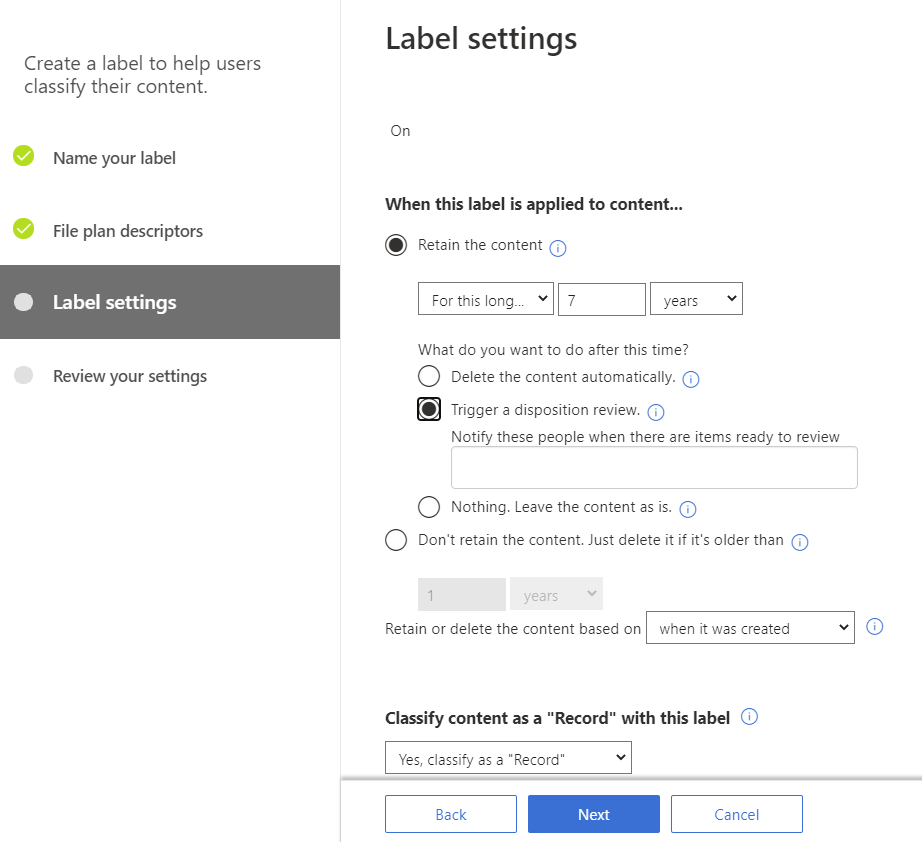
Creating a retention label with a disposition review
There are both retention labels and retention policies, and you can use them together for slightly different use cases. This is unlike Information Protection policies, where you create the labels first, and then the label policy makes them available for users to use.
Retention labels (but not Retention policies) can also optionally be used to label content as records for Records management. If an individual document has different and conflicting retention labels/policies applied to it, there’s a workflow to determine how long it’ll be retained and when it’ll be deleted.
Incorporating retention labels within Office 365 calls for a nuanced approach, where understanding the nature of your data is paramount. Begin by thoroughly assessing the types of documents and information present in your system. This assessment involves categorizing data based on sensitivity, relevance, and regulatory requirements. It’s essential to recognize that not all data is created equal, and different types of information may warrant varied retention periods.
Once you have a clear understanding of your data landscape, tailor your retention labels to align with specific business and regulatory needs. For instance, financial records might require longer retention periods compared to routine operational data. The key here is customization; your retention labels should reflect the unique aspects of your organization’s data management requirements.
Consistency in applying retention labels across your data repositories is also crucial. Inconsistencies can lead to compliance issues and data management challenges. Develop a standardized protocol for applying these labels and ensure that your team is well-trained in following these guidelines.
Finally, leverage the capabilities of Office 365 to automate the application of retention labels where possible. Automation can significantly reduce the manual effort involved in labeling large volumes of data, enhancing accuracy and efficiency. By integrating these best practices into your data governance strategy, you ensure a robust and compliant approach to data retention in your Office 365 environment.
Records Management in M365
Now that you’ve seen the basics for identifying, protecting, and managing the data you have in your business – let’s turn to records management. This is used to adhere to legal, regulatory, and business needs to manage certain types of documents differently. It can be done manually by applying a retention label or based on the content using SITs, keywords, or content types.
You can control the retention period based on when the document was created, last modified, or (unique to records) based on a particular event taking place, such as an employee leaving the company, a contract expiring, or a particular product reaching a stage in its lifecycle. This makes it possible to build workflows around governing the retention of documents.
There are three types of restrictions that can be applied using records (plus the fourth, ordinary retention labels): Record – locked, Record – unlocked, and Regulatory record. The last one is new, based on feedback from customers, and lets you lock/prevent any changes not only to the document content but also to its metadata, stops you from moving the document to another location, AND blocks the ability to change or remove the label.
This is important because businesses have strict regulations to follow and must prove that documents are immutable once declared records. The locked/unlocked record types differ in whether they allow changes to the content or not.
If your business could benefit from Regulatory records, be aware that you need to enable the feature for it to show up in the UI. Also, be aware that if you do declare a document as a Regulatory record and you later want to remove the label, you have to contact support – there’s no other way to do it (which is the point, to show auditors that the record really is immutable).
Records management has another feature – File plan. This is a structure similar to traditional (paper-based) records management and lets you add the business function/department, category (and optional subcategories), authority type, and provision/citation to the plan.

Defining file plan descriptors for a label
Once created, File plans can be exported as CSV files and edited in Excel as well as imported back into M365, which comes in handy if you’re migrating from a legacy system or you need to import a large number of labels in one go. It’s also useful as you sit down with business stakeholders to figure out what documents should be treated as records and design the workflow around them.
This workflow can involve users declaring a record manually, which will work for small amounts of documents or, as mentioned above, when a particular event happens. You can also attach retention labels automatically to documents based on SITs, keywords or, searchable properties of the documents, or trainable classifiers. Be aware that auto-apply retention labels can take up to seven days to apply.
To complete the lifecycle of your records, you need to plan for the disposition of them at the end of their useful life. As we’ve seen, records management in M365 is intimately connected to retention labels, which, by definition, configure how long different types of data should be kept.
Once time’s up, you can have the information automatically deleted, just left where it is, or trigger a disposition review. This last one requires the users who will perform the Disposition Management role (not part of the Global Administrator role by default), and auditing has to be enabled. There’s also a Records Management role, which doesn’t include the Disposition Management role today.
Disposition reviews cover content in Exchange Online mailboxes, SharePoint sites, OneDrive accounts, and Microsoft 365 groups (Teams). Reviewers will receive an email notification on a weekly basis and then use the Disposition tab in the Compliance Center to review the content and either permanently delete it, extend the retention period, or apply a different retention label.
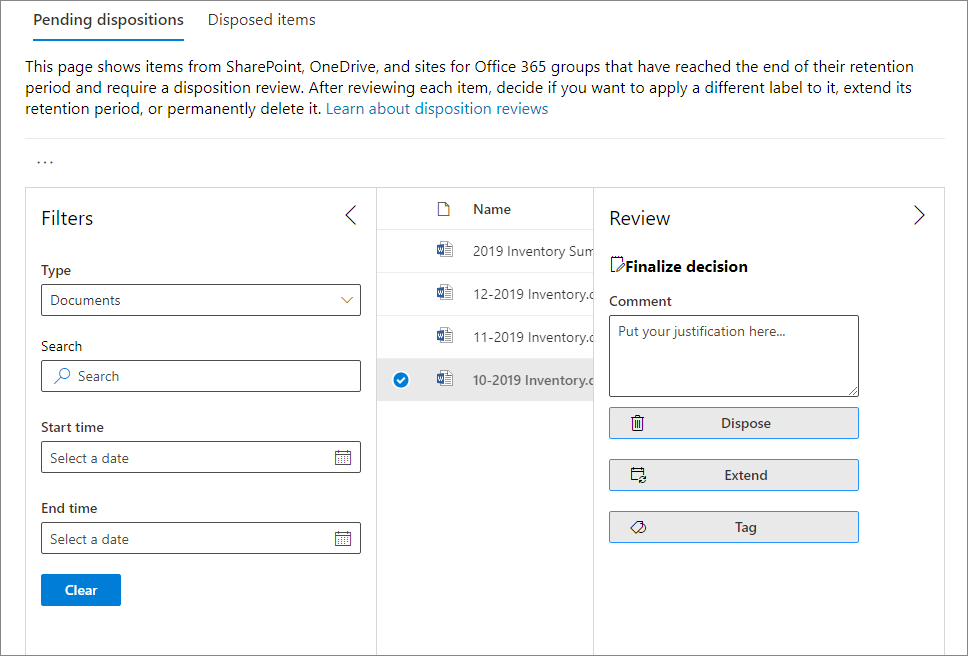
Disposition options (courtesy of Microsoft)
Note that you can only define individual user accounts or mail-enabled security groups as reviewers. I recommend the latter because if you have a seven-year retention period, you can’t guarantee that the people who were given the task that long ago are still around (although you can, of course, update the retention label with new reviewers as time goes on).
The licensing requirements that declare records manually or automatically are M365 E5, E5 Compliance, E5 Information Protection and Governance, O365 E5, E5 Advanced Compliance.
Conclusion
Microsoft is improving the overall governance of information in Microsoft 365 and adding new features regularly to provide a holistic solution built into the platform. Managing records “in place” is a good approach – are there documents in your business that you need this type of control over? If so – try out Records management to see if it fulfills your business OneDrive and regulatory requirements.


Not a DOJO Member yet?
Join thousands of other IT pros and receive a weekly roundup email with the latest content & updates!
More in this category


About the Author
Paul Schnackenburg

