Save to My DOJO
If Java is your thing, chances are that you’re familiar with the Eclipse IDE, an IDE favored by many a Java developer. It’s also good to know that Eclipse can be used to code in Perl, Phyton, Ruby, C, and a myriad of other languages and has some other uses as well. Eclipse is very flexible in terms of what it can do thanks to a plugin architecture that allows for additional functionality and installation of software packages as you’ll soon discover.
At this point, you’re probably asking yourselves how on earth is this related to anything VMware! Well, there’s this rarely mentioned tool called VMware Workbench IS, something I had completely forgotten about, to be honest, were it not for a fortuitous encounter while reading on the vSphere Java SDKs, hence today’s topic.

What is VMware Workbench IS?
VMware Workbench IS is a bundle of tools distributed as an Eclipse plugin. The bundle includes VMware specific extensions that integrate with products such as vSphere and vRealize. Workbench can also help you with the discovery and installation of VMware plugins as well as giving you a heads up about the latest VMware updates.
However, the one component that shines through, in my opinion, is Remote System Explorer (RSE) which is the focus of today’s post. Other noteworthy components are the CIM and Log browsers, the activity graph and a few more which I covered briefly.
Installing Eclipse
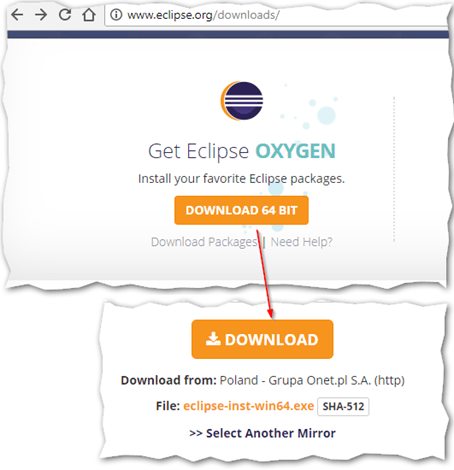
Workbench requires that you install the Eclipse IDE. If you don’t have it already installed, head here and download it.
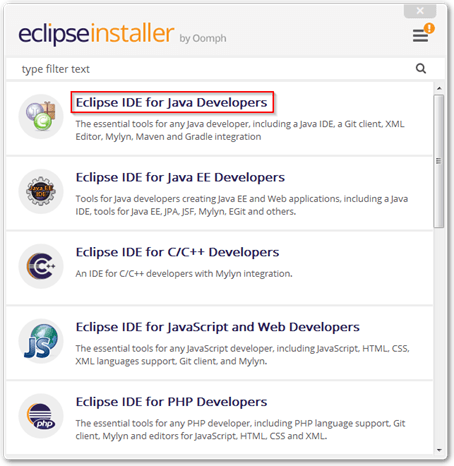
Downloading the latest Eclipse Installer
For this post, I’ll be installing Eclipse on Windows. After downloading the Eclipse Installer, run it and select the first item on the list as shown. There are a number of versions available suited to the type environment and applications being developed. The basic Eclipse IDE for Java Developers will suffice.
Selecting a version of Eclipse to install
Specify the location where you want Eclipse installed. You also have the option to have application shortcuts created for you.
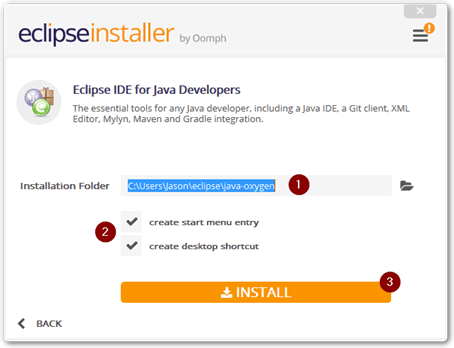
Selecting where Eclipse is installed and kicking off the installation
When prompted, click on Accept Now to acknowledge the software user agreement.

Accepting the Eclipse Software User Agreement
Wait for the installation to complete. Click on Launch to start Eclipse. Alternatively, close the dialog and use the shortcut created on the Windows desktop.
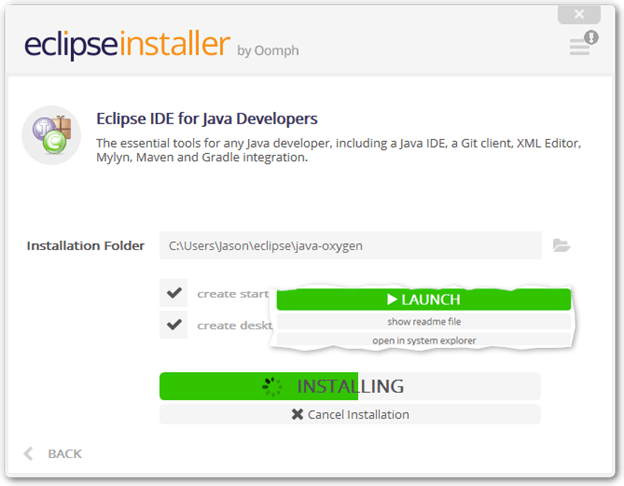
Launching Eclipse for the first time
When you first launch Eclipse, you will be prompted to set the default workspace (1) which is where stuff like code gets saved. Make sure you tick the default workspace option (2) so you can keep using the same workspace without being reminded every time you run Eclipse.
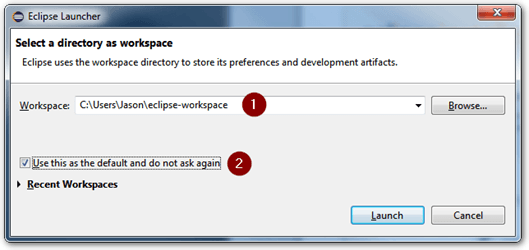
Setting Eclipse’s default workspace
Installing VMware Workbench IS
This is how things look the first time Eclipse is run. Do not worry. Start by closing the Welcome screen by clicking on the X button (1). Using the Install New Software feature (3) from the Help menu, we can now move on and add the VMware Workbench IS plugin.
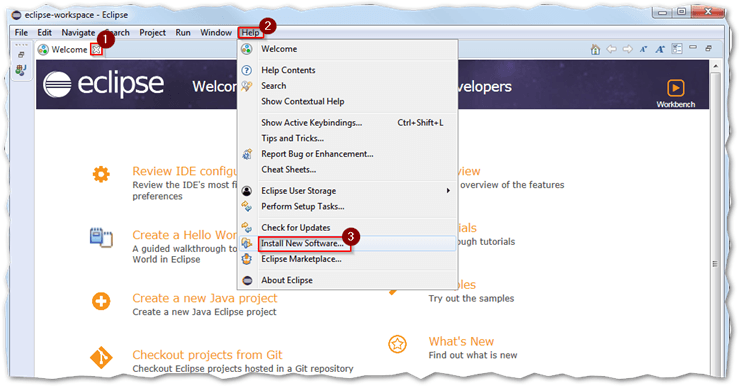
Adding software to Eclipse
On the Install New Software dialog, click on the Add button and type in the following:
- Name: VMware Workbench IS 3.5.7
- Location: https://vdc-download.vmware.com/v2/update/vmwbpkg/wbis-comp/3.5.7
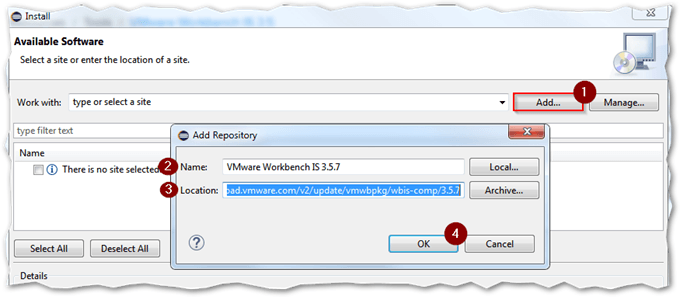
Adding a software repository in Eclipse
After a minute or so, you should see a list of components that can be individually installed. Select the whole bunch if you wish to add the vSphere SDKs to your environment. For the purposes of the post we just need to install the first item listed; the VMware Workbench Integrated suite. Press Next to continue.
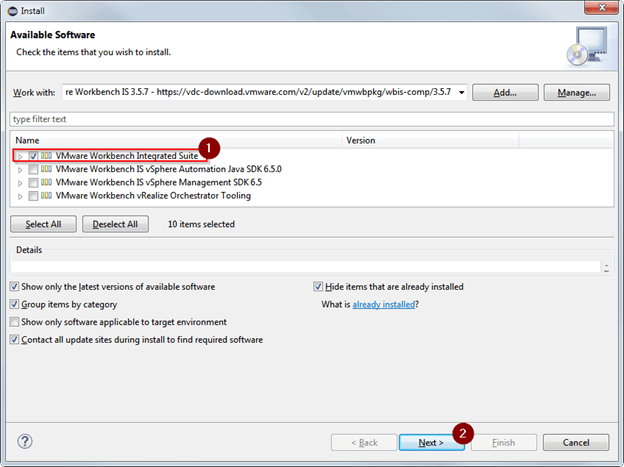
Selecting the Workbench items to install
The Install Details dialog gives you a run-down of the various sub-components about to be installed. Press Next to continue.
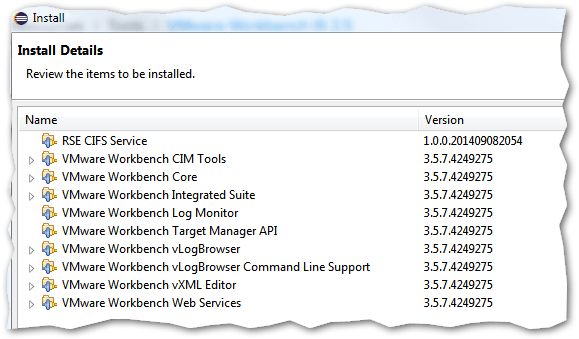
A list of the sub-items comprising the selected components
Finally, accept the various license agreements and move on with the installation by clicking on Finish.

Accepting the software license agreements
Depending on the version of Eclipse and your configuration, an installation progress bar is displayed on the bottom-right part of the screen and/or on the Installing Software dialog box itself.
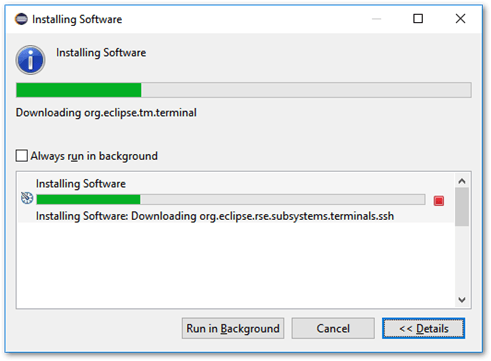
Software installation progress in Eclipse
At some point, you might be warned about unsigned content being installed. Even though it’s generally unwise to install any form of unsigned content, we know this to be VMware content, so it should be relatively safe to hit the Install anyway button to get on with the installation.
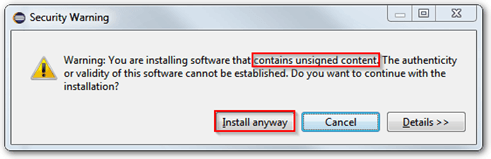
Unsigned content warning in Eclipse
Note: If your installation runs amok, make sure that you are running Eclipse under an administrative context as in right-click and run as administrator. If you have just installed Eclipse on top of an existing installation, run Eclipse -clean from the command line. This clears the cache and lets you start afresh if you are having problems installing software plugins.
Things get interesting …
Now that you’ve installed Workbench, you can finally start using it. First off, let me just say that Workbench is not a replacement for any of the available vSphere clients. Regardless, it comes with some pretty nifty features as I’ll cover shortly. What I really like about Workbench, is it’s SSH functionality most notably the ability to concurrently connect to multiple ESXi hosts from a single pane of glass. What’s more, you have full access to the host’s filesystem with full copy and paste functionality from local drives to ESXi and vice-versa. You’ll also find an inbuilt terminal/console using which you’ll be able to run commands on both ESXi and vCenter Server Appliance.
Note: vCSA must be configured to present the BASH shell instead of the appliance shell as explained here.
Let’s see how it all works.
The first step is to change the perspective in Eclipse. A perspective is just a screen layout tailored to the task at hand. To use Workbench, click on the Window menu in Eclipse and select Perspective. Next, select Open Perspective -> Other. Finally, select Remote System Explore (RSE ) and hit OK.
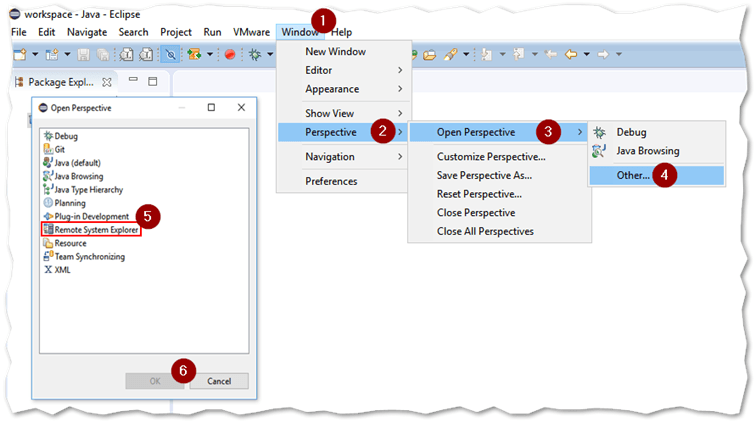
Changing perspective in Eclipse to run Workbench
The IDE look will change to something like this.
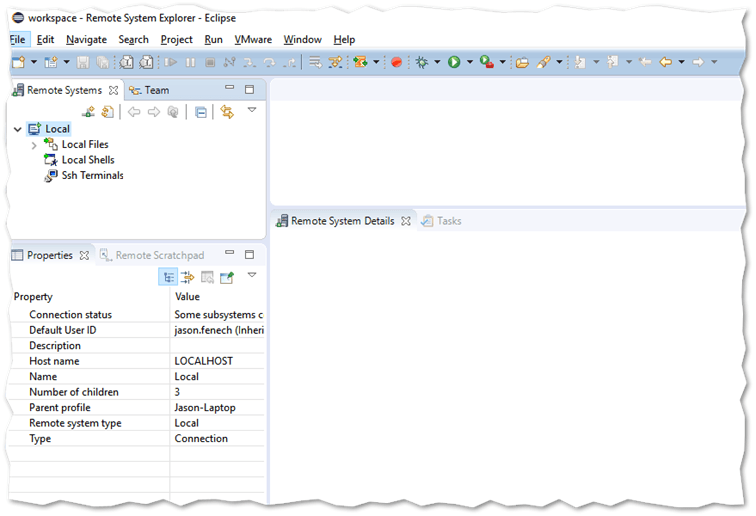
The Remote System Explorer Workbench perspective in Eclipse
RSE Connections
The Remote Systems pane is where RSE connections are created. An RSE connection is just a cached object comprising host information and credentials. The Local default connection gives you access to the local filesystem; where Eclipse is installed. It also enables you to launch shells such as the command prompt.
Let’s add a couple of ESXi connections. Click on the Connect to a remote system icon and select ESX from the list of available providers. Press Next to continue.
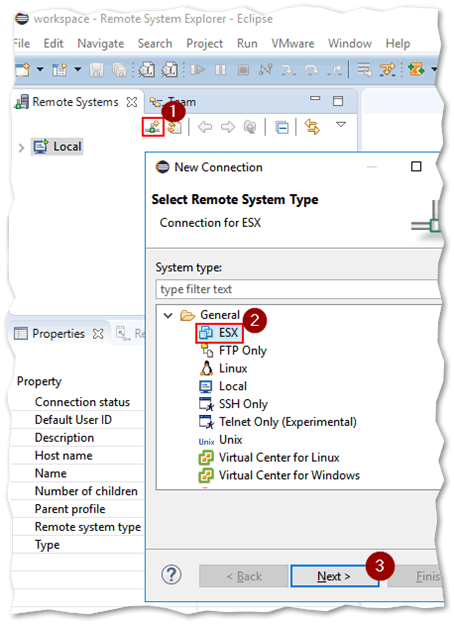
Creating an ESXi connection
On the New Connection dialog box, type in the IP address or FQDN of the ESXi host together with root credentials as shown next. Make sure that the Verify host name and Save Password options are both enabled. Press Finish to complete the process.
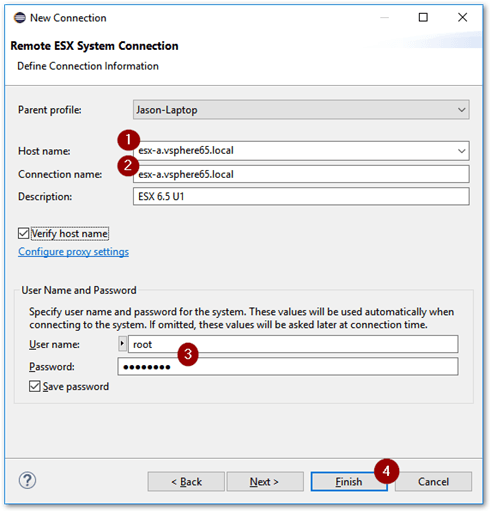
Configuring an ESXi connection
Note: In Eclipse, stored credentials used in RSE can be changed via Window -> Preferences -> Remote Systems -> Passwords.
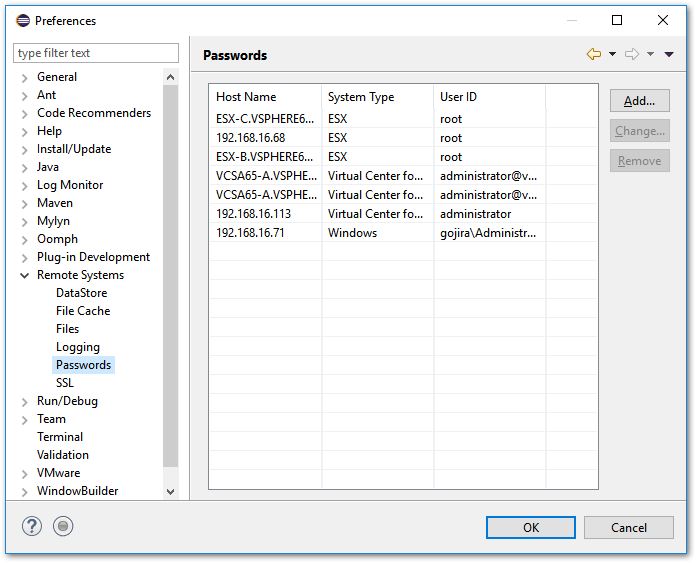
Managing credentials used for RSE connections
Expanding an ESXi connection reveals 3 more sections; File Explorer, SSH Terminals, and Resource Explorer.
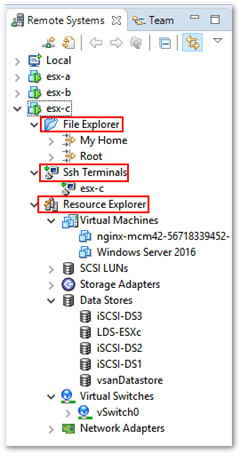
Expanding an RSE connection
File Explorer
File Explorer gives you R/W access to the ESXi host file system so be extra careful. You can also copy and paste files to and from a local filesystem. You can also enable a table-view by right-clicking on File Explorer and selecting Show in Table. The ESXi’s folder hierarchy is displayed in the bottom right-hand pane. You can view the contents of any folder by double-clicking on as well as the size, permissions set, ownership details, etc.
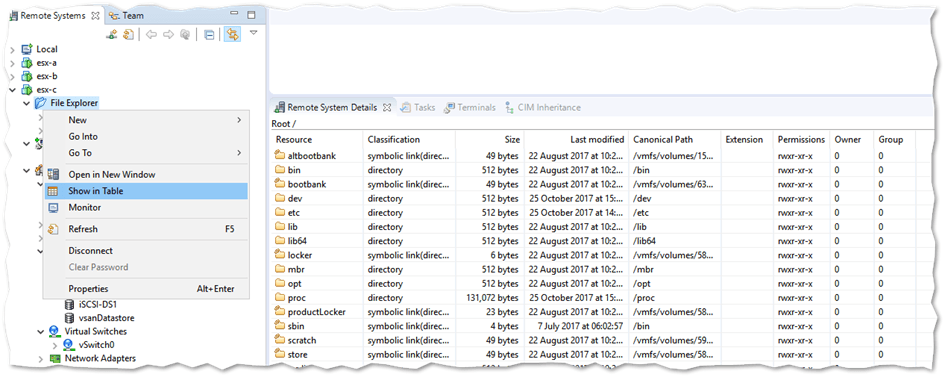
An ESXi host’s filesystem displayed in tabular form
Click on any file to display its content in the editor pane at the top of the screen. This is a handy tool to have when working with scripts and configuration files. File content can be modified by making any file writable. Use with caution!
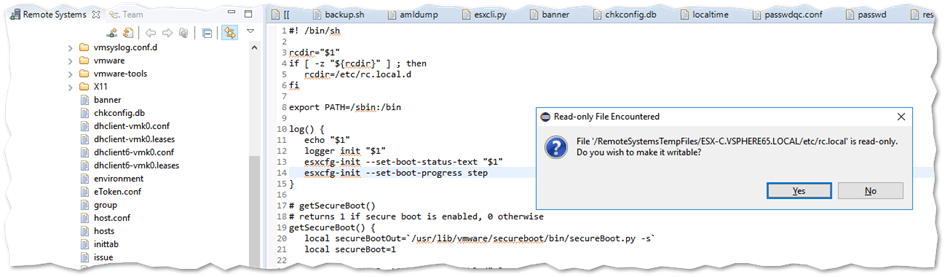
Making a file writable
SSH Terminals
As already hinted, this is the one feature I find most useful. It allows me to have multiple SSH sessions open at once on one screen.
To do this, expand SSH Terminals and right-click on an ESXi host description. Select Show in Terminals View to launch an SSH window as shown in the next screenshot. The root credentials used for the connection are those specified when creating the RSE connection. Below you can see that I opened 3 concurrent SSH sessions each under its own tab labeled by the RSE connection description.
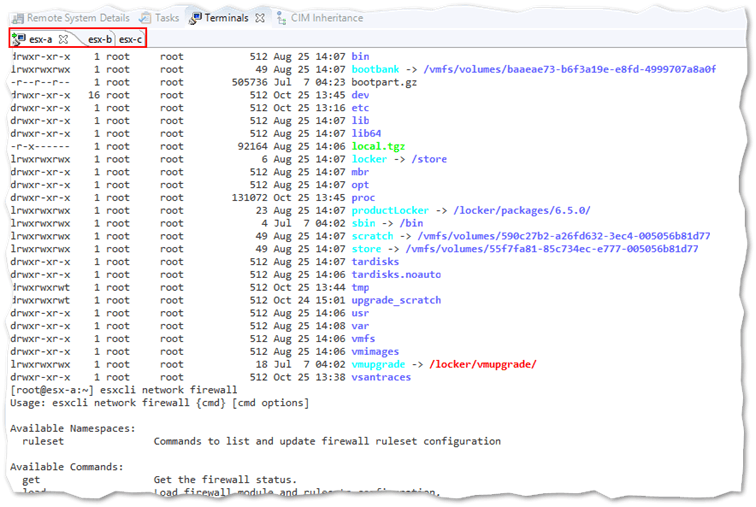
Concurrent SSH terminals in Workbench
Resource Explorer
Resource Explorer is a very mellowed-down version of Navigator, the object viewer commonly found in vSphere Web Client. Resource Explorer lists various objects and their properties. This includes virtual machines, datastores, LUNs, switches and so on. Sadly, any interactive tasks you can perform are limited to VMs and even then, you can only Power On/Off, Suspend and Reset.
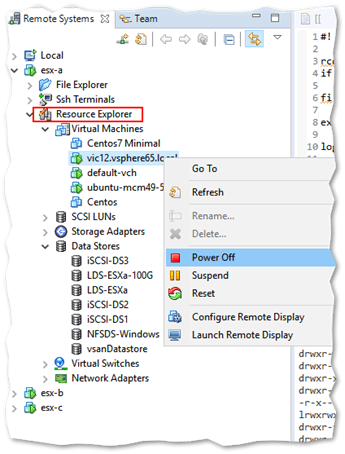
Viewing vSphere objects in Resource Explorer …
Similar to what you saw in File Explorer, most objects and their properties can be displayed in table-view. The next screenshot is a table-view of the datastores attached to an ESXi host. Total capacity, free disk space, and a list of VMs associated with a given datastore are some of the details provided.
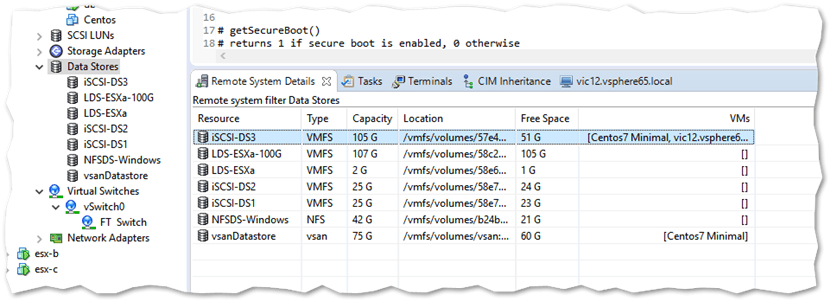
ESXi datastore table-view
Here’s another screenshot with the network card details for a nested ESXi host.

ESXi network cards details
A few more goodies
You’ll find a handful more features hiding in the context menu under VMware. Below is a brief overview of each.
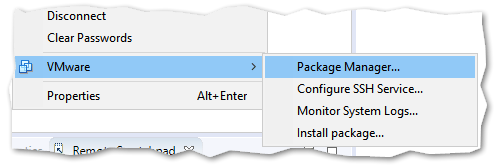
Additional VMware related Workbench features
Configure SSH Service
As you’ve probably guessed, this option is used to manage the SSH service on a selected ESXi host. It’s basically the same configuration dialog used by vSphere clients when performing the same operation.
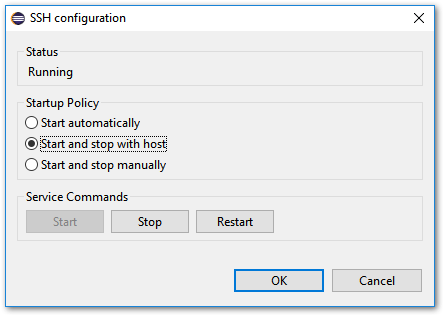
Managing the SSH service on ESXi from Workbench
Monitor System Logs
This feature loads the following ESXi logs; vpxa, fsm, hostd and vmkernel. Log content is displayed, and refreshed, in real-time inside a separate pane as shown next. The list of log files that can be read, varies according to the ESXi version monitored.
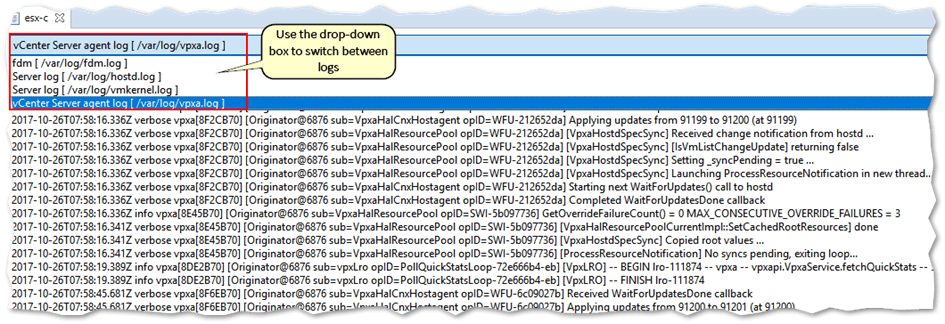
Displaying the contents of an ESXi log file
Install Package
Here’s another great tool, in my opinion at least. The Install Package feature allows you to install VIB packages such as ESXi patches and updates on remote systems. For instance, you could use it to upgrade ESXi hosts via the offline bundle method described here. Note that an RSE connection must be first created before you can deploy to it.
The next pair of screenshots, illustrate the process of deploying an ESXi offline bundle to the three ESXi hosts I previously set up in RSE.
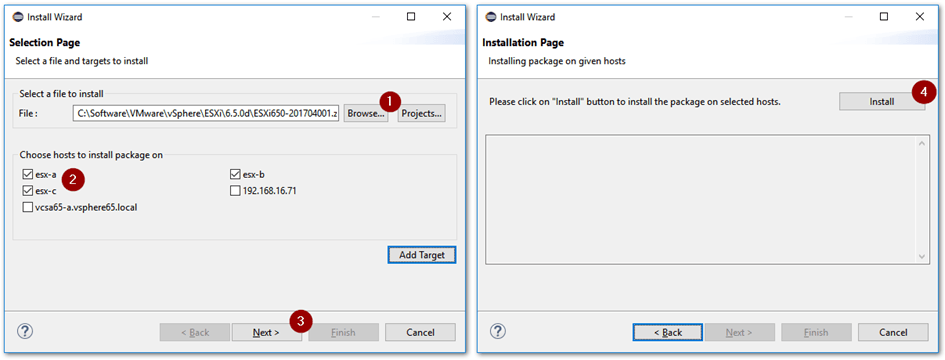
Deploying an offline bundle to multiple ESXi hosts
Package Manager
This tool (feature?) is similar to Install Package but not quite. For starters, it lists and provides insight on the VIB packages installed on ESXi. You can use the Add button to install additional VIBs and/or image profiles from a number of different location types. Useful VIB details are given when a package name is expanded.
You can also remove packages but I highly advise against it unless you know exactly what a particular VIB is used for. You’ve been warned!
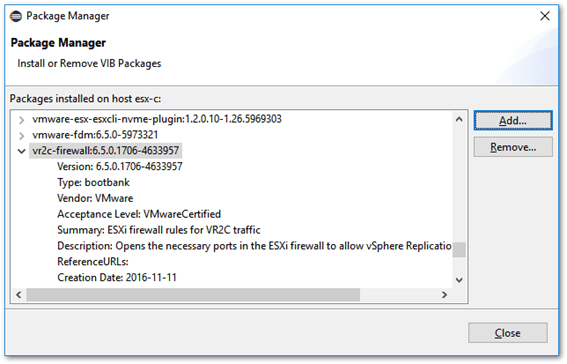
Expanding a package reveals useful VIB information
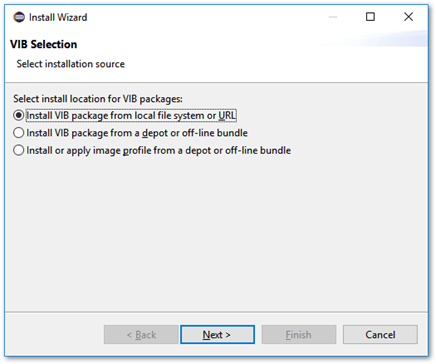
Packages can be installed from a number of different locations
The WorkBench Log Browser
Workbench Log Browser provides a faster alternative method for viewing and analyzing both ESXi and vCenter Server log files. Quoting from the official documentation:
The Workbench Log Browser works by creating logx files in a designated folder. Rather than open log files directly, Log Browser is driven by these logx configuration files, which tell Eclipse where to find a set of logs on local disk, or how to import a set of log files across the network. The logx files also describe how to parse the log files into columns for display in a table.
Here’s how one would go about using the tool.
In Eclipse, select New -> Log Analysis from the File menu.
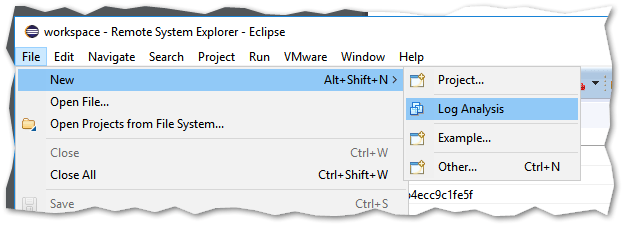
Creating a log analysis task in Workbench
- Select a Source Host (1) from the drop-down box or create a new connection by clicking on the Add button (2).
- From the Log Format (3) drop-down box, select the type of log format you want to use.
- In the Project container field, type the folder name where the logx file will be saved. You can also use the Browse button to select an existing folder.
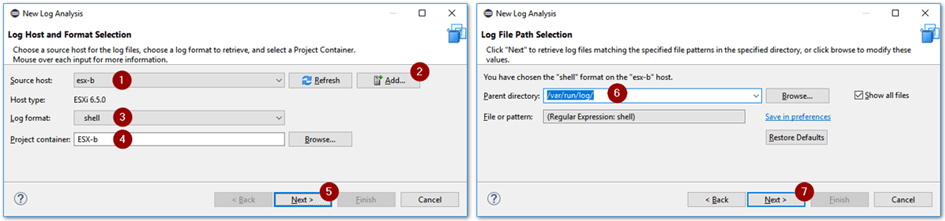
Selecting the host and type of log file to analyse
Press Finish to load the log file. In this example, I’ll be working with /var/run/log/shell.log.
Selecting the ESXi log file to analyze
A new pane pops up displaying the log content in tabular form. Use the Filter text box and button to filter entries using a specific keyword. The Highlight button is used to highlight specific text for a better search experience.
In the next example, I’m scouring the ESXi shell log to determine when the SSH login was enabled.
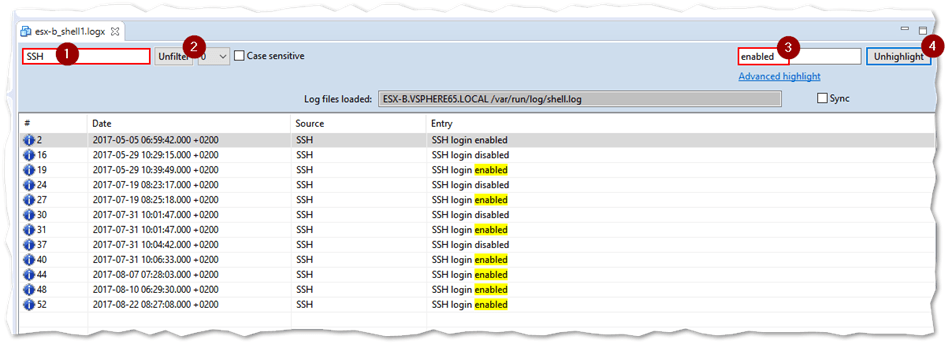
Filtering the ESXi shell log file
Conclusion
I’m ending the post here since I’m past the allowed length. Make sure to have a look at the official documentation as it provides in-depth information on Workbench IS.
Workbench is worth including in the toolset of any Java developer, but not limited to, working on VMware applications. As we’ve seen, with Workbench you can debug, browse vSphere inventories, monitor, and analyze log files, SSH to ESXi, install VIB packages and so on all via one common interface.
Likewise, VMware admins will find Workbench useful in a number of ways. Concurrent SSH sessions with multiple ESXi hosts, R/W access on ESXi and vCSA file systems, package management, real-time log monitoring and so on and so forth.


Not a DOJO Member yet?
Join thousands of other IT pros and receive a weekly roundup email with the latest content & updates!
More in this category


About the Author
Jason Fenech


21 thoughts on "How to Use VMware Workbench for Eclipse IDE Users"
Cannot complete the install because one or more required items could not be found.
Software being installed: VMware Workbench Core 3.5.7.4249275 (com.vmware.vide.feature.feature.group 3.5.7.4249275)
Missing requirement: Rse Plug-in 3.5.7.4249275 (com.vmware.vide.rse 3.5.7.4249275) requires ‘osgi.bundle; org.eclipse.rse.subsystems.terminals.core 1.0.300’ but it could not be found
Cannot satisfy dependency:
From: VMware Workbench Core 3.5.7.4249275 (com.vmware.vide.feature.feature.group 3.5.7.4249275)
To: org.eclipse.equinox.p2.iu; com.vmware.vide.rse [3.5.7.4249275,3.5.7.4249275]
org.eclipse.rse.subsystems.terminals.core 1.0.300
This is eclipse Photon – Windows 10 64bit IBM Notebook.
Could you guide me some more for me?
I could n’t find any solution looking for the answer for 4hours now but….
Hi. Eclipse dependency issues can be hard to troubleshoot. I suggest you first try running the procedure on a clean environment such as a newly installed VM with a fresh install of Eclipse.
Hi,
I’m also having the same problem with my colleague. My Eclipse environment is new and I can not install the packages. I looked at forums but found no solution.
Wow Thanks for this content i find it hard to come up with decent particulars out there when it comes to this blog posts appreciate for the article