Save to My DOJO
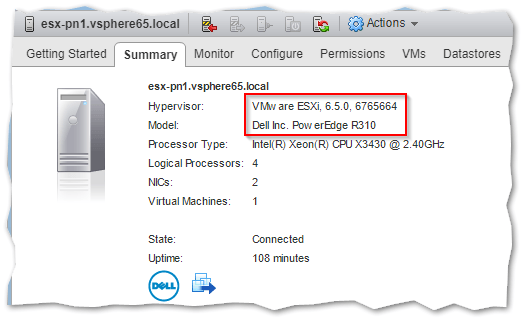
I recently acquired a couple of Dell PowerEdge R310 servers. These are now part of my testing environment and although not exactly cutting-edge technology, they do the job just fine. Incidentally, these servers are an excellent choice for a home lab as you can find them dirt cheap especially on eBay.
An added bonus is the fact that ESXi 6.5 U1 installed like a charm first time around. No issues whatsoever. I used this custom Dell ESXi ISO image to mitigate against missing drivers and I now have both servers running in a cluster. Note that the R310 is not supported by VMware for 6.5 use. This means you lose support should you require it. You can read my How to use VMware compatibility tools post to learn on how to rule out hardware and software compatibility issues.
The subject of today’s post is the Dell OpenManage suite of management products. These tools will help you to better manage your Dell-based server and network infrastructure. The one product I’ll be covering today is Dell OpenManage Server Administrator, OMSA for short.
Installing OMSA on ESXi is a 2 or 3-part process. The first step is to install a VIB on ESXi which reports back to a free OMSA Web Server component installed separately on a Windows server. Optionally, you can also install the OpenManage Integration for VMware vCenter appliance on vCenter Server which gives you access to features other than what’s available via the Web Server. The Integration appliance can be evaluated, fully, for a 90-day period up to 5 hosts.
This post covers the process of deploying the OMSA VIB to ESXi 6.5.
Downloading and Installing the OpenManage VIB
First things first, download your applicable version of the OMSA VIB from here. You’ll find that there’s a corresponding version for every ESXi release. In my case, I selected 8.5 since I’m deploying it to ESXi 6.5.

Download links for the OMSA VIB
When it comes to deploying the OMSA VIB, you can either install it manually using the esxcli shell command or via vSphere Update Manager if you have vCenter Server installed. The latter is the preferred option when you have a sizable amount of hosts to patch, or deploy VIBS to.
The Manual Way
After you download the OMSA VIB file, upload it to the host using Datastore Browser. If ESXi is vCenter managed, use the vSphere Web client or the HTML5 vSphere client instead. For standalone instances, use the embedded host client. Alternatively, use an SCP client to transfer the VIB file to the host.
Once uploaded, enable SSH on the ESXi host and use putty, or similar, to log in as root.
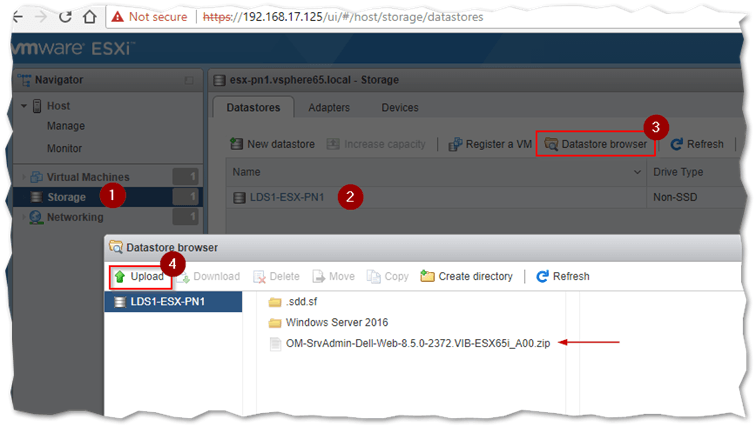
Using the ESXi host client to upload the OMSA VIB to a datastore
Run the following command from the shell command. Substitute datastore with the name of the datastore to which the OMSA VIB has been uploaded.
esxcli software vib install -d /vmfs/volumes/<datastore>/OM-SrvAdmin-Dell-Web-8.5.0-2372.VIB-ESX65i_A00.zip
Wait for the VIB to install. The host will reboot once it’s done installing.

Installing OMSA from the command line using esxcli
Note: In the screenshot above, the VIB was not installed since I already had it installed it.
The vSphere Update Manager Method
You can also install OMSA using the vSphere Update Manager (VUM). To do this, we first need to add the Dell patch repository link to the list of download sources. First, using the vSphere Web client, click on the Update Manager icon on the Home screen and click again on the vCenter Server name.
Navigate to Settings -> Download Settings and hit the topmost Edit button.
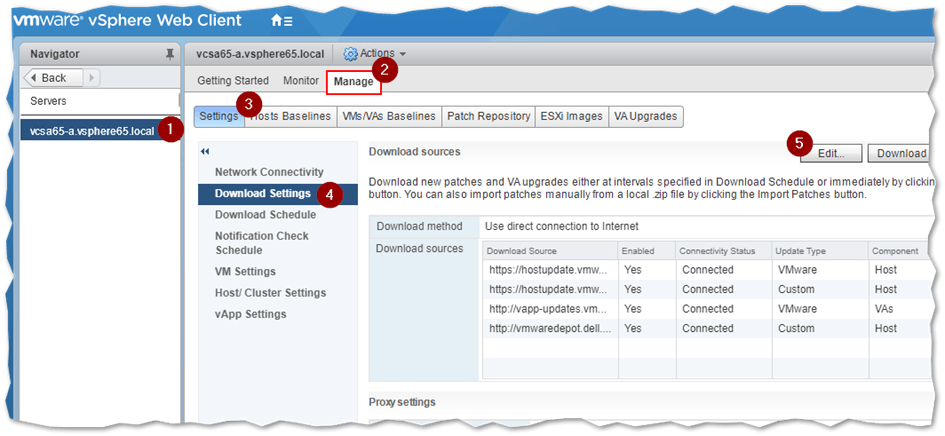
Adding Dell’s patch repository link to Update Manager
Click the Add button on the next dialog. In the Source URL field type http://vmwaredepot.dell.com/index.xml. The Description is optional. Press OK.
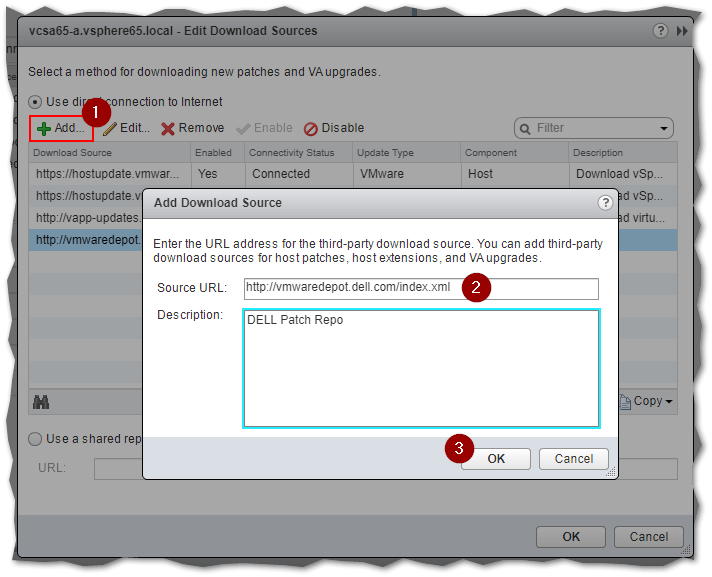
Adding Dell’s patch repository link to Update Manager
Click on the Download Now button to connect to and download the patch definitions from the Dell site.

Updating the patch definitions for vSphere Update Manager
Once the Download patch definitions task is done running (check the Recent Tasks pane), click on the Patch Repository tab and sort the patches by name by clicking on the first column’s header. You should see several versions of the OpenManage VIBs listed as shown next.
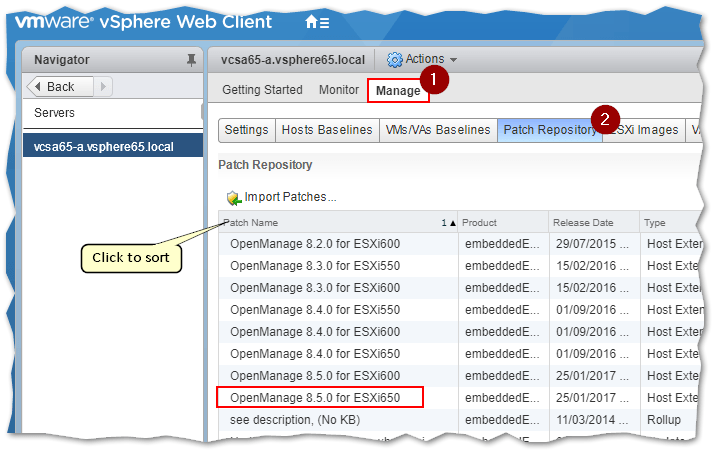
A list of Dell patches available from the repository
Switch to the Host Baselines tab and create a new host baseline called Dell Software. Select the Host Extension option for the baseline type. Press Next.
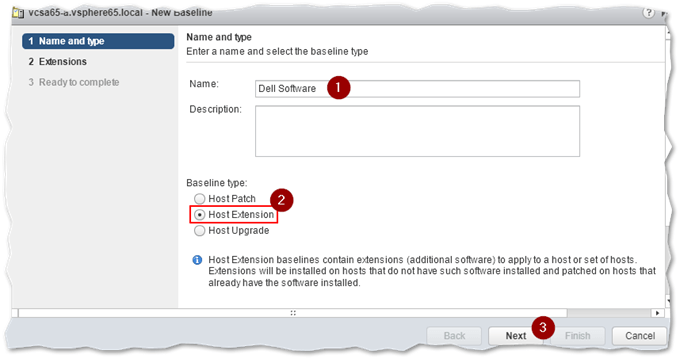
Creating a host baseline (Host Extension)
On the Extensions screen, locate and select the appropriate OMSA VIB. Since I’m deploying to ESXi 6.5, I selected Open Manage 8.5.0 for ESXi650 as shown. Press Next, and Finish on the subsequent dialog screen, to complete the baseline creation process.
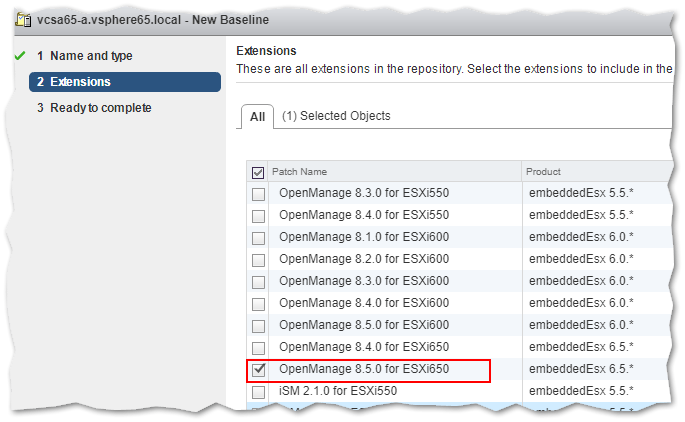
Choosing which patches to add to a baseline
In vSphere Web Client, switch to Host and Clusters view and attach the newly created host baseline to an ESXi host, or a cluster if you have one.
Select the ESXi host (2) you want to patch, switch to the Update Manager tab (3) and click on Attach Baseline (4). On the next dialog box, select the previously created host baseline (5) and click OK. After closing the Attach Baseline … dialog click on Scan for Updates (7) and click OK (8).
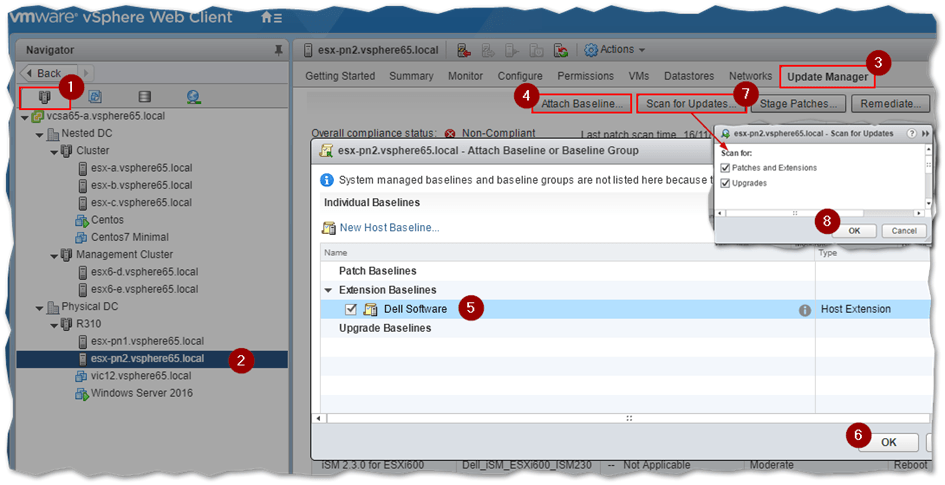
Attaching a host baseline to an ESXi host
Wait for the Scan entity task to complete.

A scan entity task in progress
The OMSA 8.5 VIB should now be listed in the Compliance Status pane unless it was installed beforehand. To install the VIB, click on the Remediate button.
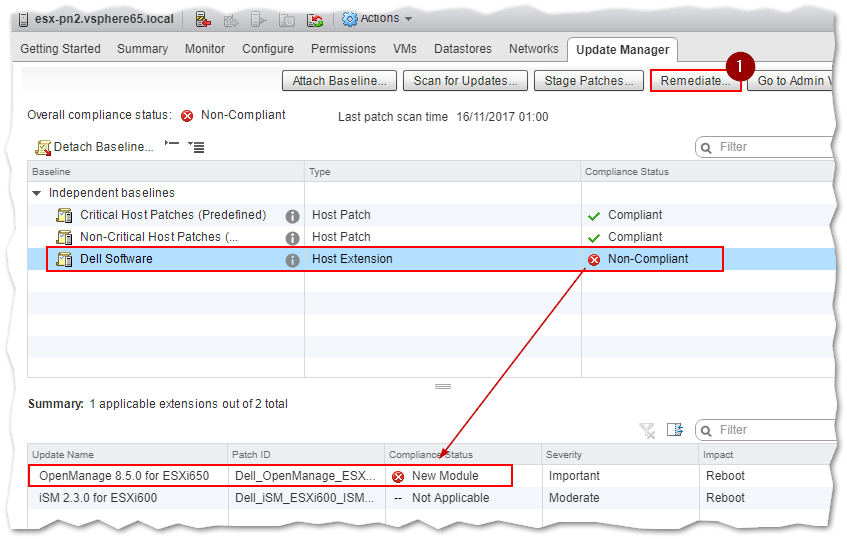
A non-compliant ESXi host. The patches that need applying are marked with a red-cross icon
The remediation wizard beings by prompting you to select the type and baseline to remediate. In this case, we select Extension Baselines and tick the check-box next to Dell Software, the host baseline we created earlier. Press Next to continue.
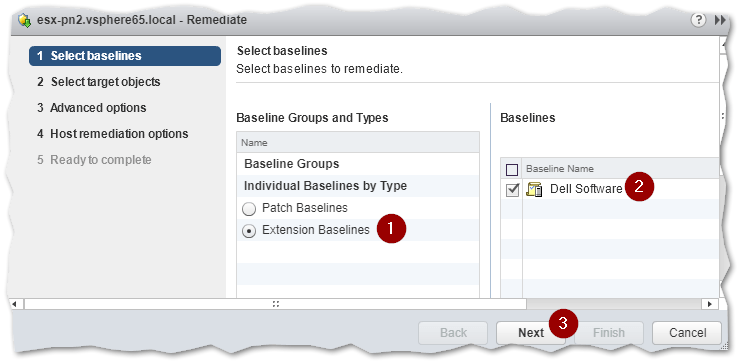
Selecting the baseline to apply for remediation
Select the target ESXi host i.e. the host on which the VIB is being deployed. Press Next.
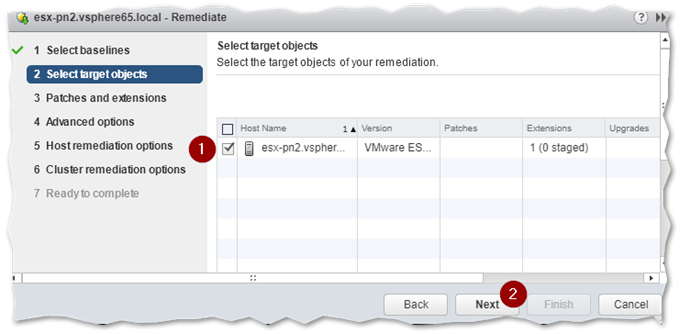
Selecting the target ESXi host to remediate
Since the baseline selected may consist of multiple patches, you’re given the option to select which ones to apply. In this example, there’s just one to choose from which is automatically selected for you. Press Next.
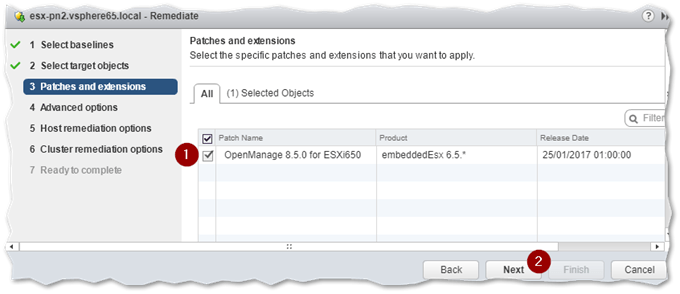
Selecting which patches to apply to the target ESXi host
The Advanced Options screen is where you schedule patch deployments for a later date and time. You can also suppress warnings related to unsupported hardware and configurations. Press Next.
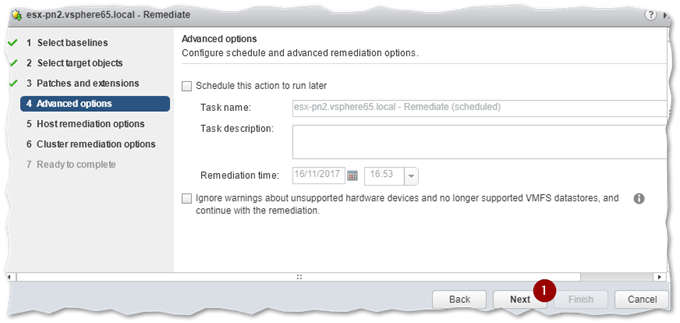
Remediation advanced options
On the Host Remediation Options screen, you get to set a number of options. These include the option to disconnect media devices from virtual machines such as mounted ISOs, which may prevent ESXi from entering maintenance mode. It’s best to leave the settings to their default. Press Next.
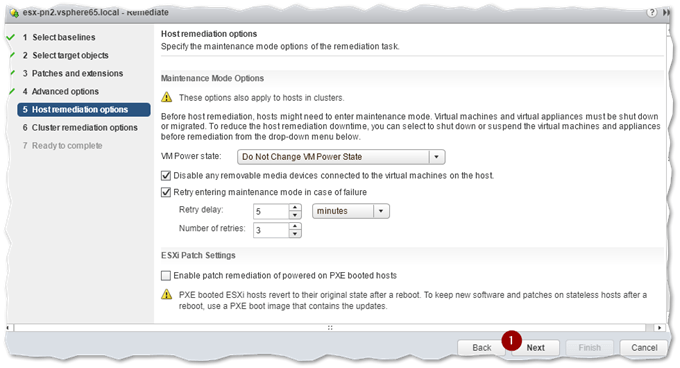
Host remediation options
If the host is part of a cluster you can opt to disable HA admission control and migrate powered off VMs to another host in the cluster before a host is put in maintenance mode.
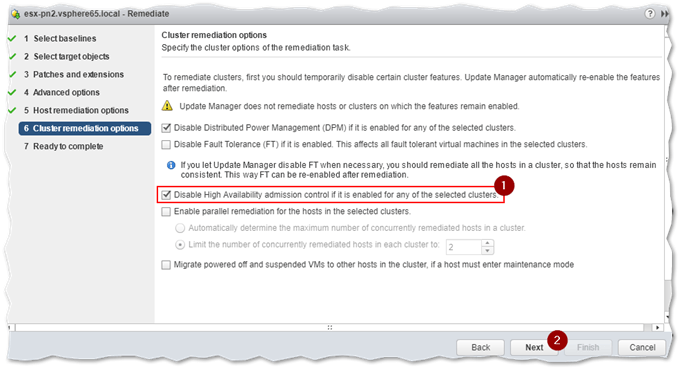
Cluster remediation options are set to ensure that the host can enter maintenance mode for instance
Once you’re done setting the options, press Finish to remediate. Optionally, clicking on the Pre-check Remediation allows you to analyze the effects of the remediation task.
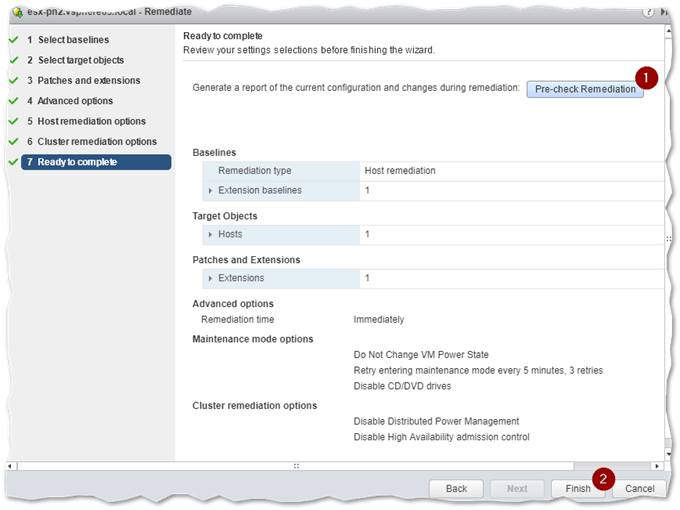
You can optionally run a pre-check remediation task before running the actual remediation task
Wait for the Remediate Entity task to complete. The host will enter maintenance mode after a short while. It will then reboot when the OMSA VIB finishes installing. Once the host is back online, it will exit maintenance mode when the remediation task completes.
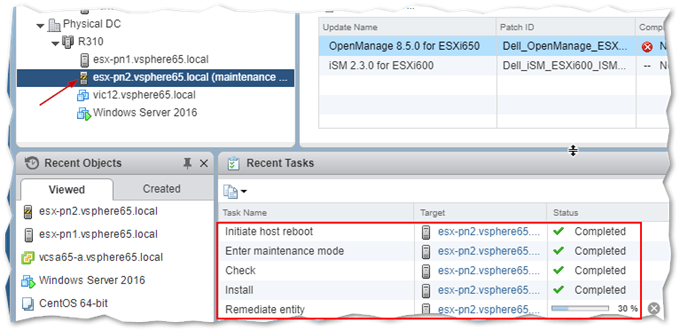
ESXi host about to reboot after application of OMSA VIB
In the second part of this mini-series, I’ll cover the process of installing the OMSA Web application as well as the vCenter Server plug-in. Both components will enable you to connect and manage the Dell Server hosting your ESXi instance. Here’s a taster of what’s next.
The web-based component of OpenManage Server Administrator seen here managing a Dell R310 server running ESX 6.5 U1
Until then, do have a look at the other posts on this blog while keeping an eye out for this post’s sequel.
Your thoughts on Dell OpenManage Server Administrator
Have you followed the steps in this guide? If so, please let me know how you got on. If you’ve experienced any problems with the steps above, I’m here to help out. Finally, if you have anything on your mind about Dell OpenManage Server Administrator – installing it on ESXi or otherwiese – let me know in the comment section below. I’m here to help you!
[the_ad id=”4738″][the_ad id=”4796″]


Not a DOJO Member yet?
Join thousands of other IT pros and receive a weekly roundup email with the latest content & updates!


20 thoughts on "How to install Dell OpenManage Server Administrator on ESXi"
I’m going to try this on my ESXi 6.7 installation. If I already have an older version of the VIB installed, I suppose I should use *upgrade* instead of *install*? Like this?
esxcli software vib upgrade -d /vmfs/volumes//.zip
Yes, the upgrade switch would be best in this case. If you run an install, it will likely just say that it needs to be updated though.
Are there OM commands that I can run when am logged into ESXi ?
Hi Vinod,
You should have access to the omconfig commands: https://www.dell.com/support/manuals/us/en/19/dell-openmanage-server-administrator-9.1/om_9.1_command_line_interface_guide/omconfig-controller-commands?guid=guid-8b211158-03c1-4e2f-ace3-6c11b56462d4&lang=en-us